Tag Archive for HA

MySQL 5.7.2 DMR and Labs – new replication features

With today’s announcement of the second MySQL 5.7 Development Milestone Release and a new labs release it’s a very exciting time for MySQL Replication. MySQL 5.6 contained a lot of new content to make replication faster, easier to use and more reliable (Global Transaction Identifiers, Multi-Threaded Slaves, Binary Log Group Commit, Optimized Row Based Replication, Crash Safe Replication, Replication Event Checksums, Time Delayed Replication & Informational Logs) and now we want to improve things even further.

The new DMR has something for everyone.

With the improvements to Semi-Synchronous Replication, the application developer can be confident that when a transaction has been commited, the changes have been safely copied to one or more slaves and so whatever happens, that change will not be lost. Further, we now prevent other application threads seeing those changes until they’ve been received by the slave and so the application cannot start acting on the new data until it’s known to be safe. This is an important improvement in consistency which moves more of the onus from the application developer onto the database.

DBAs want replication to be fast – in particular for the slave(s) not to fall behind the master. MySQL 5.6 made some massive improvements in this area – both on the master and the slave. A number of users though were unable to exploit the Multi-Threaded Slave (MTS) feature as relied on the use of multiple schemas (databases) to get changes applied in parallel. In the new MySQL 5.7 DMR we’ve included a new option for MTS where changes can be applied in parallel – even within the same schema. A second performance feature improves throughput on the master – where the dump thread no longer needs to lock the binary log – refer to this engineering Blog on Dump Thread Enhancement in MySQL 5.7.2 for more details.

DBAs also want to monitor the status of replication and for years have relied on the SHOW SLAVE STATUS command. As replication has evolved, SHOW SLAVE STATUS has become less suitable – we needed a solution that could properly model the more sophisticated replication architectures (including GTIDs and MTS) now possible. The approach we’ve taken is to provide this information through the performance_schema.

Note that the earlier MySQL 5.7 DMR added non-blocking SHOW SLAVE STATUS, idempotent and –rewrite-db options for mysqlbinlog – these are still available in the new DMR.

The new features are described in a little more detail in the following sections (together with links to more technical content from the MySQL Engineeing team).

Loss-less Semi-Synchronous Replication

Intra-Schema Semi-Synchronous Replication

Intra-Schema Semi-Synchronous Replication

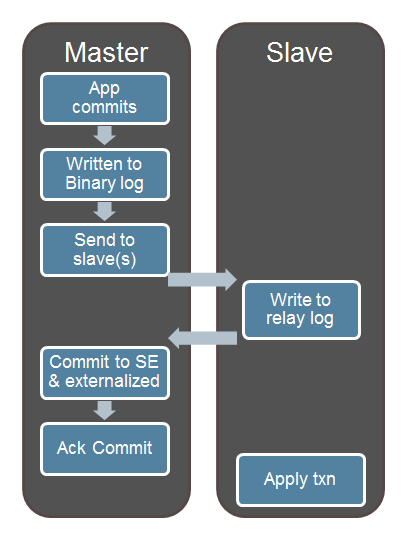
When using semi-synchronous replication in previous releases, the processing of the transaction on the master would wait for the slave’s acknowledgement after the change had been written to the storage engine but before the commit was acknowledged to the client. This satisfied the requirement that the application could be confident that if a transaction has been commited (and an acknowledgement received for the commit) then the update would not be lost. It did however leave a window where a user on another connection could read the new data from the master (because it has been written to the storage engine and the locks have been released) before the change had been received by the slave and safely stored in its relay log – that user could then start acting on that data but if the master failed at that point then that original update could still be lost and so the user would be acting on what is now inaccurate data.

This feature removes the above race condition by making the master wait for the update to be received by the slave before writing it to the storage engine and releasing the locks.

The functionality is enabled by default and shouldn’t have any negative impacts (for example on peformance) but it you’d like to disable it then you can do so using rpl_semi_sync_master_wait_point = AFTER_SYNC.

You can read more details on this in this Loss-less Semi-Synchronous Replication on MySQL 5.7.2 blog from the MySQL engineering team.

Intra-Schema Multi-Threaded Slaves

DBAs want replication to be fast – in particular for the slave(s) not to fall behind the master. If there is a short but heavy burst of writes on the master then the slave falls behind (and there is a risk of lost data if the master fails during this period) but if the write-rate is sustained then the slave would fall further and further behind indefinitely. The ongoing challenge has been that the master gets faster and faster as more cores and clients are added but applying these changes asynchronously on the slave is more complex as you need to maintain some form of ordering in order to always have a consistent data set.

The earliest solution to maintaining ordering/consistency was for the slave to apply all of the changes serially, in a single thread – this ensured that changes were applied in the same order as on the master and so guaranteed the slave always contained a consistent view. Unfortunately this meant that the slave applier thread could only exploit a single core which is very wasteful in modern systems.

MySQL 5.6 made some massive improvements for many use cases by allowing the slave to apply updates in parallel using multiple threads. The assumption made was that data was held in multiple schemas (databases) and that there were no dependencies between the data in those different schemas. In this way all of the updates for a schema would be applied in order by a single thread (ensuring consistency) but updates to other schemas could be handled by additional threads. This allowed the slave to work many times faster but was limited to those use cases that met the assumptions.

In the second MySQL 5.7 DMR we introduce a new option that enables the slave to safely apply updates in parallel – even when all of the data is held within a single schema and no assumptions can be made about the independence between any rows from any tables. To avoid conflicts/divergence from the master, the slave must ensure that any transactions that are applied in parallel don’t read or write any overlapping rows. The good news is that this grouping on non-overlapping transactions is already being figured out on the master as part of the binary log group commit functionality (introduced in MySQL 5.6) as row level locking means that overlapping transactions cannot be part of the same group commit.

MySQL 5.7 adds a logical clock/counter to the master which is used to tag transactions that are part of the same group commit’s prepare phase. The slave can then use that information – knowing that it is safe to apply all of the transactions with the same logical clock value in any order (and so can use multiple threads).

Activating the functionality is very straight-forward and the key step is to set slave-parallel-type = LOGICAL_CLOCK but see this blog from the MySQL engineering team: using the intra-schema MTS functionality for more detailed instructions. Note that there is another blog in the series – that blog provides a detailed view of how the intra-schema MTS is implemented.

Replication Performance Schema

With the ever increasing sophistication of MySQL Replication, presenting all of the information in SHOW SLAVE STATUS has become unwieldy with data for multiple slave applier threads, GTID sets etc. What would be much more convenient is if this information were presented in tables so that the user could get exactly the information they needed using SQL queries (plus of course we can lay out the data in an understandable (relational) way and can access the information from stored procedures). MySQL 5.7.2 does just this by adding MySQL Replication tables to the MySQL performance_schema.

This feature introduces 6 new performance_schema tables: replication_connection_configuration, replication_connection_status, replication_execute_configuration, replication_execute_status, replication_execute_status_by_coordinator, replication_execute_status_by_worker.

Shivji from the MySQL engineering team has written a great blog post on what’s in the new performance_schema tables and how to interpret the results.

Multi-Source Replication – LABS

Multi-Source Replication

Multi-Source Replication

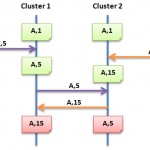
MySQL replication is very flexible in the way that networks of masters and slaves that can be built up; a master can replicate to multiple slaves, a master can itself be a slave of another master, you can create a replication ring…. The one caveat to this has always been that a slave server can only have a single master (MySQL Cluster is an exception to this rule).

Why might you want to do this? There are a few use cases around consolidating data from multiple MySQL Servers into one:
– Where each of the masters is for a different shard (where the application is responsible for the sharding) and you want to be able to run reports over all of that data to produce a consolidated view
– You want to avoid the expense of dedicating a slave server to each master server
– A remote location may require less throughput and so a single server can service all of the traffic for all of the data – the ‘super-slave’ gives it a low-overhead, local database to access all of the data
– The ‘super-slave’ is used as a point where you can perform backups for all of the data

It’s possible to have a slave time-slice between multiple masters with a bit of scripting but that isn’t an ideal solution. You can also add an additional repliation layer (such as writing your own code to use the binary log API) but it would be much simpler if it were built into MySQL itself.

In this labs (i.e. for test only, not to be deployed!) release we allow a slave to simultaneously receive and process replication events from multiple masters – exactly what our users have been asking for.

What’s more, we’ve also ensured that this new functionality is compatible with the other enhancements that have been made to the MySQL Replication architecture – this includes loss-less semi-synchronus replication; and intra-schema multi-threaded slaves (as well as the existing per-database MTS). This means that you don’t have to choose between all of these tempting features – the keys to the candy store are yours!

It’s likely that not all of the masters will be the same, have the same maintenance schedules etc. and so it makes sense to be able to manage each of the relationships independently. In this labs release you can manage each master independently, including the relevant server variables but the same replication filters are currently applied to the replication events from all of the masters – we recognise that this isn’t ideal but this is cuurently an early access release and it’s something we intend to address in future versions.

At the moment there’s no limit to the number of masters that can replicate to a specific slave – in the final version we’re likely to apply a configurable limit.

Because this further complicates the information that would need to be included in SHOW SLAVE STATUS, most of the detailed information is instead presented in the Performance Schema.

It should be pointed out that there is no conflict detection or resolution built into this feature – it is the responsibility of the application to make sure that the masters are working on distinct data sets (or that they’re comfortable with the results of any conflicts).

For more technical details, refer to this engineering blog post on multi-source replication.

Summary

There’s a lot of exciting new content in the MySQL 5.7.2 DMR (download here) and the Mulit-Source Replication labs release (download here). The reason these features has been released is that we value early feedback from our community and customers – please try them out and let us know what we’re getting right and what needs to be enhanced!


MySQL Cluster Asynchronous Replication – conflict detection & resolution

I was rooting through past blog entries and I stumbled accross a draft post on setting up multi-master (update anywhere) asynchronous replication for MySQL Cluster. The post never quite got finished and published and while the material is now 4 years old it may still be helpfull to some and so I’m posting it now. Note that a lot has happened with MySQL Cluster in the last 4 years and in this area, the most notable change has been the Enhanced conflict resolution with MySQL Cluster active-active replication feature introduced in MySQL Cluster 7.2 and if you’re only dealing with a pair of Clusters, that’s your best option as it removed the need for you to maintain the timestamp columns and backs out entire transactions rather than just the conflicting rows. So when would you use this “legacy” method? The main use case is when you want conflict detection/resolution among a ring of more than 2 Clusters. Note also that MySQL 5.6 (and so MySQL Cluster 7.3) added microsecond precision to timestamps and so you may not need the custom plugin that this post referred to.

Anyway, here’s the original post…

————————————————————
MySQL Cluster asynchronous replication allows you to run in a multi-master mode with the application making changes to both sites (or more than 2 sites using a replication ring). As the replication is asynchronous, if the application(s) modified the same row on both sites at ‘about the same time’ then there is a potential for a collision. Left to their own devices, each site would store (and provide to the application) different data indefinitely. This article explains how to use MySQL Cluster collision detection and resolution to cope with this.

Fig. 1 Multi-master replication leading to inconsistencies

Fig. 1 Multi-master replication leading to inconsistencies

Fig. 1 shows the timeline that can result in a conflict. The same or two different applications make a change to the same row in the table but to the 2 different instances of MySQL Cluster. Each cluster synchronously replicates the data amongst its local data node in order to provide local High Availability (everything there is safe!). At some point later (normally a fraction of a second), the changes are replicated to the remote site asynchronously – this delay opens a window for a conflict where Cluster 2 is updated by the application just before it receives the earlier update from Cluster 1. Cluster 2 will overwrite it’s row with the value (5) it has received but only after its earlier change (directly from the application) is written to the binary log ready for replication to Cluster 1 which in turn will cause that value (15) to be stored by Cluster 1. Each Cluster instance replicates what it believes to be the correct data to the other site – overwriting what that site had previously stored. In our example, that leaves one database holding the value 15 for key ‘A’ while the other stores 5.

It’s often the case that the application will tend to go to the same site during a particular time when accessing the same data and so the chances of a conflict are reduced but the application may still want to guard against (even rare) race conditions. If replication slows down (for example due to a backlog of updates to be applied) or stops temporarily (for example due to network failure to the geographically remote site) then the chances of a collision greatly increase.

For information on setting up multi-master asynchronous replication with MySQL Cluster, please take a look at Setting up MySQL Asynchronous Replication for High Availability.

Conflict Detection & Resolution using MySQL Cluster

MySQL Cluster provides two different schemes to handle these collisions/conflicts. The first scheme (referred to as “greatest timestamp wins”) detects that a conflict occurs and automatically resolves it (the change most recently received from the application is stored on both Clusters). The second scheme (referred to as “same value wins”) detects that a conflict has occurred but does not fix it – instead the conflict is recorded in such a way that the application (or user) can figure out how best to resolve it based on a full understanding of the schema, what the data means and how it’s used. It is up to the developer which approach they use (if any) – it is selected on a per-table basis.

Common prerequisite steps

These steps should be followed regardless of whether you want to use conflict resolution or conflict detection (where the application decides how to resolve it).

  1. Set up multi-master replication as described in Setting up MySQL Asynchronous Replication for High Availability
  2. Create the function “inttime” for use in the stored procedures as described in Creating a MySQL plugin to produce an integer timestamp Note that you will need to install inttime.so on each host

Setting up Automatic Conflict Resolution (Greatest timestamp wins)

This is the simplest way to handle conflicts with MySQL Cluster when implementing multi-master asynchronous replication (actually, the simplest is to do nothing and accept that if your application(s) update the same row at about the same time at both Clusters then those Clusters may be left with different data until the application(s) next update that row).

Remember that this mechanism works by checking that the timestamp field of the update received by the slave is later than the one already stored. In the example that follows, the ‘ts’ column is used for the timestamp.

Create the database on either cluster (replication will make sure that it appears in both Clusters):

mysql> create database clusterdb;

Before creating the application tables, set  up the ndb_replication system table (again, in either Cluster):

mysql> CREATE TABLE mysql.ndb_replication ( db VARBINARY(63), table_name VARBINARY(63), server_id INT UNSIGNED, binlog_type INT UNSIGNED, conflict_fn VARBINARY(128), PRIMARY KEY USING HASH (db, table_name, server_id) ) ENGINE=NDB PARTITION BY KEY(db,table_name);

mysql> insert into mysql.ndb_replication values ('clusterdb', 'tab1', 7, NULL, 'NDB$MAX(ts)');

After that, you can create the application table:

cluster1 mysql> use clusterdb;

cluster1 mysql> create table tab1 (NAME varchar(30) not null primary key,VALUE int, ts BIGINT UNSIGNED default NULL) engine=ndb;

To test that the basic replication is working for this table, insert a row into cluster1, check it’s there in cluster2, add a second row to cluster2 and make sure it’s visible in cluster1:

cluster1 mysql> insert into tab1 values ('Frederick', 1, 0);

cluster2 mysql> use clusterdb;
cluster2 mysql> select * from tab1;
+-----------+-------+------+
| NAME      | VALUE | ts   |
+-----------+-------+------+
| Frederick |     1 |    0 |
+-----------+-------+------+
1 row in set (0.00 sec)
cluster2 mysql> insert into tab1 values ('William',20,0);

cluster1 mysql> select * from tab1;
+-----------+-------+------+
| NAME      | VALUE | ts   |
+-----------+-------+------+
| Frederick |     1 |    0 |
| William   |    20 |    0 |
+-----------+-------+------+
2 rows in set (0.00 sec)

For both rows, the timestamp was set to 0 to represent ‘the start of time’, from this point on, whenever making a change to those rows, the timestamp should be increased. Later on on in this article, I’ll show how to automate that process.

We’re now ready to test that the conflict resolution is working; to do so replication is stopped (in both directions) to increase the window for a conflict and the same tuple updated on each Cluster. Replication is then restarted and then I’ll confirm that the last update wins on both clusters:

cluster1 mysql> slave stop;

cluster2 mysql> slave stop;

cluster1 mysql> update tab1 set VALUE=10,ts=1 where NAME='Frederick';

cluster2 mysql> update tab1 set VALUE=11,ts=2 where NAME='Frederick';

cluster1 mysql> slave start;

cluster2 mysql> slave start;

cluster1 mysql> select * from tab1;
+-----------+-------+------+
| NAME      | VALUE | ts   |
+-----------+-------+------+
| William   |    20 |    0 |
| Frederick |    11 |    2 |
+-----------+-------+------+
2 rows in set (0.00 sec)

clusrer2 mysql> select * from tab3;
+-----------+-------+------+
| NAME      | VALUE | ts   |
+-----------+-------+------+
| William   |    20 |    0 |
| Frederick |    11 |    2 |
+-----------+-------+------+
2 rows in set (0.00 sec)

This confirms that the later update (timestamp of 2) is stored in both Clusters – conflict resolved!

Automating the timestamp column

Manually setting the timestamp value is convenient when testing that the mechanism is working as expected could be a nuisance in a production environment (for example, you would need to get the clocks of all application nodes exactly in sync wherever in the world they’re located). This section describes how that can be automated using stored procedures (note that stored procedures don’t work when using the NDB API to make changes but in that situation it should be straight-forward to provide wrapper methods that manage the timestamp field). Note that the timestamp must be an integer field (and needs a high level of precision) and so you can’t use the regular MySQL TIMESTAMP type.

This mechanism assumes that you’ve built “inttime.so” and deployed it to the hosts running the mysqld processes for each cluster (refer to the prerequisite section).

cluster1 mysql> create trigger tab1_insert before insert on tab3 for each row set NEW.ts=inttime;
cluster1 mysql> create trigger tab1_update before update on tab3 for each row set NEW.ts=inttime;
cluster1 mysql> insert into tab1 (NAME,VALUE) values ('James',10),('David',20);
cluster1 mysql> select * from tab1;
+-----------+-------+------------------+
| NAME      | VALUE | ts               |
+-----------+-------+------------------+
| William   |    20 |                0 |
| David     |    20 | 1250090500370307 |
| James     |    10 | 1250090500370024 |
| Frederick |    11 |                2 |
+-----------+-------+------------------+
4 rows in set (0.00 sec)

cluster2 mysql> update tab1 set VALUE=55 where NAME='William';
cluster2 mysql> select * from tab1;
+-----------+-------+------------------+
| NAME      | VALUE | ts               |
+-----------+-------+------------------+
| James     |    10 | 1250090500370024 |
| Frederick |    11 |                2 |
| William   |    55 | 1250090607251846 |
| David     |    20 | 1250090500370307 |
+-----------+-------+------------------+
4 rows in set (0.00 sec)

Setting up Conflict Detection (Same timestamp wins)

With this method, conflicts are detected and recorded but not automatically resolved. The intent is to allow the application to decide how to handle the conflict based on an understanding of what the data means.

Create the database on either cluster (replication will make sure that it appears in both Clusters):

mysql> create database clusterdb;

Before creating the application tables, set  up the ndb_replication system table (again, in either Cluster):

mysql> CREATE TABLE mysql.ndb_replication ( db VARBINARY(63), table_name VARBINARY(63), server_id INT UNSIGNED, binlog_type INT UNSIGNED, conflict_fn VARBINARY(128), PRIMARY KEY USING HASH (db, table_name, server_id) ) ENGINE=NDB PARTITION BY KEY(db,table_name);

mysql> insert into mysql.ndb_replication values ('clusterdb', 'SubStatus', 7, NULL, 'NDB$OLD(ts)');

After that, you can create the application table and its associated exception table:

cluster1 mysql> use clusterdb;
cluster1 mysql> create table SubStatus$EX (server_id INT UNSIGNED,master_server_id INT UNSIGNED,master_epoch BIGINT UNSIGNED,count INT UNSIGNED,sub_id int not null,notes VARCHAR(30) DEFAULT 'To be resolved', PRIMARY KEY (server_id, master_server_id, master_epoch, count)) engine=ndb;
cluster1 mysql> create table SubStatus (sub_id int not null primary key, ActivationStatus varchar(20), ts BIGINT default 0) engine=ndb;

To test that the exception table gets filled in, add some rows to the table and then cause an update conflict (in a similar way to the conflict resolution example but after setting up the timestamp automation):

cluster1 mysql> create trigger SubStatus_insert before insert on SubStatus for each row set NEW.ts=inttime();
cluster1 mysql> insert into SubStatus (sub_id, ActivationStatus) values (1,'Active'),(2,'Deactivated');
cluster1 mysql> select * from SubStatus;
+--------+------------------+------------------+
| sub_id | ActivationStatus | ts               |
+--------+------------------+------------------+
|      1 | Active           | 1250094170589948 |
|      2 | Deactivated      | 1250094170590250 |
+--------+------------------+------------------+
2 rows in set (0.00 sec)

cluster2 myql> use clusterdb;
cluster2 mysql> select * from SubStatus;
+--------+------------------+------------------+
| sub_id | ActivationStatus | ts               |
+--------+------------------+------------------+
|      1 | Active           | 1250094170589948 |
|      2 | Deactivated      | 1250094170590250 |
+--------+------------------+------------------+
2 rows in set (0.00 sec)

cluster1 mysql> slave stop;

cluster2 mysql> slave stop;

...

(at this point, just go on to test as with the conflict resoultion example but in this case expect to see that the confict is not resolved but an entry is added into the conflict table).

Of course, you can always add a trigger on the conflict table and use that to spur the application into initiating its own conflict resolution algorithm.


Holding MySQL HA workshop in Oxford

All Your Base Conference - MySQL HA WorkshopOn 17th October I’ll be running a hands-on workshop on the various technologies available to provide High Availability using MySQL. The workshop is being held on 17th October (the day before the All Your Base conference) in Oxford (UK). The cost is £250 + VAT and you can register here.

This workshop provides an introduction to what High Availability (HA) is; what technology options are available to achieve it with MySQL and how to actually implement your own HA solutions. The session will be a mixture of presentations, demonstrations and (most importantly) hands-on tutorials.

We’ll start with an overview of High Availability – in general and in the context of MySQL and then a survey of the technologies to choose from:

  • MySQL Replication
  • MySQL Cluster
  • DRBD
  • Shared storage clustering options
    • Windows Server Failover Clustering
    • Solaris Clusters
    • Oracle Virtual Machine

There will be deep-dives on MySQL Replication and MySQL Cluster and this is where the hands-on parts of the workshop will focus:

  • What these technologies achieve and how
  • Get your own database clusters up and running (hands-on)
  • “What happens when I do this…?” (hands-on)
  • Monitoring (mix of hands-on and demos)

The plan is to get everyone up and running with multiple VMs on their laptops so that they can experiment and test with MySQL Cluster and MySQL Replication over multiple (virtual) hosts. As a stretch, we’ll try creating a Cluster running over everyone’s machine at the same time – though that might be stretching the logisitics! I’ve got a supply of 30 USB sticks and hope to have 2-3 unique virtual appliances on each – what could go wrong?


New replication & HA white papers

MySQLReplication and High Availability logoWith the General Availability of the standalone MySQL Utilities it now makes sense to use these to simplify (and optionally automate) your MySQL Replication and High Availability solutions. In light of that, 4 of our MySQL white papers have been updated to reflect the new opportunities:

MySQL Guide to High Availability Solutions. Data is the currency of today’s web, mobile, social, enterprise and cloud applications. Ensuring data is always available is a top priority for any organization – minutes of downtime will result in significant loss of revenue and reputation.

This Guide is designed to assist Developers, Architects and DBAs in navigating the complex waters of HA. It presents:

  • A methodology for selecting the right HA solution to meet Service Level Agreements
  • A tour of the leading certified HA solutions for MySQL
  • Operational best practices to implement and support HA

MySQL Replication: High Availability – Building a Self-Healing Replication Topology. Download the whitepaper to learn how to improve user-experience, reduce cost and innovate faster using MySQL replication.

Global Transaction Identifiers (GTIDs) are one of the core new features of MySQL 5.6 replication, providing a foundation to building self-healing, highly available data clusters.

By reading this whitepaper, you will be able to:

  • Illustrate use-cases and implementation of MySQL replication
  • Learn how High Availability (HA) with MySQL replication is achieved using GTIDs
  • Gain an overview of MySQL replication utilities
  • Discover resources for achieving HA with MySQL replication

The paper concludes with an overview of operational best practices.

MySQL Replication: An Introduction. Download the whitepaper to learn how MySQL replication enables the largest web, cloud, mobile and social applications to scale-out on commodity hardware, while reducing the risks of downtime.

The whitepaper discusses:

  • Replication concepts
  • Replication enhancements in MySQL 5.6
  • Replication use-cases
  • Replication topologies
  • Replication monitoring and management

The paper concludes with resources to get started with MySQL replication in building next generation services.

MySQL Replication Tutorial: Configuration, Provisioning and Management. Download the whitepaper for practical examples and best practices in building highly available services using MySQL replication as well as MySQL Utilities.

By reading this paper, you will be able to:

  • Configure and provision MySQL replication (with or without MySQL Utilities)
  • Migrate to semi-synchronous replication
  • Administer and trouble-shoot MySQL replication (with or without MySQL Utilities)
  • Promote a slave to be the new master in the event of a failed Master (manual or automatic, with or without MySQL Utilities

The paper concludes with additional resources to tune and optimize MySQL replication for your environment.


Sessions now scheduled for MySQL Connect

MySQL Connect 2013 - I'm speaking logoThe sessions for this year’s MySQL Connect conference have now been scheduled – as you can see below, my 2 MySQL Cluster sessions will be on Saturday 21st September at 11:30 and 14:30 (Pacific).

The MySQL Connect conference is a great opportunity to listen to and chat with people from the MySQL community – including the engineers who work on or around MySQL as well people who are using it in production. The conference takes place from 21-23 September in San Francisco (runs up to Oracle OpenWorld). There are 84 sessions scheduled and the content catalog has now been published.

I’ll be presenting 2 sessions:

  • What’s New in MySQL Cluster 7.3 [CON2477] (Saturday 11:30 Hilton – Imperial Ballroom B). In this session, discover the latest developments and how MySQL Cluster 7.3 enables developers to focus on building robust, scalable applications faster. Get your database up and running in minutes by using the browser-based autoinstaller, combining autodiscovery with best practices to deliver the ideal configuration the first time. Migrate existing applications and frameworks to MySQL Cluster, and simplify new ones by exploiting cross-shard foreign keys. Access your data directly with the native driver for JavaScript/Node.js. At the same time, enjoy the benefits of 99.999 percent uptime and a distributed, autosharded database that scales to deliver higher loads than ever whether with SQL or NoSQL APIs—even when you’re working with queries and updates that span shards.
  • Deploy and Scale MySQL Cluster Like a Pro Without Opening the Manual [CON3763] (Saturday 14:30 Hilton – Union Square Room 5/6). This session aims to tackle a few myths head-on: “Installing a distributed database has to be complex,” “Only NoSQL data stores make life easy for developers,” “Years of painful experience and a PhD are needed to configure a distributed, real-time database.” In this session, see for yourself how to configure and deploy MySQL Cluster over several hosts in just minutes—right from your browser. Observe how the MySQL Cluster Installer applies best practices to produce a tailored configuration, using your hints about your application together with autodiscovery of the system resources. Also see how MySQL Cluster Manager simplifies the management of your cluster, performing sophisticated operations such as adding new nodes or performing online upgrades with ease.

Register now!


Standalone MySQL Utilities Now GA! Includes running mysqlfailover as a daemon

MySQL Utilities are now GA - logoWith the release of MySQL Utilities 1.3.4, the standalone (not bundled with the MySQL WorkBench GUI) package is now Generally Available and fully supported. This post will focus on a very important change (the ability to run as a daemon rather than in a terminal) to the mysqlfailover utility which allows you to build a light-weight HA database solution using MySQL Replication.

For a general overview of MySQL Utilities, take a look at this recent webinar or for a deeper dive into using them to setup replication and adding auto-failover of the master function to slaves watch this video and worked example.

When we first released the mysqlfailover utility, the reaction was very positive but the feedback also told us that to really use this to provide High Availability in a production system two enhancements were critical:

  1. The ability to not have the database password visible when someone queries the status of the process (for example, using the ps command). This was addressed by allowing the connection string to be specified using a login-path (referring to an entry in .mylogin.cnf – see https://dev.mysql.com/doc/refman/5.6/en/mysql-config-editor.html) in place of <user>[:<passwd>]@<host>. This is a vital security enhancement added in MySQL Utilities 1.3.1.
  2. Allowing mysqlfailover to be run as a daemon rather than being tied to the terminal from where it had to be manually launched. This option is key to enabling the user to build a reslient HA system that doesn’t rely on mysqlfailover being launched from a terminal and that terminal then never going away.

The rest of this post focuses on how to run mysqlfailover as a daemon.

By default, mysqlfailover runs as an interactive program within the terminal it was run from; it constantly refreshes, providing a summary of the status of the replication topology as shown below.

mysql@mini servers]$ mysqlfailover --master=root@192.168.1.101:5001 
  --discover-slaves-login=root --rediscover

MySQL Replication Failover Utility
Failover Mode = auto     Next Interval = Thu Aug  1 23:34:56 2013

Master Information
------------------
Binary Log File   Position  Binlog_Do_DB  Binlog_Ignore_DB
mini1-bin.000001  581

GTID Executed Set
1aca3d80-faf9-11e2-a214-0800272b8804:1-2

WARNING: Errant transaction(s) found on slave(s).
Replication Health Status
+----------------+-------+---------+--------+------------+---------+
| host           | port  | role    | state  | gtid_mode  | health  |
+----------------+-------+---------+--------+------------+---------+
| 192.168.1.101  | 5001  | MASTER  | UP     | ON         | OK      |
| 192.168.1.101  | 5002  | SLAVE   | UP     | ON         | OK      |
| 192.168.1.101  | 5003  | SLAVE   | UP     | ON         | OK      |
| 192.168.1.101  | 5004  | SLAVE   | UP     | ON         | OK      |
+----------------+-------+---------+--------+------------+---------+

Q-quit R-refresh H-health G-GTID Lists U-UUIDs

To run mysqlfailover as a daemon, the first new command-line option you must provide is –daemon=start; as you’d expect this runs the process as a daemon. In this mode, you won’t get to see the output from mysqlfailover at your terminal and so you should make sure that you know what log file is being used – so it’s best to specify it with –log=<path-to-log-file>. You can also control what information is periodically written to the log file using –report-values=<list-of-attributes from health,gtid,uuid>.  As you’ll likely to want to be able to manage the daemon without having to be in the same directory (and also likely to manage it from scripts that are automatically run when the server starts and stops) it makes sense to specify where the process ID file should be stored using –pid=<path-to-pid-file>.

The final incantation might look something like the following:

mysqlfailover --master=root@192.168.1.101:5001 
  --discover-slaves-login=root 
  --rediscover 
  --log=/home/mysql/servers/mysqlfailover.log 
  --pidfile=/home/mysql/servers/mysqlfailover.pid 
  --daemon=start 
  --report-values=health,gtid,uuid

and the resulting log file could then contain information such as this:

2013-08-02 01:10:34 AM INFO Getting health for master: 192.168.1.101:5001.
2013-08-02 01:10:35 AM INFO Health Status:
2013-08-02 01:10:35 AM INFO host: 192.168.1.101, port: 5001, role: MASTER, state: UP, gtid_mode: ON, health: OK
2013-08-02 01:10:35 AM INFO host: 192.168.1.101, port: 5002, role: SLAVE, state: UP, gtid_mode: ON, health: OK
2013-08-02 01:10:35 AM INFO host: 192.168.1.101, port: 5003, role: SLAVE, state: UP, gtid_mode: ON, health: OK
2013-08-02 01:10:35 AM INFO host: 192.168.1.101, port: 5004, role: SLAVE, state: UP, gtid_mode: ON, health: OK
2013-08-02 01:10:35 AM INFO GTID Status - Transactions executed on the servers:
2013-08-02 01:10:35 AM INFO host: 192.168.1.101, port: 5001, role: MASTER, gtid: 1aca3d80-faf9-11e2-a214-0800272b8804:1-2
2013-08-02 01:10:35 AM INFO host: 192.168.1.101, port: 5002, role: SLAVE, gtid: 1aca3d80-faf9-11e2-a214-0800272b8804:1-2
2013-08-02 01:10:35 AM INFO host: 192.168.1.101, port: 5002, role: SLAVE, gtid: 1db19050-faf9-11e2-a214-0800272b8804:1
2013-08-02 01:10:35 AM INFO host: 192.168.1.101, port: 5003, role: SLAVE, gtid: 1aca3d80-faf9-11e2-a214-0800272b8804:1-2
2013-08-02 01:10:35 AM INFO host: 192.168.1.101, port: 5003, role: SLAVE, gtid: 200f8139-faf9-11e2-a214-0800272b8804:1
2013-08-02 01:10:35 AM INFO host: 192.168.1.101, port: 5004, role: SLAVE, gtid: 1aca3d80-faf9-11e2-a214-0800272b8804:1-2
2013-08-02 01:10:35 AM INFO host: 192.168.1.101, port: 5004, role: SLAVE, gtid: 22842441-faf9-11e2-a214-0800272b8804:1
2013-08-02 01:10:35 AM INFO UUID Status:
2013-08-02 01:10:35 AM INFO host: 192.168.1.101, port: 5001, role: MASTER, uuid: 1aca3d80-faf9-11e2-a214-0800272b8804
2013-08-02 01:10:35 AM INFO host: 192.168.1.101, port: 5002, role: SLAVE, uuid: 1db19050-faf9-11e2-a214-0800272b8804
2013-08-02 01:10:35 AM INFO host: 192.168.1.101, port: 5003, role: SLAVE, uuid: 200f8139-faf9-11e2-a214-0800272b8804
2013-08-02 01:10:35 AM INFO host: 192.168.1.101, port: 5004, role: SLAVE, uuid: 22842441-faf9-11e2-a214-0800272b8804

As you’d expect, you can also stop the daemon:

mysqlfailover 
    --log=/home/mysql/servers/mysqlfailover.log 
    --pidfile=/home/mysql/servers/mysqlfailover.pid 
    --daemon=stop

and restart it:

mysqlfailover 
    --log=/home/mysql/servers/mysqlfailover.log 
    --pidfile=/home/mysql/servers/mysqlfailover.pid 
    --daemon=restart

The final option for daemon= is daemon=nodetach which is like start but the terminal that it’s run from will continue to view the output from the daemon.

One thing to note is that when the server is restarted, mysqlfailover needs to be started again and this is not something that is automatically configured when you run it as a daemon – rather, it’s your responsibility to ensure that it’s restarted (for example, including it in an init script.

Please try it out and (as always) let us know how you get on – the addition of these extra options is a direct result of the user feedback received for the earlier versions.


MySQL 5.6 Replication Webinar

Update – the recording of this webinar is now available here.

This Wednesday (27th March) Mat Keep and I will be presenting a free, live webinar on MySQL 5.6 Replication. You need to register here ahead of the webinar – worth doing even if you can’t attend as you’ll then be sent a link to the replay when it’s available. We’ll also have some of the key MySQL replication developers on-line to answer your questions and so it’s also a great chance to get some free consultancy 😉

Details….

Join this session to learn how the new replication features in MySQL 5.6 enable developers and DBAs to build and scale next generation services using the world’s most popular open source database. MySQL 5.6 delivers new replication capabilities which we will discuss and demonstrate in the webinar:

  • High performance with Binary Log Group Commit, Multi-Threaded Slaves and Optimized Row Based Replication
  • High availability with Global Transaction Identifiers, Failover Utilities and Crash Safe Slaves & Binlog
  • Data integrity with Replication Event Checksums
    Dev/Ops agility with new Replication Utilities, Time Delayed Replication and more

The session will wrap up with resources to get started with MySQL 5.6.

WHEN:
Wed, Mar 27: 07:00 Pacific time (America)
Wed, Mar 27: 08:00 Mountain time (America)
Wed, Mar 27: 09:00 Central time (America)
Wed, Mar 27: 10:00 Eastern time (America)
Wed, Mar 27: 14:00 UTC
Wed, Mar 27: 14:00 Western European time
Wed, Mar 27: 15:00 Central European time
Wed, Mar 27: 16:00 Eastern European time
Wed, Mar 27: 19:30 India, Sri Lanka
Wed, Mar 27: 22:00 Singapore/Malaysia/Philippines time
Wed, Mar 27: 22:00 China time
Wed, Mar 27: 23:00 日本
Thu, Mar 28: 01:00 NSW, ACT, Victoria, Tasmania (Australia)

The presentation will be approximately 60 minutes long.


MySQL now provides support for DRBD

Oracle has announced that it now provides support for DRBD with MySQL – this means a single point of support for the entire MySQL/DRBD/Pacemaker/Corosync/Linux stack! As part of this, we’ve released a new white paper which steps you through everything you need to do to configure this High Availability stack. The white paper provides a step-by-step guide to installing, configuring, provisioning and testing the complete MySQL and DRBD stack, including:

  • MySQL Database
  • DRBD kernel module and userland utilities
  • Pacemaker and Corosync cluster messaging and management processes
  • Oracle Linux operating system

DRBD is an extremely popular way of adding a layer of High Availability to a MySQL deployment – especially when the 99.999% availability levels delivered by MySQL Cluster isn’t needed. It can be implemented without the shared storage required for typical clustering solutions (not required by MySQL Cluster either) and so it can be a very cost effective solution for Linux environments.

Introduction to MySQL on DRBD/Pacemaker/Corosync/Oracle Linux

Fig 1 – MySQL-DRBD Stack

Figure 1 illustrates the stack that can be used to deliver a level of High Availability for the MySQL service.

At the lowest level, 2 hosts are required in order to provide physical redundancy; if using a virtual environment, those 2 hosts should be on different physical machines. It is an important feature that no shared storage is required. At any point in time, the services will be active on one host and in standby mode on the other.

Pacemaker and Corosync combine to provide the clustering layer that sits between the services and the underlying hosts and operating systems. Pacemaker is responsible for starting and stopping services – ensuring that they’re running on exactly one host, delivering high availability and avoiding data corruption. Corosync provides the underlying messaging infrastructure between the nodes that enables Pacemaker to do its job; it also handles the nodes membership within the cluster and informs Pacemaker of any changes.

The core Pacemaker process does not have built in knowledge of the specific services to be managed; instead agents are used which provide a wrapper for the service-specific actions. For example, in this solution we use agents for Virtual IP Addresses, MySQL and DRBD – these are all existing agents and come packaged with Pacemaker. This white paper will demonstrate how to configure Pacemaker to use these agents to provide a High Availability stack for MySQL.

The essential services managed by Pacemaker in this configuration are DRBD, MySQL and the Virtual IP Address that applications use to connect to the active MySQL service.

DRBD synchronizes data at the block device (typically a spinning or solid state disk) – transparent to the application, database and even the file system. DRBD requires the use of a journaling file system such as ext3 or ext4. For this solution it acts in an active-standby mode – this means that at any point in time the directories being managed by DRBD are accessible for reads and writes on exactly one of the two hosts and inaccessible (even for reads) on the other. Any changes made on the active host are synchronously replicated to the standby host by DRBD.

Setting up MySQL with DRBD/Pacemaker/Corosync/Oracle Linux

Fig 2 – Target network config

Figure 2 shows the network configuration used in this paper – note that for simplicity a single network connection is used but for maximum availability in a production environment you should consider redundant network connections.

A single Virtual IP (VIP) is shown in the figure (192.168.5.102) and this is the address that the application will connect to when accessing the MySQL database. Pacemaker will be responsible for migrating this between the 2 physical IP addresses.

One of the final steps in configuring Pacemaker is to add network connectivity monitoring in order to attempt to have an isolated host stop its MySQL service to avoid a “split-brain” scenario. This is achieved by having each host ping an external (not one part of the cluster) IP addresses – in this case the network router (192.168.5.1).


Fig 3 – Locations of files

Figure 3 shows where the MySQL files will be stored. The MySQL binaries as well as the socket (mysql.sock) and process-id (mysql.pid) files are stored in a regular partition – independent on each host (under /var/lib/mysql/). The MySQL Server configuration file (my.cnf) and the database files (data/*) are stored in a DRBD controlled file system that at any point in time is only available on one of the two hosts – this file system is controlled by DRBD and mounted under /var/lib/mysql_drbd/.


Fig 4 – Clustered resources

The white paper steps through setting all of this up as well as the resources in Pacemaker/Corosync that allow detection of a problem and the failover of the storage (DRBD), database (MySQL) and the Virtual IP address used by the application to access the database – all in a coordinated way of course. As you’ll notice in Figure 4 this involves setting up quite a few entities and relationships – the paper goes through each one.


Replication and auto-failover made easy with MySQL Utilities

MySQL utilities in Workbench

Utilities in MySQL Workbench

If you’re a user of MySQL Workbench then you may have noticed a pocket knife icon appear in the top right hand corner – click on that and a terminal opens which gives you access to the MySQL utilities. In this post I’m focussing on the replication utilities but you can also refer to the full MySQL Utilities documentation.

What I’ll step through is how to uses these utilities to:

  • Set up replication from a single master to multiple slaves
  • Automatically detect the failure of the master and promote one of the slaves to be the new master
  • Introduce the old master back into the topology as a new slave and then promote it to be the master again

Tutorial Video

Before going through the steps in detail here’s a demonstration of the replication utilities in action…

To get full use of these utilities you should use the InnoDB storage engine together with the Global Transaction ID functionality from the latest MySQL 5.6 DMR.

Do you really need/want auto-failover?

For many people, the instinctive reaction is to deploy a fully automated system that detects when the master database fails and then fails over (promotes a slave to be the new master) without human intervention. For many applications this may be the correct approach.

There are inherent risks to this though – What if the failover implementation has a flaw and fails (after all, we probably don’t test this out in the production system very often)? What if the slave isn’t able to cope with the workload and makes things worse? Is it just a transitory glitch and would the best approach have been just to wait it out?

Following a recent, high profile outage there has been a great deal of debate on the topic between those that recommend auto-failover and those that believe it should only ever be entrusted to a knowledgeable (of the application and the database architecture) and well informed (of the state of the database nodes, application load etc.) human. Of course, if the triggering of the failover is to be left to a human then you want that person to have access to the information they need and an extremely simple procedure (ideally a single command) to execute the failover. Probably the truth is that it all depends on your specific circumstances.

The MySQL replication utilities aim to support you whichever camp you belong to:

  • In the fully automated mode, the utilities will continually monitor the state of the master and in the event of its failure identify the best slave to promote – by default it will select the one that is most up-to-date and then apply any changes that are available on other slaves but not on this one before promoting it to be the new master. The user can override this behaviour (for example by limiting which of the slaves are eligible for promotion). The user is also able to bind in their own programs to be run before and after the failover (for example, to inform the application).
  • In the monitoring mode, the utility still continually checks the availability of the master, and informs the user if it should fail. The user then executes a single command to fail over to their preferred slave.

Step 1. Make sure MySQL Servers are configured correctly

For some of the utilities, it’s important that you’re using Global Transaction IDs; binary logging needs to be enabled; may as well use the new crash-safe slave functionality… It’s beyond the scope of this post to go through all of those and so instead I’ll just give example configuration files for the 5 MySQL Servers that will be used:

my1.cnf

[mysqld]
binlog-format=ROW
log-slave-updates=true
gtid-mode=on
disable-gtid-unsafe-statements=true # Use enforce-gtid-consistency from 5.6.9+
master-info-repository=TABLE
relay-log-info-repository=TABLE
sync-master-info=1
datadir=/home/billy/mysql/data1
server-id=1
log-bin=util11-bin.log
report-host=utils1
report-port=3306
socket=/home/billy/mysql/sock1
port=3306

my2.cnf

[mysqld]
binlog-format=ROW
log-slave-updates=true
gtid-mode=on
disable-gtid-unsafe-statements=true # Use enforce-gtid-consistency from 5.6.9+
master-info-repository=TABLE
relay-log-info-repository=TABLE
sync-master-info=1
datadir=/home/billy/mysql/data2
server-id=2
log-bin=util12-bin.log
report-host=utils1
report-port=3307
socket=/home/billy/mysql/sock2
port=3307

my3.cnf

[mysqld]
binlog-format=ROW
log-slave-updates=true
gtid-mode=on
disable-gtid-unsafe-statements=true # Use enforce-gtid-consistency from 5.6.9+
master-info-repository=TABLE
relay-log-info-repository=TABLE
sync-master-info=1
datadir=/home/billy/mysql/data3
server-id=3
log-bin=util2-bin.log
report-host=utils2
report-port=3306
socket=/home/billy/mysql/sock3
port=3306

my4.cnf

[mysqld]
binlog-format=ROW
log-slave-updates=true
gtid-mode=on
disable-gtid-unsafe-statements=true # Use enforce-gtid-consistency from 5.6.9+
master-info-repository=TABLE
relay-log-info-repository=TABLE
master-info-file=/home/billy/mysql/master4.info
datadir=/home/billy/mysql/data4
server-id=4
log-bin=util4-bin.log
report-host=utils2
report-port=3307
socket=/home/billy/mysql/sock4
port=3307

my5.cnf

[mysqld]
binlog-format=ROW
log-slave-updates=true
gtid-mode=on
disable-gtid-unsafe-statements=true # Use enforce-gtid-consistency from 5.6.9+
datadir=/home/billy/mysql/data5
master-info-repository=TABLE
relay-log-info-repository=TABLE
sync-master-info=1
#master-info-file=/home/billy/mysql/master5.info
server-id=5
log-bin=util5-bin.log
report-host=utils2
report-port=3308
socket=/home/billy/mysql/sock5
port=3308

The utilities are actually going to be run from a remote host and so it will be necessary for that host to access each of the MySQL Servers and so a user has to be granted remote access (note that the utilities will automatically create the replication user):

[billy@utils1 ~]$ mysql -h 127.0.0.1 -P3306 -u root -e "grant all on *.* to root@'%' with grant option;"
[billy@utils1 ~]$ mysql -h 127.0.0.1 -P3307 -u root -e "grant all on *.* to root@'%' with grant option;"
[billy@utils2 ~]$ mysql -h 127.0.0.1 -P3306 -u root -e "grant all on *.* to root@'%' with grant option;"
[billy@utils2 ~]$ mysql -h 127.0.0.1 -P3307 -u root -e "grant all on *.* to root@'%' with grant option;"
[billy@utils2 ~]$ mysql -h 127.0.0.1 -P3308 -u root -e "grant all on *.* to root@'%' with grant option;"

OK – that’s the most painful part of the whole process out of the way!

Set up replication

While there are extra options (such as specifying what username/password to use for the replication user or providing a password for the root user) I’m going to keep things simple and use the defaults as much as possible. The following commands are run from the MySQL Utilities terminal – just click on the pocket-knife icon in MySQL Workbench.

mysqlreplicate --master=root@utils1:3306 --slave=root@utils1:3307
# master on utils1: ... connected.
# slave on utils1: ... connected.
# Checking for binary logging on master...
# Setting up replication...
# ...done.

mysqlreplicate --master=root@utils1:3306 --slave=root@utils2:3306
# master on utils1: ... connected.
# slave on utils2: ... connected.
# Checking for binary logging on master...
# Setting up replication...
# ...done.

mysqlreplicate --master=root@utils1:3306 --slave=root@utils2:3307
# master on utils1: ... connected.
# slave on utils2: ... connected.
# Checking for binary logging on master...
# Setting up replication...
# ...done.

mysqlreplicate --master=root@utils1:3306 --slave=root@utils2:3308
# master on utils1: ... connected.
# slave on utils2: ... connected.
# Checking for binary logging on master...
# Setting up replication...
# ...done.

That’s it, replication has now been set up from one master to four slaves.

You can now check that the replication topology matches what you intended:

mysqlrplshow --master=root@utils1 --discover-slaves-login=root;
# master on utils1: ... connected.
# Finding slaves for master: utils1:3306

# Replication Topology Graph
utils1:3306 (MASTER)
   |
   +--- utils1:3307 - (SLAVE)
   |
   +--- utils2:3306 - (SLAVE)
   |
   +--- utils2:3307 - (SLAVE)
   |
   +--- utils2:3308 - (SLAVE)

Additionally, you can also check that any of the replication relationships is correctly configure:

mysqlrplcheck --master=root@utils1 --slave=root@utils2
# master on utils1: ... connected.
# slave on utils2: ... connected.
Test Description                                                     Status
---------------------------------------------------------------------------
Checking for binary logging on master                                [pass]
Are there binlog exceptions?                                         [pass]
Replication user exists?                                             [pass]
Checking server_id values                                            [pass]
Is slave connected to master?                                        [pass]
Check master information file                                        [pass]
Checking InnoDB compatibility                                        [pass]
Checking storage engines compatibility                               [pass]
Checking lower_case_table_names settings                             [pass]
Checking slave delay (seconds behind master)                         [pass]
# ...done.

Including the -s option would have included the output that you’d expect to see from SHOW SLAVE STATUSG on the slave.

Automated monitoring and failover

The previous section showed how you can save some serious time (and opportunity for user-error) when setting up MySQL replication. We now look at using the utilities to automatically monitor the state of the master and then automatically promote a new master from the pool of slaves. For simplicity I’ll stick with default values wherever possible but note that there are a number of extra options available to you such as:

  • Constraining which slaves are eligible for promotion to master; the default is to take the most up-to-date slave
  • Binding in your own scripts to be run before or after the failover (e.g. inform your application to switch master?)
  • Have the utility monitor the state of the servers but don’t automatically initiate failover

Here is how to set it up:

mysqlfailover --master=root@utils1:3306 --discover-slaves-login=root --rediscover

MySQL Replication Failover Utility
Failover Mode = auto     Next Interval = Wed Aug 15 13:19:30 2012

Master Information
------------------
Binary Log File    Position  Binlog_Do_DB  Binlog_Ignore_DB
util11-bin.000001  2586

Replication Health Status
+---------+-------+---------+--------+------------+---------+
| host    | port  | role    | state  | gtid_mode  | health  |
+---------+-------+---------+--------+------------+---------+
| utils1  | 3306  | MASTER  | UP     | ON         | OK      |
| utils1  | 3307  | SLAVE   | UP     | ON         | OK      |
| utils2  | 3306  | SLAVE   | UP     | ON         | OK      |
| utils2  | 3307  | SLAVE   | UP     | ON         | OK      |
| utils2  | 3308  | SLAVE   | UP     | ON         | OK      |
+---------+-------+---------+--------+------------+---------+

Q-quit R-refresh H-health G-GTID Lists U-UUIDs

mysqlfailover will then continue to run, refreshing the state – just waiting for something to go wrong.

Rather than waiting, I kill the master MySQL Server:

mysqladmin -h utils1 -P3306 -u root shutdown

Checking with the still-running mysqlfailover we can see that it has promoted utils1:3307.

MySQL Replication Failover Utility
Failover Mode = auto     Next Interval = Wed Aug 15 13:21:13 2012

Master Information
------------------
Binary Log File    Position  Binlog_Do_DB  Binlog_Ignore_DB
util12-bin.000001  7131

Replication Health Status
+---------+-------+---------+--------+------------+---------+
| host    | port  | role    | state  | gtid_mode  | health  |
+---------+-------+---------+--------+------------+---------+
| utils1  | 3307  | MASTER  | UP     | ON         | OK      |
| utils2  | 3306  | SLAVE   | UP     | ON         | OK      |
| utils2  | 3307  | SLAVE   | UP     | ON         | OK      |
| utils2  | 3308  | SLAVE   | UP     | ON         | OK      |
+---------+-------+---------+--------+------------+---------+

Q-quit R-refresh H-health G-GTID Lists U-UUIDs

Add the recovered MySQL Server back into the topology

After restarting the failed MySQL Server, it can be added back into the mix as a slave to the new master:

mysqlreplicate --master=root@utils1:3307 --slave=root@utils1:3306
# master on utils1: ... connected.
# slave on utils1: ... connected.
# Checking for binary logging on master...
# Setting up replication...
# ...done.

The output from mysqlfailover (still running) confirms the addition:

MySQL Replication Failover Utility
Failover Mode = auto     Next Interval = Wed Aug 15 13:24:38 2012

Master Information
------------------
Binary Log File    Position  Binlog_Do_DB  Binlog_Ignore_DB
util12-bin.000001  7131

Replication Health Status
+---------+-------+---------+--------+------------+---------+
| host    | port  | role    | state  | gtid_mode  | health  |
+---------+-------+---------+--------+------------+---------+
| utils1  | 3307  | MASTER  | UP     | ON         | OK      |
| utils1  | 3306  | SLAVE   | UP     | ON         | OK      |
| utils2  | 3306  | SLAVE   | UP     | ON         | OK      |
| utils2  | 3307  | SLAVE   | UP     | ON         | OK      |
| utils2  | 3308  | SLAVE   | UP     | ON         | OK      |
+---------+-------+---------+--------+------------+---------+

Q-quit R-refresh H-health G-GTID Lists U-UUIDs

If it were important that the recovered MySQL Server be restored as the master then it is simple to manually trigger the promotion (after quitting out of mysqlfailover):

mysqlrpladmin --master=root@utils1:3307 --new-master=root@utils1:3306 --demote-master 
  --discover-slaves-login=root switchover

# Discovering slaves for master at utils1:3307
# Checking privileges.
# Performing switchover from master at utils1:3307 to slave at utils1:3306.
# Checking candidate slave prerequisites.
# Waiting for slaves to catch up to old master.
# Stopping slaves.
# Performing STOP on all slaves.
# Demoting old master to be a slave to the new master.
# Switching slaves to new master.
# Starting all slaves.
# Performing START on all slaves.
# Checking slaves for errors.
# Switchover complete.
#
# Replication Topology Health:
+---------+-------+---------+--------+------------+---------+
| host    | port  | role    | state  | gtid_mode  | health  |
+---------+-------+---------+--------+------------+---------+
| utils1  | 3306  | MASTER  | UP     | ON         | OK      |
| utils1  | 3307  | SLAVE   | UP     | ON         | OK      |
| utils2  | 3306  | SLAVE   | UP     | ON         | OK      |
| utils2  | 3307  | SLAVE   | UP     | ON         | OK      |
| utils2  | 3308  | SLAVE   | UP     | ON         | OK      |
+---------+-------+---------+--------+------------+---------+
# ...done.

As always, we’d really appreciate people trying this out and giving us feedback!


Upcoming webinar: MySQL 5.6 Replication – For Next Generation of Web and Cloud Services

MySQL 5.6 Replication - Global Transaction IDs

MySQL 5.6 Replication - Global Transaction IDs

On Wednesday (16th May 2012), Mat Keep and I will be presenting the new replication features that are previewed as part of the latest MySQL 5.6 Development Release. If you’d like to attend then register here.

MySQL 5.6 delivers new replication capabilities which we will discuss in the webinar:

  • High performance with Multi-Threaded Slaves and Optimized Row Based Replication
  • High availability with Global Transaction Identifiers, Failover Utilities and Crash Safe Slaves & Binlog
  • Data integrity with Replication Event Checksums
  • Dev/Ops agility with new Replication Utilities, Time Delayed Replication and more

The session will wrap up with resources to get started with MySQL 5.6 and an opportunity to ask questions.

The webinar will last 45-60 minutes and will start on Wednesday, May 16, 2012 at 09:00 Pacific time (America); start times in other time zones:

  • Wed, May 16: 06:00 Hawaii time
  • Wed, May 16: 10:00 Mountain time (America)
  • Wed, May 16: 11:00 Central time (America)
  • Wed, May 16: 12:00 Eastern time (America)
  • Wed, May 16: 16:00 UTC
  • Wed, May 16: 17:00 Western European time
  • Wed, May 16: 18:00 Central European time
  • Wed, May 16: 19:00 Eastern European time

As always, it’s worth registering even if you can’t make the live webcast as you’ll  be emailed a link to the replay as soon as it’s available.