We’re very pleased to announce that MySQL Cluster 7.3 has gone GA; for a full run-down of the new features and enhancements, take a look at the "MySQL Cluster 7.3 New Features for Internet-Scale Performance with Carrier-Grade Availability" white paper but this post will focus on just one of the features – the MySQL Cluster JavaScript Driver for Node.js. The post will step you through setting everything up so that you can get your first Node.js code reading and writing from MySQL Cluster.
Background
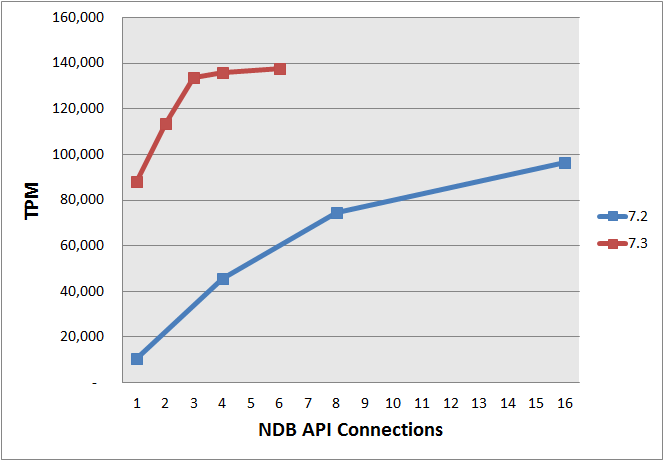
MySQL Cluster is a distributed, shared nothing database that provides linear scalability, 99.999% availability and high read/write throughput with low latency. SQL is just one way of accessing data stored in MySQL Cluster – there are also a number of native NoSQL APIs that go straight to the data without any interim conversion to SQL. These APIs include C++, Memcached, Java, JPA and REST – in MySQL Cluster 7.3 JavaScript/Node.js is added to the list.
Node.js (typically referred to simply as "Node") is a platform for running fast, scalable applications using JavaScript. For maximum performance, Node.js is built around a non-blocking, event-driven architecture – just like MySQL Cluster and so they fit together very well.
The MySQL Cluster JavaScript Driver for Node.js is just what it sounds like it is – it’s a connector that can be called directly from your JavaScript code to read and write your data. As it accesses the data nodes directly, there is no extra latency from passing through a MySQL Server and need to convert from JavaScript code//objects into SQL operations. If for some reason, you’d prefer it to pass through a MySQL Server (for example if you’re storing tables in InnoDB) then that can be configured.
As with all of the other APIs that we offer, you’re able to mix & match access methods; while you access the database using JavaScript objects, these will be mapped to rows in database tables and this same data can simultaneously be accessed by other NoSQL API or through SQL.
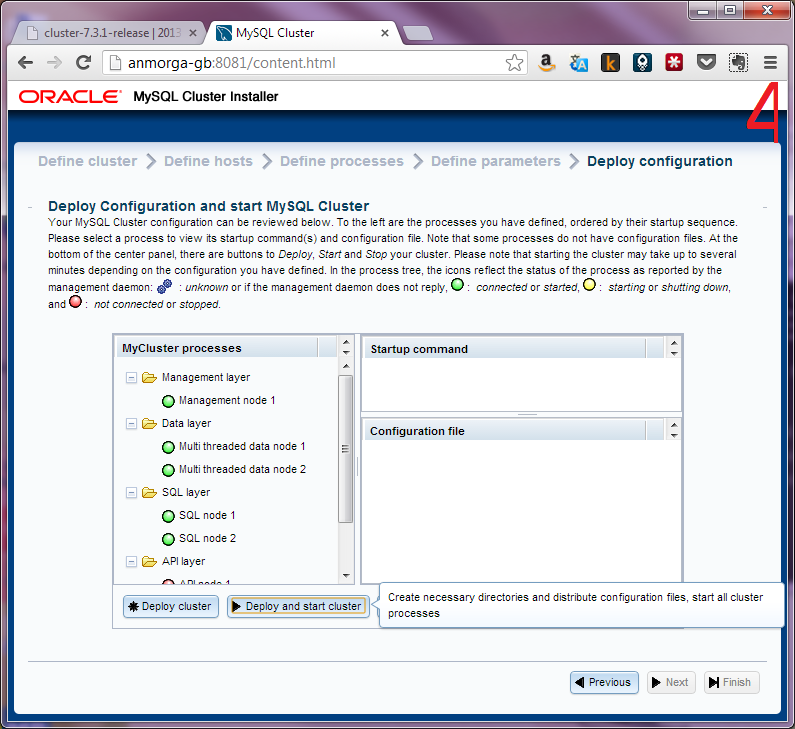
MySQL Cluster Auto-Installer
Installing MySQL Cluster
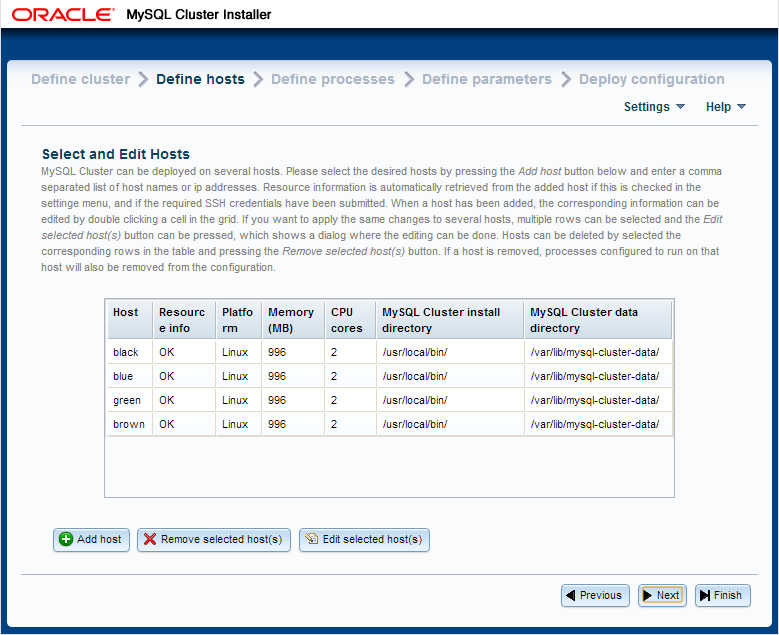
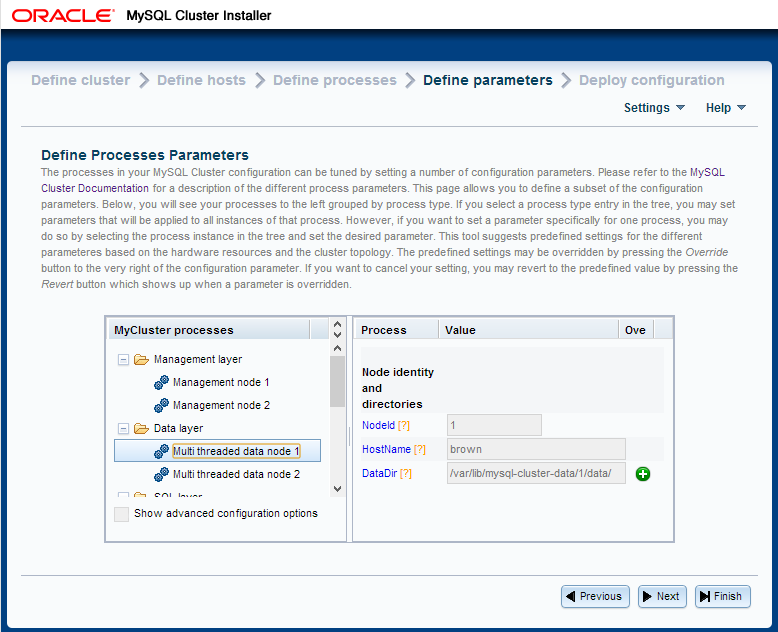
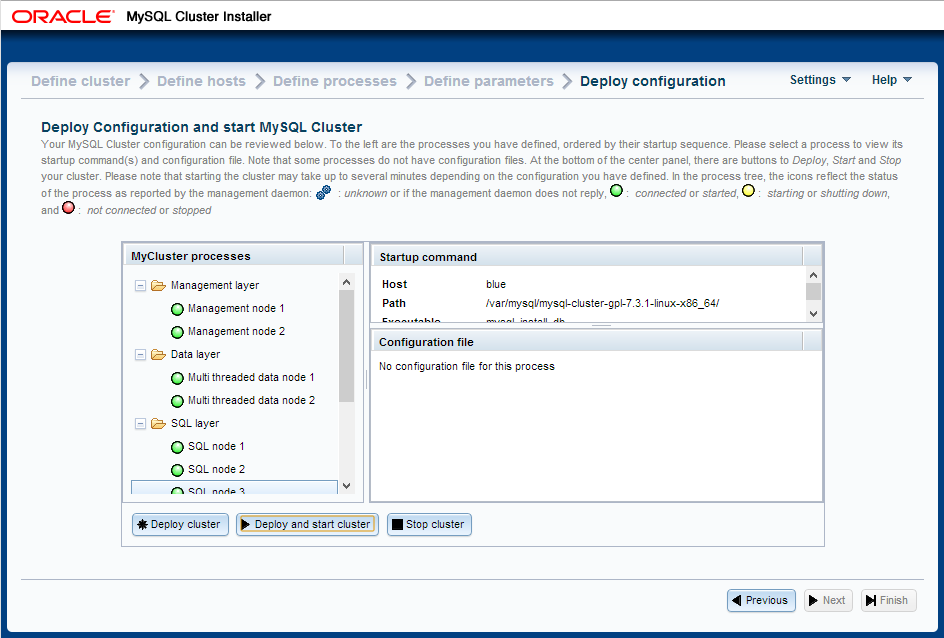
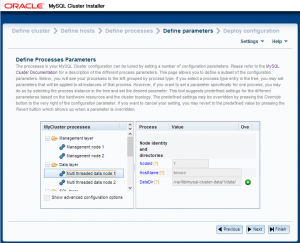
Obviously, to try out our JavaScript code we’ll need a database to access. The simplest way to do this is to use the new auto-installer that’s part of MySQL Cluster 7.3; this provides a browser-based GUI that configures and runs a MySQL Cluster database that’s been configured for your application and environment. Using this installer is described in the "MySQL Cluster Auto-Installer" post.
Setting up the Database

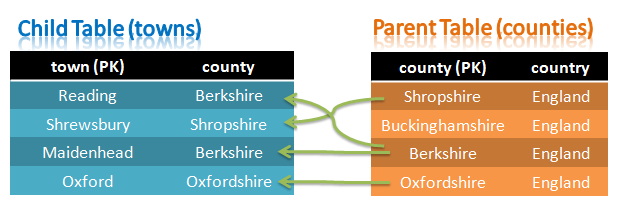
Tables with Foreign Key constraint
A simple database schema is being used – a single table would really be enough but we’ll actually create two in order to demonstrate that Foreign Key constraints (Foreign Keys are another new feature in MySQL Cluster 7,3) are still enforced when using the NoSQL APIs.
These two tables are set up as follows:
[billy@bob]$ mysql --protocol=tcp -u root
Welcome to the MySQL monitor.  Commands end with ; or g.
Your MySQL connection id is 2
Server version: 5.6.10-ndb-7.3.1-cluster-gpl MySQL Cluster Community Server (GPL)

Copyright (c) 2000, 2013, Oracle and/or its affiliates. All rights reserved.

Oracle is a registered trademark of Oracle Corporation and/or its
affiliates. Other names may be trademarks of their respective
owners.

Type 'help;' or 'h' for help. Type 'c' to clear the current input statement.

mysql> CREATE TABLE test.counties (county VARCHAR(30) NOT NULL PRIMARY KEY,
country VARCHAR(30)) ENGINE=ndb;
Query OK, 0 rows affected (1.17 sec)

mysql> CREATE TABLE test.towns (town VARCHAR(30) NOT NULL PRIMARY KEY, county VARCHAR(30),
INDEX county_county_index (county), CONSTRAINT county_town FOREIGN KEY (county) REFERENCES counties(county)
ON DELETE RESTRICT ON UPDATE RESTRICT) ENGINE=ndb;
Query OK, 0 rows affected (1.00 sec)
Installing Node.js
Node.js can be downloaded from Node.js.org.
If you’re using Windows then the MSI will guide you through the process – though when you’ve finished you’ll need to manually run the following from the cmd prompt:
npm install -g node-gyp
On Linux, you’ll need to manually build and install Node.js after you’ve downloaded it:
[root@bob node-v0.10.7]# ./configure
[root@bob node-v0.10.7]# make
[root@bob node-v0.10.7]# make install
Building mysql-js (the JavaScript driver for MySQL Cluster)
Regardless of what operating system is being used, the driver must be built before it can be used. Furthermore, to build the driver you need to have a local MySQL Cluster package (so that it can access the NDB API client library).
Depending on the exact Linux distro and version being used, some dependencies may need to be installed first:
[root@bob]$ yum install gcc
[root@bob]$ yum install gcc-c++
[root@bob]$ npm install mysql
[root@bob]$ npm install -g node-gyp
Once that has been done, the driver can be built – the following should be run from within the share/nodejs directory within the MySQL Cluster package:
[billy@bob nodejs]$ node configure.js
[billy@bob nodejs]$ node-gyp configure build -d
Example Code
To begin with, the complete code is provided and then each component is explained.
var nosql = require('..');

var Town = function(name, county) {
    if (name) this.town = name;
    if (county) this.county = county;
};

// create basic object<->table mapping
var annotations = new nosql.TableMapping('towns').applyToClass(Town);

//check results of find
var onFind = function(err, result) {
    console.log('onFind.');
    if (err) {
        console.log(err);
    } else {
        console.log('Found: ' + JSON.stringify(result));
    }
    process.exit(0);
};

//check results of insert
var onInsert = function(err, object, session) {
    console.log('onInsert.');
    if (err) {
        console.log(err);
    } else {
        console.log('Inserted: ' + JSON.stringify(object));

        // Now read the data back out from the database
        session.find(Town, 'Maidenhead', onFind);
    }
};

// insert an object
var onSession = function(err, session) {
    console.log('onSession.');
    if (err) {
    console.log('Error onSession.');
        console.log(err);
        process.exit(0);
    } else {
        var data = new Town('Maidenhead', 'Berkshire');
        session.persist(data, onInsert, data, session);
    }
};

var dbProperties = nosql.ConnectionProperties('ndb');

console.log('Openning session');

// connect to the database
nosql.openSession(dbProperties, Town, onSession);

console.log('Openned session');
Step 1 Import API software
The first step is for your JavaScript application to specify that it will use the new API (mysql-js); this will work if this file is stored in a directory under cluster-install/share/nodejs:
var nosql = require('mysql-js');
Step 2 Define JavaScript class
A class should be defined that will be used by the application and will also be mapped to the towns table that has already been created. The class is defined through the specification of its constructor:
var Town = function(name, county) {
    if (name) this.town = name;
    if (county) this.county = county;
};
Step 3 Define schema mappings
MySQL Cluster is a relational database while JavaScript works with objects. To get the best of both worlds, mappings can be set up between MySQL tables (or individual columns) and JavaScript objects – in this case it’s kept very simple and the Town class is mapped to the towns table:
var annotations = new nosql.TableMapping('towns').applyToClass(Town);
Note that you can also define mappings at a finer level – only mapping to specific columns within a table and allowing the class members to have different names to the table columns.
Step 4 Connect to the database
In this step, the application connects to the database to indicate that it wants to access the data nodes directly rather than via the MySQL Server (and hidden conversion to SQL), the ConnectionProperties is set to ndb (rather than mysql). Additionally, a callback function (onSession) is passed as an argument. Recall that this is an event-driven, non-blocking, asynchronous API and so after calling openSession, control will be immediately returned to the application – without waiting for the session to actually be established – the application can then go away and perform other useful work. Once the session has been created, the callback function (onSession) will be invoked, allowing the application to take the next steps.
var dbProperties = nosql.ConnectionProperties('ndb');
nosql.openSession(dbProperties, annotations, onSession);
Step 5 Store some data
Note that the code in this step is the implementation of the call back function (onSession) that we passed in as a parameter to openSession in the previous step. This function simply instantiates a Town JavaScript object and then writes it to MySQL Cluster through the persist method. Once more, a callback function is passed in (onInsert) which will be invoked once the data has been stored in the database. Note that any objects specified after the callback function in the parameter list (in this case, the Town object data) will be provided as parameters to the callback function when it’s executed – note that the session parameter is also included and the framework will pass that as a parameter to the onInsert callback function.
var onSession = function(err, session) {
    if (err) {...} else {
        var data = new Town('Maidenhead', 'Berkshire');
        session.persist(data, onInsert, data, session);
    }
};
Step 6 Verify insert succeeded & initiate reading of data from the database
Next, our callback function (onInsert) is called and the object parameter contains the Town that had been passed into the persist method in the previous step, together with the session variable. This function simply checks that there wasn’t an error and then displays the Town that has been stored in the database. Again, a callback function is provided – onFind – that will be called once the data has been found.
var onInsert = function(err, object, session) {
    if (err) { ... } else {
        console.log('Inserted: ' + JSON.stringify(object));
        session.find(Town, 'Maidenhead', onFind);
    }
};
Step 7 Process the data read back from the database
Finally, onFind is called-back and it handles the processing of the results (whether it is an error or the Town object in the form of the result parameter).
var onFind = function(err, result) {
    console.log('onFind.');
    if (err) { ... } else {
        console.log('Found: ' + JSON.stringify(result));
    }
    process.exit(0);
};
The on-line documentation for mysql-js describes the API in full and includes some further examples.
Running the application
Before running the application, the location of the NDB API client library must be provided (this is with the MySQL Cluster package):
[billy@bob my_samples]$ export LD_LIBRARY_PATH=/home/billy/cluster_7_3/lib
The example code should be stored in a file called my-test.js in a directory under cluster-install/share/nodejs/my_samples. To run the application, just run the following (spoiler – there will be a database error!):
[billy@bob my_samples]$ node my-test.js
Openning session
Openned session
Connected to cluster as node id: 50
onSession.
onInsert.
{ message: 'Error',
  sqlstate: '23000',
  ndb_error: null,
  cause:
   { message: 'Foreign key constraint violated: No parent row found [255]',
     sqlstate: '23000',
     ndb_error:
      { message: 'Foreign key constraint violated: No parent row found',
        handler_error_code: 151,
        code: 255,
        classification: 'ConstraintViolation',
        status: 'PermanentError' },
     cause: null } }
This error is seen because the code is attempting to add an object/row to the towns table where the county doesn’t already have an entry in the counties table – this breaks the Foreign Key constraint that was included when the tables were created.
To get around this, the required row should be added to the counties table:
[billy@bob my_samples]$ mysql --protocol=tcp -u root
Welcome to the MySQL monitor.  Commands end with ; or g.
Your MySQL connection id is 3
Server version: 5.6.10-ndb-7.3.1-cluster-gpl MySQL Cluster Community Server (GPL)

Copyright (c) 2000, 2013, Oracle and/or its affiliates. All rights reserved.

Oracle is a registered trademark of Oracle Corporation and/or its
affiliates. Other names may be trademarks of their respective
owners.

Type 'help;' or 'h' for help. Type 'c' to clear the current input statement.

mysql> REPLACE INTO test.counties VALUES ('Berkshire', 'England');
Query OK, 1 row affected (0.25 sec)
The code can then be executed again – this time successfully:
[billy@drbd1 my_samples]$ node my-test.js
Openning session
Openned session
Connected to cluster as node id: 50
onSession.
onInsert.
Inserted: {"town":"Maidenhead","county":"Berkshire"}
onFind.
Found: {"county":"Berkshire","town":"Maidenhead"}
What next?
Please give this a try – especially with your own code – and let us know how you get on. We’re especially interested in what features you’d like to see added – embedded objects, lists, joins….
 The binary version for MySQL Cluster 7.3.2 has now been made available at http://www.mysql.com/downloads/cluster/ (GPL version) or Oracle’s Software Delivery Cloud for the commercial version.