Archive for November 22, 2016

Adding Document Validation Rules Using MongoDB Compass 1.5

Adding Document Validation Rules Using MongoDB Compass 1.5

This post looks at a new feature in MongoDB Compass 1.5 (in beta at the time of writing) which allows document validation rules to be added from the GUI rather from the mongo shell command line. This makes it easy to create and modify rules that ensure that all documents written to a collection contain the data you expect to be there.

Introduction

One of MongoDB’s primary attractions for developers is that it gives them the ability to start application development without first needing to define a formal schema. Operations teams appreciate the fact that they don’t need to perform a time-consuming schema upgrade operation every time the developers need to store a different attribute. For business leaders, the application gets launched much faster, and new features can be rolled out more frequently. MongoDB powers agility.

Many projects reach a point where it’s necessary to enforce rules on what’s being stored in the database – for example, that for any document in a particular collection, you can be certain that specific attributes are present in every document. Reasons for this include:

  • Different development teams can work with the same data, each needing to know what they can expect to find in a particular collection.
  • Development teams working on different applications can be spread over multiple sites, which means that a clear agreement on the format of shared data is important.
  • Development teams from different companies may be working with the same collections; misunderstandings about what data should be present can lead to issues.

As an example, an e-commerce website may centralize product catalog feeds from multiple vendors into a single collection. If one of the vendors alters the format of its product catalog, global catalog searches could fail.

To date, this resulted in developers building their own validation logic – either within the application code (possibly multiple times for different applications) or by adding middleware such as Mongoose.

To address the challenges discussed above, while at the same time maintaining the benefits of a dynamic schema, MongoDB 3.2 introduced document validations. Adding and viewing validation rules required understanding the correct commands to run from the mongo shell’s command line.

MongoDB Compass 1.5 allows users to view, add, and modify document validation rules through its GUI, making them more accessible to both developers and DBAs.

Validating Documents in MongoDB

Document Validation provides significant flexibility to customize which parts of the documents are and are not validated for any collection. For any attribute it might be appropriate to check:

  • That the attribute exists
  • If an attribute does exist, that it is of the correct type
  • That the value is in a particular format (e.g., regular expressions can be used to check if the contents of the string matches a particular pattern)
  • That the value falls within a given range

Further, it may be necessary to combine these checks – for example that the document contains the user’s name and either their email address or phone number, and if the email address does exist, then it must be correctly formed.

Adding the validation checks from the command line is intuitive to developers or DBAs familiar with the MongoDB query language as it uses the same expression syntax as a find query to search the database. For others, it can be a little intimidating.

As an example, the following snippet adds validations to the contacts collection that validates:

  • The year of birth is no later than 1994
  • The document contains a phone number and/or an email address
  • When present, the phone number and email address are strings
db.runCommand({
   collMod: "contacts",
   validator: { 
      $and: [
        {yearOfBirth: {$lte: 1994}},
        {$or: [ 
                  {"contact.phone": { $type: "string"}}, 
                  {"email": { $type: "string"}}
              ]}]
    }})

Note that types can be specified using either a number or a string alias.

Wouldn’t it be nice to be able to define these rules through a GUI rather than from the command line?

Using MongoDB Compass to Add Document Validation Rules

If you don’t already have MongoDB Compass 1.5 (or later) installed, download it and start the application. You’ll then be asked to provide details on how to connect to your database.

MongoDB Compass is free for evaluation and for use in development, for production, a MongoDB Professional of MongoDB Enterprise Advanced subscription is required.

If you don’t have a database to test this on, the simplest option is to create a new MongoDB Atlas cluster. Details on launching a MongoDB Atlas cluster can be found in this post.

Note that MongoDB Compass currently only accepts a single server address rather than the list of replica set members in the standard Atlas connect string and so it’s necessary to explicitly provide Compass with the address of the current primary – find that by clicking on the cluster in the Atlas GUI (Figure 1).

Identify the replica set primary

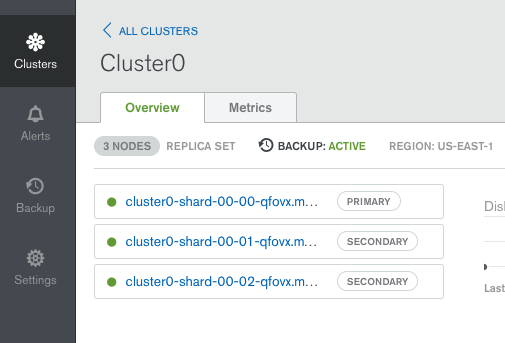
Figure 1: Identify the replica set primary

Connect MongoDB Compass to MongoDB Atlas

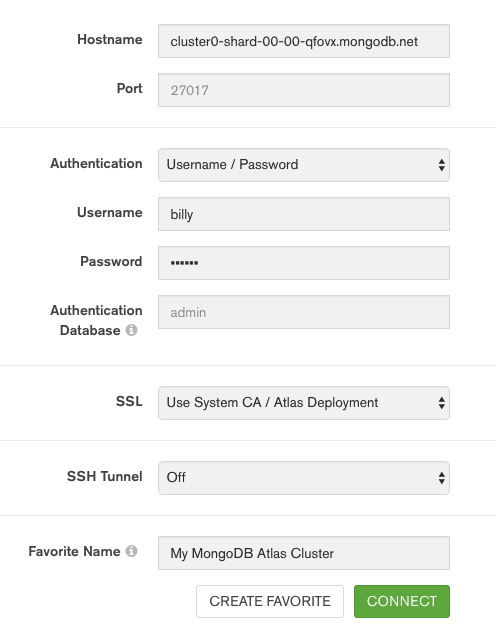
Figure 2: Connect MongoDB Compass to MongoDB Atlas

The connection panel can then be populated as shown in Figure 2.

Load Data and Check in MongoDB Compass

If you don’t already have a populated MongoDB collection, create one now. For example, use curl to download a pre-prepared JSON file containing contact data and use mongoimport to load it into your database:

curl -o contacts.json http://clusterdb.com/upload/contacts.json
mongoimport -h cluster0-shard-00-00-qfovx.mongodb.net -d clusterdb -c contacts --ssl -u billy -p SECRET --authenticationDatabase admin contacts.json

Connect MongoDB Compass to your database (Figure 3).

Connect MongoDB Compass to database

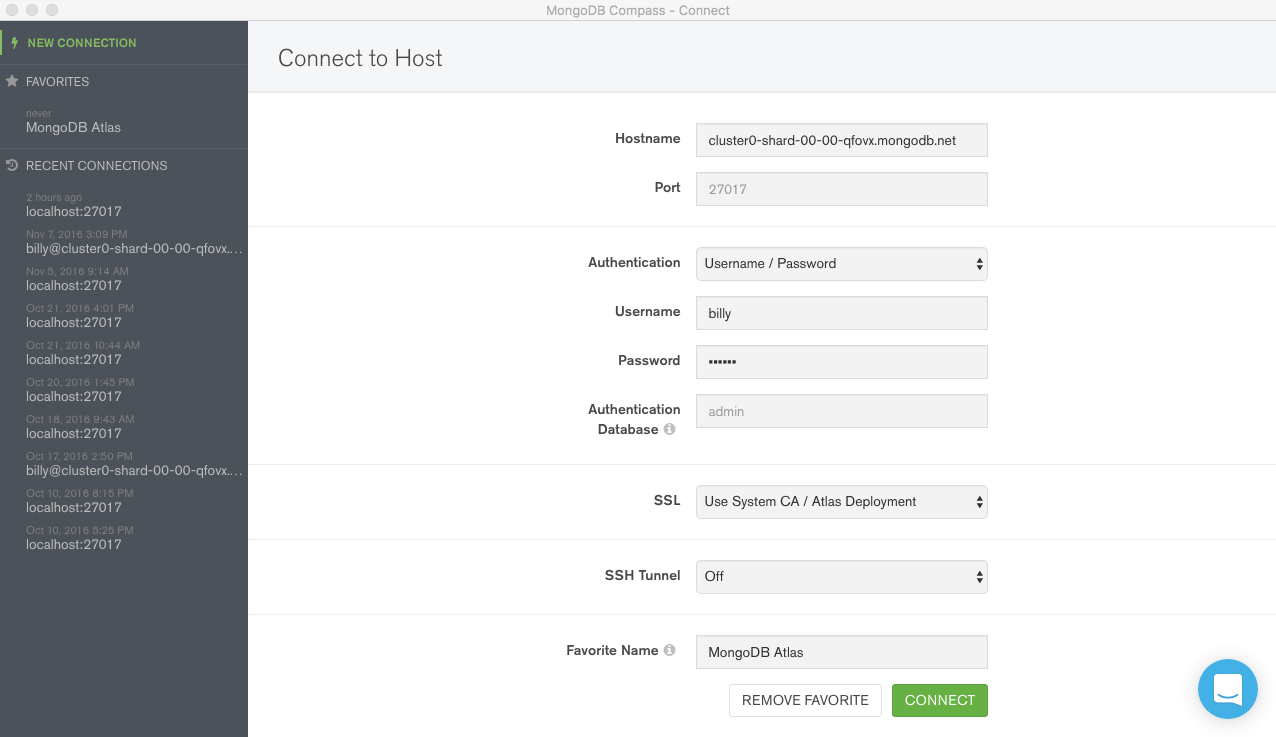
Figure 3: Connect MongoDB Compass to database

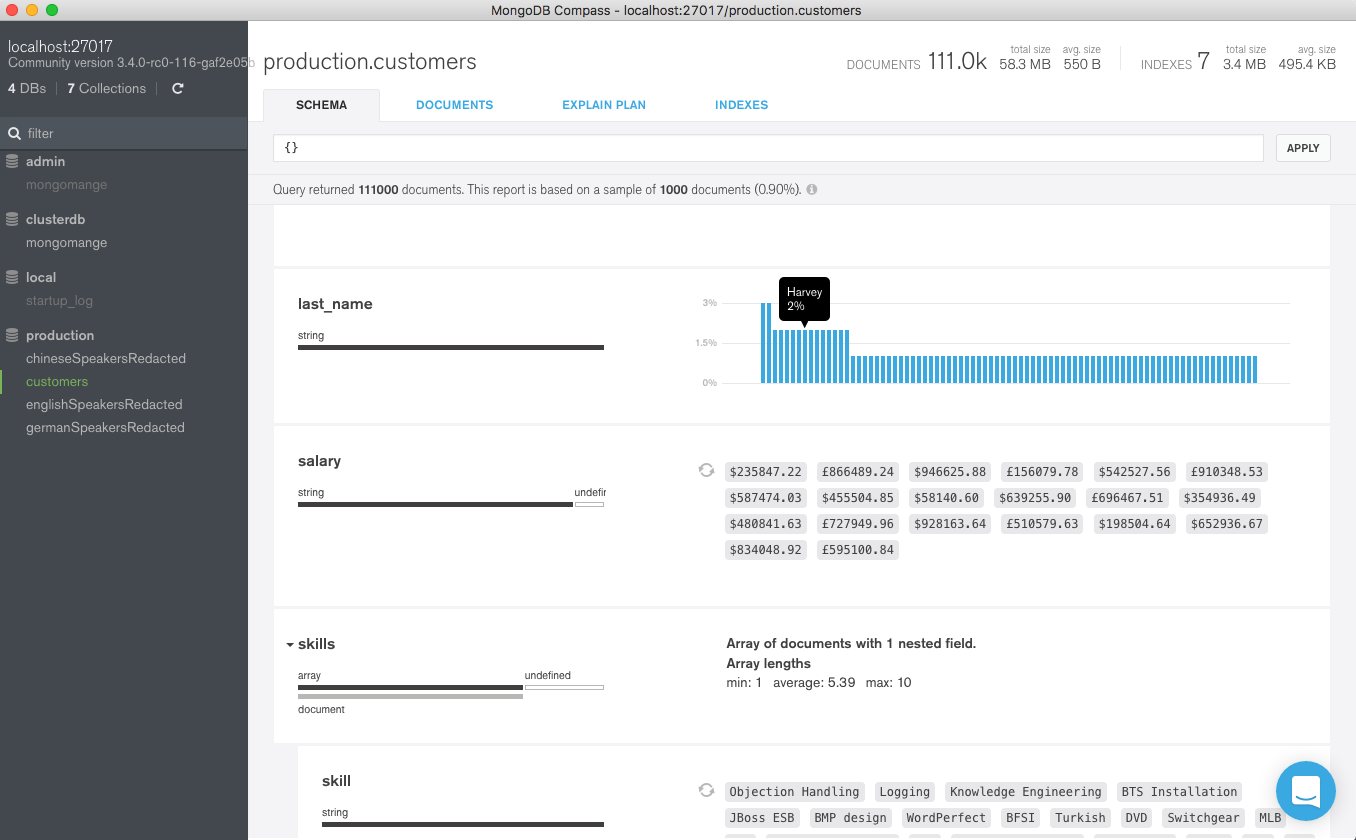
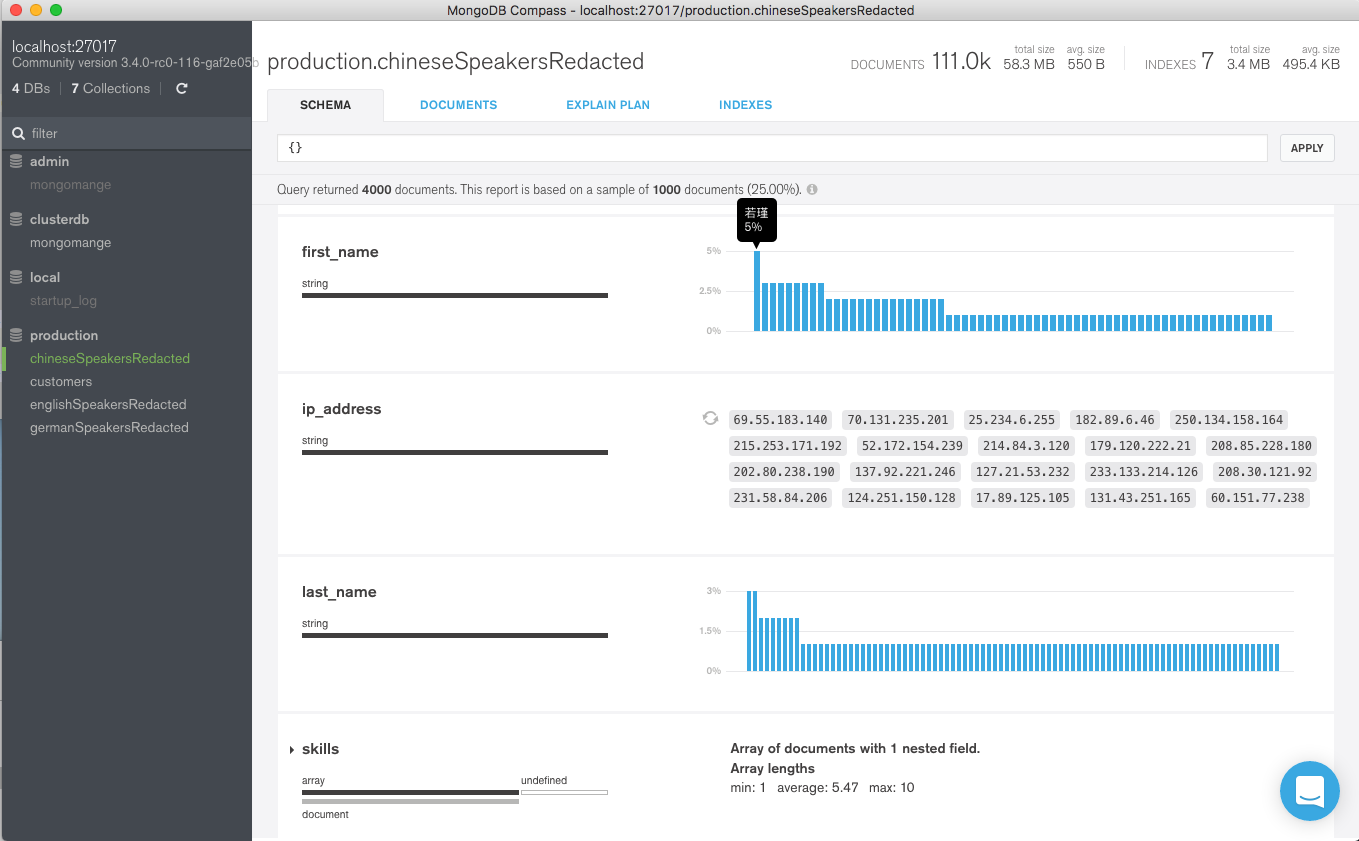
Select the contacts data and browse the schema (Figure 4).

Check schema in MongoDB Compass

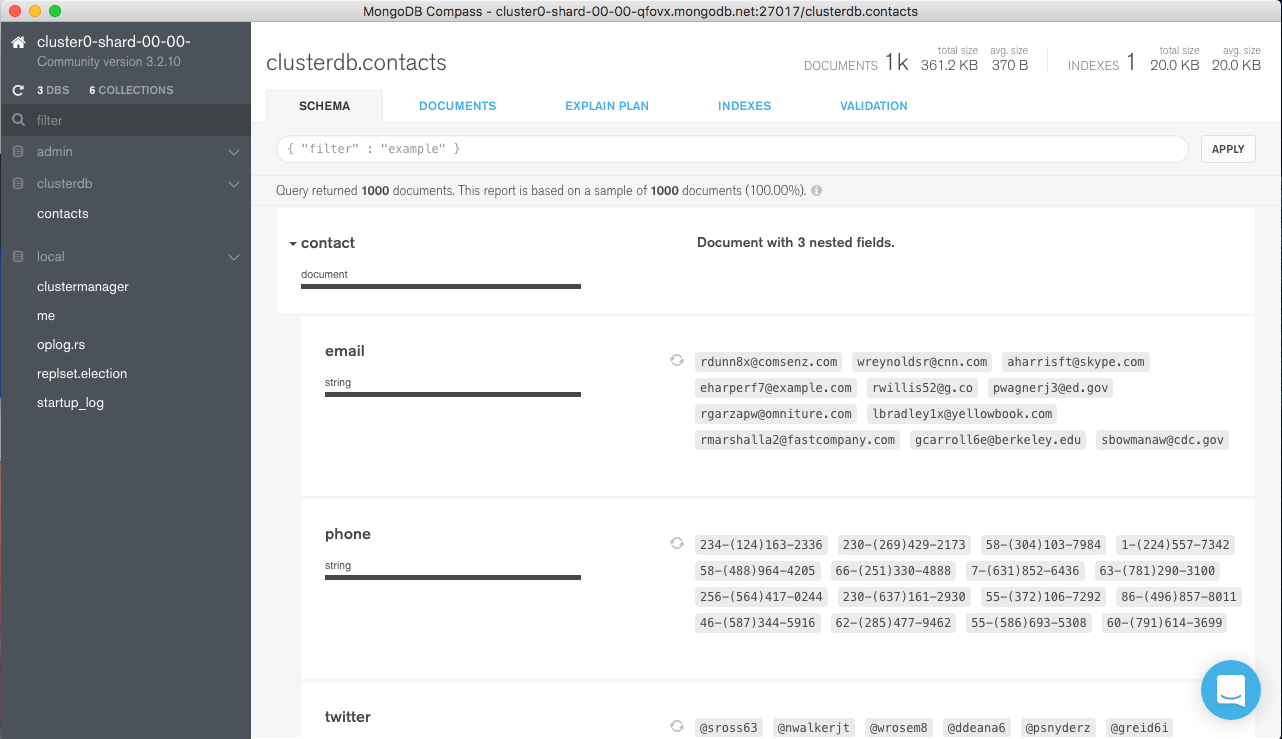
Figure 4: Check schema in MongoDB Compass

Browse some documents (Figure 5).

Browse documents using MongoDB Compass

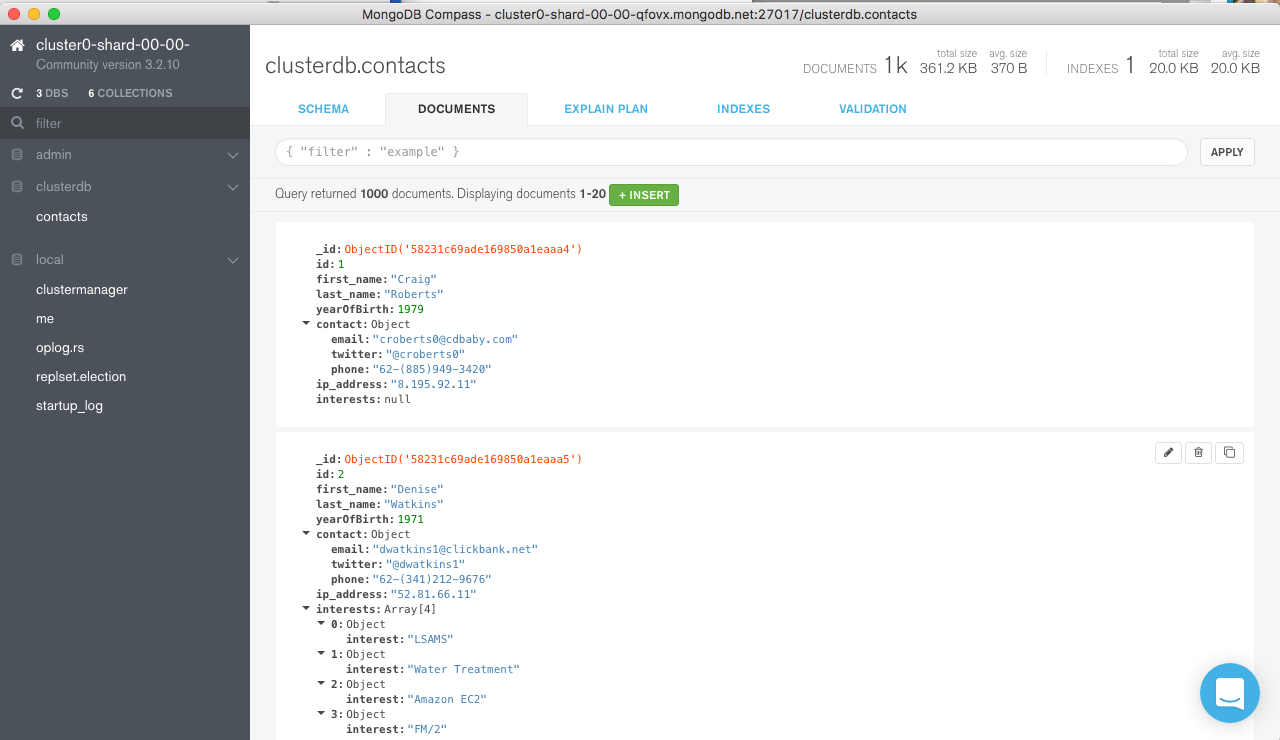
Figure 5: Browse documents using MongoDB Compass

Add Document Validation Rules

In this section, we build the document validation rule shown earlier.

Navigate to the Validation tab in MongoDB Compass GUI and select the desired validation action and validation level. The effects of these settings are shown in Figure 6. Any warnings generated by the rules are written to the MongoDB log.

MongoDB document validation configuration parameters

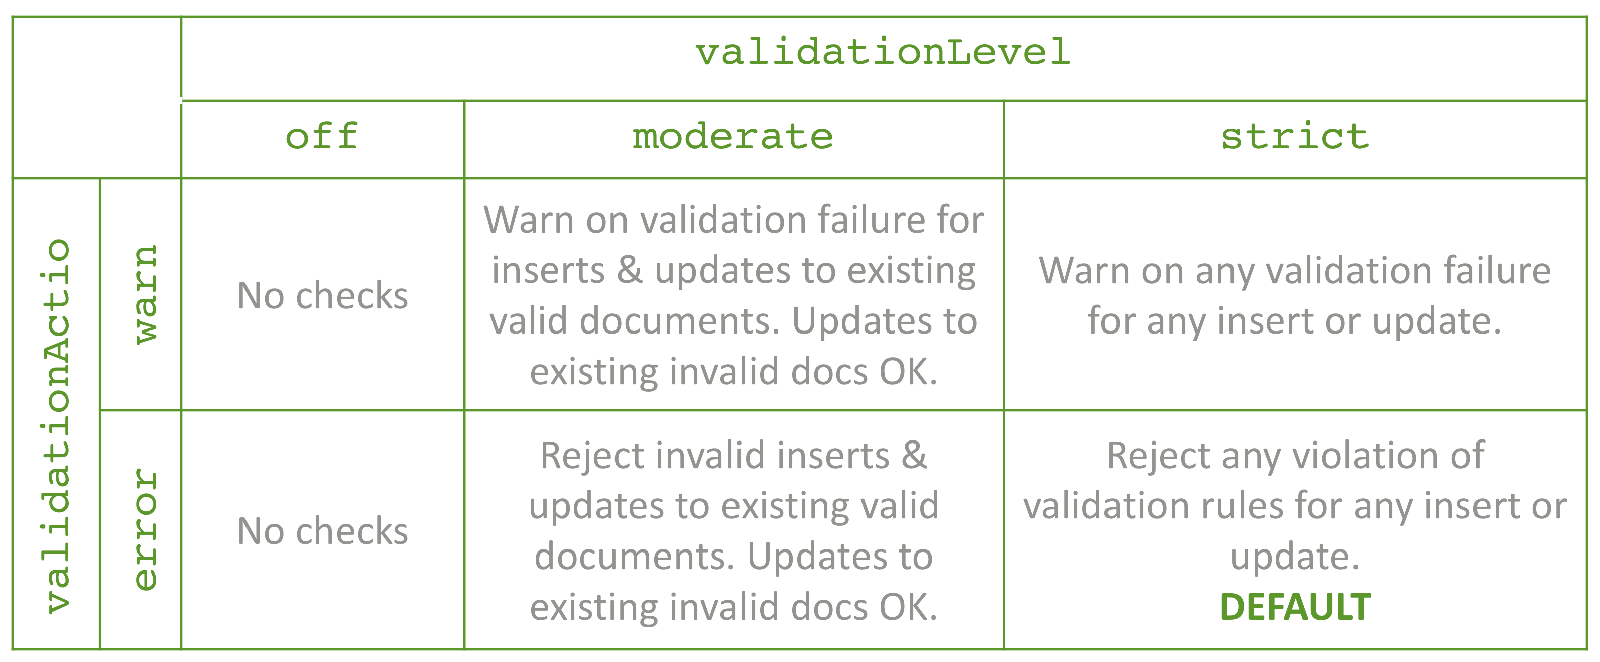
Figure 6: MongoDB document validation configuration parameters

When adding document validation rules to an existing collection, you may want to start with fairly permissive rules so that existing applications aren’t broken before you have chance to clean things up. Once you’re confident that all applications are following the rules you could then become stricter. Figure 7 shows a possible life cycle for a collection.

Life cycle of a MongoDB collection

Figure 7: Life cycle of a MongoDB collection

This post is starting with a new collection and so you can go straight to error/strict as shown in Figure 8.

Set document validation to error/strict

Figure 8: Set document validation to error/strict

Multiple rules for the document can then be added using the GUI (Figure 9). Note that the rule for the email address uses a regular expression (^([a-zA-Z0-9_\\-\\.]+)@((\\[[0-9]{1,3}\\.[0-9]{1,3}\\.[0-9]{1,3}\\.)|(([a-zA-Z0-9\\-]+\\.)+))([a-zA-Z]{2,4}|[0-9]{1,3})(\\]?)$) to test that the address is properly formatted – going further than the original rule.

Add new document validation rule through MongoDB Compass

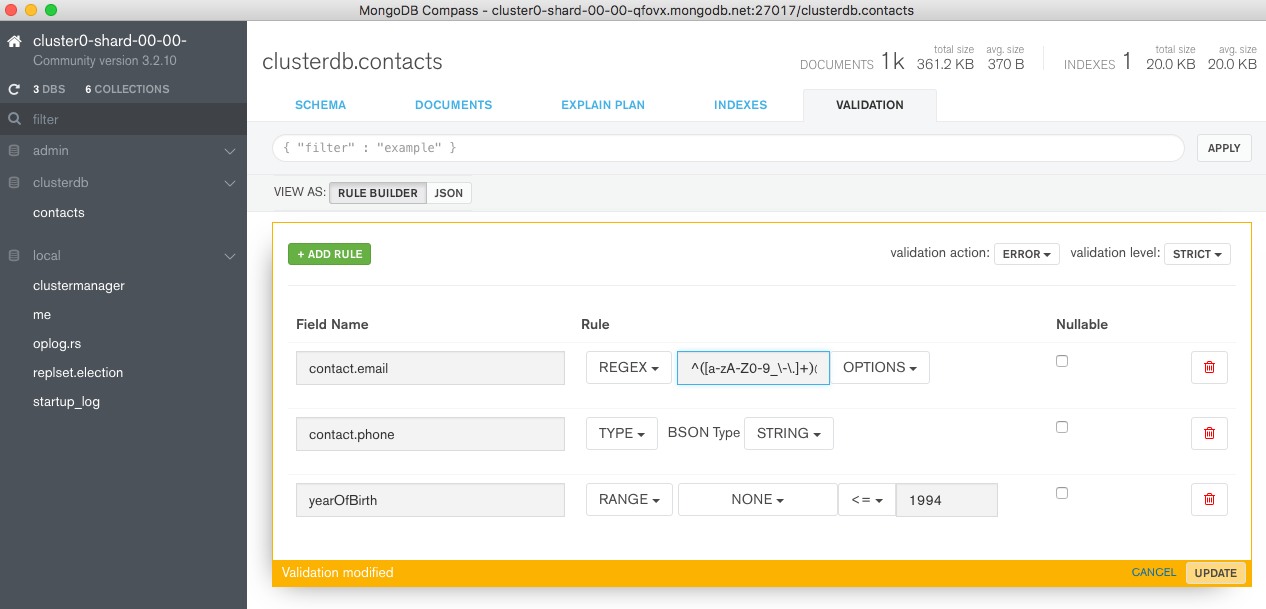
Figure 9: Add new document validation rule through MongoDB Compass

Clicking UPDATE applies the change and then you can review it by pressing the JSON button (Figure 10).

JSON view of new document validation rule

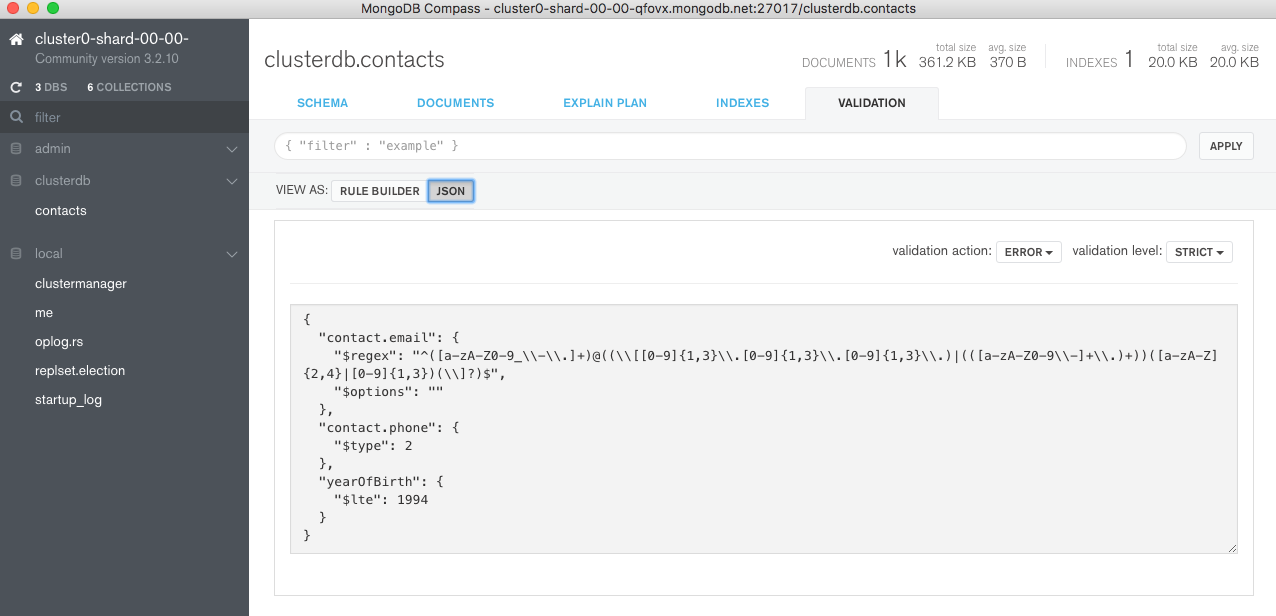
Figure 10: JSON view of new document validation rule

At this point, a problem appears. Compass has combined the 3 sub-rules with an and relationship but our intent was to test that the document contained either an email address or a phone number and that yearOfBirth was no later than 1994. Fortunately, for these more complex checks, the JSON can be altered directly within Compass:

{
  "$and": [
    {"yearOfBirth": {"$lte": 1994}}, 
    {
      "$or": [
        {"contact.email": {
          "$regex": "^([a-zA-Z0-9_\\-\\.]+)@((\\[[0-9]{1,3}\\.[0-9]{1,3}\\.[0-9]{1,3}\\.)|(([a-zA-Z0-9\\-]+\\.)+))([a-zA-Z]{2,4}|[0-9]{1,3})(\\]?)$",
          "$options": ""
          }
        },
        {
          "$and": [
            {"contact.phone": {"$type": 2}},
            {"contact.email": {"$exists": false}}
          ]
        }
      ]
    }
  ]
}

Paste the refined rule into Compass and press UPDATE (Figure 11).

Manually edit validation rules in MongoDB Compass

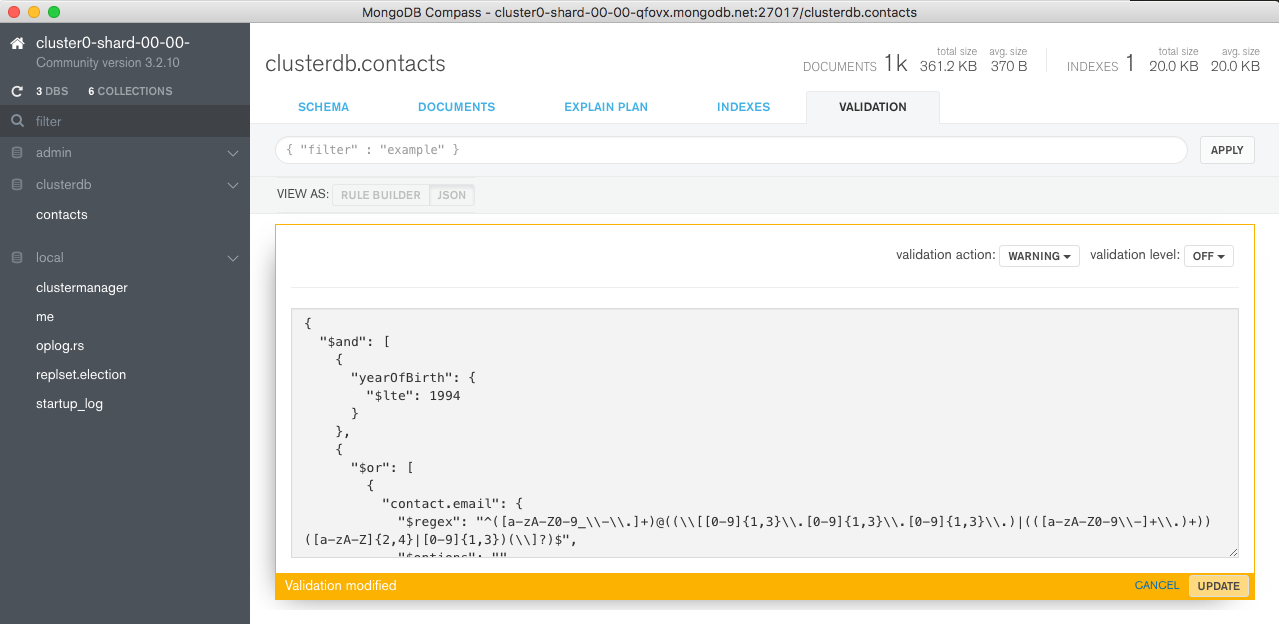
Figure 11: Manually edit validation rules in MongoDB Compass

Recall that this rule checks that the yearOfBirth is no later than 1994 and that there is a phone number (formatted as a string)or a properly formatted email address.

Test The Rules

However you write to the database, the document validation rules are applied in the same way – through any of the drivers, or through the mongo shell. For this post we can test the rules directly from the MongoDB Compass GUI, from the DOCUMENTS tab. Select a document and try changing the yearOfBirth to a year later than 1994 as shown in Figure 12.

hange fails document validation

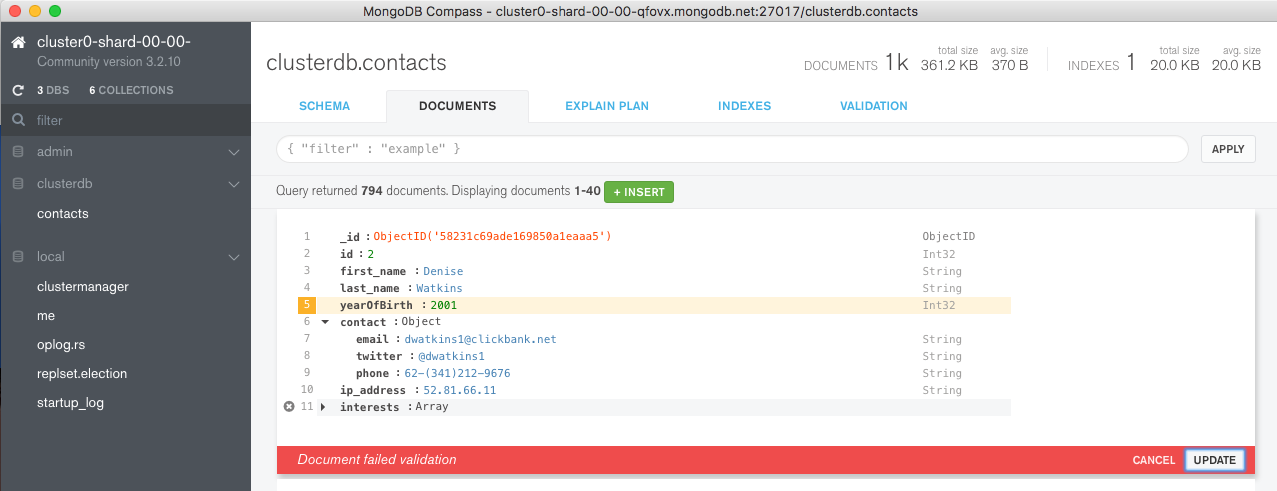
Figure 12: Change fails document validation

Find the Offending Documents Already in the Collection

There are a number of ways to track down existing documents that don’t meet the new rules. A very simple option is to query the database using the negation of the rule definition by wrapping the validation document in a $nor clause:

{"$nor": [
  {
    "$and": [
      {"yearOfBirth": {"$lte": 1994}}, 
      {
        "$or": [
          {"contact.email": {
            "$regex": "^([a-zA-Z0-9_\\-\\.]+)@((\\[[0-9]{1,3}\\.[0-9]{1,3}\\.[0-9]{1,3}\\.)|(([a-zA-Z0-9\\-]+\\.)+))([a-zA-Z]{2,4}|[0-9]{1,3})(\\]?)$",
            "$options": ""
            }
          },
          {"contact.phone": {"$type": 2}}
        ]
      }
    ]
  }]
}

The query document can be pasted into the query bar in Compass and then pressing APPLY reveals that there are 206 documents with yearOfBirth greater than 1994 – Figure 13.

Find documents not matching the validation rules

Figure 13: Find documents not matching the validation rules

Cleaning up Offending Documents

Potentially more problematic is how to clean up the existing documents which do not match the validation rules, as you need to decide what should happen to them. The good news is that the same $nor document used above can be used as a filter when executing your chosen action.

For example, if you decided that the offending documents should not be in the collection at all then this command can be run from the mongo shell command line to delete them:

use clusterdb
db.contacts.remove(
{"$nor": [
  {
    "$and": [
      {"yearOfBirth": {"$lte": 1994}}, 
      {
        "$or": [
          {"contact.email": {
            "$regex": "^([a-zA-Z0-9_\\-\\.]+)@((\\[[0-9]{1,3}\\.[0-9]{1,3}\\.[0-9]{1,3}\\.)|(([a-zA-Z0-9\\-]+\\.)+))([a-zA-Z]{2,4}|[0-9]{1,3})(\\]?)$",
            "$options": ""
            }
          },
          {"contact.phone": {"$type": 2}}
        ]
      }
    ]
  }]
})

Another Example – Coping with Multiple Schema Versions

A tricky problem to solve with RDBMSs is the versioning of data models; with MongoDB it’s very straight-forward to set up validations that can cope with different versions of documents, with each version having a different set of checks applied. In the example validation checks below, the following logic is applied:

  • If the document is unversioned (possibly dating to the time before validations were added), then no checks are applied
  • For version 1, the document is checked to make sure that the name key exists
  • For version 2 documents, the type of the name key is also validated to ensure that it is a string
{"$or": [
  {version: {"$exists": false}},
  {"$and": [
    {version: 1},
    {Name: {"$exists": true}}
  ]},
  {"$and": [
    {version: 2},
    {Name: {"$exists": true, "$type": "string"}}
  ]}
]} 

In this way, multiple versions of documents can exist within the same collection, and the application can lazily up-version them over time. Note that the version attribute is user-defined.

Where MongoDB Document Validation Excels (vs. RDBMSs)

In MongoDB, document validation is simple to set up – especially now that it can be done through the MongoDB Compass GUI. You can avoid the maintenance headache of stored procedures – which for many types of validation would be required in an RDBMS – and because the familiar MongoDB query language is used, there is no new syntax to learn.

The functionality is very flexible and it can enforce constraints on as little or as much of the schema as required. You get the best of both worlds – a dynamic schema for rapidly changing, polymorphic data, with the option to enforce strict validation checks against specific attributes from the onset of your project, or much later on. You can also use the Compass GUI to find and modify individual, pre-existing documents that don’t follow any new rules. If you initially have no validations defined, they can still be added later – even once in production, across thousand of servers.

It is always a concern whether adding extra checks will impact the performance of the system; in our tests, document validation adds a negligible overhead.

So, is all Data Validation Now Done in the Database?

The answer is “probably not” – either because there’s a limit to what can be done in the database or because there will always be a more appropriate place for some checks. Here are some areas to consider:

  • For a good user experience, checks should be made as early and as high up the stack as is sensible. For example, the format of an entered email address should be first checked in the browser rather than waiting for the request to be processed and an attempt made to write it to the database.
  • Any validations which need to compare values between keys, other documents, or external information cannot currently be implemented within the database.
  • Many checks are best made within the application’s business logic – for example “is this user allowed to use these services in their home country”; the checks in the database are primarily there to protect against coding errors.
  • If you need information on why the document failed validation, the developer or application will need to check the document against each of the sub-rules within the collection’s validation rule in turn as the error message doesn’t currently give this level of detail.

Summary

In this post, we’ve taken a look at the powerful document validation functionality that was added back in MongoDB 3.2. We then explored how MongoDB Compass 1.5 adds the convenience of being able to define these rules through an intuitive GUI.

This is just one of the recent enhancements to MongoDB Compass; others include:

A summary of the enhancements added in MongoDB Compass 1.4 & 1.5 can be found in MongoDB 3.4 – What’s New.


Powering Microservices with MongoDB, Docker, Kubernetes & Kafka

Andrew Morgan presenting on Microservices at MongoDB Europe 2016The slides and recording from my session at MongoDB Europe 2016, are now available. The presentation covers Microservices and some of the key technologies that enable them.

Session Summary

Organisations are building their applications around microservice architectures because of the flexibility, speed of delivery, and maintainability they deliver.

Want to try out MongoDB on your laptop? Execute a single command and you have a lightweight, self-contained sandbox; another command removes all trace when you’re done. Need an identical copy of your application stack in multiple environments? Build your own container image and then your entire development, test, operations, and support teams can launch an identical clone environment.

Containers are revolutionising the entire software lifecycle: from the earliest technical experiments and proofs of concept through development, test, deployment, and support. Orchestration tools manage how multiple containers are created, upgraded and made highly available. Orchestration also controls how containers are connected to build sophisticated applications from multiple, microservice containers.

This session introduces you to technologies such as Docker, Kubernetes & Kafka which are driving the microservices revolution. Learn about containers and orchestration – and most importantly how to exploit them for stateful services such as MongoDB.

Recording

Slides


Language-Specific Views in MongoDB 3.4

Language-Specific Views in MongoDB 3.4

Introduction

This post shows you how to create multiple language-specific views on top of a common collection. Each view is optimized for its language with a collated index which only presents entries for documents in that language. Additionally, each view excludes some fields from the underlying collection – further limiting the data that can be seen through the that view. Finally, user-defined roles are created to restrict users to just the view(s) they should be able to see, ensuring they can only access the data that they’re entitled to.

In the course of setting up this environment, a number of features are demonstrated:

  • Read-Only Views (New in MongoDB 3.4): DBAs can define non-materialized views that expose only a subset of data from an underlying collection, i.e. a view that filters out entire documents or specific fields, such as Personally Identifiable Information (PII) from sales data or health records. As a result, risks of data exposure are dramatically reduced. DBAs can define a view of a collection that’s generated from an aggregation over another collection(s) or view.
  • Multiple Language Collations (New in MongoDB 3.4): Applications addressing global audiences require handling content that spans many languages. Each language has different rules governing the comparison and sorting of data. MongoDB collations allow users to build applications that adhere to these language-specific comparison rules for over 100 different languages and locales. Developers can specify collations for collections, indexes, views, or for individual operations.
  • Partial Indexes: Partial indexes balance delivering good query performance while consuming fewer system resources. For example, consider an order processing application. The order collection is frequently queried by the application to display all incomplete orders for a particular user. Building an index on the userID field of the collection is necessary for good performance. However, only a small percentage of orders are in progress at a given time. Limiting the index on userID to contain only orders that are in the “active” state could reduce the number of index entries from millions to thousands, saving working set memory and disk space, while speeding up queries even further as smaller indexes result in faster searches.
  • User Defined Roles: User-defined roles, enable administrators to assign finely-grained privileges to users and applications, based on the specific functionality they require. MongoDB provides the ability to specify user privileges at both the database, collection, and view levels.
  • MongoDB Compass: MongoDB Compass is the easiest way for DBAs to explore and manage MongoDB data. As the GUI for MongoDB, Compass enables users to visually explore their data, and run ad-hoc queries in seconds – all with zero knowledge of MongoDB’s query language. The latest Compass release expands functionality to allow users to manipulate documents directly from the GUI, optimize performance, and create data governance controls.

The Data Set

The example used in this post is built on a collection containing documents for customers from multiple countries – one of the fields indicates a customer’s country, but there is no field that identifies their spoken language. To fix that, we infer their language from their country to create a new language field in each document:

db.customers.updateMany(
    {country: "China"},
    {$set: {language: "Chinese"}})

db.customers.updateMany(
    {country: "Germany"},
    {$set: {language: "German"}})

db.customers.updateMany(
    {country: {$in: ["USA", "Canada", "United Kingdom"]}},
    {$set: {language: "English"}})

A typical document now looks like this:

db.customers.findOne()
{
    "_id" : ObjectId("57fb8fbb99b01440193088eb"),
    "first_name" : "Ben",
    "last_name" : "Dixon",
    "country" : "Germany",
    "avatar" : "https://robohash.org/quiseumquam.bmp?size=50x50&set=set1",
    "ip_address" : "10.102.15.35",
    "dependents" : [
        {
            "name" : "Ben",
            "birthday" : "12-Apr-1994"
        },
        {
            "name" : "Lucas",
            "birthday" : "22-Jun-2016"
        },
        {
            "name" : "Erik",
            "birthday" : "05-Jul-2005"
        }
    ],
    "birthday" : "02-Jul-1964",
    "salary" : "£910070.80",
    "skills" : [
        {
            "skill" : "Cvent"
        },
        {
            "skill" : "TKI"
        }
    ],
    "gender" : "Male",
    "language" : "German"
}

You might ask why we need to add this extra field rather than simply calculating the language each time it’s needed? The answer is that multiple countries share the same language and partial indexes don’t allow us to use the $or or $in operators.

At this stage, the only index on the collection is on the _id field:

db.customers.getIndexes()
[
    {
        "v" : 2,
        "key" : {
            "_id" : 1
        },
        "name" : "_id_",
        "ns" : "production.customers"
    }
]

If you want to work through this example for yourself then the following steps will populate a collection called “customers” in a database called production:

curl -o customers.tgz http://clusterdb.com/upload/customers.tgz
tar fxz customers.tgz
mongorestore

There should be 111,000 documents in the collection after running mongorestore:

use production
db.customers.findOne()
{
    "_id" : ObjectId("57fb8fbb99b01440193088eb"),
    "first_name" : "Ben",
    "last_name" : "Dixon",
    "country" : "Germany",
    "avatar" : "https://robohash.org/quiseumquam.bmp?size=50x50&set=set1",
    "ip_address" : "10.102.15.35",
    "dependents" : [
        {
            "name" : "Ben",
            "birthday" : "12-Apr-1994"
        },
        {
            "name" : "Lucas",
            "birthday" : "22-Jun-2016"
        },
        {
            "name" : "Erik",
            "birthday" : "05-Jul-2005"
        }
    ],
    "birthday" : "02-Jul-1964",
    "salary" : "£910070.80",
    "skills" : [
        {
            "skill" : "Cvent"
        },
        {
            "skill" : "TKI"
        }
    ],
    "gender" : "Male",
    "language" : "German"
}

db.customers.count()
111000

Adding Indexes

Collations – allow values to be compared and sorted using rules specific to a local language. In this example, we are supporting 3 languages: English, German, and Chinese. For each of these languages, a collated index will later be used to correctly sort the customers based on their last and first name.

To this end, collation-specific, compound (last_name + first_name) indexes are created:

db.customers.createIndex( 
    {last_name: 1, first_name : 1 }, 
    {name: "chinese_name_index",
     collation: {locale: "zh" },
     partialFilterExpression: { language: "Chinese" } 
    }
);

db.customers.createIndex( 
    {last_name: 1, first_name : 1 }, 
    {name: "english_name_index",
     collation: {locale: "en" },
     partialFilterExpression: { language: "English" } 
    }
);

db.customers.createIndex( 
    {last_name: 1, first_name : 1 }, 
    {name: "german_name_index",
     collation: {locale: "de" },
     partialFilterExpression: { language: "German" } 
    }
);

The exact behaviour of comparisons and sorting using the collated index can be further refined by including additional parameters alongside the locale in the collation documentation. Details of these optional parameters can be found in the collation documentation.

Note that each of those indexes is partial, only containing entries for document where language is set to the matching value. This saves memory and disk space, and speeds up both reads and writes.

This is the final set of indexes:

db.customers.getIndexes()
[
    {
        "v" : 2,
        "key" : {
            "_id" : 1
        },
        "name" : "_id_",
        "ns" : "production.customers"
    },
    {
        "v" : 2,
        "key" : {
            "last_name" : 1,
            "first_name" : 1
        },
        "name" : "german_name_index",
        "ns" : "production.customers",
        "partialFilterExpression" : {
            "language" : "German"
        },
        "collation" : {
            "locale" : "de",
            "caseLevel" : false,
            "caseFirst" : "off",
            "strength" : 3,
            "numericOrdering" : false,
            "alternate" : "non-ignorable",
            "maxVariable" : "punct",
            "normalization" : false,
            "backwards" : false,
            "version" : "57.1"
        }
    },
    {
        "v" : 2,
        "key" : {
            "last_name" : 1,
            "first_name" : 1
        },
        "name" : "chinese_name_index",
        "ns" : "production.customers",
        "partialFilterExpression" : {
            "language" : "Chinese"
        },
        "collation" : {
            "locale" : "zh",
            "caseLevel" : false,
            "caseFirst" : "off",
            "strength" : 3,
            "numericOrdering" : false,
            "alternate" : "non-ignorable",
            "maxVariable" : "punct",
            "normalization" : false,
            "backwards" : false,
            "version" : "57.1"
        }
    },
    {
        "v" : 2,
        "key" : {
            "last_name" : 1,
            "first_name" : 1
        },
        "name" : "english_name_index",
        "ns" : "production.customers",
        "partialFilterExpression" : {
            "language" : "English"
        },
        "collation" : {
            "locale" : "en",
            "caseLevel" : false,
            "caseFirst" : "off",
            "strength" : 3,
            "numericOrdering" : false,
            "alternate" : "non-ignorable",
            "maxVariable" : "punct",
            "normalization" : false,
            "backwards" : false,
            "version" : "57.1"
        }
    }
]

Create Views

A view is created for each language to:

  • Filter out any documents where the language field doesn’t match that of the view
  • Remove the salary, country, and language fields
  • Indicate which collation should be used
db.createView(
    "chineseSpeakersRedacted",
    "customers",
    [
        {$match: {
            language: "Chinese",
            last_name: {$exists: true}
        }},
        {$project: {
            salary: 0, 
            country: 0,
            language: 0
            }
        }
    ],
    {collation: {locale: "zh"}}
)

db.createView(
    "englishSpeakersRedacted",
    "customers",
    [
        {$match: {
            language: "English",
            last_name: {$exists: true}
        }},
        {$project: {
            salary: 0, 
            country: 0,
            language: 0
            }
        }
    ],
    {collation: {locale: "en"}}
)

db.createView(
    "germanSpeakersRedacted",
    "customers",
    [
        {$match: {
            language: "German",
            last_name: {$exists: true}
        }},
        {$project: {
            salary: 0, 
            country: 0,
            language: 0
            }
        }
    ],
    {collation: {locale: "de"}}
)

You might ask why last_name: {$exists: true} is included in the $match stage? The reason is that it encourages the optimizer to use our language-specific partial indexes when using these views.

Note that this is using the MongoDB Aggregation Framework and so you could add lots of other operations, including: unwinding arrays, looking up values from other collections, grouping data, and adding new, computed fields.

The views now appear like collections and can be queried in the same manner (note that they are ready-only):

show collections

chineseSpeakersRedacted
customers
englishSpeakersRedacted
germanSpeakersRedacted
system.views

db.germanSpeakersRedacted.find({last_name: "Cole"}, {first_name:1, _id:0, gender:1}).sort({first_name: 1})
{ "first_name" : "Amelie", "gender" : "Female" }
{ "first_name" : "Anna", "gender" : "Female" }
{ "first_name" : "Anton", "gender" : "Male" }

The query above searches for all documents where the last_name is Cole (because this query is using the German view, behind the scenes, all non-German documents have already been filtered out), discards all but the first_name and gender fields, and then sorts by the first_name (using the German collation).

explain() confirms that the German collation index was used:

db.germanSpeakersRedacted.find({last_name: "Cole"}, {first_name:1, _id:0, gender:1}).sort({first_name: 1}).explain()
{
    "stages" : [
        {
            "$cursor" : {
                "query" : {
                    "$and" : [
                        {
                            "language" : "German",
                            "last_name" : {
                                "$exists" : true
                            }
                        },
                        {
                            "last_name" : "Cole"
                        }
                    ]
                },
                "fields" : {
                    "first_name" : 1,
                    "gender" : 1,
                    "_id" : 0
                },
                "queryPlanner" : {
                    "plannerVersion" : 1,
                    "namespace" : "production.customers",
                    "indexFilterSet" : false,
                    "parsedQuery" : {
                        "$and" : [
                            {
                                "language" : {
                                    "$eq" : "German"
                                }
                            },
                            {
                                "last_name" : {
                                    "$eq" : "Cole"
                                }
                            },
                            {
                                "last_name" : {
                                    "$exists" : true
                                }
                            }
                        ]
                    },
                    "collation" : {
                        "locale" : "de",
                        "caseLevel" : false,
                        "caseFirst" : "off",
                        "strength" : 3,
                        "numericOrdering" : false,
                        "alternate" : "non-ignorable",
                        "maxVariable" : "punct",
                        "normalization" : false,
                        "backwards" : false,
                        "version" : "57.1"
                    },
                    "winningPlan" : {
                        "stage" : "FETCH",
                        "filter" : {
                            "$and" : [
                                {
                                    "last_name" : {
                                        "$exists" : true
                                    }
                                },
                                {
                                    "language" : {
                                        "$eq" : "German"
                                    }
                                }
                            ]
                        },
                        "inputStage" : {
                            "stage" : "IXSCAN",
                            "keyPattern" : {
                                "last_name" : 1,
                                "first_name" : 1
                            },
                            "indexName" : "german_name_index",
                            "collation" : {
                                "locale" : "de",
                                "caseLevel" : false,
                                "caseFirst" : "off",
                                "strength" : 3,
                                "numericOrdering" : false,
                                "alternate" : "non-ignorable",
                                "maxVariable" : "punct",
                                "normalization" : false,
                                "backwards" : false,
                                "version" : "57.1"
                            },
                            "isMultiKey" : false,
                            "multiKeyPaths" : {
                                "last_name" : [ ],
                                "first_name" : [ ]
                            },
                            "isUnique" : false,
                            "isSparse" : false,
                            "isPartial" : true,
                            "indexVersion" : 2,
                            "direction" : "forward",
                            "indexBounds" : {
                                "last_name" : [
                                    "[\"-E?1\u0001\b\u0001\u0007\", \"-E?1\u0001\b\u0001\u0007\"]"
                                ],
                                "first_name" : [
                                    "[MinKey, MaxKey]"
                                ]
                            }
                        }
                    },
                    "rejectedPlans" : [ ]
                }
            }
        },
        {
            "$project" : {
                "language" : false,
                "country" : false,
                "salary" : false
            }
        },
        {
            "$sort" : {
                "sortKey" : {
                    "first_name" : 1
                }
            }
        },
        {
            "$project" : {
                "_id" : false,
                "gender" : true,
                "first_name" : true
            }
        }
    ],
    "ok" : 1

User-Defined Roles – Limiting Access to the Views

One of the reasons for creating the views was to protect some of the data (the customers’ salaries) as not all users should see this information. At this point, all users can still access the base “customers” collection and so we’ve fallen short of that objective. User-defined roles to the rescue!

We create an admin user that has the built in root role and so can access any database, create new users, and perform any other activity:

use admin
db.createUser({
    user: "admin",
    pwd: "secret",
    roles: [
        {role:"root",db:"admin"}
        ]
    })

The next step is to create a role that only gives its members read access to the germanSpeakersRedacted collection (within the production database):

use admin
db.createRole(
   {
     role: "germanViewer",
     privileges: [
       { resource: { db: "production", collection: "germanSpeakersRedacted" },  actions: [ "find" ] }
     ],
     roles: []
   }
)

You can then create one or more users that have germanViewer within their defined roles:

use admin
db.createUser({
    user: "germanIT",
    pwd: "secret",
    roles: [
        {role:"germanViewer",db:"admin"}
        ]
    })

Additional privileges can be added to existing roles using grantPrivilegesToRole and extra roles can be assigned to existing users using grantRolesToUser.

For these access controls to work, users must be created with appropriate permissions and the MongoDB server process must be started with the --auth option:

mongod --auth

When connecting to the database as our newly-created admin user, the base customers collection is still accessible:

mongo -u admin -p secret --authenticationDatabase admin

use production
db.customers.findOne()

{
    "_id" : ObjectId("57fb8fbb99b01440193088eb"),
    "first_name" : "Ben",
    "last_name" : "Dixon",
    "country" : "Germany",
    "avatar" : "https://robohash.org/quiseumquam.bmp?size=50x50&set=set1",
    "ip_address" : "10.102.15.35",
    "dependents" : [
        {
            "name" : "Ben",
            "birthday" : "12-Apr-1994"
        },
        {
            "name" : "Lucas",
            "birthday" : "22-Jun-2016"
        },
        {
            "name" : "Erik",
            "birthday" : "05-Jul-2005"
        }
    ],
    "birthday" : "02-Jul-1964",
    "salary" : "£910070.80",
    "skills" : [
        {
            "skill" : "Cvent"
        },
        {
            "skill" : "TKI"
        }
    ],
    "gender" : "Male",
    "language" : "German"
}

When connecting as the germanIT user, only the German view can be accessed:

mongo -u germanIT -p secret --authenticationDatabase admin

use production

show collections
2016-10-28T10:24:03.765+0100 E QUERY    [main] Error: listCollections failed: {
    "ok" : 0,
    "errmsg" : "not authorized on production to execute command { listCollections: 1.0, filter: {} }",
    "code" : 13,
    "codeName" : "Unauthorized"
} :
_getErrorWithCode@src/mongo/shell/utils.js:25:13
DB.prototype._getCollectionInfosCommand@src/mongo/shell/db.js:805:1
DB.prototype.getCollectionInfos@src/mongo/shell/db.js:817:19
DB.prototype.getCollectionNames@src/mongo/shell/db.js:828:16
shellHelper.show@src/mongo/shell/utils.js:748:9
shellHelper@src/mongo/shell/utils.js:645:15
@(shellhelp2):1:1

db.customers.findOne()
2016-10-21T14:40:19.477+0100 E QUERY    [main] Error: error: {
    "ok" : 0,
    "errmsg" : "not authorized on production to execute command { find: \"customers\", filter: {}, limit: 1.0, singleBatch: true }",
    "code" : 13,
    "codeName" : "Unauthorized"
} :
_getErrorWithCode@src/mongo/shell/utils.js:25:13
DBCommandCursor@src/mongo/shell/query.js:702:1
DBQuery.prototype._exec@src/mongo/shell/query.js:117:28
DBQuery.prototype.hasNext@src/mongo/shell/query.js:288:5
DBCollection.prototype.findOne@src/mongo/shell/collection.js:294:10
@(shell):1:1

db.germanSpeakersRedacted.findOne()
{
    "_id" : ObjectId("57fb8fbb99b01440193088eb"),
    "first_name" : "Ben",
    "last_name" : "Dixon",
    "avatar" : "https://robohash.org/quiseumquam.bmp?size=50x50&set=set1",
    "ip_address" : "10.102.15.35",
    "dependents" : [
        {
            "name" : "Ben",
            "birthday" : "12-Apr-1994"
        },
        {
            "name" : "Lucas",
            "birthday" : "22-Jun-2016"
        },
        {
            "name" : "Erik",
            "birthday" : "05-Jul-2005"
        }
    ],
    "birthday" : "02-Jul-1964",
    "skills" : [
        {
            "skill" : "Cvent"
        },
        {
            "skill" : "TKI"
        }
    ],
    "gender" : "Male"
}

MongoDB Compass – Viewing Views Graphically

While the mongo shell is very powerful and flexible, it is often easier to understand and navigate your data graphically, this is where MongoDB Compass is invaluable. The good news is that MongoDB Compass handles views in exactly the same way as it does collections.

In Figure 1, we can view the documents in the base, customers, collection. Note that the salary value is visible.

View data in MongoDB base customers collection

Figure 1: View data in base customers collection

Figure 2 confirms that the salary field has been removed from the German view.

Salary has been redacted from the German view

Figure 2: Salary has been redacted from the German view

In Figure 3, we see that only Chinese documents have been included in the Chinese view.

Chinese view contains only Chinese documents

Figure 3: Chinese view contains only Chinese documents

Next Steps

Collation and read-only views are just 2 of the exciting new features added in MongoDB 3.4 – read more and these and everything else that’s new in MongoDB 3.4: What’s New.


Webinar Replay (EMEA) – Data Streaming with Apache Kafka & MongoDB

MongoDB with Apache Kafka

The replay from the MongoDB/Apache Kafka webinar that I co-presented with David Tucker from Confluent earlier this week is now available:

The replay is now available: Data Streaming with Apache Kafka & MongoDB.

Abstract

A new generation of technologies is needed to consume and exploit today’s real time, fast moving data sources. Apache Kafka, originally developed at LinkedIn, has emerged as one of these key new technologies.

This webinar explores the use-cases and architecture for Kafka, and how it integrates with MongoDB to build sophisticated data-driven applications that exploit new sources of data.

Watch the webinar to learn:

  • What MongoDB is and where it’s used
  • What data streaming is and where it fits into modern data architectures
  • How Kafka works, what it delivers, and where it’s used
  • How to operationalize the Data Lake with MongoDB & Kafka
  • How MongoDB integrates with Kafka – both as a producer and a consumer of event – data

Slides


Processing Data Streams with Amazon Kinesis and MongoDB Atlas

This post provides an introduction to Amazon Kinesis: its architecture, what it provides, and how it’s typically used. It goes on to step through how to implement an application where data is ingested by Amazon Kinesis before being processed and then stored in MongoDB Atlas.

This is part of a series of posts which examine how to use MongoDB Atlas with a number of complementary technologies and frameworks.

Introduction to Amazon Kinesis

The role of Amazon Kinesis is to get large volumes of streaming data into AWS where it can then be processed, analyzed, and moved between AWS services. The service is designed to ingest and store terabytes of data every hour, from multiple sources. Kinesis provides high availability, including synchronous replication within an AWS region. It also transparently handles scalability, adding and removing resources as needed.

Once the data is inside AWS, it can be processed or analyzed immediately, as well as being stored using other AWS services (such as S3) for later use. By storing the data in MongoDB, it can be used both to drive real-time, operational decisions as well as for deeper analysis.

As the number, variety, and velocity of data sources grow, new architectures and technologies are needed. Technologies like Amazon Kinesis and Apache Kafka are focused on ingesting the massive flow of data from multiple fire hoses and then routing it to the systems that need it – optionally filtering, aggregating, and analyzing en-route.

AWS Kinesis Architecture

Figure 1: AWS Kinesis Architecture

Typical data sources include:

  • IoT assets and devices(e.g., sensor readings)
  • On-line purchases from an ecommerce store
  • Log files
  • Video game activity
  • Social media posts
  • Financial market data feeds

Rather than leave this data to fester in text files, Kinesis can ingest the data, allowing it to be processed to find patterns, detect exceptions, drive operational actions, and provide aggregations to be displayed through dashboards.

There are actually 3 services which make up Amazon Kinesis:

  • Amazon Kinesis Firehose is the simplest way to load massive volumes of streaming data into AWS. The capacity of your Firehose is adjusted automatically to keep pace with the stream throughput. It can optionally compress and encrypt the data before it’s stored.
  • Amazon Kinesis Streams are similar to the Firehose service but give you more control, allowing for:
    • Multi-stage processing
    • Custom stream partitioning rules
    • Reliable storage of the stream data until it has been processed.
  • Amazon Kinesis Analytics is the simplest way to process the data once it has been ingested by either Kinesis Firehose or Streams. The user provides SQL queries which are then applied to analyze the data; the results can then be displayed, stored, or sent to another Kinesis stream for further processing.

This post focuses on Amazon Kinesis Streams, in particular, implementing a consumer that ingests the data, enriches it, and then stores it in MongoDB.

Accessing Kinesis Streams – the Libraries

There are multiple ways to read (consume) and write (produce) data with Kinesis Streams:

  • Amazon Kinesis Streams API
  • Amazon Kinesis Producer Library (KPL)
    • Easy to use and highly configurable Java library that helps you put data into an Amazon Kinesis stream. Amazon Kinesis Producer Library (KPL) presents a simple, asynchronous, high throughput, and reliable interface.
  • Amazon Kinesis Agent
    • The agent continuously monitors a set of files and sends new entries to your Stream or Firehose.
  • Amazon Kinesis Client Library (KCL)
    • A Java library that helps you easily build Amazon Kinesis Applications for reading and processing data from an Amazon Kinesis stream. KCL handles issues such as adapting to changes in stream volume, load-balancing streaming data, coordinating distributed services, providing fault-tolerance, and processing data.
  • Amazon Kinesis Client Library MultiLangDemon
    • The MultiLangDemon is used as a proxy by non-Java applications to use the Kinesis Client Library.
  • Amazon Kinesis Connector Library
    • A library that helps you easily integrate Amazon Kinesis with other AWS services and third-party tools.
  • Amazon Kinesis Storm Spout
    • A library that helps you easily integrate Amazon Kinesis Streams with Apache Storm.

The example application in this post use the Kinesis Agent and the Kinesis Client Library MultiLangDemon (with Node.js).

Role of MongoDB Atlas

MongoDB is a distributed database delivering a flexible schema for rapid application development, rich queries, idiomatic drivers, and built in redundancy and scale-out. This makes it the go-to database for anyone looking to build modern applications.

MongoDB Atlas is a hosted database service for MongoDB. It provides all of the features of MongoDB, without the operational heavy lifting required for any new application. MongoDB Atlas is available on demand through a pay-as-you-go model and billed on an hourly basis, letting you focus on what you do best.

It’s easy to get started – use a simple GUI to select the instance size, region, and features you need. MongoDB Atlas provides:

  • Security features to protect access to your data
  • Built in replication for always-on availability, tolerating complete data center failure
  • Backups and point in time recovery to protect against data corruption
  • Fine-grained monitoring to let you know when to scale. Additional instances can be provisioned with the push of a button
  • Automated patching and one-click upgrades for new major versions of the database, enabling you to take advantage of the latest and greatest MongoDB features
  • A choice of regions and billing options

Like Amazon Kinesis, MongoDB Atlas is a natural fit for users looking to simplify their development and operations work, letting them focus on what makes their application unique rather than commodity (albeit essential) plumbing. Also like Kinesis, you only pay for MongoDB Atlas when you’re using it with no upfront costs and no charges after you terminate your cluster.

Example Application

The rest of this post focuses on building a system to process log data. There are 2 sources of log data:

  1. A simple client that acts as a Kinesis Streams producer, generating sensor readings and writing them to a stream
  2. Amazon Kinesis Agent monitoring a SYSLOG file and sending each log event to a stream

In both cases, the data is consumed from the stream using the same consumer, which adds some metadata to each entry and then stores it in MongoDB Atlas.

Create Kinesis IAM Policy in AWS

From the IAM section of the AWS console use the wizard to create a new policy. The policy should grant permission to perform specific actions on a particular stream (in this case “ClusterDBStream”) and the results should look similar to this:

Next, create a new user and associate it with the new policy. Important: Take a note of the AWS_ACCESS_KEY_ID and AWS_SECRET_ACCESS_KEY.

Create MongoDB Atlas Cluster

Register with MongoDB Atlas and use the simple GUI to select the instance size, region, and features you need (Figure 2).

create mongodb atlas cluster

Create a user with read and write privileges for just the database that will be used for your application, as shown in Figure 3.

Creating an Application user in MongoDB Atlas

Figure 3: Creating an Application user in MongoDB Atlas

You must also add the IP address of your application server to the IP Whitelist in the MongoDB Atlas security tab (Figure 4). Note that if multiple application servers will be accessing MongoDB Atlas then an IP address range can be specified in CIDR format (IP Address/number of significant bits).

Add App Server IP Address(es) to MongoDB Atlas

Figure 4: Add App Server IP Address(es) to MongoDB Atlas

If your application server(s) are running in AWS, then an alternative to IP Whitelisting is to configure a VPC (Virtual Private Cloud) Peering relationship between your MongoDB Atlas group and the VPC containing your AWS resources. This removes the requirement to add and remove IP addresses as AWS reschedules functions, and is especially useful when using highly dynamic services such as AWS Lambda.

Click the “Connect” button and make a note of the URI that should be used when connecting to the database (note that you will substitute the user name and password with ones that you’ve just created).

App Part 1 – Kinesis/Atlas Consumer

The code and configuration files in Parts 1 & 2 are based on the sample consumer and producer included with the client library for Node.js (MultiLangDaemon).

Install the Node.js client library:

git clone https://github.com/awslabs/amazon-kinesis-client-nodejs.git
cd amazon-kinesis-client-nodejs
npm install

Install the MongoDB Node.js Driver:

npm install --save mongodb

Move to the consumer sample folder:

cd samples/basic_sample/consumer/

Create a configuration file (“logging_consumer.properties”), taking care to set the correct stream and application names and AWS region:

The code for working with MongoDB can be abstracted to a helper file (“db.js”):

Create the application Node.js file (“logging_consumer_app.js”), making sure to replace the database user and host details in “mongodbConnectString” with your own:

Note that this code adds some metadata to the received object before writing it to MongoDB. At this point, it is also possible to filter objects based on any of their fields.

Note also that this Node.js code logs a lot of information to the “application log” file (including the database password!); this is for debugging and would be removed from a real application.

The simplest way to have the application use the user credentials (noted when creating the user in AWS IAM) is to export them from the shell where the application will be launched:

export AWS_ACCESS_KEY_ID=????????????????????
export AWS_SECRET_ACCESS_KEY=????????????????????????????????????????

Finally, launch the consumer application:

../../../bin/kcl-bootstrap --java /usr/bin/java -e -p ./logging_consumer.properties

Check the “application.log” file for any errors.

App Part 2 – Kinesis Producer

As for the consumer, export the credentials for the user created in AWS IAM:

cd amazon-kinesis-client-nodejs/samples/basic_sample/producer

export AWS_ACCESS_KEY_ID=????????????????????
export AWS_SECRET_ACCESS_KEY=????????????????????????????????????????

Create the configuration file (“config.js”) and ensure that the correct AWS region and stream are specified:

Create the producer code (“logging_producer.js”):

The producer is launched from “logging_producer_app.js”:

Run the producer:

node logging_producer_app.js

Check the consumer and producer “application.log” files for errors.

At this point, data should have been written to MongoDB Atlas. Using the connection string provided after clicking the “Connect” button in MongoDB Atlas, connect to the database and confirm that the documents have been added:

App Part 3 – Capturing Live Logs Using Amazon Kinesis Agent

Using the same consumer, the next step is to stream real log data. Fortunately, this doesn’t require any additional code as the Kinesis Agent can be used to monitor files and add every new entry to a Kinesis Stream (or Firehose).

Install the Kinesis Agent:

sudo yum install –y aws-kinesis-agent

and edit the configuration file to use the correct AWS region, user credentials, and stream in “/etc/aws-kinesis/agent.json”:

“/var/log/messages” is a SYSLOG file and so a “dataProcessingOptions” field is included in the configuration to automatically convert each log into a JSON document before writing it to the Kinesis Stream.

The agent will not run as root and so the permissions for “/var/log/messages” need to be made more permissive:

sudo chmod og+r /var/log/messages

The agent can now be started:

sudo service aws-kinesis-agent start

Monitor the agent’s log file to see what it’s doing:

sudo tail -f /var/log/aws-kinesis-agent/aws-kinesis-agent.log

If there aren’t enough logs being generated on the machine then extra ones can be injected manually for testing:

logger -i This is a test log

This will create a log with the “program” field set to your username (in this case, “ec2-user”). Check that the logs get added to MongoDB Atlas:

Checking the Data with MongoDB Compass

To visually navigate through the MongoDB schema and data, download and install MongoDB Compass. Use your MongoDB Atlas credentials to connect Compass to your MongoDB database (the hostname should refer to the primary node in your replica set or a “mongos” process if your MongoDB cluster is sharded).

Navigate through the structure of the data in the “clusterdb” database (Figure 5) and view the JSON documents.

Explore Schema Using MongoDB Compass

Figure 5: Explore Schema Using MongoDB Compass

Clicking on a value builds a query and then clicking “Apply” filters the results (Figure 6).

View Filtered Documents in MongoDB Compass

Figure 6: View Filtered Documents in MongoDB Compass

Add Document Validation Rules

One of MongoDB’s primary attractions for developers is that it gives them the ability to start application development without first needing to define a formal schema. Operations teams appreciate the fact that they don’t need to perform a time-consuming schema upgrade operation every time the developers need to store a different attribute.

This is well suited to the application built in this post as logs from different sources are likely to include different attributes. There are however some attributes that we always expect to be there (e.g., the metadata that the application is adding). For applications reading the documents from this collection to be able to rely on those fields being present, the documents should be validated before they are written to the database. Prior to MongoDB 3.2, those checks had to be implemented in the application but they can now be performed by the database itself.

Executing a single command from the “mongo” shell adds the document checks:

The above command adds multiple checks:

  • The “program” field exists and contains a string
  • There’s a sub-document called “metadata” containing at least 2 fields:
  • “mongoLabel” which must be a string
  • “timeAdded” which must be a date

Test that the rules are correctly applied when attempting to write to the database:

Cleaning Up (IMPORTANT!)

Remember that you will continue to be charged for the services even when you’re no longer actively using them. If you no longer need to use the services then clean up:

  • From the MongoDB Atlas GUI, select your Cluster, click on the ellipses and select “Terminate”.
  • From the AWS management console select the Kinesis service, then Kinesis Streams, and then delete your stream.
  • From the AWS management console select the DynamoDB service, then tables, and then delete your table.

Using MongoDB Atlas with Other Frameworks and Services

We have detailed walkthroughs for using MongoDB Atlas with several programming languages and frameworks, as well as generic instructions that can be used with others. They can all be found in Using MongoDB Atlas From Your Favorite Language or Framework.


Building Microservices with MongoDB, Docker, Kubernetes & Kafka

Building Microservices with Docker, Kubernetes, Kafka & MongoDB

Building Microservices with Docker, Kubernetes, Kafka & MongoDB

As part of MongoDB Europe on 15th November, I’ll be presenting on Microservices and some of the key technologies that enable them. Tickets are still available and the discount code andrewmorgan20 saves you 20% – register here.

Session Abstract

Organisations are building their applications around microservice architectures because of the flexibility, speed of delivery, and maintainability they deliver.

Want to try out MongoDB on your laptop? Execute a single command and you have a lightweight, self-contained sandbox; another command removes all trace when you’re done. Need an identical copy of your application stack in multiple environments? Build your own container image and then your entire development, test, operations, and support teams can launch an identical clone environment.

Containers are revolutionising the entire software lifecycle: from the earliest technical experiments and proofs of concept through development, test, deployment, and support. Orchestration tools manage how multiple containers are created, upgraded and made highly available. Orchestration also controls how containers are connected to build sophisticated applications from multiple, microservice containers.

This session introduces you to technologies such as Docker, Kubernetes & Kafka which are driving the microservices revolution. Learn about containers and orchestration – and most importantly how to exploit them for stateful services such as MongoDB.