Tag Archive for serverless

How to create Dynamic Custom Roles with MongoDB Stitch

None of us want to write lots of code to control what data each user can access. In most cases, you can set up your data access controls in seconds by using Stitch’s built-in templates, e.g., “Users can read and write their own data” or “Users can read and write their own data. Users that belong to a sharing list can read that data”. Stitch also lets you create custom roles that you tailor to your application and schema – this post creates such a rule, querying a second collection when deciding whether to allow a user to insert a document.

The application is a troll-free timeline where you can only tag another user in a post if that user has labeled you as a trusted friend. I’ve already created a database called safeplace for the collections.

The users collection includes a list of usernames for their trusted friends (peopleWhoCanTagMe):

{
    "_id" : ObjectId("5c9273127558d01d93f53dc0"),
    "username" : "alovelace",
    "name" : {
        "first" : "Ada",
        "last" : "Lovelace"
    },
    "peopleWhoCanTagMe" : [
        "jeckert",
        "jmauchly"
    ]
}

You then need to create a data access rule for the posts collection, consisting of 2 roles, which Stitch evaluates in sequence:
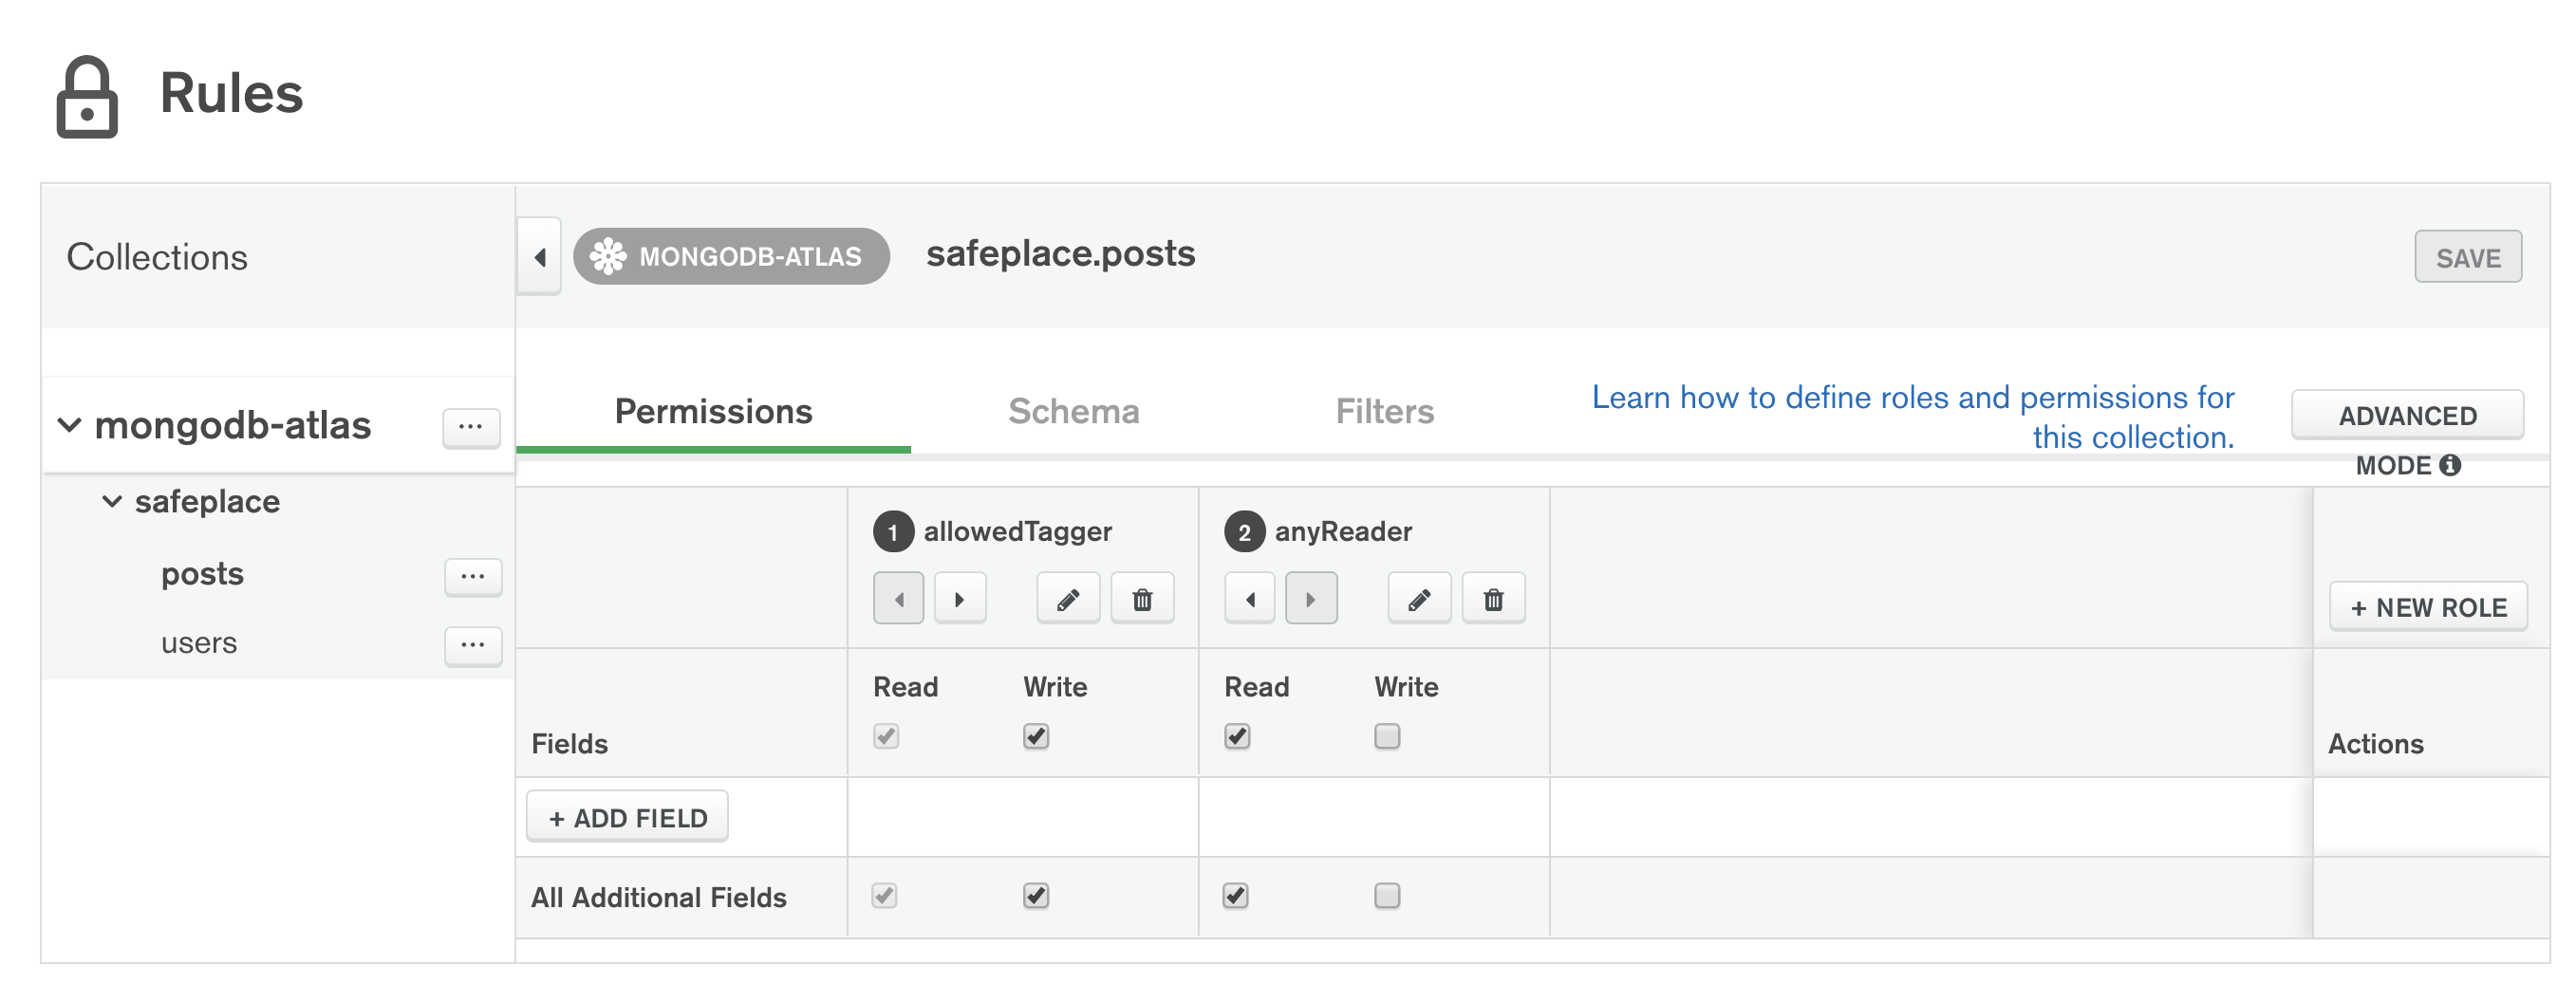
Creating custom roles for Stitch data access control rules

The second, anyReader, role lets anyone read any post, but the role we care about is allowedTagger which controls what the application can write to the collection.

The allowedTagger role is defined using this JSON expression:

{
  "%%true": {
    "%function": {
      "name": "canTheyTag",
      "arguments": [
        "%%root.poster",
        "%%root.tagged"
      ]
    }
  }
}

%%root represents the document that the user is attempting to insert. The poster and tagged attributes of the document to be written are the usernames of the author and their claimed friend. The JSON expression passes them as parameters to a Stitch function named canTheyTag:

exports = function(poster, tagged){
  var collection = context.services.get("mongodb-atlas")
    .db("safeplace").collection("users");
  return collection.findOne({username: tagged})
  .then ( userDoc => { 
    return (userDoc.peopleWhoCanTagMe.indexOf(poster) > -1);
  }).catch( e => { console.log(e); return false; }); 
};

This searches the users collection for the tagged user and then checks that the poster’s username appears in the peopleWhoCanTagMe array in the retrieved document.

You can test this new rule using the mongo shell (courtesy of Stitch’s MongoDB Connection String feature). Initially, I’m not included in Ada’s list of friends and so trying to tag her in a post fails:

db.posts.insert({ 
    poster: "amorgan", 
    tagged: "alovelace", 
    post: "Just sent you a pull request" })

WriteCommandError({ "ok" : 0, "errmsg" : "insert not permitted" })

The logs show that the insert didn’t match our customer role but that it did match the second (anyReader), but that inserts aren’t allowed for that role:

Logs:
[
  "uncaught promise rejection: StitchError: insert not permitted"
]
Error:
role anyReader does not have insert permission
Stack Trace:
StitchError: insert not permitted
{
  "name": "insertOne",
  "service": "mongodb-atlas"
}
Compute Used: 936719 bytes•ms

Ada then adds me as a trusted friend:

db.users.update(
    {username: "alovelace"}, 
    {$push: {peopleWhoCanTagMe: "amorgan"}}
)

My second attempt to tag her in a post succeeds:

db.posts.insert({
    poster: "amorgan", 
    tagged: "alovelace", 
    post: "Just sent you a pull request" })

WriteResult({ "nInserted" : 1 })

I recently had someone ask me how to implement “traditional database roles” using Stitch, i.e. an administrator explicitly defines which user ids belong to a specific role, and then use that role to determine whether they can access a collection. You can use this same approach for that use case – have a collection that assigns users to roles and then find the user id in that collection from a Stitch function that’s used in roles for the collections you want to protect. You could then optimize the rules by including the users’ roles as an attribute in their authentication token – but I’ll save that for a future post!


Stitch & Mobile Webinar Questions & Replay

How do you test MongoDB Stitch functions, how do you store Stitch triggers, and what services can you integrate Stitch with? These were some of the great questions that were asked and answered in my recent webinar. You can watch the replay of “MongoDB Mobile and MongoDB Stitch – Introduction and Latest Developments” here, or read on as I share the answers to those questions here.

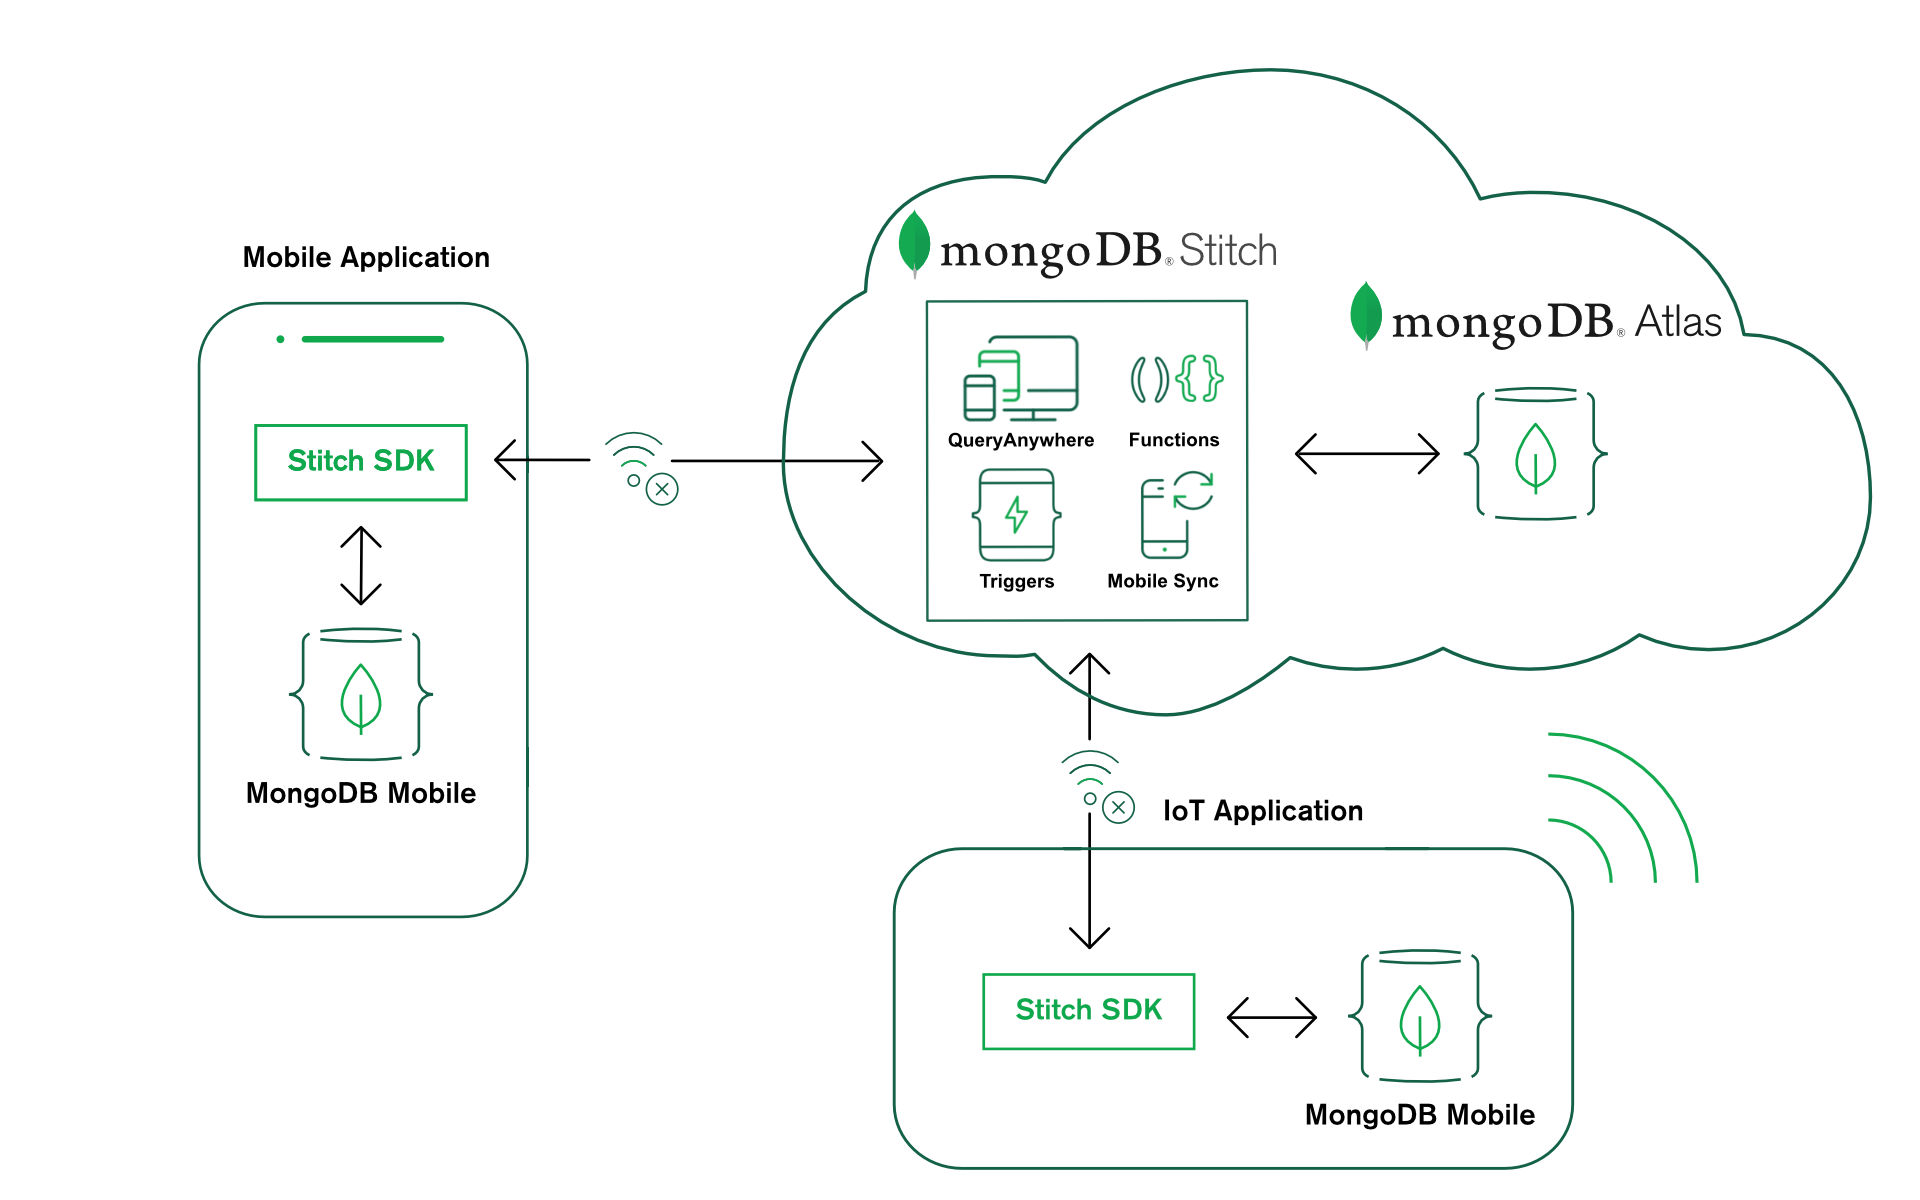
For those new to MongoDB Stitch, it’s the serverless platform from MongoDB that isolates complexity and ‘plumbing’ so you can build applications faster. Stitch went GA in June 2018, and we recently added a set of new capabilities, including global Stitch apps, more AWS services, a React Native SDK, and the beta for Stitch Mobile Sync. MongoDB Mobile is an embedded version of the MongoDB database that you can embed in your mobile or IoT apps.

Building mobile apps with MongoDB Mobile, MongoDB Stitch, and MongoDB Atlas

These are some of the questions I thought might be of interest:

How do you test Stitch functions?

The Stitch UI includes a console which can be used to test your Stitch functions; you can include console.log statements to add extra debug output to the console (they also get added to the log files for every function invoked from an incoming webhook, trigger, or the Stitch SDK).

You can also invoke your Stitch functions through the mongo shell. To do that, you’ll need to enable the MongoDB wire protocol so that the shell can talk to your Stitch app, then use the Stitch connection string provided. Once connected, you can call Stitch functions explicitly like this:

mongo> db.runCommand({callFunction: "morning", arguments: ["Billy"]})

{"ok" : 1,
 "response" : {"message" : "Good Morning Billy from andrew.morgan@mongodb.com"}
}

You can read more about this in this post which takes you through the process.

How do you store stitch triggers in your Git repo?

You can export your Stitch application from the Stitch UI or the Stitch CLI; the exported app is represented by a directory structure containing JSON and JavaScript files:

yourStitchApp/
├── stitch.json
├── secrets.json
├── variables.json
├── auth_providers/
│   └── <provider name>.json
├── functions/
│   └── <function name>/
│       ├── config.json
│       └── source.js
├── services/
│   └── <service name>/
│       ├── config.json
│       ├── incoming_webhooks/
│       │   ├── config.json
│       │   └── source.js
│       └── rules/
│           └── <rule name>.json
├── triggers/
│   └── <trigger name>/
│       ├── config.json
│       └── source.js
└── values/
    └── <value name>.json

You can then work on the trigger configuration and the associated function locally, source control the app using Git, or import it into a new App.

We saw a few integration provider logos in the presentation. Is there a page on the MongoDB site with the comprehensive list?

You can find the list of Stitch’s built-in service integrations in the Stitch documentation.

Note that if we don’t have a built-in integration for a particular service, then you can easily integrate it yourself, using the Stitch HTTP service and incoming webhooks. You can even export your new service integration to share with others.

Is MongoDB Mobile + Stitch Mobile Sync the same as a cache in a progressive app?

It certainly removes the need to have a separate cache, but it does much more. With MongoDB Mobile, the data is persistently stored on your device. You also have the full power of the MongoDB Query Language to perform sophisticated queries and aggregations on that local data. Changes made to the local database are pushed back to MongoDB Atlas, and from there to any other mobile devices configured to sync the same documents (e.g., for the same user running the app on another device).

How do I download & embed MongoDB Mobile?

You simply need to add 1 line to your Android or Xcode project to have access to the entire Stitch SDK, including the Stitch Local Database service (i.e.,the MongoDB Mobile database). The Stitch SDK includes the entire mobile and makes it very easy to use and consume, even if you’re just using the local MongoDB Mobile database and not Stitch.


Creating your first Stitch app? Start with one of the Stitch tutorials.

Want to learn more about MongoDB Stitch? Read the white paper.


Working with MongoDB Stitch Through the mongo Shell – MongoDB Wire Protocol Support

The Stitch SDK is the best way to access MongoDB Stitch from your frontend application code – getting to your data and accessing your Stitch Services and Functions becomes child’s’ play.

However, those already using MongoDB may have existing backend code and tools that work with MongoDB. MongoDB Stitch now supports the MongoDB wire protocol – meaning that you can continue to work with your favorite tools (including the mongo shell) and drivers while benefiting from Stitch’s quick and simple data access control and hosted JavaScript functions.

After enabling connection string access, connecting to your Stitch app from the mongo shell is business as usual – just use the connection string you’re shown in the Stitch UI:

mongo "mongodb://andrewjamXXXXX%40gmail.com:gXXXX@stitch.mongodb.com:27020\
    /?authMechanism=PLAIN&authSource=%24external&ssl=true&\
    appName=imported_trackme-xxxxz:mongodb-atlas:local-userpass" --norc

Once connected, adding a document through Stitch should feel very familiar:

db.comments.insert({
    owner_id: "5bacd4e7698a67f72dfdb44c",
    author: "Andrew Morgan",
    comment: "Stitch wire protocol support rocks!"
})

MongoDB Stitch wire protocol

However, Stitch is about more than accessing MongoDB data. I’ve created a (stupidly) simple Stitch (morning) Function to show how you can test your Stitch app:

exports = function(name){
  return {message: "Good Morning " + name + " from " 
             + context.user.data.email};
};

From the mongo shell, I can now test that function:

db.runCommand({ callFunction: "morning", arguments: ["Billy"] })
{
    "ok" : 1,
    "response" : {
        "message" : "Good Morning Billy from greetings@clusterdb.com"
    }
}

Creating your first Stitch app? Start with one of the Stitch tutorials.

Want to learn more about MongoDB Stitch? Read the white paper.


Sending Text Messages with MongoDB Stitch & Twilio

When creating a well-rounded app, there are lots of table stakes features that make the app more useful but have already been implemented thousands of times before. Having the application backend send a text message informing your customer of an event is a classic example of such a “commodity” feature.

Think about using a website or app to book a taxi, where you give your phone number so that you get sent a text message when the taxi’s on its way. Why would the writers of that taxi app want to waste time writing text messaging code? There’s nothing extra they can do to differentiate it from other apps – so why not just consume it as a service from something like Twilio?

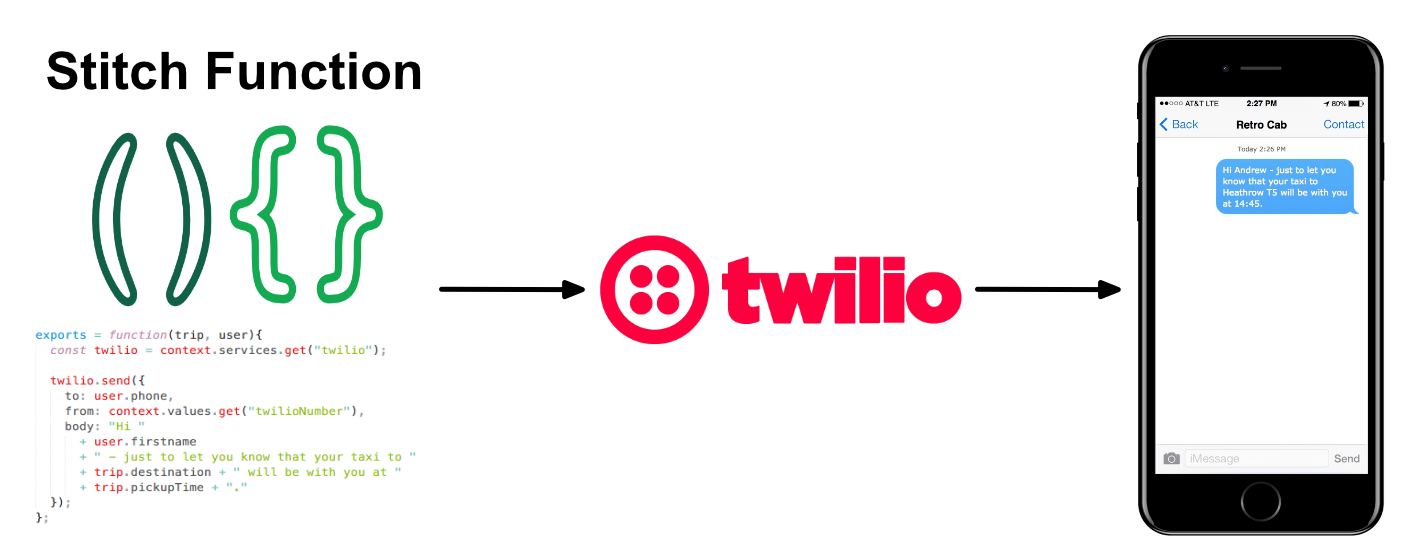
MongoDB Stitch makes it even less work to add this kind of feature. Rather than standing up an app server, figuring out how to use the Twilio API, writing the code, and possibly creating a REST API, just configure the Twilio service in Stitch.

Using MongoDB Stitch to send SMS text messages via Twilio

When configuring the Stitch Twilio serving, you supply the Account ID and Auth Token from your Twilio account. All that’s left is to write the Stitch function to invoke the service:

exports = function(trip, user){
  const twilio = context.services.get("twilio");

  twilio.send({
    to: user.phone,
    from: context.values.get("twilioNumber"),
    body: "Hi " 
      + user.firstname 
      + " - just to let you know that your taxi to " 
      + trip.destination + " will be with you at " 
      + trip.pickupTime + "."
  });
};

You can also have your application react when receiving a text message by configuring incoming webhooks for the Twilio service.

Creating your first Stitch app? Start with one of the Stitch tutorials.

Want to learn more about MongoDB Stitch? Read the white paper.


Testing & Debugging MongoDB Stitch Functions

When discussing serverless computing (Functions as a Service) with developers, a common concern that arises is the complexity of testing and debugging your functions. Fortunately, the MongoDB Stitch UI makes this simple.

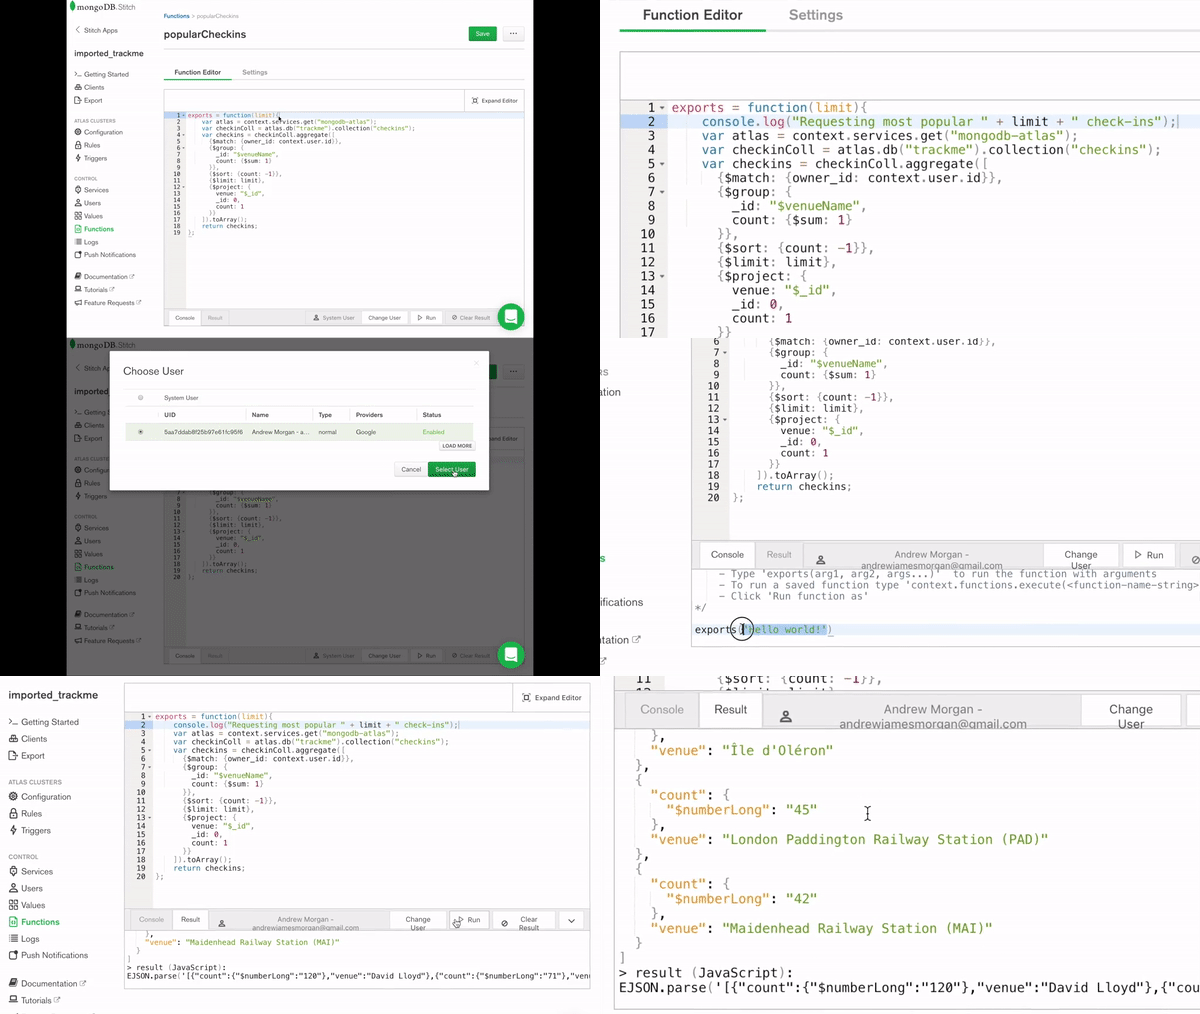
It’s a bit old school, but if you want to display debug info from your functions, then it’s as simple as adding console.log() commands to your code. If testing the function through the Stitch UI, the output appears in the Results panel. When executed normally, the output appears in the Stitch logs.

To test a Stitch function from the UI, select a user for the function to run as (that way the function can access whatever data the user is entitled to). In the Console panel, call exports(<parameters>), including any parameters that the function expects – these could be simple values or complex documents.

The results of the function call (the returned data + any console.log() output) appear in the Results panel.

Demo of testing a MongoDB Stitch Function

If you want to check on what’s happening in your production apps, check out the Logs panel in the Stitch UI.

Creating your first Stitch app? Start with one of the Stitch tutorials.

Want to learn more about MongoDB Stitch? Read the white paper.


Recording sensor data with MongoDB Stitch & Electric Imp

Old school IoT

My early experiments with IoT involved standalone sensors, breakout boards, Arduinos, Raspberry Pis, and a soldering iron. It was a lot of fun, but it took ages to build even the simplest of projects.

Therefore, I was super excited when I discovered that Electric Imp had a self-contained IoT hardware developer kit and a library to access MongoDB Stitch directly.

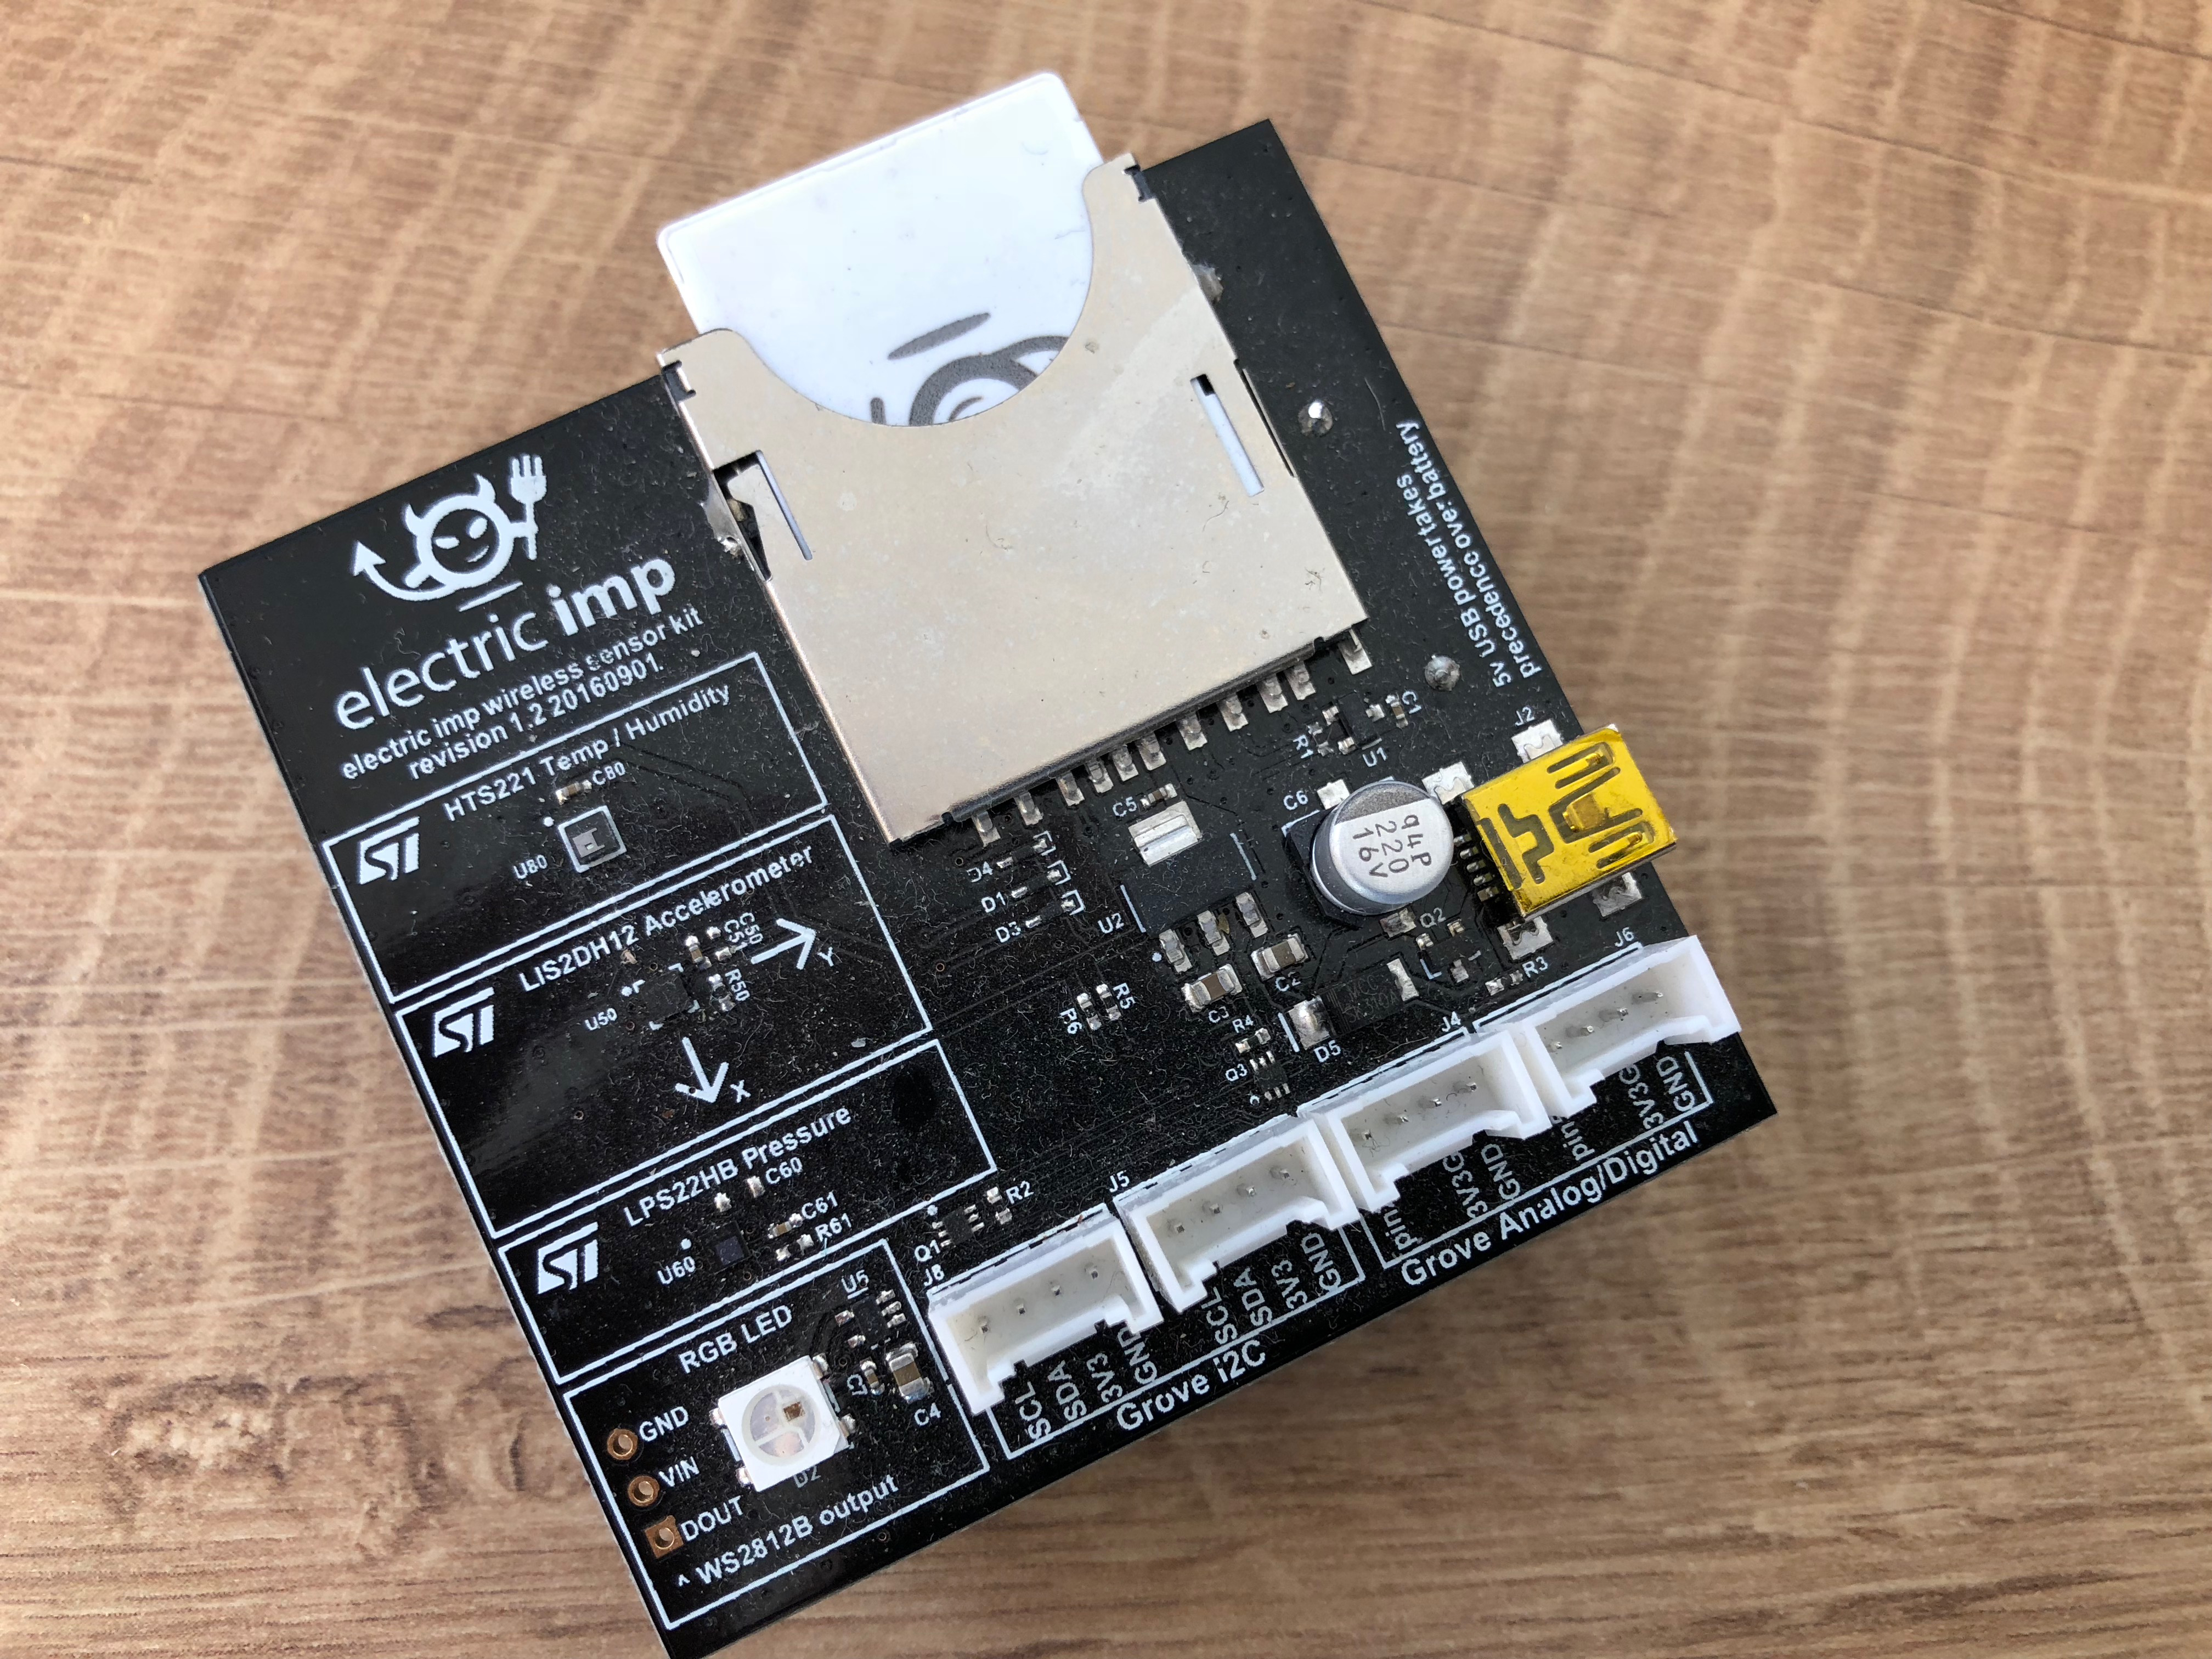
Electric Imp impExplorer IoT development kit

My first experiment with Electric Imp took sensor data (temperature, humidity, air pressure, light level, and orientation) from the device, and stored it in MongoDB.

The Electric Imp code (written in Squirrel) is split into 2 parts:
– On-device code – sends sensor data to the agent
– Agent code, running in Electric Imp’s cloud – forwards the data to Stitch

This post focuses on the integration between the Electric Imp agent code and Stitch, but those interested can view the device code.

The agent code receives the readings from the device, and then it uses the Electric Imp MongoDB Stitch library to forward them to Stitch:

#require "MongoDBStitch.agent.lib.nut:1.0.0"

//Create the connection to Stitch
stitch <- MongoDBStitch("imptemp-sobpa");

//Add an API key to link this device to a specific Stitch User
const API_KEY = "hNErDmBw1zYGOfpaSv4Pf5kaNQrIaxOHLZgj0vExzDcxWf9GAEX055l1mXXX";

//Ensure you are authenticated to Stitch
stitch.loginWithApiKey(API_KEY);

function log(data) {
    stitch.executeFunction("Imp_Write", [data], function (error, response) {
        if (error) {
            server.log("error: " + error.details);
        } else {
            server.log("temperature sent");
        }
    });
}

// Register a function to receive sensor data from the device
device.on("reading.sent", log);

Note that you will need to create the API_KEY through the Stitch UI.

impExplorer sends readings to Electric Imp agent which sends them to MongoDB Stitch to store in MongoDB Atlas

The Imp_Write function receives the readings from the agent, retrieves outside weather data from DarkSky.net, and stores the data in the TempData MongoDB Atlas collection:

exports = function(data){

  //Get the current time
  var now = new Date();

  var darksky = context.services.get("darksky");
  var mongodb = context.services.get("mongodb-atlas");
  var TempData = mongodb.db("Imp").collection("TempData");

  // Fetch the current weather from darksky.net

  darksky.get({"url": "https://api.darksky.net/forecast/" + 
    context.values.get("DarkSkyKey") + '/' + 
    context.values.get("DeviceLocation") +
    "?exclude=minutely,hourly,daily,alerts,flags&units=auto"
  }).then(response => {
    var darkskyJSON = EJSON.parse(response.body.text()).currently;

    var status =
      {
        "Timestamp": now.getTime(),
        "Date": now,
        "Readings": data,
        "External": darkskyJSON,
      };
    status.Readings.light = (100*(data.light/65536));
    context.functions.execute("controlHumidity", data.temp, data.humid);
    TempData.insertOne(status).then(
      results => {
        console.log("Successfully wrote document to TempData");
      },
      error => {
        console.log("Error writing to TempData collection: " + error);
      });
  });
};

ImpWrite also calls the controlHumidity method – find more on that in this post.

You can recreate the Stitch app for yourself by downloading the app from GitHub and importing it into Stitch. You’ll need to set some of your own keys first (including the details of your IFTTT webhook address) – details are in the README. The repo also includes the Electric Imp code for the agent and device.

Creating your first Stitch app? Start with one of the Stitch tutorials.

Want to learn more about MongoDB Stitch? Read the MongoDB Stitch white paper.