Tag Archive for MongoDB Stitch

How to create Dynamic Custom Roles with MongoDB Stitch

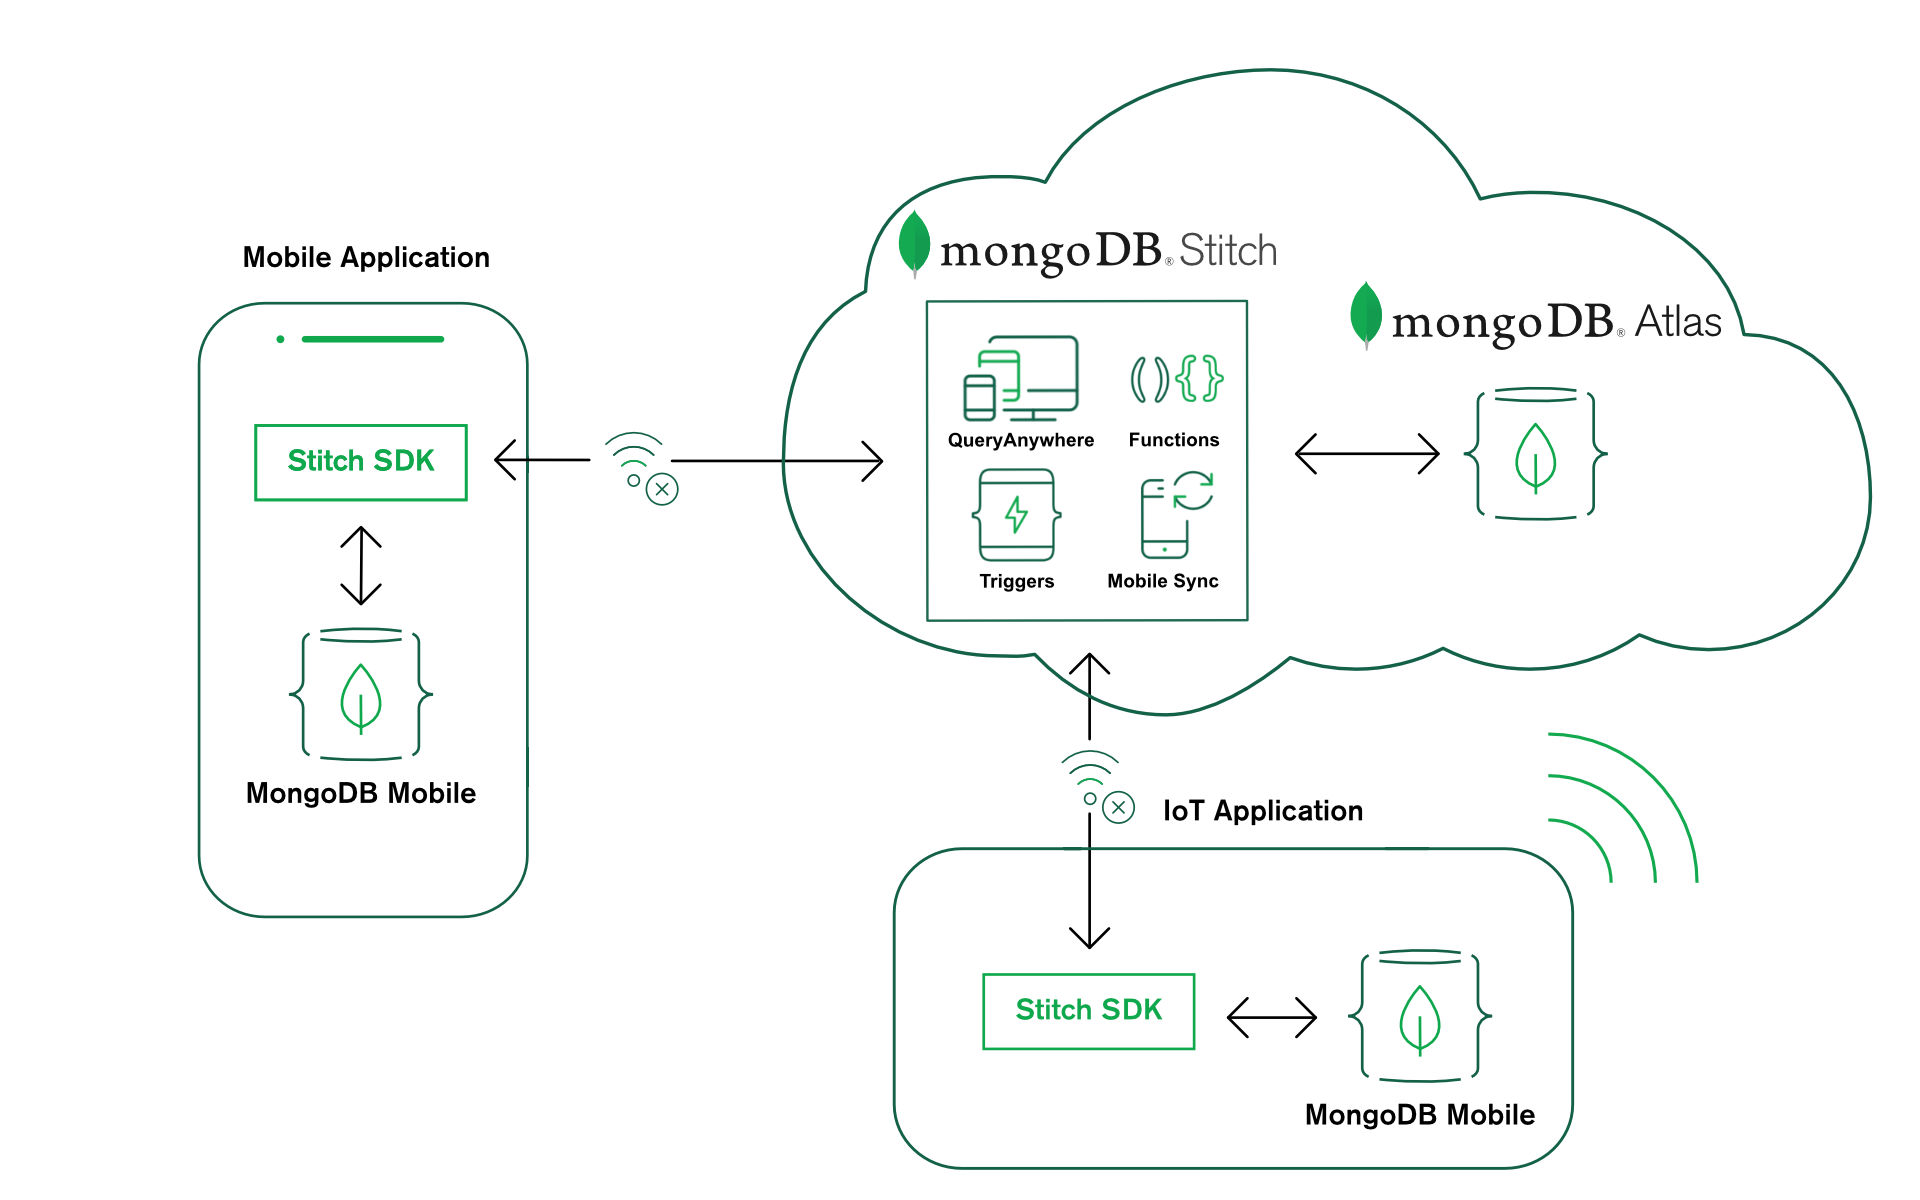
None of us want to write lots of code to control what data each user can access. In most cases, you can set up your data access controls in seconds by using Stitch’s built-in templates, e.g., “Users can read and write their own data” or “Users can read and write their own data. Users that belong to a sharing list can read that data”. Stitch also lets you create custom roles that you tailor to your application and schema – this post creates such a rule, querying a second collection when deciding whether to allow a user to insert a document.

The application is a troll-free timeline where you can only tag another user in a post if that user has labeled you as a trusted friend. I’ve already created a database called safeplace for the collections.

The users collection includes a list of usernames for their trusted friends (peopleWhoCanTagMe):

{
    "_id" : ObjectId("5c9273127558d01d93f53dc0"),
    "username" : "alovelace",
    "name" : {
        "first" : "Ada",
        "last" : "Lovelace"
    },
    "peopleWhoCanTagMe" : [
        "jeckert",
        "jmauchly"
    ]
}

You then need to create a data access rule for the posts collection, consisting of 2 roles, which Stitch evaluates in sequence:

Creating custom roles for Stitch data access control rules

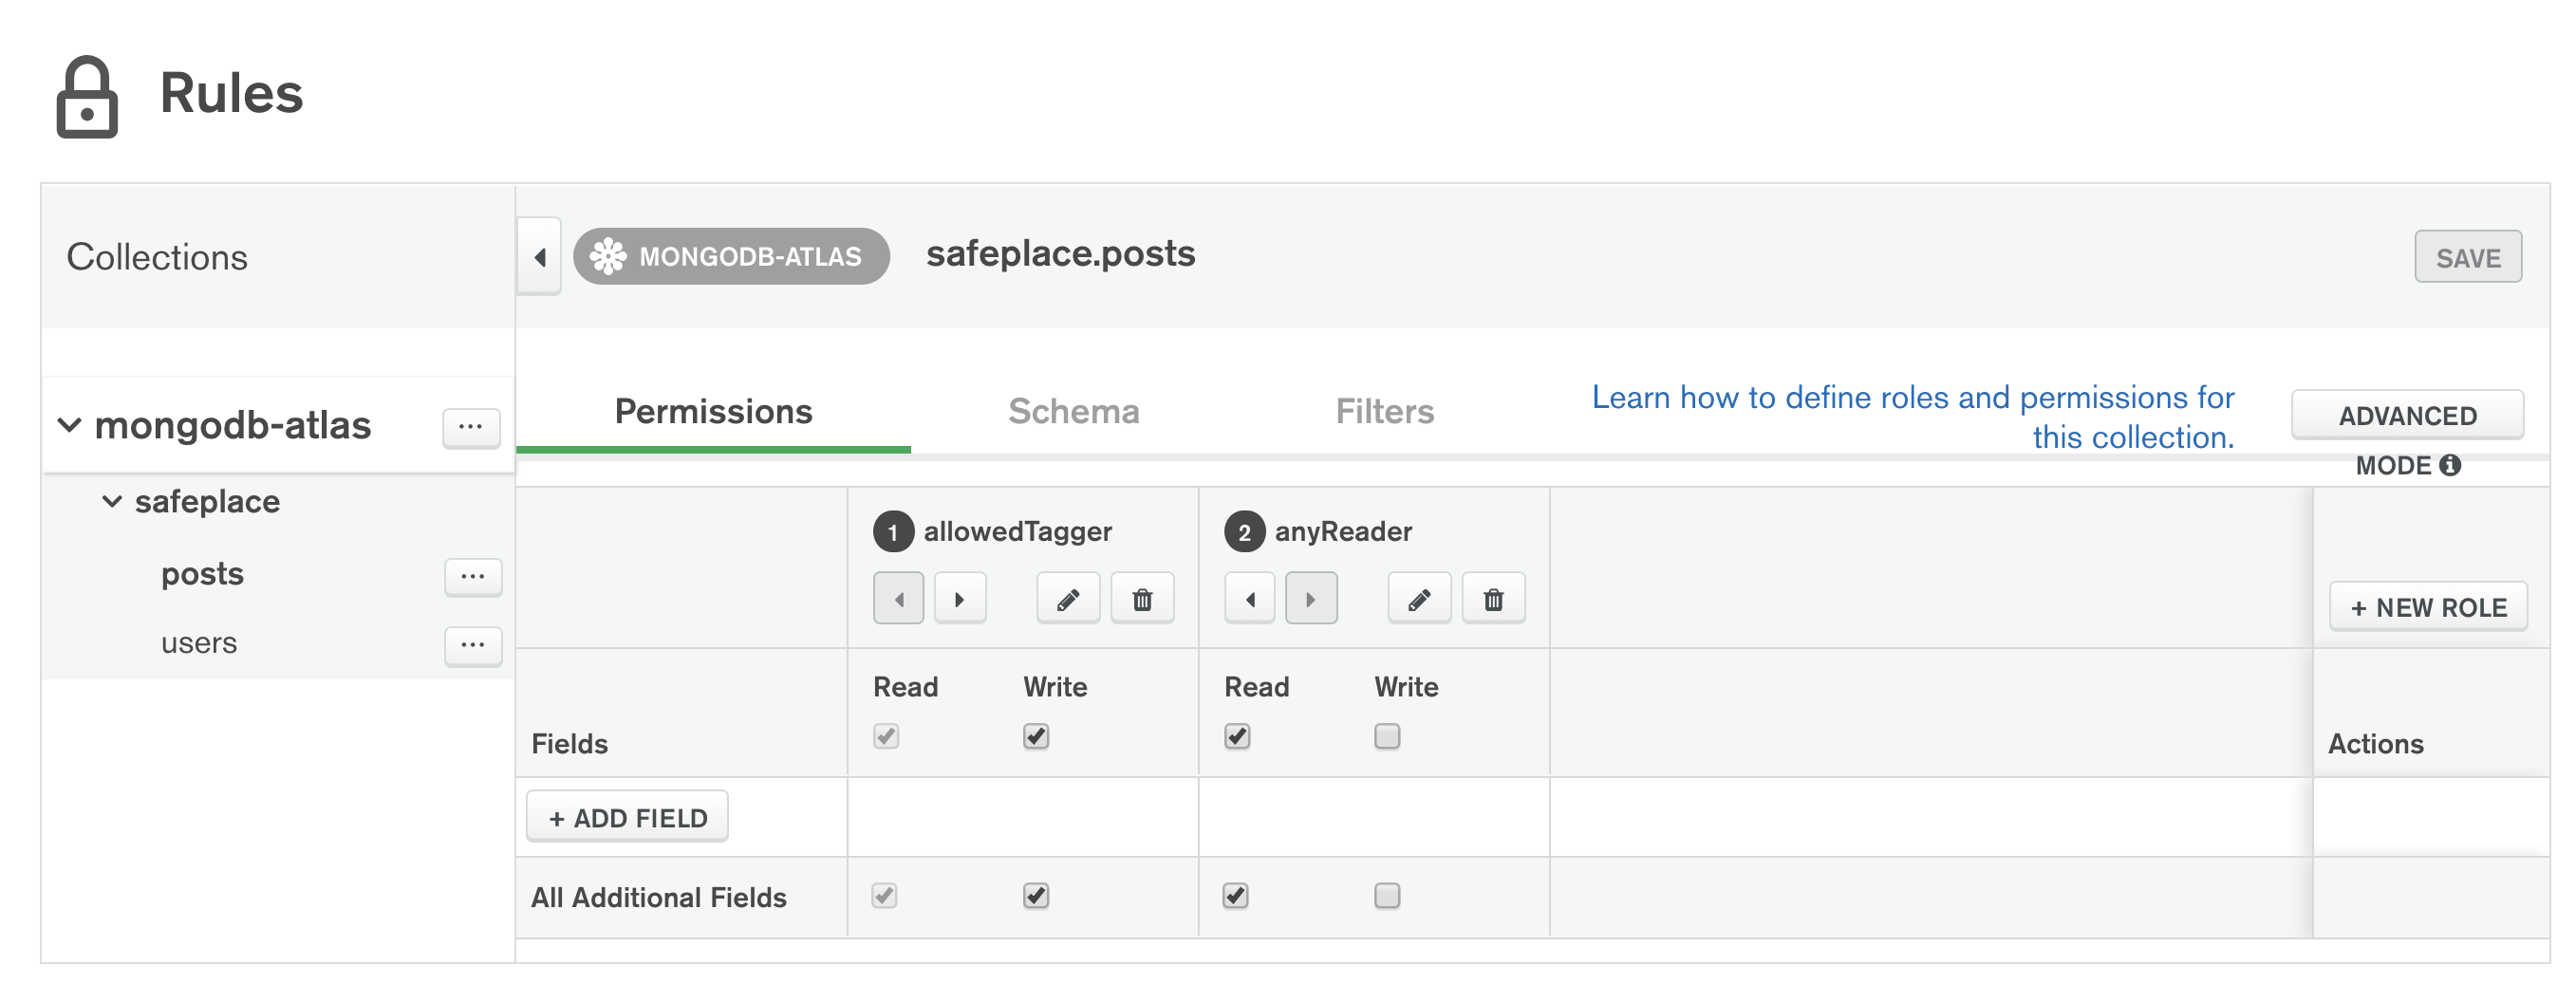
The second, anyReader, role lets anyone read any post, but the role we care about is allowedTagger which controls what the application can write to the collection.

The allowedTagger role is defined using this JSON expression:

{
  "%%true": {
    "%function": {
      "name": "canTheyTag",
      "arguments": [
        "%%root.poster",
        "%%root.tagged"
      ]
    }
  }
}

%%root represents the document that the user is attempting to insert. The poster and tagged attributes of the document to be written are the usernames of the author and their claimed friend. The JSON expression passes them as parameters to a Stitch function named canTheyTag:

exports = function(poster, tagged){
  var collection = context.services.get("mongodb-atlas")
    .db("safeplace").collection("users");
  return collection.findOne({username: tagged})
  .then ( userDoc => { 
    return (userDoc.peopleWhoCanTagMe.indexOf(poster) > -1);
  }).catch( e => { console.log(e); return false; }); 
};

This searches the users collection for the tagged user and then checks that the poster’s username appears in the peopleWhoCanTagMe array in the retrieved document.

You can test this new rule using the mongo shell (courtesy of Stitch’s MongoDB Connection String feature). Initially, I’m not included in Ada’s list of friends and so trying to tag her in a post fails:

db.posts.insert({ 
    poster: "amorgan", 
    tagged: "alovelace", 
    post: "Just sent you a pull request" })

WriteCommandError({ "ok" : 0, "errmsg" : "insert not permitted" })

The logs show that the insert didn’t match our customer role but that it did match the second (anyReader), but that inserts aren’t allowed for that role:

Logs:
[
  "uncaught promise rejection: StitchError: insert not permitted"
]
Error:
role anyReader does not have insert permission
Stack Trace:
StitchError: insert not permitted
{
  "name": "insertOne",
  "service": "mongodb-atlas"
}
Compute Used: 936719 bytes•ms

Ada then adds me as a trusted friend:

db.users.update(
    {username: "alovelace"}, 
    {$push: {peopleWhoCanTagMe: "amorgan"}}
)

My second attempt to tag her in a post succeeds:

db.posts.insert({
    poster: "amorgan", 
    tagged: "alovelace", 
    post: "Just sent you a pull request" })

WriteResult({ "nInserted" : 1 })

I recently had someone ask me how to implement “traditional database roles” using Stitch, i.e. an administrator explicitly defines which user ids belong to a specific role, and then use that role to determine whether they can access a collection. You can use this same approach for that use case – have a collection that assigns users to roles and then find the user id in that collection from a Stitch function that’s used in roles for the collections you want to protect. You could then optimize the rules by including the users’ roles as an attribute in their authentication token – but I’ll save that for a future post!


Replace tedious coding with MongoDB Stitch and public APIs

Most apps and websites contain much functionality that’s tedious to implement and has been done thousands of times before. MongoDB Stitch takes care of a lot of these chores – for example, making it simple to interact with third-party APIs. This post explains how I used Stitch to do just that that this week.

I recently described how I ported my legacy website to Stitch. After reading that post, one of our Paris Solution Architects spotted that there was a bug in how I was validating phone numbers in my forms (specific to France’s dialling plan). I was about to go into my code to tweak the regular expressions to cope with French phone numbers. However, what if there was another country with odd rules? What if the rules changed?

It then struck me that this is precisely the kind of chore that I should use Stitch to replace – being an expert in regular expressions and country-specific dialling plans wasn’t going to make the experience any better for my users, and so I should contract it out to “someone” else.

A quick Google later, and I’d settled on the NumVerify service which provides an API to validate phone numbers and add some extra information such as the type of line and the same number in full international format.

To access the NumVerify API, I needed to create a Stitch HTTP service. I named the service apiplayer.net and created a rule to allow the service to access the required domain (apiplayer.net) using GET requests:

Creating an HTTP Service rule in MongoDB Stitch to access REST APIs

Then I can call use that service from a new Stitch Function (verifyPhoneNumber):

exports = function(phoneNumber){
  const APIKey = context.values.get("numverifyAPIKey");
  const http = context.services.get("numverify");
  const url = "http://apilayer.net/api/validate?access_key=" + APIKey + "&number=" + phoneNumber + "&country_code=&format=1";
  var validationResults;

  return http.get({"url": url})
  .then((resp) => {
      const result = EJSON.parse(resp.body.text());
      if (result.valid) {
        console.log(result.international_format);
        return result;
      } else {
        console.log(result.number + " is not a valid phone number");
        return {valid: false};
      }
    },
    (error) => {
      console.log("Verification failed: " + error);
      return {valid: false};
    }
  );
};

Note that numverifyAPIKey is a Stitch Value that I’ve set to the API key I received when registering with NumVerify.

A typical (successful) result from this function looks like:

{
  "valid": true,
  "number": "448449808001",
  "local_format": "08449808001",
  "international_format": "+448449808001",
  "country_prefix": "+44",
  "country_code": "GB",
  "country_name": "United Kingdom of Great Britain and North",
  "location": "",
  "carrier": "",
  "line_type": "special_services"
}

The JavaScript running in the browser now executes the Stitch Function:

function validatePhone (inputField, helpText) {
  return new Promise(function(resolve, reject) {
    if (!validateNonEmpty (inputField, helpText)) {resolve(false)} else {
      const client = stitch.Stitch.defaultAppClient;
      client.callFunction("verifyPhoneNumber", [inputField.value]).then(
      result => {
        if (result.valid) {
          inputField.value = result.international_format;
          resolve(true);
        } else {
          helpText.innerHTML = 
            '<span class="english_material" lang="en">Phone number is invalid."</span>\
             <span class="french_material" lang="fr">Le numéro de téléphone est invalide.</span>';
             resolve(false);
        }
      }),(
      error => {
        helpText.innerHTML = 
          '<span class="english_material" lang="en">Phone number validation failed, but you can submit anyway."</span>\
           <span class="french_material" lang="fr">La validation du numéro de téléphone a échoué, mais vous pouvez quand même soumettre.</span>';
        // Not going to reject the form request just because the cloud service
        // is unavailable
        resolve(true);
      });
    }
  })   
}

NumVerify is as flexible as possible in accepting phone numbers in different formats. It also sets the resulting international_format field to a fully formatted international number – I use that to replace the user-provided number in the form, ensuring that all numbers stored in Atlas are in the same format. In one swoop, I’ve ripped out my spaghetti regular expression code, made the validations more robust, and added a new feature (normalizing the phone numbers before I store them) – result!

See the results at stitch.oleronvilla.com, but please don’t judge my code, I still need to delegate a lot more to Stitch and other services!

Creating your first Stitch app? Start with one of the Stitch tutorials.

Want to learn more about MongoDB Stitch? Read the white paper.


From Legacy Website to Serverless with MongoDB Stitch Hosting

From the start, Stitch has been great at serving up dynamic content and interacting with backend services. There was just one piece missing that meant that you still needed an app server or hosting service – storing and serving up your static assets (index.html, style.css, logo.png, etc.). The recent addition of Stitch Hosting, currently in beta, fixes that!

Following the dogfooding principle, I decided to try porting one of my existing websites to Stitch (the site is for renting out our holiday home). Now, this isn’t some newfangled website with all the latest bells and whistles. I’d built the original site before the serverless and mobile-first movements took off; using PHP in the backend and JavaScript/JQuery in the frontend. The vast majority of the porting effort went into replacing the backend PHP code with frontend JavaScript. Once that was done, porting it to Stitch was a breeze.

Step 1 was to enable Hosting through the Stitch UI and upload the (907) static files. You can upload all the files manually through the UI, but here’s a pro-tip, you can perform a bulk upload using the Stitch CLI:

stitch-cli import --include-hosting --strategy=replace

When I made further edits, I used the Stitch UI to upload the modified files:

Upload modified static files through the MongoDB Stitch UI

When users submitted forms on the original site, I was sent an email via GoDaddy’s temperamental gdform.php script (which writes the data to a local file, which GoDaddy’s cron job may eventually process to send the email), and I was looking forward to ripping that out and using Stitch QueryAnywhere instead. The frontend code to store the data in MongoDB is straightforward:

function addBooking (booking) {
    const client = stitch.Stitch.initializeDefaultAppClient('oleronvilla-xxxxx');
    const db = client.getServiceClient(stitch.RemoteMongoClient.factory, 
        'mongodb-atlas').db('oleron');
    const collection = db.collection('bookings');

    return client.auth.loginWithCredential(
            new stitch.AnonymousCredential()).then(user => {
        return collection.insertOne({owner_id: client.auth.user.id, 
                                    bookingRequest: booking})
            .catch(err => console.error(err.message))});
}

So that safely stores the user-submitted data in MongoDB. The next step was to bring the site into the 1990s by having it send me a text message with the submitted data. I could have gone back to the frontend code to send the data to a Stitch Function (in addition to writing it to Atlas), but, as my legacy frontend code is somewhat ‘fragile’, I prefer to make as few changes there as possible. Stitch Triggers to the rescue! I created a new Stitch Function (textReservation) to send the form data to Twilio:

exports = function(event) {
    const twilio = context.services.get("TwilioText");
    const request = event.fullDocument.bookingRequest;
    const body = "New booking from "
      + request.name.first + " " + request.name.last
      + " for these weeks: " + request.requestedDates.toString() + ". "
      + "Call on " + request.contact.phone
      + " or email " + request.contact.email + ". "
      + "Comment: " + request.comments;
    twilio.send({
        to: context.values.get("phoneNumber"),
        from: context.values.get("twilioNumber"),
        body: body
    }); 
};

The final step was to link this function to a Stitch Trigger which fires whenever Stitch QueryAnywhere adds a new document to the oleron.bookings collection:

Create a MongoDB Stitch Trigger

Note that I used the Stitch option to bring my own domain name. See the results at stitch.oleronvilla.com, but please don’t judge my code!

Creating your first Stitch app? Start with one of the Stitch tutorials.

Want to learn more about MongoDB Stitch? Read the white paper.


MongoDB Stitch Triggers & Amazon Kinesis – The AWS re:Invent Stitch Rover Demo

This post delves into using MongoDB Stitch Triggers and the Stitch AWS service to push MongoDB database changes to Amazon Kinesis. This is the fifth and final article in a series of blog posts examining how the MongoDB Mobile/Stitch-controlled rover was put together for our AWS re:Invent demo.

Sensor data from MongoDB Stitch Rover is pushed to Amazon Kinesis

Stitch has simple, built-in integration with AWS services, letting you call services like Kinesis from Stitch Functions using syntax similar to the AWS SDK. To start, we configure a new AWS service in Stitch using an IAM role from AWS and then create a new Stitch Service rule to enable Kinesis:

Configure the Amazon Kinesis through the MongoDB Stitch AWS Service

We then need a Stitch Function (kinesisTrigger) to put our rover’s sensor data onto a Kinesis stream. Note that the sensor data is taken from the event function argument (we’ll get to that in a second):

exports = function(event){
  const awsService = context.services.get('aws');
  const roverId = event.fullDocument.roverId;
  try{
    awsService.kinesis("us-west-2").PutRecord({
      Data: JSON.stringify(event.fullDocument), 
      StreamName: context.values.get("Stream"),
      PartitionKey: context.values.get("Partitions")[roverId]
    }).then(function(response) {
      return response;
    });

    console.log("Successfully put the following document into the " +
      context.values.get("Stream") + " Kinesis stream: " + 
             EJSON.stringify(event.fullDocument));
  }catch(error){
    console.log(error);
  }
};

As the rover will sometimes be disconnected from the network, it stores the readings locally in the MongoDB Mobile database. Stitch Mobile Sync will then sync these same documents to Atlas whenever it’s online.

Propagating sensor data to Amazon Kinesis using MongoDB Stitch Mobile Sync, Stitch Triggers, and a Stitch Function

We’ve configured the kinesisTrigger trigger to fire whenever a new document is added to the rover.sensors collection. The trigger calls the linked function KinesisTrigger (the trigger and function names don’t need to match), passing the inserted document as a function argument. From the time that the Stitch Trigger is hit, it typically takes just 20ms to get the data into Kinesis.

Creating a MongoDB Database Trigger using Stitch Triggers

This completes the blog series. As a reminder, this is what we’ve covered in the five posts:
MongoDB Stitch/Mobile Mars Rover Lands at AWS re:Invent describes how MongoDB Stitch, MongoDB Mobile, Atlas, Android Things, a Raspberry Pi, and Amazon Kinesis are used to reliably control our Mars rover.
MongoDB Stitch QueryAnywhere focuses on how the Mission Control app records the user commands in MongoDB Atlas by calling the Stitch SDK directly from the frontend code.
MongoDB Stitch Mobile Sync shows how Stitch Mobile Sync synchronizes the user commands written to MongoDB Atlas by the Mission Control app with the MongoDB Mobile database embedded in the rover (and how it syncs the data back to Atlas when it’s updated in MongoDB Mobile).
MongoDB Stitch Functions focuses on how a Stitch Function is used to provide aggregated sensor data such as the average temperature for the last 5 minutes.
MongoDB Stitch Triggers & Amazon Kinesis shows how we use MongoDB Stitch Triggers and the Stitch AWS service to push MongoDB database changes to Amazon Kinesis.

You can find all of the code in the Stitch Rover GitHub repo.

Why not try Stitch out for yourself.


MongoDB Stitch Functions – The AWS re:Invent Stitch Rover Demo

This is the fourth in a series of blog posts examining how the MongoDB Mobile/Stitch-controlled rover was put together for our re:Invent demo. This post focuses on how a Stitch Function is used to provide aggregated sensor data such as the average temperature for the last 5 minutes.

A common question we were asked at re:Invent is how Stitch’s serverless Functions compare with AWS Lambda functions. Stitch functions are designed to be very light-weight (run as Goroutines and deliver low latency – ideal, for example, when working with a database (especially as your function has a persistent MongoDB connection). In contrast, Lambda functions are more heavy-weight (Lambda spins up containers to run your functions in) – better suited to compute-heavy operations.

You write your functions in JavaScript (ES6) through the Stitch UI or the command line. We created this function (getReadings) to fetch a rover’s sensor data for the specified interval and then return the computed average, minimum, and maximum values:

exports = function(roverId, start, end){
  const mdb = context.services.get('mongodb-atlas');
  const sensors = mdb.db("Rovers").collection("Sensors");

  return sensors.find({"id": roverId, "time":{"$gt":start,"$lt":end}})
    .toArray()
    .then(readings => {
     let data = objArray.map(readings => readings.reading);
     return {"Average": data.reduce((a,b) => a + b, 0) / data.length,
        "Min": Math.min(...readings),
        "Max": Math.max(...readings)};
  });
};

This function can then be called from your app frontend code:

Calling a MongoDB Stitch Function from a client frontend

The frontend code to run this function is as simple as this:

context.functions.execute("getReadings", myId, samplePeriod.start, 
    samplePeriod.end);

There’s a lot more that you can do in functions, such as sending data to another cloud service. You’ll see an example of this in the next post which shows how a Stitch Trigger calls a Stitch function to send MongoDB Atlas data to AWS Kinesis.

If you can’t wait then you can find all of the code in the Stitch Rover GitHub repo.


MongoDB Stitch Mobile Sync – The AWS re:Invent Stitch Rover Demo

At AWS re:Invent, we demonstrated how MongoDB Mobile, MongoDB Stitch, and AWS services could be used to build a cloud-controlled Mars rover – read the overview post for the setup. This post focuses on how Stitch Mobile Sync synchronizes the user commands written to MongoDB Atlas by the Mission Control app with the MongoDB Mobile database embedded in the rover (and how it syncs the data back to Atlas when it’s updated in MongoDB Mobile).

MongoDB Stitch Rover - Stitch Mobile Sync

Many people who took part in the demo at re:Invent asked why Mission Control wrote the commands to Atlas rather than sending them directly to the rover. The reason is that you can’t guarantee that the rover will always have network access (and when thousands descended on the expo hall for the Monday evening social, we learned that maintaining a connection over conference WiFi can be just as tricky as maintaining one to Mars). The commands are stored in Atlas and then synchronized to the rover whenever it’s online.

Stitch Mobile Sync architecture

Each rover has a single document in the rover.rovers collection, and each command is stored as an element in the moves array:

{
  "_id" : "5bee1053fdc728f2623e20eb",
  "moves" : [
    {
      "_id" : "5c0e4db5119f6e36c7d06f55",
      "angle" : 90,
      "speed" : 2
    },
    {
      "_id" : "5c0e4dbc119f6e36c7d06f56",
      "angle" : 118,
      "speed" : 3
    },
    {
      "_id" : "5c0e4dc3119f6e36c7d06f57",
      "angle" : 45,
      "speed" : -1
    }
  ],
  "__stitch_sync_version" : {
    "spv" : 1,
    "id" : "2f704b04-2338-4c75-a7cf-d555c94cb556",
    "v" : NumberLong(10313)
  }
}

Stitch Mobile sync automatically pushes the document to the rover’s MongoDB Mobile database, and the rover’s Android app moves the rover in response. Once a move command has been acted on, the app removes it from the array and updates the document in MongoDB Mobile. Stitch Mobile Sync then automatically pushes the change back to Atlas:

doMove(move);
final Document update = new Document("$pull", new Document("moves",
                new Document("_id", move.getId())));
rovers.sync().updateOne(getRoverFilter(), update).addOnCompleteListener(task -> {
  if (!task.isSuccessful()) {
    Log.d(TAG, "failed to update rover document", task.getException());
  }
  try {
    Thread.sleep(MOVE_LOOP_WAIT_TIME_MS);
  } catch (InterruptedException e) {
    e.printStackTrace();
  }
  moveLoop();
}

You may have noticed that the same document is being updated in both Atlas and MongoDB Mobile, raising the possibility of conflicts. A conflict occurs when the document is updated in one database and, before that change has been synced, the same document is updated in the second. Sketchy network connectivity increases the size of the window where this can happen and that makes conflicts more likely.

Fortunately, Stitch Mobile Sync allows the client application to register a conflict handler function. The function is passed both versions of the document and can decide what the ‘winning’ document should look like. The conflict handling could be as simple as “local wins”, but in this case, we take the remote document (which contains at least one command not yet added to the local database) and remove any commands that have already been acted on:

public class RoverActivity extends Activity 
  implements ConflictHandler<Rover> {

  @Override
  public Rover resolveConflict(
    final BsonValue documentId,
    final ChangeEvent<Rover> localEvent,
    final ChangeEvent<Rover> remoteEvent
    ) {
    if (localEvent.getFullDocument().getLastMoveCompleted() == null) {
      return remoteEvent.getFullDocument();
    }
    // Given this sync model consists of a single producer and a
    // single consumer, a conflict can only occur when a production
    // and consumption happens at the same "time". That means
    // that there should always be an overlap of moves during a 
    // conflict and that the last move completed is always present
    // in the remote. Therefore we should trim all moves up to
    // and including the last completed move.
    final Rover localRover = localEvent.getFullDocument();
    final String lastMoveCompleted = localRover.getLastMoveCompleted();
    final Rover remoteRover = remoteEvent.getFullDocument();
    final List<Move> nextMoves = new ArrayList<>(remoteRover
      .getMoves().size());
    boolean caughtUp = false;
    for (final Move move : remoteRover.getMoves()) {
      if (move.getId().equals(lastMoveCompleted)) {
        caughtUp = true;
      } else 
      {
        if (caughtUp) {
          nextMoves.add(move);
        }
      }
    }
    return new Rover(localRover, nextMoves);
  }
}

The next post in this series looks at how Stitch Functions can be used to provide an aggregated view of the rover’s sensor data.

If you can’t wait then you can find all of the code in the Stitch Rover GitHub repo.


MongoDB Stitch Mobile Sync – The AWS re:Invent Stitch Rover Demo

At AWS re:Invent, we demonstrated how MongoDB Mobile, MongoDB Stitch, and AWS services could be used to build a cloud-controlled Mars rover – read the overview post for the setup. This post focuses on how the mission control app records the user commands in MongoDB Atlas.

Mission Control is a simple web application that we ran on an iPad. The web app takes commands from the user through its UI which displays directions for the rover to travel in. Each command sets the rover off in that direction for a short fixed amount of time.

MongoDB Stitch QueryAnywhere rover Mission Control web app

Rather than sending the command directly to the rover, and as Mars is a long way away and network connections are not always reliable, the app stores the commands in an array within the rover’s document in Atlas – in that way, commands can be queued up and sent to the rover as soon as it’s back online.

MongoDB Stitch QueryAnywhere

This is what the document looks like after a few commands have been submitted (but not yet acted on by the rover):

{
    "_id" : "5bee1053fdc728f2623e20eb",
    "moves" : [
        {
            "_id" : "5c0e4db5119f6e36c7d06f55",
            "angle" : 90,
            "speed" : 2
        },
        {
            "_id" : "5c0e4dbc119f6e36c7d06f56",
            "angle" : 118,
            "speed" : 3
        },
        {
            "_id" : "5c0e4dc3119f6e36c7d06f57",
            "angle" : 45,
            "speed" : -1
        }
    ],
    "__stitch_sync_version" : {
        "spv" : 1,
        "id" : "2f704b04-2338-4c75-a7cf-d555c94cb556",
        "v" : NumberLong(10313)
    }
}

A traditional way of access the database from the frontend app would be to stand up an app server, implement a custom REST API and data access control layer, and then send the commands to it from the frontend app. MongoDB Stitch massively simplifies that workflow by letting a web (or mobile) app execute MongoDB Query Language operations directly – removing the need for thousands of lines of boilerplate code.

When we explained this access model to demo visitors, some were nervous about this approach as we’ve been taught that the schema and database access should be hidden from the frontend (remember SQL injection attacks?). Fortunately, Stitch QueryAnywhere is made up of two components – the first is the Stitch SDK that enables direct access to the database, the second is the sophisticated, fine-grained user access controls provided by the Stitch service. If that doesn’t allay your fears then you have the option to obfuscate the schema by accessing the database through Stitch Functions.

Updating the document from the web app is a cinch with Stitch. The first step is to import the Stitch SDK:

<head>
  <script src="https://s3.amazonaws.com/stitch-sdks/js/bundles/4.0.15-0/stitch.js"></script>
  <script src="https://s3.amazonaws.com/stitch-sdks/bson/bson.bundle.js"></script>
</head>

The second step is to create the object/document for the command and push it onto the moves array within this rover’s document in the rover.rovers collection:

function pushMoveToRover(roverId) {
    const client = stitch.Stitch.defaultAppClient;
    const coll = client.getServiceClient(stitch.RemoteMongoClient.factory,
        'mongodb-atlas').db('rover').collection('rovers');
    const angle = parseInt($("#angle").val());
    const speed = parseInt($("#speed").val());
    if (isNaN(angle) || isNaN(speed)) {
        return;
    }
    const move = {"_id": new BSON.ObjectID().toHexString(), angle, speed};
    coll.updateOne({"_id": roverId}, {"$push": { "moves": move }, 
        "$inc": {"__stitch_sync_version.v": 1}});
}

If you are used to working with the MongoDB Query Language from an app server, that should seem very familiar. The only thing that might catch your eye is that __stitch_sync_version.v. That’s part of how this update will get to the MongoDB Mobile database embedded in the rover. We’ll explain that in the next part.

If you can’t wait then you can find all of the code in the Stitch Rover GitHub repo.


MongoDB Stitch/Mobile Mars Rover Lands at AWS re:Invent

Powered by MongoDB Mobile, MongoDB Stitch, and AWS Kinesis, the MongoDB rover debuted at AWS re:Invent. More than a thousand people stopped by our demo to see if they could navigate the rover around a treacherous alien landscape.

MongoDB Stitch & Rover at AWS re:Invent

One of the challenges in controlling a rover on the other side of the Solar System is that there will frequently be times when you lose connectivity. To solve that, we store all of the commands in MongoDB Atlas and sync them to the rover (in its local MongoDB Mobile database) whenever it’s contactable.

MongoDB Stitch Rover Application Architecture

Visitors controlled the rover via a JavaScript web app, which uses Stitch QueryAnywhere to write commands for the rover directly to a collection in MongoDB Atlas (the fully managed hosted MongoDB database, in this case, running in the AWS cloud).

After the commands are sent to the cloud, Stitch Mobile Sync takes over, ensuring all commands are automatically written to the MongoDB Mobile database embedded on the rover (running Android Things on a Raspberry Pi 3b) by Stitch Mobile Sync. The Java app on the rover then acts on the synced commands (moving the Rover), before removing them from the mobile database to reflect that it’s completed with that set of commands – with the updated status then finally synced back to Atlas by Stitch Mobile Sync.

The rover can also record environmental sensor data in MongoDB Mobile, which Stitch Mobile Sync syncs to the sensors collection in Atlas. A Stitch Trigger on the sensors collection then runs a Stitch Function to push those sensor readings to AWS Kinesis for further analysis, such as anomaly detection.

The first appearance of the MongoDB rover coincided with the Mars landing of InSight. We even had our own 7 minutes of terror when the event WiFi buckled under the pressure of thousands of delegates descending on the expo hall during Monday’s evening social – but it did at least demonstrate that Stitch Mobile Sync quickly catches up once connectivity is restored.

This post is the first in a series delving into the components of this interactive demo, and if you can’t wait for more details, then you can find all of the code in GitHub.


Stitch & Mobile Webinar Questions & Replay

How do you test MongoDB Stitch functions, how do you store Stitch triggers, and what services can you integrate Stitch with? These were some of the great questions that were asked and answered in my recent webinar. You can watch the replay of “MongoDB Mobile and MongoDB Stitch – Introduction and Latest Developments” here, or read on as I share the answers to those questions here.

For those new to MongoDB Stitch, it’s the serverless platform from MongoDB that isolates complexity and ‘plumbing’ so you can build applications faster. Stitch went GA in June 2018, and we recently added a set of new capabilities, including global Stitch apps, more AWS services, a React Native SDK, and the beta for Stitch Mobile Sync. MongoDB Mobile is an embedded version of the MongoDB database that you can embed in your mobile or IoT apps.

Building mobile apps with MongoDB Mobile, MongoDB Stitch, and MongoDB Atlas

These are some of the questions I thought might be of interest:

How do you test Stitch functions?

The Stitch UI includes a console which can be used to test your Stitch functions; you can include console.log statements to add extra debug output to the console (they also get added to the log files for every function invoked from an incoming webhook, trigger, or the Stitch SDK).

You can also invoke your Stitch functions through the mongo shell. To do that, you’ll need to enable the MongoDB wire protocol so that the shell can talk to your Stitch app, then use the Stitch connection string provided. Once connected, you can call Stitch functions explicitly like this:

mongo> db.runCommand({callFunction: "morning", arguments: ["Billy"]})

{"ok" : 1,
 "response" : {"message" : "Good Morning Billy from andrew.morgan@mongodb.com"}
}

You can read more about this in this post which takes you through the process.

How do you store stitch triggers in your Git repo?

You can export your Stitch application from the Stitch UI or the Stitch CLI; the exported app is represented by a directory structure containing JSON and JavaScript files:

yourStitchApp/
├── stitch.json
├── secrets.json
├── variables.json
├── auth_providers/
│   └── <provider name>.json
├── functions/
│   └── <function name>/
│       ├── config.json
│       └── source.js
├── services/
│   └── <service name>/
│       ├── config.json
│       ├── incoming_webhooks/
│       │   ├── config.json
│       │   └── source.js
│       └── rules/
│           └── <rule name>.json
├── triggers/
│   └── <trigger name>/
│       ├── config.json
│       └── source.js
└── values/
    └── <value name>.json

You can then work on the trigger configuration and the associated function locally, source control the app using Git, or import it into a new App.

We saw a few integration provider logos in the presentation. Is there a page on the MongoDB site with the comprehensive list?

You can find the list of Stitch’s built-in service integrations in the Stitch documentation.

Note that if we don’t have a built-in integration for a particular service, then you can easily integrate it yourself, using the Stitch HTTP service and incoming webhooks. You can even export your new service integration to share with others.

Is MongoDB Mobile + Stitch Mobile Sync the same as a cache in a progressive app?

It certainly removes the need to have a separate cache, but it does much more. With MongoDB Mobile, the data is persistently stored on your device. You also have the full power of the MongoDB Query Language to perform sophisticated queries and aggregations on that local data. Changes made to the local database are pushed back to MongoDB Atlas, and from there to any other mobile devices configured to sync the same documents (e.g., for the same user running the app on another device).

How do I download & embed MongoDB Mobile?

You simply need to add 1 line to your Android or Xcode project to have access to the entire Stitch SDK, including the Stitch Local Database service (i.e.,the MongoDB Mobile database). The Stitch SDK includes the entire mobile and makes it very easy to use and consume, even if you’re just using the local MongoDB Mobile database and not Stitch.


Creating your first Stitch app? Start with one of the Stitch tutorials.

Want to learn more about MongoDB Stitch? Read the white paper.


Working with MongoDB Stitch Through Existing Drivers – Python & PyMongo

If you are developing an app using Java, Swift, or JavaScript then the Stitch SDK is the best way to access MongoDB Stitch from your frontend application code – getting to your data and accessing your Stitch Services and Functions becomes child’s play.

But, what if you are developing in another language – perhaps running on an app server? Luckily, MongoDB Stitch now supports the MongoDB wire protocol – meaning that you can continue to work with your favorite MongoDB drivers (such as PyMongo) and tools such as the mongo shell.

After enabling connection string access, connecting to your Stitch app from your application is business as usual – just use the connection string you’re shown in the Stitch UI (replacing the username and password with one of your existing Stitch users). This example is for Python, but the pattern is the same for other languages:

>>> import pymongo
>>> from pymongo import MongoClient
>>> client = MongoClient('mongodb://andrewxxxxmorgan%40gmail.com:\
      my_password@stitch.mongodb.com:27020/?authMechanism=PLAIN&\
      authSource=%24external&ssl=true&\
      appName=imported_trackme-etjzr:mongodb-atlas:local-userpass')

Inserting a document should seem very familiar (note that I’m including an owner_id attribute so that the app can take advantage of Stitch’s data access controls):

>>> db = client.trackme
>>> collection = db.comments

>>> comment = {
    "author" : "Andrew Morgan",
    "comment" : "Using Stitch from Python – who knew?!",
    "owner_id" : "5bacd4e7698a67f72dfdb44c"
}
>>> collection.insert_one(comment)

<pymongo.results.InsertOneResult object at 0x102b362d8>

Connecting to MongoDB Stitch using the MongoDB Python Driver

However, Stitch is about more just than accessing MongoDB data. I’ve created a (stupidly) simple Stitch (morning) Function to show how you can execute Stitch Functions through MongoDB drivers:

>>> db.command("callFunction", "morning", arguments=['Billy'])

u'ok': 1, u'response': {u'message': u'Good Morning Billy from andrewxxxxxxorgan@gmail.com'}}

Creating your first Stitch app? Start with one of the Stitch tutorials.

Want to learn more about MongoDB Stitch? Read the white paper.