This is the fifth in a series of blog posts examining technologies such as ReactJS that are driving the development of modern web and mobile applications.
Modern Application Stack – Part 1: Introducing The MEAN Stack introduced the technologies making up the MEAN (MongoDB, Express, Angular, Node.js) and MERN (MongoDB, Express, React, Node.js) Stacks, why you might want to use them, and how to combine them to build your web application (or your native mobile or desktop app).
The remainder of the series is focussed on working through the end to end steps of building a real (albeit simple) application – MongoPop. Part 2: Using MongoDB With Node.js created an environment where we could work with a MongoDB database from Node.js; it also created a simplified interface to the MongoDB Node.js Driver. Part 3: Building a REST API with Express.js built on Part 2 by using Express.js to add a REST API which will be used by the clients that we implement in the final posts. Part 4: Building a Client UI Using Angular 2 (formerly AngularJS) & TypeScript completed the MEAN stack by adding an Angular 2 client.
This post is similar to Part 4 except that it uses ReactJS rather than Angular to implement a remote web-app client for the Mongopop application – completing the full MERN application stack.
ReactJS (recap)
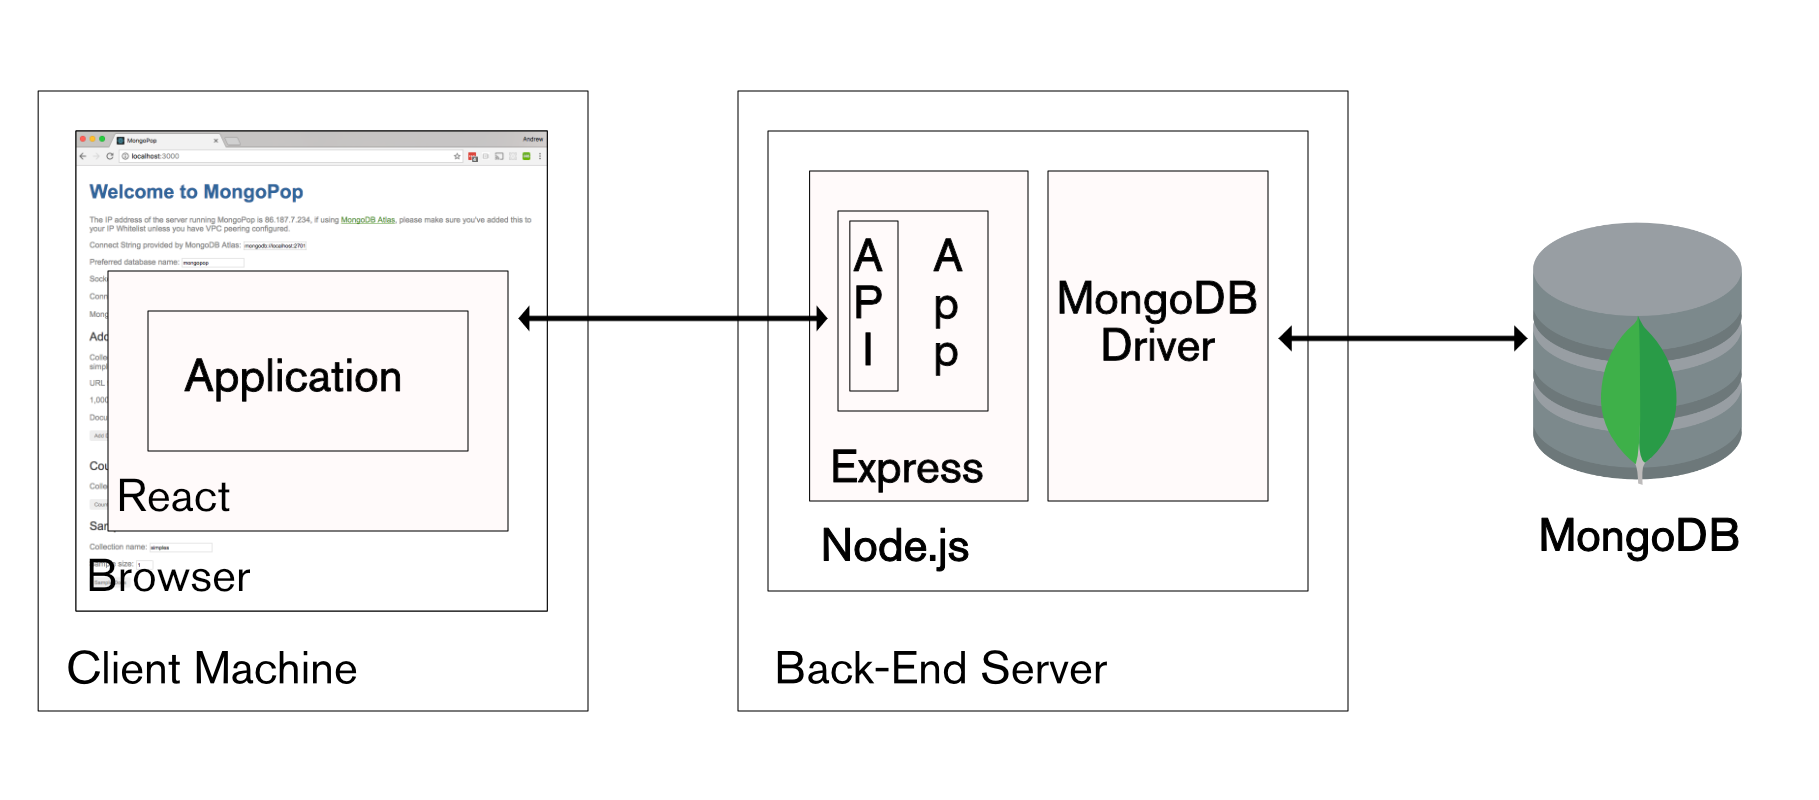
MERN Stack architecture with React
React (alternatively referred to as ReactJS), is an up and coming alternative to Angular. It is a JavaScript library, developed by Facebook and Instagram, to build interactive, reactive user interfaces. Like Angular, React breaks the front-end application down into components. Each component can hold its own state_and a parent can pass its state down to its child components (as _properties) and those components can pass changes back to the parent through the use of callback functions. Components can also include regular data members (which are not state or properties) for data which isn’t rendered.
State variables should be updated using the setState function – this allows ReactJS to calculate which elements of the page need to be refreshed in order to reflect the change. As refreshing the whole page can be an expensive operation, this can represent a significant efficiency and is a big part of what makes React live up to its name as “reactive”.
React components are typically implemented using JSX – an extension of JavaScript that allows HTML syntax to be embedded within the code.
React is most commonly executed within the browser but it can also be run on the back-end server within Node.js, or as a mobile app using React Native.
JSX & ReactJS
It’s possible to implement ReactJS components using ‘pure’ JavaScript (though, we’ve already seen in this series that it’s more complicated than that) but it’s more typical to use JSX. JSX extends the JavaScript syntax to allow HTML and JavaScript expressions to be used in the same code – making the code concise and easy to understand.
Components can be implemented as a single function but in this post a class is used as it offers more options. The following code implements a very simple component:
class HelloMessage extends React.Component {
  render() {
    return <div>Hello {this.props.name}</div>;
  }
}
By extending React.Component, we indicate that the class implements a component and that the render() method returns the contents of that component
The enclosing component can pass data down to this component as properties (accessed within the component as this.props); in this case, there is just one – name. JavaScript can be included at any point in the returned HTML by surrounding it with braces {this.props.name}. The enclosing component would include this code within its own render() method, where userName is part of that component’s state.:
<HelloMessage
name={this.state.userName}
/>
The state data member for a component should include all of the variable values that are to be rendered (apart from those that have been passed down as properties). State values can be initialized directly in the class’s constructor function but after that, the setState({userName: "Andrew"}) method should be used so that ReactJS knows that any elements containing userName should be rerendered.
JSX gets compiled into JavaScript before it’s used (this post uses the Babel compiler) and so there are no special dependencies on the browser.
Downloading, running, and using the Mongopop ReactJS application
The compiled ReactJS client code is included as part if the Mongopop package installed in Part 2: Using MongoDB With Node.js.
The back-end application should be installed & run in the same way as in parts 2 & 3:
git clone git@github.com:am-MongoDB/MongoDB-Mongopop.git
cd MongoDB-Mongopop
npm install
npm run express
Run the ReactJS client by browsing to http://<back-end-server>:3000/react.
Unlike the Angular client, the ReactJS application is developed and built as a separate project, and then compiled results are copied to public/react in the back-end server (this is covered in the next section).
Build and deploy
To access the source and build an updated version of the client, a new GitHub repository must be downloaded – MongoDB-Mongopop-ReactJS:
git clone git@github.com:am-MongoDB/MongoDB-Mongopop-ReactJS.git
cd MongoDB-Mongopop-ReactJS
As with the back-end and the Angular client, package.json includes a list of dependencies as well as scripts:
{
  "name": "mongopop-react-client",
  "version": "0.1.0",
  "private": false,
  "homepage": "http://localhost:3000/react",
  "devDependencies": {
    "react-scripts": "0.8.5"
  },
  "dependencies": {
    "mongodb": "^2.2.20",
    "react": "^15.4.2",
    "react-dom": "^15.4.2"
  },
  "scripts": {
    "start": "react-scripts start",
    "build": "react-scripts build",
    "eject": "react-scripts eject"
  }
}
Before running any of the software, the Node.js dependencies (as defined in package.json must be installed into the node_modules directory):
npm install
To compile the JSX code, start the development server, and run the ReactJS client, run:
export PORT=3030 # As Express is already using 3000 on this machine
npm start
This should automatically open the application within your browser. Note that the ReactJS code was loaded from a local development server but it will use the real REST API running in the back-end.
Note that when running in this mode, you may get errors when your browser tries accessing the REST API – this is because browsers typically block cross-site scripting. To work around this, install this extension from the Google Chrome store.
If you make changes to the ReactJS client and want to include them in the real back-end then build a new, optimized version:
npm run build
The contents of the MongoDB-Mongopop-ReactJS/build folder should then be copied to MongoDB-Mongopop/public/react.
To see exactly what react-scripts is doing for these operations, review the scripts in node_modules/react-scripts/scripts.
Component architecture of the Mongopop ReactJS UI
Most ReactJS applications are built from one or more, nested components – Mongopop is no exception:

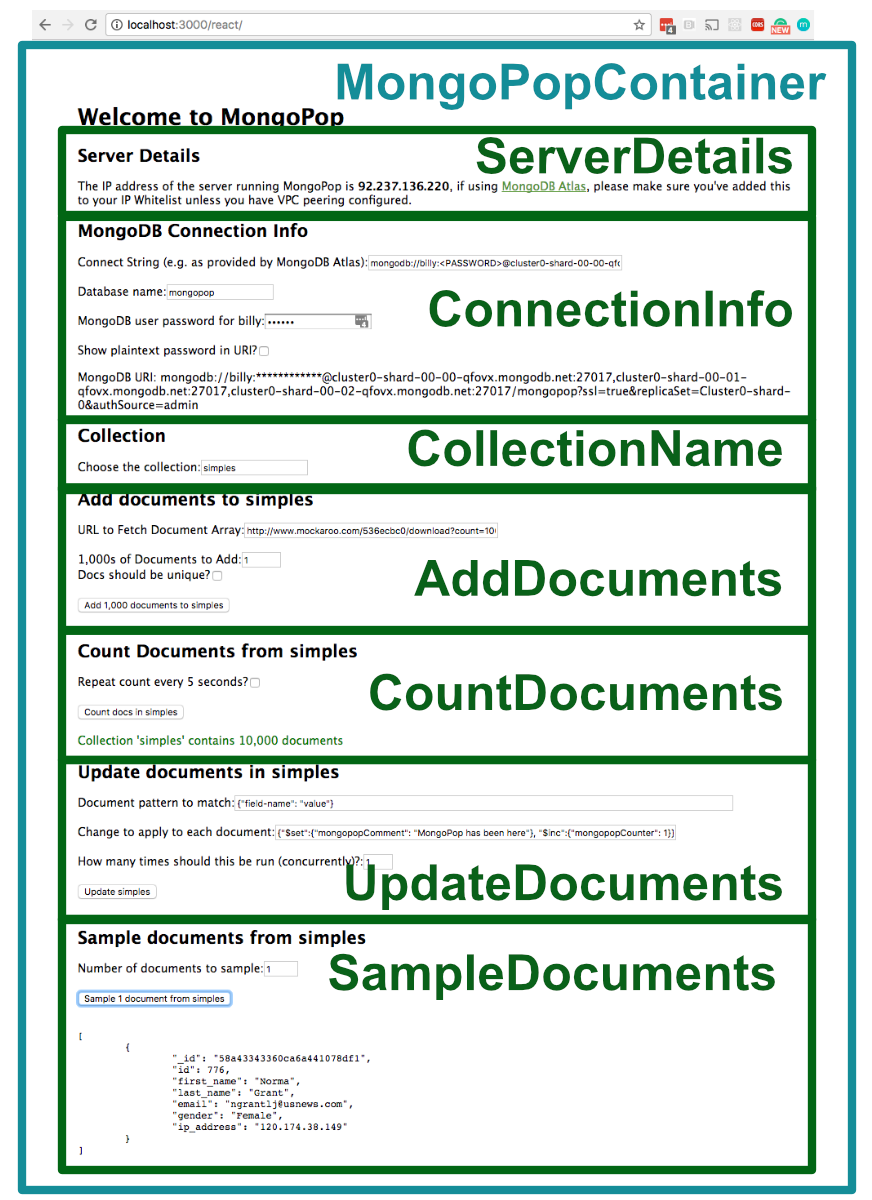
ReactJS components making up the Mongopop client app
The top-level component (MongoPopContainer) renders the “Welcome to MongoPop” heading before delegating the the rest of the page to seven sub-components.
MongoPopContainer is implemented by a JSX class of the same name. The class contains the state variables for any information which must be used by more than one sub-component (e.g. the collection name). It also includes handler functions that will be used by sub-components when they make changes to any state variable passed down. The class implements the render() function which returns the expression that ReactJS must convert to HTML for rendering; in addition to the opening <h1>Welcome to MongoPop</h1>, it includes an element for each of the sub-components. As part of those element definitions, it passes down state variables (which the sub-component receives as properties):
<CountDocuments
  dataService={this.dataService}
  collection={this.state.MongoDBCollectionName}
/>
Changes to a data value by a parent component will automatically be propagated to a child – it’s best practice to have data flow in this direction as much as possible. If a data value is changed by a child and the parent (either directly or as a proxy for one of its other child components) needs to know of the change, then the child triggers an event. That event is processed by a handler registered by the parent – the parent may then explicitly act on the change, but even if it does nothing explicit, the change flows to the other child components.
Each of the sub-components is implemented by its own JSX class – e.g. CountDocuments.
Mongopop is a reasonably flat application with only one layer of sub-components below MongoPopContainer, but more complex applications may nest deeper and reuse components.
This table details what data is passed from MongoPopContainer down to each of its children and what data change events are sent back up to MongoPopContainer (and from there, back down to the other children):
| Child component | Data passed down | Data changes passed back up |
|---|---|---|
ServerDetails |
Data service | |
ConnectionInfo |
Data service | |
CollectionName |
Data service | Collection Name |
AddDocuments |
Collection Name | |
| Data service | ||
CountDocuments |
Collection Name | |
| Data service | ||
UpdateDocuments |
Collection Name | |
| Data service | ||
| Sample data to play with | ||
SampleDocuments |
Collection Name | Sample data to play with |
| Data service |
What are all of these files?
To recap, the files and folders covered earlier in this series (for the back-end, under MongoDB-Mongopop folder):
package.json: Instructs the Node.js package manager (npm) what it needs to do; including which dependency packages should be installednode_modues: Directory wherenpmwill install packagesnode_modues/mongodb: The MongoDB driver for Node.jsnode_modues/mongodb-core: Low-level MongoDB driver library; available for framework developers (application developers should avoid using it directly)javascripts/db.js: A JavaScript module we’ve created for use by our Node.js apps (in this series, it will be Express) to access MongoDB; this module in turn uses the MongoDB Node.js driver.config.js: Contains the application–specific configuration optionsbin/www: The script that starts an Express application; this is invoked by thenpm startscript within thepackage.jsonfile. Starts the HTTP server, pointing it to theappmodule inapp.jsapp.js: Defines the main back-end application module (app). Configures:- That the application will be run by Express
- Which routes there will be & where they are located in the file system (
routesdirectory) - What view engine to use (Jade in this case)
- Where to find the views to be used by the view engine (
viewsdirectory) - What middleware to use (e.g. to parse the JSON received in requests)
- Where the static files (which can be read by the remote client) are located (
publicdirectory) - Error handler for queries sent to an undefined route
views: Directory containing the templates that will be used by the Jade view engine to create the HTML for any pages generated by the Express application (for this application, this is just the error page that’s used in cases such as mistyped routes (“404 Page not found”))routes: Directory containing one JavaScript file for each Express routeroutes/pop.js: Contains the Express application for the/poproute; this is the implementation of the Mongopop REST API. This defines methods for all of the supported route paths.
public: Contains all of the static files that must be accessible by a remote client (e.g., our Angular to React apps).
In addition, for the ReactJS client application:
public/reactThe deployed ReactJS client code; e.g. the JSX code that has been compiled down into vanilla JavaScript
More significant for this post are the new files introduced under the MongoDB-Mongopop-ReactJS folder:
build: Directory containing the compiled and optmized JavaScript (to be copied to the back-end)node-modules: Node.js modules used by the ReactJS client application (as opposed to the Express, server-side Node.js modules)public/index.html: Outer template for the application (includes therootdiv element)src: Directory JSX source code files we write for the applicationindex.js: Top-level JSX for the client; creates the<App />element as a placeholder to be expanded by App.jsApp.js: Replaces the<App />element fromindex.jswith the output from theMongoPopContainercomponent/class. Includes the rest of the client componentsX.component.js: Class implementing sub-component Xdata.service.js: Service used to interact with the back-end REST API (mostly used to access the database)
package.json: Instructs the Node.js package manager (npm) what it needs to do; including which dependency packages should be installed
“Boilerplate” files and how they get invoked
If you’ve already read Part 4: Building a Client UI Using Angular 2 (formerly AngularJS) & TypeScript, you should be relieved to see that far fewer source files are involved before reaching the actual application code:

Relationships between ReactJS files
public/index.html defines a div element with its id set to root:
src/index.js accesses the root element from public/index.html so that it can be populated with the output from the application. It imports src/App.js and creates the <App /> element.
src/App.js defines the App class to satisfy the App element in src/index.js; that class renders the <MongoPopContainer /> element, which is made up of all of the sub-components. App.js imports each of the sub-component source files (X.component.js) so that they can implement those components. It also imports src/data.service.js to give access to the back-end Mongopop REST API:
Calling the REST API
The Data Service class hides the communication with the back-end REST API; serving two purposes:
- Simplifying all of the components’ code
- Shielding the components’ code from any changes in the REST API signature or behavior – that can all be handled within the DataService
The functions of the data service return promises to make working with their asynchronous behaviour simpler. Refer back to Part 2: Using MongoDB With Node.js if you need a recap on using promises.
As a reminder from Part 3: Building a REST API with Express.js, this is the REST API we have to interact with:
| Route Path | HTTP Method | Parameters | Response | Purpose
|
|---|---|---|---|---|
/pop/ |
GET |
{
"AppName": "MongoPop",
"Version": 1.0
}
|
Returns the version of the API. | |
/pop/ip |
GET |
{"ip": string}
|
Fetches the IP Address of the server running the Mongopop backend. | |
/pop/config |
GET |
{
mongodb: {
    defaultDatabase: string,
    defaultCollection: string,
    defaultUri: string
},
mockarooUrl: string
}
|
Fetches client-side defaults from the back-end config file. | |
/pop/addDocs |
POST |
{
MongoDBURI: string;
collectionName: string;
dataSource: string;
numberDocs: number;
unique: boolean;
}
|
{
success: boolean;
count: number;
error: string;
}
|
Add `numberDocs` batches of documents, using documents fetched from `dataSource` |
/pop/sampleDocs |
POST |
{
MongoDBURI: string;
collectionName: string;
numberDocs: number;
}
|
{
success: boolean;
documents: string;
error: string;
}
|
Read a sample of the documents from a collection. |
/pop/countDocs |
POST |
{
MongoDBURI: string;
collectionName: string;
}
|
{
success: boolean;
count: number;
error: string;
}
|
Counts the number of documents in the collection. |
/pop/updateDocs |
POST |
{
MongoDBURI: string;
collectionName: string;
matchPattern: Object;
dataChange: Object;
threads: number;
}
|
{
success: boolean;
count: number;
error: string;
}
|
Apply an update to all documents in a collection which match a given pattern |
This data access class uses the XMLHttpRequest API to make asynchronous HTTP requests to the REST API running in the back-end (mostly to access MongoDB).
One of the simplest functions that data.service.js provides is fetchConfig which sends an HTTP GET request to the back-end to retrieve default the client configuration parameters:
When using this API, the application registers handler functions against a number of possible events; in this case:
onreadystatechange: triggered if/when a successful HTTP response is receivedonerror&onabort: triggered when there has been a problem
The method returns a promise which subsequently – via the bound-in function (processRequest & processError) – either:
- Provides an object representing the received response
- Raises an error with an appropriate message
The baseURL data member is set to http://localhost:3000/pop but that can be changed by editing the data service creation line in App.js:
this.dataService = new DataService("http://localhost:3000/pop");
Another of the methods sends a POST message to the REST API’s pop/addDocs route path to request the bulk addition of documents to a MongoDB collection:
The program flow is very similar to that of the previous function and, in the success case, it eventually resolves the returned promise with a count of the number of documents added.
A final method from the DataService class worth looking at is calculateMongoDBURI() which takes the MongoDB URI provided by MongoDB Atlas and converts it into one that can actually be used to access the database – replacing the <DATABASE> and <PASSWORD> placeholders with the actual values:
The function stores the final URI in the data service class’s MongoDBURI data member – to sent to the back-end when accessing the database (see sendAddDocs above). It also returns a second value (MongoDBURIRedacted) with the password masked out – to be used when displaying the URI.
A simple component that accepts data from its parent
Recall that the application consists of eight components: the top-level application which contains each of the ServerDetails, ConnectionInfo, CollectionName, AddDocuments, CountDocuments, UpdateDocuments, and SampleDocuments components.
When building a new application, you would typically start by designing the the top-level component and then working downwards. As the top-level container is, perhaps, the most complex one to understand, we’ll start at the bottom and then work up.
A simple sub-component to start with is the AddDocuments component:
ReactJS component
A central design decision for any component is what state is required (any variable data that is to be rendered by the component should either be part of the component’s state or of the properties passed by its parent component). The state is initialised in the class’s constructor:
Recall that any state variable X can be read using this.state.X but only the constructor should write to it that way – anywhere else should use the setState() function so that ReactJS is made aware of the change – enabling it to refresh any affected elements. In this class, there are six state variables:
MockarooURL: The URL from a service such as Mockaroo which will return an array containing a set of example JSON documentsnumDocsToAdd: How many batches of documents should be added (with the default value ofMockarooURL, each batch contains 1,000 documents)uniqueDocs: Whether each batch should be distinct from the other batches (this significantly slows things down)numDocsAdded: Updated with the number of added documents in the event that the operation succeedserrorText: Updated with an error message in the event that the operation failsaddedCollection: Name of the collection that documents were last added to (initialized with thecollectionproperty passed by the parent component)

ReactJS state variables
Note that the constructor receives the properties passed down from the parent component. The constructor from the React.Component class must always be invoked within the component’s constructor: super(props).
The binds at the end of the constructor make this available for use within the class’s methods.
Further down in the class is the render() method which returns the content that ReactJS converts to HTML and JavaScript for the browser to render:
Recall that when coding in JSX, JavaScript can be embedded in the HTML by surrounding it with braces. The function uses that almost immediately to include the collection name in the component’s header: <h2>Add documents to {this.props.collection}</h2>.
The first input is initialized with this.state.MockarooURL and if the user changes the value then this.handleURLChange is invoked – which in turn updates the state value:
The same pattern holds for the inputs for numDocsToAdd & uniqueDocs.
When this component’s button is pressed, the onClick event calls this.handleAddSubmit():
This function invokes the sendAddDocs() method of the data service that was passed down from the parent component (and so is part of this.props). sendAddDocs() returns a promise and the first function in the then clause is called if/when that promise is successfully resolved – setting the numDocsAdded state to the number of added documents; if the promise is instead rejected then the second function is called – setting the error message. In either case, the state change will cause the associated element to be rerendered:
Passing data down to a sub-component (and receiving changes back)
The AddDocs component is embedded within the render()method of MongoPopContainer component class; implemented in App.js:
It passes down two items:
dataServiceis an instance of theDataServiceclass and is used to access the back-end (in particular, to interact with MongoDB). Appears as part ofAddDocument‘s properties and can be accessed asthis.props.dataService.collectionis a string representing the collection name. Appears as part ofAddDocument‘s properties and can be accessed asthis.props.collection.
MongoDBCollectionName is initialized, and dataService is instantiated as part of the MongoPopContainer constructor:
Note that for a real, deployed application, http://localhost:3000/pop would be replaced with the public URL for REST API. Additionally, you should consider adding authentication to the API .
But where did the collection name get set – the constructor initialized it to an empty string but that’s not we see when running the application? There’s a clue in the constructor:
this.handleCollectionChange=this.handleCollectionChange.bind(this);
Recall that a bind like this is to allow a function (this.handleCollectionChange()) to access the this object:
The handleCollectionChange() method is passed down to the CollectionName component:
This is the CollectionName component class:
CollectionName has a single state variable – collection – which is initially set in the componentDidMount() method by fetching the default client configuration information from the back-end by calling this.props.dataService.fetchConfig(). componentDidMount is one of the component lifecycle methods that are part of any React.Component class – it is invoked after the component has been loaded into the browser, it is where you would typically fetch any data from the back-end that’s needed for the component’s starting state. After setting the collection state, the change notification function passed down by the parent component is invoked to pass up the new value:
_this.props.onChange(_this.state.collection);
Of course, the user needs to be able to change the collection name and so an input element is included. The value of the element is initialized with the collection state variable and when the user changes that value, this.handleCollectionNameChange is invoked. In turn, that method updates the component state and passes the new collection name up to the parent component by calling the change notification method provided by the parent.
Optionally empty components
It’s common that a component should only display its contents if a particular condition is met. Mongopop includes a feature to allow the user to apply a bulk change to a set of documents – selected using a pattern specified by the user. If they don’t know the typical document structure for the collection then it’s unlikely that they’ll make a sensible change. Mongopop forces them to first retrieve a sample of the documents before they’re given the option to make any changes.
This optionality is implemented through the SampleDocuments & UpdateDocuments components:
| Child component | Data passed down | Data changes passed back up |
|---|---|---|
UpdateDocuments |
Collection Name | |
| Data service | ||
| Sample data to play with | ||
SampleDocuments |
Collection Name | Sample data to play with |
| Data service |
Recall that the MongoPopContainer component class includes a state variable named DataToPlayWith which is initialized to FALSE:
That state is updated using the handleDataAvailabiltyChange method:
That method is passed down to the SampleDocuments component:
When the user fetches a sample of the documents from a collection, the SampleDocuments component invokes the change notification method (_this.props.onDataToWorkWith()), passing back TRUE if the request was a success, FALSE otherwise:
MongoPopContainer passes its state variable DataToPlayWith down to the UpdateDocuments component:
The UpdateDocuments component class is then able to check the value using:
Otherwise, the rest of this component is similar to those already seen:
Periodic operations
The CountDocuments component has an extra feature – if the repeat option is checked then it will fetch and display the document count every five seconds. The function that’s called when the count button is clicked, checks the value of the state variable associated with the checkbox and if it’s set, calls setInterval() to call the countOnce() method every five seconds:
The timer is cleared (clearInterval()) if there is an error or just before the component is unmounted (in componentWillUnmount).
Other components
For completeness, this is the full top-level component, App.js, which includes the rest of the sub-components:
Testing & debugging the ReactJS application
Now that the full MERN stack application has been implemented, you can test it from within your browser:
Debugging the ReactJS client is straightforward using the Google Chrome Developer Tools which are built into the Chrome browser. Despite the browser executing the transpiled JavaScript the Dev Tools allows you to navigate and set breakpoints in your JSX code:
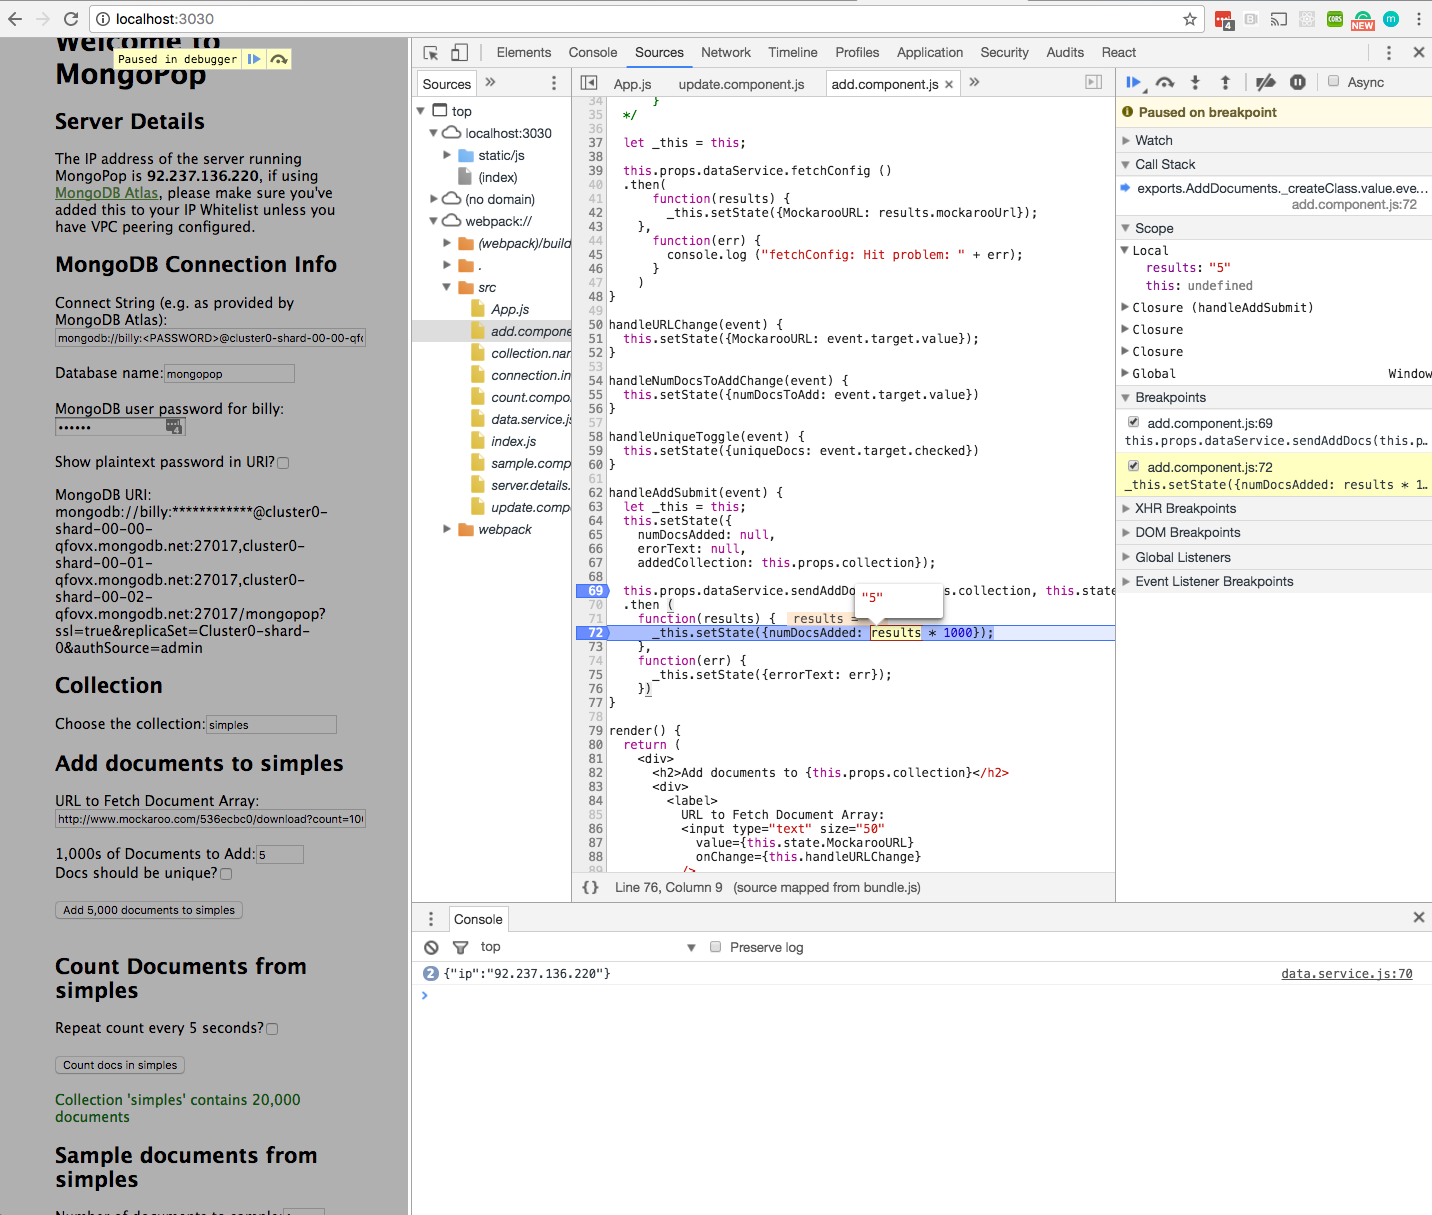
Debug React JSX with Google Chrome Developer tools
If there is a compilation error then the error is sent to the browser:
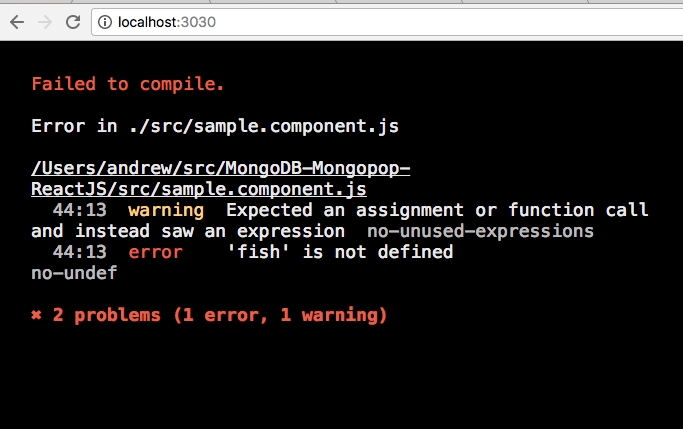
ReactJS Compile errors in Google Chrome Developer tools
By installing the React Developer Tools from the Google Chrome Store, you get an extra “React” tab that can be used to view or modify the state or properties for any of the components:
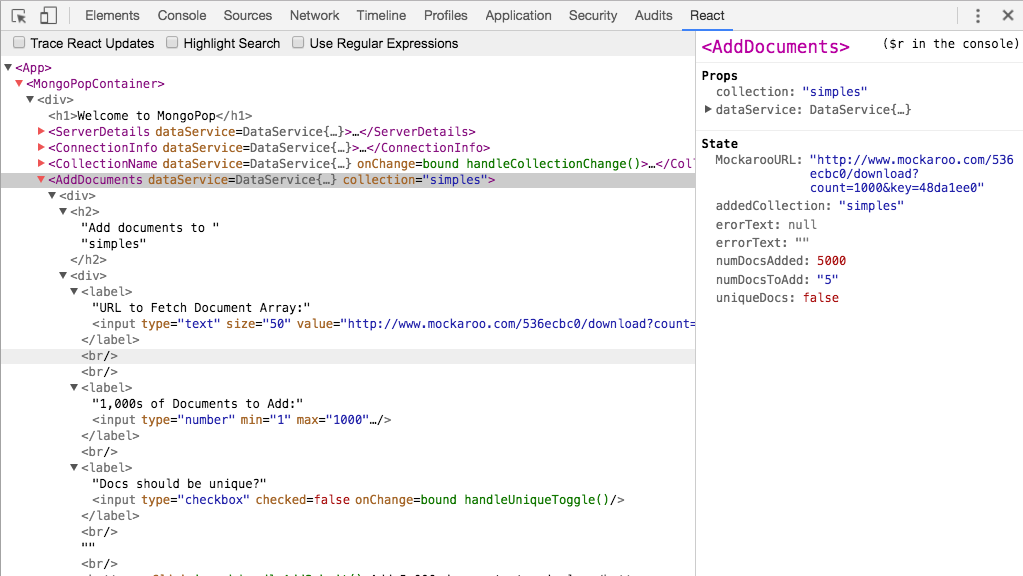
React in Google Chrome Developer tools
ReactJS vs. Angular
So should you use Angular 2 or React for your new web application? A quick Google search will find you some fairly deep comparisons of the two technologies but in summary, Angular 2 is a little more powerful while React is easier for developers to get up to speed with and use (note how many fewer files are needed). The previous blog in this series built the Mongopop client application using Angular 2, while this one built a near-identical app using ReactJS – hopefully these posts have helped you pick a favorite.
The following snapshot from Google Trends suggests that Angular has been much more common for a number of years but that React is gaining ground:
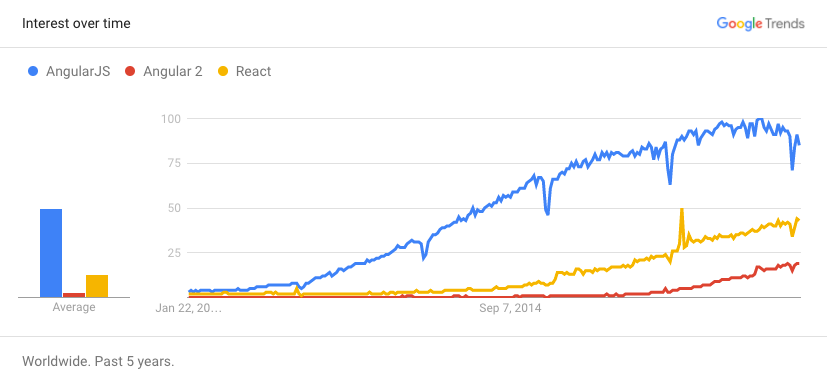
ReactJS popularity vs. Angular and Angular 2
Summary & what’s next in the series
Previous posts stepped through building the Mongopop application back-end and then the creation of an Angular 2 client application. This post described how to build a front-end client using ReactJS. At this point, we have a complete, working, MERN stack application.
The coupling between the front and back-end is loose; the client simply makes remote, HTTP requests to the back-end service – using the interface created in Part 3: Building a REST API with Express.js.
This series will finish by demonstrating alternate methods to implement front-end client applications that aren’t browser-based.
Continue to the final post this blog series to discover some more unconventional ways to use the Mongopop REST API:
* Part 1: Introducing The MEAN Stack (and the young MERN upstart)
* Part 2: Using MongoDB With Node.js
* Part 3: Building a REST API with Express.js
* Part 4: Building a Client UI Using Angular 2 (formerly AngularJS) & TypeScript
* Part 5: Using ReactJS, ES6 & JSX to Build a UI (the rise of MERN)
* Part 6: Browsers Aren’t the Only UI – Mobile Apps, Amazon Alexa, Cloud Services…
A simpler way to build your app – MongoDB Stitch, Backend as a Service
MongoDB Stitch is a backend as a service (BaaS), giving developers a REST-like API to MongoDB, and composability with other services, backed by a robust system for configuring fine-grained data access controls. Stitch provides native SDKs for JavaScript, iOS, and Android.
Built-in integrations give your application frontend access to your favorite third party services: Twilio, AWS S3, Slack, Mailgun, PubNub, Google, and more. For ultimate flexibility, you can add custom integrations using MongoDB Stitch’s HTTP service.
MongoDB Stitch allows you to compose multi-stage pipelines that orchestrate data across multiple services; where each stage acts on the data before passing its results on to the next.
Unlike other BaaS offerings, MongoDB Stitch works with your existing as well as new MongoDB clusters, giving you access to the full power and scalability of the database. By defining appropriate data access rules, you can selectively expose your existing MongoDB data to other applications through MongoDB Stitch’s API.
If you’d like to try it out, step through building an application with MongoDB Stitch.


