Archive for April 13, 2011

Delayed Replication in MySQL 5.6 Development Release

The new Development Release for MySQL 5.6 contains a great feature that our users have been asking for for a while (work log 344 first raised in 2010!) – delayed replication.

Stop mistake being propagated

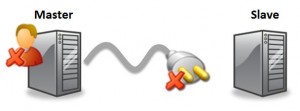
The concept (and as you’ll see the execution) is extremely simple. If a user makes a mistake on the master – such as dropping some critical tables – then we want to give them the opportunity to recover the situation by using the data held on one of the slaves. The problem is that the slave is busily trying to keep up with the master and in all likelihood will have dropped these tables before the user has time to pull the plug on the replication stream. What this feature does is give the DBA the option to introduce a configurable delay into the replication process so that they have time to cut it off before the mistake is propagated.

This blog explains how this works, how to set that up and then how to bring the slave up to date (to the point in time just before the mistake was made on the master).

MySQL Replication Implementation

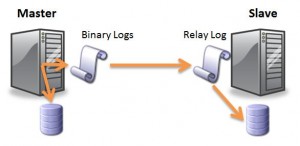
To understand how this is implemented, it helps to have a little bit of background on how MySQL replication is implemented. When a change is made on the master, it is applied to the master’s local disk copy and then written to the binary log. The change is then asynchronously (but normally immediately) copied from the master’s binary log to the relay log on the slave; from there an SQL thread on the slave will read the change from the relay log and apply it to the slave’s copy of the data.

This feature works by allowing the user to configure a delay between when the change is applied on the master and when that change is taken from the relay log and applied to the slave. Note that if the master fails during this delay period then the change is not lost as it is has already been safely recorded in the slave’s relay log.

Immediate & Delayed Replication

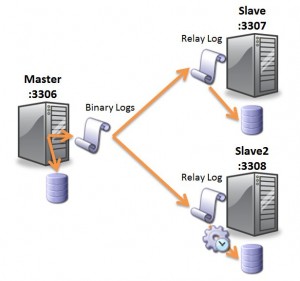
As the delay is implemented on the slave, you are free to use ‘real-time’ replication to one slave (to allow the fastest possible failover if the master fails) and delayed replication to a second slave to guard against user error. This is the setup that this post steps through.

For simplicity, all three MySQL Servers will be run on a single host but each uses a different port number as shown in the diagram. “slave” will apply changes as quickly as it can while “slave2” will introduce a delay when applying changes from its relay log.

Setting up the first slave is very standard:

master> CREATE USER repl_user@localhost;
master> GRANT REPLICATION SLAVE ON *.* TO 
  repl_user@localhost IDENTIFIED BY 'pw';
slave> CHANGE MASTER TO
 -> MASTER_HOST = 'localhost',
 -> MASTER_PORT = 3306,
 -> MASTER_USER = 'repl_user',
 -> MASTER_PASSWORD = 'pw';
slave> start slave;
When setting up the delayed slave, one extra parameter is included in the CHANGE MASTER command:
slave2> CHANGE MASTER TO
 -> MASTER_HOST = 'localhost',
 -> MASTER_PORT = 3306,
 -> MASTER_USER = 'repl_user',
 -> MASTER_PASSWORD = 'pw',
 -> MASTER_DELAY = 20;
slave2> START SLAVE;
The MASTER_DELAY parameter indicates the delay in seconds (here I’ve used 20 seconds – in a production environment you’d probably want to give your self much longer.
Prior to this, a simple table had already been created:
master> CREATE DATABASE clusterdb;USE clusterdb;
master> CREATE TABLE towns (Town VARCHAR(20));
Next we check that changes are immediately applied on slave while delayed on slave2:
master> REPLACE INTO towns VALUES ("Maidenhead"),("Bray");
slave> SELECT * FROM towns;
 +------------+
 | Town       |
 +------------+
 | Maidenhead |
 | Bray       |
 +------------+
slave2> SELECT * FROM towns;
 Empty set (0.00 sec)

slave2> SELECT * FROM towns;
 +------------+
 | Town       |
 +------------+
 | Maidenhead |
 | Bray       |
 +------------+
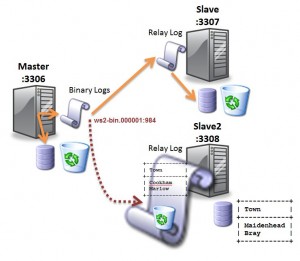
The next step is to simulate a user error; I add some more data to the table and then drop the table. Following on from that I stop the replication on slave2 before the mistake is applied:
master> REPLACE INTO towns VALUES ("Cookham"),("Marlow");
master> DROP TABLE towns;
slave> SELECT * FROM tables;
     ERROR 1146 (42S02): Table 'clusterdb.tables' doesn't exist
slave2> STOP SLAVE;
slave2> SELECT * FROM towns;
 +------------+
 | Town       |
 +------------+
 | Maidenhead |
 | Bray       |
 +------------+

Bring the Slave up to the Desired Point in Time

This is a good start, while slave has dropped the table, it still exists on slave2. Unfortunately, slave2 is missing the additions to the table that were made just before the mistake was made. The next step is to bring slave 2 almost up to date – stopping just before the table was dropped. To do this we need to find the position within the master’s binary log just before the table was dropped – this can be done using the SHOW BINLOG EVENTS command on the master. Once we have that position (file-name + position) we can tell slave 2 to catch up just to that point using START SLAVE UNTIL . Once that has been done, I check that the extra 2 inserts have been applied to slave2:

master> SHOW BINLOG EVENTSG
....
*************************** 10. row ***************************
 Log_name: ws2-bin.000001
 Pos: 842
 Event_type: Query
 Server_id: 1
 End_log_pos: 957
 Info: use `clusterdb`; REPLACE INTO towns VALUES ("Cookham"),("Marlow")
 *************************** 11. row ***************************
 Log_name: ws2-bin.000001
 Pos: 957
 Event_type: Xid
 Server_id: 1
 End_log_pos: 984
 Info: COMMIT /* xid=32 */
 *************************** 12. row ***************************
 Log_name: ws2-bin.000001
 Pos: 984
 Event_type: Query
 Server_id: 1
 End_log_pos: 1096
 Info: use `clusterdb`; DROP TABLE `towns` /* generated by server */
slave2> START SLAVE UNTIL
 -> MASTER_LOG_FILE='ws2-bin.000001',
 -> MASTER_LOG_POS=984;
slave2> SELECT * FROM towns;
 +------------+
 | Town       |
 +------------+
 | Maidenhead |
 | Bray       |
 | Cookham    |
 | Marlow     |
 +------------+

Success! Now slave2 contains exactly the data we need. After this it’s up to you what to do next; typically this could involve promoting slave2 to be the new master.

If you want to try this out for yourselves then you can download the MySQL 5.6 Milestone Development Release from dev.mysql.com (select the Development Maintenance Release sub-tab to get MySQL 5.6).


Feature Preview – Multi-Threaded Replication Slaves

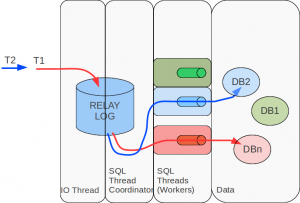
This week, MySQL released a feature-preview – the ability to have multiple threads on the slave so that it is better able to keep pace with the updates being applied on the master. To simplify potential sequencing issues, all updates for a particular database will be handled by the same thread – in other words you need to make sure that your application uses multiple databases in order to see the benefits.
Luís Soares (from the development team) has written a great Blog going into the details.


Sharing user credentials between MySQL Servers with Cluster

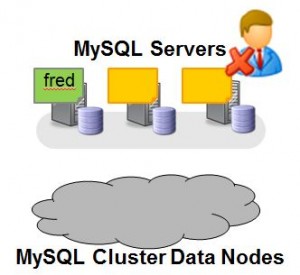
Fig. 1 User privileges stored in MyISAM

The Developer Release for MySQL Cluster 7.2 includes a new feature that allows the system data required for checking user access to be shared amongst all of your MySQL Servers. By default all of the tables holding these credentials are stored in MyISAM and so are local to that MySQL Server.

This can become painful to manage – every time you want to create a new user or change their permissions you need to repeat it on every server, miss one out and the user won’t be able to access that server (or will still be able to access it after you withdraw their privileges).

This is illustrated in Fig.1 – The user “fred” is created on one MySQL Server but when Fred attempts to connect to one of the MySQL Servers they’re blocked. This maybe what you wanted to happen but probably not.

In this post, we’ll see how to change this behaviour but first we’ll confirm the default behaviour.

Obviously, it makes sense to try this out for yourself and you can download the source or binaries from http://dev.mysql.com/downloads/cluster/ (select the sub-tab for the Development Milestone Release).

The first step is to run Cluster with multiple MySQL Servers – if you’re not comfortable with how to do this then refer to this post on how to distribute MySQL Cluster over multiple hosts.

Four mysql client connections will be used – one for root to connect to server 1; one for Fred to connect to server 1; one for root to connect to server 2 and one for Fred to try connecting to server 2.

So, let’s create Fred on server 1 and a table for him to access:

$ mysql -h 192.168.1.7 -P3306 -u root --prompt 'server1-root> '
server1-root> GRANT ALL ON *.* TO 'fred'@'192.168.1.7';
server1-root> CREATE DATABASE clusterdb; USE clusterdb;
server1-root> CREATE TABLE towns (id INT NOT NULL PRIMARY KEY,
  town VARCHAR(20)) ENGINE=NDBCLUSTER;
server1-root> REPLACE INTO towns VALUES (1,'Maidenhead'),(2, 'Reading');

Next we confirm that Fred can access this data when connecting through server 1:

$ mysql -h 192.168.1.7 -P3306 -u fred --prompt 'server1-fred> '
server1-fred> SELECT * FROM clusterdb.towns;
+----+------------+
| id | town       |
+----+------------+
|  1 | Maidenhead |
|  2 | Reading    |
+----+------------+

Now try the same thing from server 2:

$ mysql -h 192.168.1.7 -P3307 -u fred --prompt 'server2> '
server2-fred> SELECT * FROM clusterdb.towns;
ERROR 1142 (42000): SELECT command denied to user ''@'ws2.localdomain'
 for table 'towns'

What we need to do next is to run a script (as MySQL root) and then a stored procedure to convert 5 tables from the mysql database (“user”, “db”, “tables_priv”, “columns_priv” & “procs_priv”) from the MyISAM to the ndbcluster storage engine:

server1-root> SOURCE /usr/local/mysql/share/mysql/ndb_dist_priv.sql;
server1-root> CALL mysql.mysql_cluster_move_privileges();

We can confirm that the storage engine has changed, for example:

server1-root> SHOW CREATE TABLE mysql.userG
*************************** 1. row ***************************
      Table: userCreate Table: CREATE TABLE `user` (
  `Host` char(60) COLLATE utf8_bin NOT NULL DEFAULT '',
....
....
 ) ENGINE=ndbcluster DEFAULT CHARSET=utf8 COLLATE=utf8_bin COMMENT='Users
 and global privileges'

Note that “ENGINE=ndbcluster”.

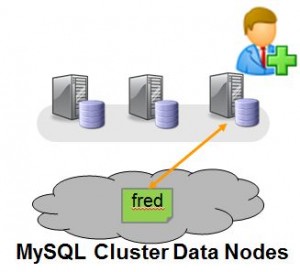
Fig. 2 User Privilege Tables Stored in MySQL Cluster

Now that these tables are stored in MySQL Cluster, they should be visible from all of the MySQL Servers. So now, whichever MySQL Server Fred attempts to connect through, that MySQL Server will fetch the privilege data from the shared data nodes rather than using local information and so Fred will get the same access rights. As our clusterdb.towns table was created using the ndbcluster storage engine as well, it is accessible from all servers and so Fred should now be able to see the contents of the table from server 2 as the access rights on server 2 now allow it. Note that the data already stored in those 5 mysql tables survived the migration from MyISAM to MySQL Cluster.

So the final test is to confirm that Fred really is allowed to get to this data from server 2:

$ mysql -h 192.168.1.7 -P3307 -u fred --prompt 'server2-fred>
server2-fred> SELECT * FROM clusterdb.towns;
+----+------------+
| id | town       |
+----+------------+
|  1 | Maidenhead |
|  2 | Reading    |
+----+------------+

Note that if “fred” were already connected to server2 then he would need to disconnect and reconnect.

Once server1 has been set up in this way, changes to the user privileges data can be made from any one of the mysql servers in the Cluster (not just server1) and they will be enforced by all of the MySQL Servers.

You can find the official documentation for this feature here.


Dramatically Increased MySQL Cluster JOIN performance with Adaptive Query Localization

Regular readers of this Blog or attendees at the 2010 O’Reilly MySQL Conference may recall a feature that the MySQL Cluster team were working to speed up JOINs (see Jonas’s slides from that conference here). The good news is that work has continued since then and it is now part of the new MySQL Cluster 7.2 Milestone Development Release. This post will step through where to get hold of the binaries and see the benefits for yourself. The examples I try here result in a 25x speedup just by turning the feature on – I’ve also seen a 50x speedup on other queries!

We’re anxious to get feedback on what benefits you see with your application’s JOINs, please respond to this post.

What’s in a name?

If some of this seems familiar but you don’t remember hearing the term “Adaptive Query Localization” before then you’re not going crazy – previous internal names were SPJ (Select Project Join) and Pushed-Down Joins. We just figured that Adaptive Query Localization was more descriptive.
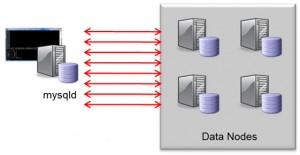
Classic Nested-Loop-Join

What does it do?

Traditionally, joins have been implemented in the MySQL Server where the query was executed. This is implemented as a nested-loop join; for every row from the first part of the join, a request has to be sent to the data nodes in order to fetch the data for the next level of the join and for every row in that level…. This method can result in a lot of network messages which slows down the query (as well as wasting resources).

When turned on, Adaptive Query Localization results in the hard work being pushed down to the data nodes where the data is locally accessible. As a bonus, the work is divided amongst the pool of data nodes and so you get parallel execution.
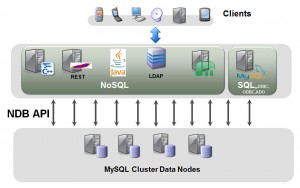
NDB API

How is it implemented?

I’ll leave the real deep and dirty details to others but cover the basic concepts here. All API nodes access the data nodes using the native C++ NDB API, the MySQL Server is one example of an API node (the new Memcached Cluster API is another). This API has been expanded to allowed parameterised or linked queries where the input from one query is dependent on the previous one.

To borrow an example from an excellent post by Frazer Clement on the topic, the classic way to implement a join would be…

SQL > select t1.b, t2.c from t1,t2 where t1.pk=22 and t1.b=t2.pk;
  ndbapi > read column b from t1 where pk = 22;
              [round trip]
           (b = 15)
  ndbapi > read column c from t2 where pk = 15;
              [round trip]
           (c = 30)
           [ return b = 15, c = 30 ]

Using the new functionality this can be performed with a single network round trip where the second read operation is dependent on the results of the first…

  ndbapi > read column @b:=b from t1 where pk = 22;
           read column c from t2 where pk=@b;
              [round trip]
           (b = 15, c = 30)
           [ return b = 15, c = 30 ]
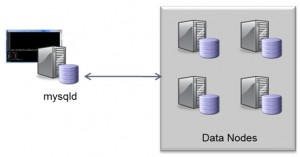
Effects of Adaptive Query Localization

Note that if your application is using the NDB API directly then you can use this same linked query functionality to speed up your queries.

Where do I get it?

Download the source or binaries from http://dev.mysql.com/downloads/cluster/ (select the sub-tab for the Development Milestone Release).

How do I use it?

The first step is to get you Cluster up and running. As the focus of this feature is to reduce the amount of network messaging, it makes sense to perform your tests on multiple machines; if you need pointers on setting Cluster up then check this post on running Cluster over multiple machines (or the Windows version).
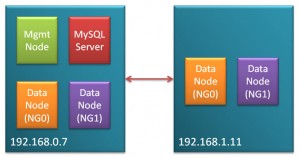
System Configuration

For my test, I used 2 PCs, each running Fedora 14 with Quad-Core CPU, 8 GBytes of RAM and Gigabit Ethernet connectivity. Each PC was running 2 data nodes (ndbd rather than ndbmtd) and one of the PCs was also running the management node and the MySQL Server running the queries (note that this configuration is not suitable for a HA deployment – for that run the management node on a third machine and run a MySQL Server on 192.168.1.11).

I’d hoped to go a step further and have the MySQL Server run on a third machine but hardware problems put paid to that – the reason that this would have been interesting is that it would have meant more of the messaging would be over the network and so would give a more realistic performance comparison (the speedup factor should have been higher). Another couple of steps that could further improve the speedup:

  1. Use multi-threaded data nodes (as more of the work is being done in the data nodes, this should help)
  2. Use machines with more cores
  3. Tune the configuration parameters (I’m keeping it as simple as possible here)

For reference, here is the configuration file used (config.ini):

 [ndb_mgmd]
 hostname=192.168.1.7
 datadir=/home/billy/mysql/spj/my_cluster/ndb_data
 NodeId=1

 [ndbd default]
 noofreplicas=2
 DiskPageBufferMemory=4M

 [ndbd]
 hostname=192.168.1.7
 datadir=/home/billy/mysql/spj/my_cluster/ndb_data
 NodeId=3

 [ndbd]
 hostname=192.168.1.11
 datadir=/home/billy/mysql/spj/my_cluster/ndb_data
 NodeId=4

 [ndbd]
 hostname=192.168.1.7
 datadir=/home/billy/mysql/spj/my_cluster/ndb_data2
 NodeId=5

 [ndbd]
 hostname=192.168.1.11
 datadir=/home/billy/mysql/spj/my_cluster/ndb_data2
 NodeId=6

 [mysqld]
 NodeId=50

And for the MySQL Server (my.cnf):

[mysqld]
ndbcluster
datadir=/home/billy/mysql/spj/my_cluster/mysqld_data

As a reminder – here is how you start up such a Cluster:

[billy@ws2 my_cluster]$ ndb_mgmd -f conf/config.ini --initial 
  --configdir=/home/billy/mysql/spj/my_cluster/conf/
[billy@ws2 my_cluster]$ ndbd -c 192.168.1.7:1186
[billy@ws1 my_cluster]$ ndbd -c 192.168.1.7:1186
[billy@ws2 my_cluster]$ ndbd -c 192.168.1.7:1186
[billy@ws1 my_cluster]$ ndbd -c 192.168.1.7:1186
[billy@ws2 my_cluster]$ ndb_mgm -e show # Wait until data nodes are running [billy@ws2 my_cluster]$ mysqld --defaults-file=conf/my.cnf& [billy@ws2 my_cluster]$ mysql -h 127.0.0.1 -P 3306 -u root

Three tables that are to be used for the queries and these are created as follows:

mysql> CREATE DATABASE clusterdb; USE clusterdb;
mysql> CREATE TABLE residents (id INT NOT NULL PRIMARY KEY, name VARCHAR(20),
  postcode VARCHAR(20)) ENGINE=ndb;
mysql> CREATE TABLE postcodes (postcode VARCHAR(20) NOT NULL PRIMARY KEY, 
  town VARCHAR(20)) ENGINE=ndb;
mysql> CREATE TABLE towns (town VARCHAR(20) NOT NULL PRIMARY KEY,
  county VARCHAR(20)) ENGINE=ndb;

I then added 100K rows to each of these tables; if you want to recreate this then you can download the data files here.

mysql> LOAD DATA LOCAL INFILE  "/home/billy/Dropbox/LINUX/projects/SPJ/residents.csv"
   REPLACE INTO TABLE residents FIELDS TERMINATED BY ',' ENCLOSED BY '"';
mysql> LOAD DATA LOCAL INFILE  "/home/billy/Dropbox/LINUX/projects/SPJ/postcodes.csv"
  REPLACE INTO TABLE postcodes FIELDS TERMINATED BY ',' ENCLOSED BY '"';
mysql> LOAD DATA LOCAL INFILE  "/home/billy/Dropbox/LINUX/projects/SPJ/towns.csv"
  REPLACE INTO TABLE towns FIELDS TERMINATED BY ',' ENCLOSED BY '"'; 

Now everything is set up to actually perform our tests! First of all two queries are run with the adaptive query localization turned off i.e. this is the “before” picture:

mysql> set ndb_join_pushdown=off;
mysql> SELECT COUNT(*)  FROM residents,postcodes WHERE
  residents.postcode=postcodes.postcode AND postcodes.town="MAIDENHEAD";
 +----------+
 | COUNT(*) |
 +----------+
 |    20000 |
 +----------+
 1 row in set (27.65 sec)
mysql> SELECT COUNT(*)  FROM residents,postcodes,towns WHERE
  residents.postcode=postcodes.postcode AND
  postcodes.town=towns.town AND towns.county="Berkshire";
 +----------+
 | COUNT(*) |
 +----------+
 |    40001 |
 +----------+
 1 row in set (48.68 sec)

and then the test is repeated with adaptive query localization turned on:

mysql> set ndb_join_pushdown=on;
mysql> SELECT COUNT(*)  FROM residents,postcodes WHERE
  residents.postcode=postcodes.postcode AND postcodes.town="MAIDENHEAD";
 +----------+
 | COUNT(*) |
 +----------+
 |    20000 |
 +----------+
 1 row in set (1.07 sec)
mysql> SELECT COUNT(*)  FROM residents,postcodes,towns WHERE
  residents.postcode=postcodes.postcode AND postcodes.town=towns.town
  AND towns.county="Berkshire";
 +----------+
 | COUNT(*) |
 +----------+
 |    40001 |
 +----------+
 1 row in set (2.02 sec)

For those 2 queries it represents a 25.8x and 24.1x speedup.

It’s important to note that not every join can currently be pushed down to the data nodes; here are the current rules (we hope to relax them overtime) for a query to be suitable:

  • JOINed columns must have the same data type
  • Queries should not reference BLOBs
  • Explicit locking is not supported
  • Only supports fully or partially qualified primary keys or plain indexes as access method for child tables (first part of JOIN can be a full table scan)

You can check whether your query is fitting these rules using EXPLAIN, for example:

mysql> set ndb_join_pushdown=on;
mysql> EXPLAIN SELECT COUNT(*)  FROM residents,postcodes WHERE residents.postcode=postcodes.postcode AND postcodes.town="MAIDENHEAD";
+----+-------------+-----------+--------+---------------+---------+---------+------------------------------+--------+--------------------------------------------------------------------------+
| id | select_type | table     | type   | possible_keys | key     | key_len | ref                          | rows   | Extra                                                                    |
+----+-------------+-----------+--------+---------------+---------+---------+------------------------------+--------+--------------------------------------------------------------------------+
|  1 | SIMPLE      | residents | ALL    | NULL          | NULL    | NULL    | NULL                         | 100000 | Parent of 2 pushed join@1                                                |
|  1 | SIMPLE      | postcodes | eq_ref | PRIMARY       | PRIMARY | 22      | clusterdb.residents.postcode |      1 | Child of 'residents' in pushed join@1; Using where with pushed condition |
+----+-------------+-----------+--------+---------------+---------+---------+------------------------------+--------+--------------------------------------------------------------------------+
mysql> EXPLAIN EXTENDED SELECT COUNT(*)  FROM residents,postcodes,towns WHERE residents.postcode=postcodes.postcode AND postcodes.town=towns.town AND towns.county="Berkshire";
+----+-------------+-----------+--------+---------------+---------+---------+------------------------------+--------+----------+------------------------------------------------------------------------------------------------------------------------+
| id | select_type | table     | type   | possible_keys | key     | key_len | ref                          | rows   | filtered | Extra                                                                                                                  |
+----+-------------+-----------+--------+---------------+---------+---------+------------------------------+--------+----------+------------------------------------------------------------------------------------------------------------------------+
|  1 | SIMPLE      | residents | ALL    | NULL          | NULL    | NULL    | NULL                         | 100000 |   100.00 | Parent of 3 pushed join@1                                                                                              |
|  1 | SIMPLE      | postcodes | eq_ref | PRIMARY       | PRIMARY | 22      | clusterdb.residents.postcode |      1 |   100.00 | Child of 'residents' in pushed join@1                                                                                  |
|  1 | SIMPLE      | towns     | eq_ref | PRIMARY       | PRIMARY | 22      | clusterdb.postcodes.town     |      1 |   100.00 | Child of 'postcodes' in pushed join@1; Using where with pushed condition: (`clusterdb`.`towns`.`county` = 'Berkshire') |
+----+-------------+-----------+--------+---------------+---------+---------+------------------------------+--------+----------+------------------------------------------------------------------------------------------------------------------------+

Note that if you want to check for more details why your join isn’t currently being pushed down to the data node then you can use “EXPLAIN EXTENDED” and then “SHOW WARNINGS” to get more hints. Hopefully that will allow you to tweak your queries to get the best improvements.

PLEASE let us know your experiences and give us examples of queries that worked well and (just as importantly) those that didn’t so that we can improve the feature – just leave a comment on this Blog with your table schemas, your query and your before/after timings.

Almost here – MySQL Cluster at Collaborate 11


A quick reminder that MySQL is well represented at the Oracle Collaborate conference which starts in Orlando on Sunday.

For those not familiar with Collaborate, it’s the big community conference for Oracle users – this year it’s in Orlando from April 10th through 14th (I’ve just re-checked the weather forecast, 31 Celsius vs. -18 at the last conference I presented at – OOW Beijing in December – what a difference 4 months and 8,000 miles make!).

I’ll be presenting on MySQL Cluster in a session called “Building Highly Available Scalable Real-Time Services with MySQL Cluster” where I’ll focus on:

  • Basics of MySQL Cluster – what it does, who uses it and why
  • Accessing your data – SQL and NoSQL access methods
  • Latest features
  • What’s coming in the future.

My session starts at 8:00 am on Tuesday 12th April (sorry for the early start) and is in room 306A.

For people interested in MySQL Cluster, another session you should try to attend is “MySQL Cluster for the Enterprise” presented by Craig Russell at 2:15 pm on Wednesday 13th April.

Other MySQL HA topics from the Oracle team:

To get an overall picture of what is happening to MySQL in Oracle, you should attend Tomas Ulin’s (VP of MySQL Engineering) “The State of MySQL” session at 9:15 am on Monday 11th April.

You can see a full list of sessions in the MySQL track here.

And last but not least, come and visit us at the MySQL booths in the Oracle Demo Grounds (Booth #657) to chat with us and/or get a demo. Here are the opening times:

  • Monday 6:00pm – 8:00pm (Welcome Reception)
  • Tuesday 10:15am – 4:00pm & 5:30pm-7:00pm (Reception)
  • Wednesday 10:15am – 4:00pm

I’ll be at the demo booth as much as possible but definitely for the 6:00pm – 8:00pm slot on Monday and from 10:15am – 1pm on Wednesday – hope to see some of you there.

Register for the event at http://collaborate11.ioug.org/Home/Registration/tabid/82/Default.aspx