We are excited to announce the public preview of our next version of Realm Sync: Flexible Sync. This new method of syncing puts the power into the hands of the developer. Now, developers can get more granular control over the data synced to user applications with intuitive language-native queries and hierarchical permissions.
Introduction
Prior to launching the general availability of Realm Sync in February 2021, the Realm team spent countless hours with developers learning how they build best-in-class mobile applications. A common theme emerged—building real-time, offline-first mobile apps require an overwhelming amount of complex, non-differentiating work.
Our first version of Realm Sync addressed this pain by abstracting away offline-first, real-time syncing functionality using declarative APIs. It expedited the time-to-market for many developers and worked well for apps where data is static and compartmentalized, or where permissions rarely need to change. But for dynamic apps and complex use cases, developers still had to spend time creating workarounds instead of developing new features. With that in mind, we built the next iteration of Realm Sync: Flexible Sync. Flexible Sync is designed to help developers:
Get to market faster: Use intuitive, language-native queries to define the data synced to user applications instead of proprietary concepts.
Optimize real-time collaboration between users: Utilize object-level conflict-resolution logic.
Simplify permissions: Apply role-based logic to applications with an expressive permissions system that groups users into roles on a pe-class or collection basis.
Language-Native Querying
Flexible Sync’s query-based sync logic is distinctly different from how Realm Sync operates today. The new structure is designed to more closely mirror how developers are used to building sync today—typically using GET requests with query parameters.
One of the primary benefits of Flexible Sync is that it eliminates all the time developers spend determining what query parameters to pass to an endpoint. Instead, the Realm APIs directly integrate with the native querying system on the developer’s choice of platform—for example, a predicate-based query language for iOS, a Fluent query for Android, a string-based query for Javascript, and a LINQ query for .NET.
Under the hood, the Realm Sync thread sends the query to MongoDB Realm (Realm’s cloud offering). MongoDB Realm translates the query to MongoDB’s query language and executes the query against MongoDB Atlas. Atlas then returns the resulting documents. Those documents are then translated into Realm objects, sent down to the Realm client, and stored on disk. The Realm Sync thread keeps a queue of any changes made locally to synced objects—even when offline. As soon as connectivity is reestablished, any changes made to the server-side or client-side are synced down using built-in granular conflict resolution logic. All of this occurs behind the scenes while the developer is interacting with the data. This is the part we’ve heard our users describe as “magic.”
Flexible Sync also enables much more dynamic queries, based on user inputs. Picture a home listing app that allows users to search available properties in a certain area. As users define inputs—only show houses in Dallas, TX that cost less than $300k and have at least three bedrooms—the query parameters can be combined with logical ANDs and ORs to produce increasingly complex queries, and narrow down the search result even further. All query results are combined into a single realm file on the client’s device, which significantly simplifies code required on the client-side and ensures changes to data are synced efficiently and in real time.
Swift
// Set your Schema
class Listing: Object {
    @Persisted(primaryKey: true) var _id: ObjectId
    @Persisted var location: String
    @Persisted var price: Int
    @Persisted var bedrooms: Int
}

// Configure your App and login
let app = App(id: "XXXX")
let user = try! await app.login(credentials:
            .emailPassword(email: "email", password: "password"))

// Set the new Flexible Sync Config and open the Realm
let config = user.flexibleSyncConfiguration()
let realm = try! await Realm(configuration: config, downloadBeforeOpen: .always)

// Create a Query and Add it to your Subscriptions
let subscriptions = realm.subscriptions

try! await subscriptions.write {
    subscriptions.append(QuerySubscription<Listing>(name: "home-search") {
        $0.location == "dallas" && $0.price < 300000 && $0.bedrooms >= 3
    })
}

// Now query the local realm and get your home listings - output is 100 listings
// in the results
print(realm.objects(Listing.self).count)

// Remove the subscription - the data is removed from the local device but stays
// on the server
try! await subscriptions.write {
    subscriptions.remove(named: "home-search")
}

// Output is 0 - listings have been removed locally
print(realm.objects(Listing.self).count)
Kotlin
// Set your Schema
open class Listing: ObjectRealm() {
  @PrimaryKey
  @RealmField("_id")
  var id: ObjectId
  var location: String = ""
  var price: Int = 0
  var bedrooms: Int = 0
}

// Configure your App and login
val app = App("<YOUR_APP_ID_HERE>")
val user = app.login(Credentials.emailPassword("email", "password"))

// Set the new Flexible Sync Config and open the Realm
let config = SyncConfiguration.defaultConfig(user)
let realm = Realm.getInstance(config)

// Create a Query and Add it to your Subscriptions
val subscriptions = realm.subscriptions
subscriptions.update { mutableSubscriptions ->
   val sub = Subscription.create(
      "home-search",
      realm.where<Listing>()
         .equalTo("location", "dallas")
         .lessThan("price", 300_000)
         .greaterThanOrEqual("bedrooms", 3)
   )
   mutableSubscriptions.add(subscription)
}

// Wait for server to accept the new subscription and download data
subscriptions.waitForSynchronization()
realm.refresh()

// Now query the local realm and get your home listings - output is 100 listings
// in the results
val homes = realm.where<Listing>().count()

// Remove the subscription - the data is removed from the local device but stays
// on the server
subscriptions.update { mutableSubscriptions ->
   mutableSubscriptions.remove("home-search")
}
subscriptions.waitForSynchronization()
realm.refresh()

// Output is 0 - listings have been removed locally
val homes = realm.where<Listing>().count()
.NET
// Set your Schema
class Listing: RealmObject
{
    [PrimaryKey, MapTo("_id")]
    public ObjectId Id { get; set; }
    public string Location { get; set; }
    public int Price { get; set; }
    public int Bedrooms { get; set; }
}

// Configure your App and login
var app = App.Create(YOUR_APP_ID_HERE);
var user = await app.LogInAsync(Credentials.EmailPassword("email", "password"));

// Set the new Flexible Sync Config and open the Realm
var config = new FlexibleSyncConfiguration(user);
var realm = await Realm.GetInstanceAsync(config);

// Create a Query and Add it to your Subscriptions
var dallasQuery = realm.All<Listing>().Where(l => l.Location == "dallas" && l.Price < 300_000 && l.Bedrooms >= 3);
realm.Subscriptions.Update(() =>
{
    realm.Subscriptions.Add(dallasQuery);
});

await realm.Subscriptions.WaitForSynchronizationAsync();

// Now query the local realm and get your home listings - output is 100 listings
// in the results
var numberOfListings = realm.All<Listing>().Count();

// Remove the subscription - the data is removed from the local device but stays
// on the server

realm.Subscriptions.Update(() =>
{
    realm.Subscriptions.Remove(dallasQuery);
});

await realm.Subscriptions.WaitForSynchronizationAsync();

// Output is 0 - listings have been removed locally
numberOfListings = realm.All<Listing>().Count();
JavaScript
import Realm from "realm";

// Set your Schema
const ListingSchema = {
  name: "Listing",
  primaryKey: "_id",
  properties: {
    _id: "objectId",
    location: "string",
    price: "int",
    bedrooms: "int",
  },
};

// Configure your App and login
const app = new Realm.App({ id: YOUR_APP_ID_HERE });
const credentials = Realm.Credentials.emailPassword("email", "password");
const user = await app.logIn(credentials);

// Set the new Flexible Sync Config and open the Realm
const realm = await Realm.open({
  schema: [ListingSchema],
  sync: { user, flexible: true },
});

// Create a Query and Add it to your Subscriptions
await realm.subscriptions.update((mutableSubscriptions) => {
  mutableSubscriptions.add(
    realm
      .objects(ListingSchema.name)
      .filtered("location = 'dallas' && price < 300000 && bedrooms = 3", {
        name: "home-search",
      })
  );
});

// Now query the local realm and get your home listings - output is 100 listings
// in the results
let homes = realm.objects(ListingSchema.name).length;

// Remove the subscription - the data is removed from the local device but stays
// on the server
await realm.subscriptions.update((mutableSubscriptions) => {
  mutableSubscriptions.removeByName("home-search");
});

// Output is 0 - listings have been removed locally
homes = realm.objects(ListingSchema.name).length;
Optimizing for Real-Time Collaboration
Flexible Sync also enhances query performance and optimizes for real-time user collaboration by treating a single object or document as the smallest entity for synchronization. Flexible Sync allows for Sync Realms to more efficiently share data and for conflict resolution to incorporate changes faster and with less data transfer.
For example, you and a fellow employee are analyzing the remaining tasks for a week. Your coworker wants to see all of the time-intensive tasks remaining (workunits > 5), and you want to see all the tasks you have left for the week (owner == ianward). Your queries will overlap where workunits > 5 and owner == ianward. If your coworker notices one of your tasks is marked incorrectly as 7 workunits and changes the value to 6, you will see the change reflected on your device in real time. Under the hood, the merge algorithm will only sync the changed document instead of the entire set of query results increasing query performance.
Permissions
Whether it’s a company’s internal application or an app on the App Store, permissions are required in almost every application. That’s why we are excited by how seamless Flexible Sync makes applying a document-level permission model when syncing data—meaning synced documents can be limited based on a user’s role.
Consider how a sales organization uses a CRM application. An individual sales representative should only be able to access her own sales pipeline while her manager needs to be able to see the entire region’s sales pipeline. In Flexible Sync, a user’s role will be combined with the client-side query to determine the appropriate result set. For example, when the sales representative above wants to view her deals, she would send a query where opportunities.owner == "EmmaLullo" but when her manager wants to see all the opportunities for their entire team, they would query with opportunities.team == “West”. If a user sends a much more expansive query, such as querying for all opportunities, then the permissions system would only allow data to be synced for which the user had explicit access.
Ultimately, our goal with Flexible Sync is to deliver a sync service that can fit any use case or schema design pattern imaginable without custom code or workarounds. And while we are excited that Flexible Sync is now in preview, we’re nowhere near done.
The Realm Sync team is planning to bring you more query operators and permissions integrations over the course of 2022. Up next we are looking to expose array operators and enable querying on embedded documents, but really, we look to you, our users, to help us drive the roadmap. Submit your ideas and feature requests to our feedback portal and ask questions in our Community forum. Happy building!
This is the fifth in a series of blog posts examining technologies such as ReactJS that are driving the development of modern web and mobile applications.
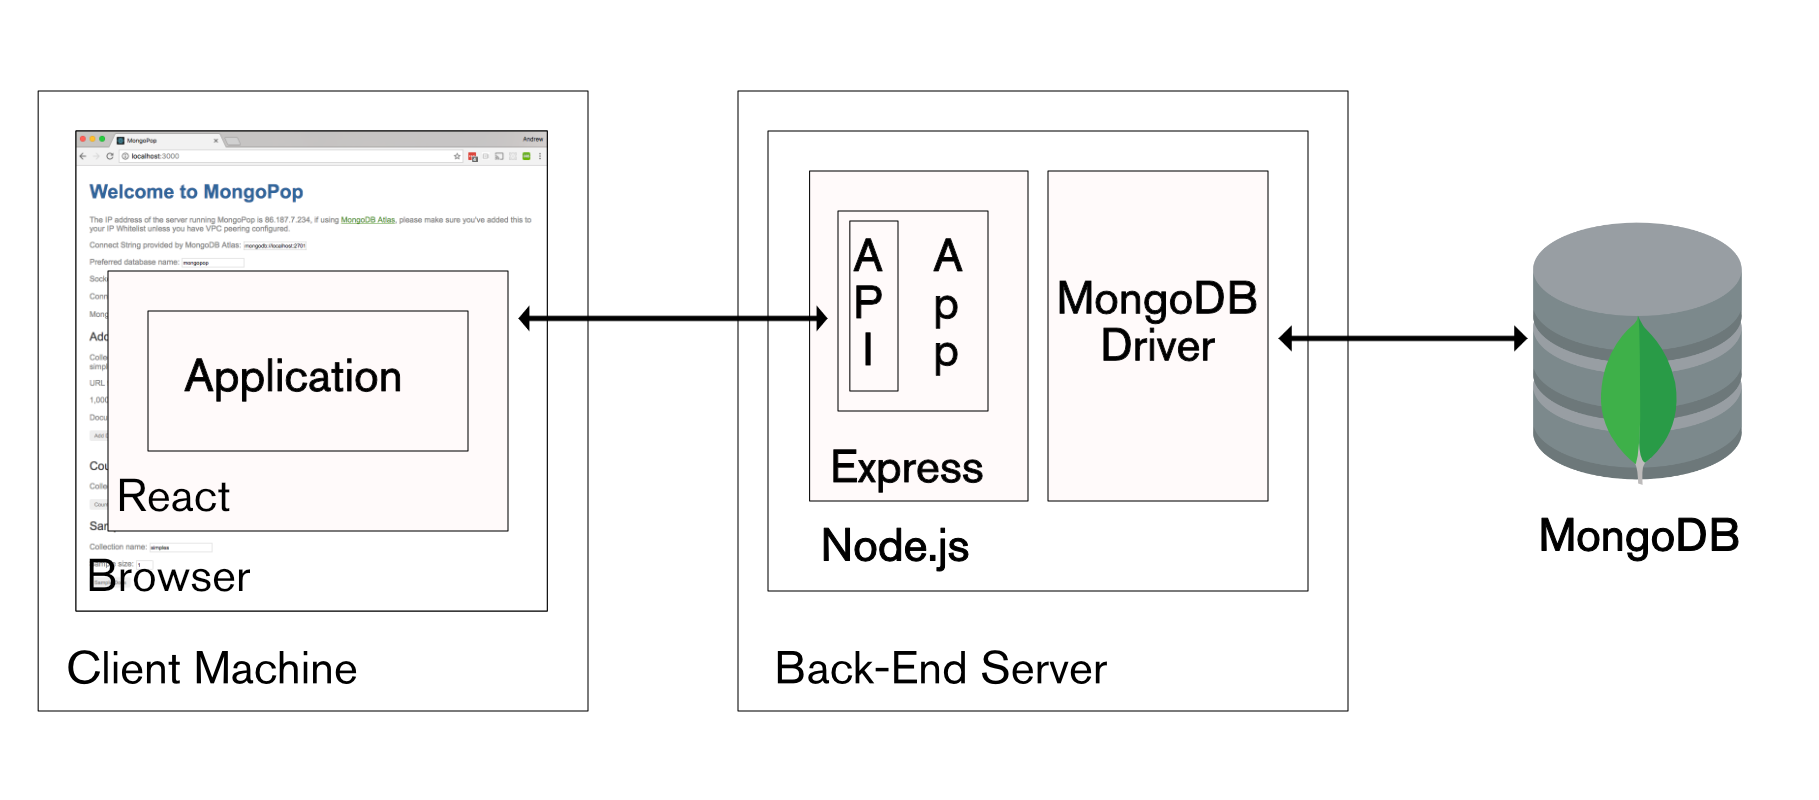
Modern Application Stack – Part 1: Introducing The MEAN Stack introduced the technologies making up the MEAN (MongoDB, Express, Angular, Node.js) and MERN (MongoDB, Express, React, Node.js) Stacks, why you might want to use them, and how to combine them to build your web application (or your native mobile or desktop app).
The remainder of the series is focussed on working through the end to end steps of building a real (albeit simple) application – MongoPop. Part 2: Using MongoDB With Node.js created an environment where we could work with a MongoDB database from Node.js; it also created a simplified interface to the MongoDB Node.js Driver. Part 3: Building a REST API with Express.js built on Part 2 by using Express.js to add a REST API which will be used by the clients that we implement in the final posts. Part 4: Building a Client UI Using Angular 2 (formerly AngularJS) & TypeScript completed the MEAN stack by adding an Angular 2 client.
This post is similar to Part 4 except that it uses ReactJS rather than Angular to implement a remote web-app client for the Mongopop application – completing the full MERN application stack.
ReactJS (recap)
MERN Stack architecture with React
React (alternatively referred to as ReactJS), is an up and coming alternative to Angular. It is a JavaScript library, developed by Facebook and Instagram, to build interactive, reactive user interfaces. Like Angular, React breaks the front-end application down into components. Each component can hold its own state_and a parent can pass its state down to its child components (as _properties) and those components can pass changes back to the parent through the use of callback functions. Components can also include regular data members (which are not state or properties) for data which isn’t rendered.
State variables should be updated using the setState function – this allows ReactJS to calculate which elements of the page need to be refreshed in order to reflect the change. As refreshing the whole page can be an expensive operation, this can represent a significant efficiency and is a big part of what makes React live up to its name as “reactive”.
React components are typically implemented using JSX – an extension of JavaScript that allows HTML syntax to be embedded within the code.
React is most commonly executed within the browser but it can also be run on the back-end server within Node.js, or as a mobile app using React Native.
JSX & ReactJS
It’s possible to implement ReactJS components using ‘pure’ JavaScript (though, we’ve already seen in this series that it’s more complicated than that) but it’s more typical to use JSX. JSX extends the JavaScript syntax to allow HTML and JavaScript expressions to be used in the same code – making the code concise and easy to understand.
Components can be implemented as a single function but in this post a class is used as it offers more options. The following code implements a very simple component:
By extending React.Component, we indicate that the class implements a component and that the render() method returns the contents of that component
The enclosing component can pass data down to this component as properties (accessed within the component as this.props); in this case, there is just one – name. JavaScript can be included at any point in the returned HTML by surrounding it with braces {this.props.name}. The enclosing component would include this code within its own render() method, where userName is part of that component’s state.:
<HelloMessage
name={this.state.userName}
/>
The state data member for a component should include all of the variable values that are to be rendered (apart from those that have been passed down as properties). State values can be initialized directly in the class’s constructor function but after that, the setState({userName: "Andrew"}) method should be used so that ReactJS knows that any elements containing userName should be rerendered.
JSX gets compiled into JavaScript before it’s used (this post uses the Babel compiler) and so there are no special dependencies on the browser.
Downloading, running, and using the Mongopop ReactJS application
The back-end application should be installed & run in the same way as in parts 2 & 3:
git clone git@github.com:am-MongoDB/MongoDB-Mongopop.git
cd MongoDB-Mongopop
npm install
npm run express
Run the ReactJS client by browsing to http://<back-end-server>:3000/react.
Unlike the Angular client, the ReactJS application is developed and built as a separate project, and then compiled results are copied to public/react in the back-end server (this is covered in the next section).
Build and deploy
To access the source and build an updated version of the client, a new GitHub repository must be downloaded – MongoDB-Mongopop-ReactJS:
git clone git@github.com:am-MongoDB/MongoDB-Mongopop-ReactJS.git
cd MongoDB-Mongopop-ReactJS
As with the back-end and the Angular client, package.json includes a list of dependencies as well as scripts:
Before running any of the software, the Node.js dependencies (as defined in package.json must be installed into the node_modules directory):
npm install
To compile the JSX code, start the development server, and run the ReactJS client, run:
export PORT=3030 # As Express is already using 3000 on this machine
npm start
This should automatically open the application within your browser. Note that the ReactJS code was loaded from a local development server but it will use the real REST API running in the back-end.
Note that when running in this mode, you may get errors when your browser tries accessing the REST API – this is because browsers typically block cross-site scripting. To work around this, install this extension from the Google Chrome store.
If you make changes to the ReactJS client and want to include them in the real back-end then build a new, optimized version:
npm run build
The contents of the MongoDB-Mongopop-ReactJS/build folder should then be copied to MongoDB-Mongopop/public/react.
To see exactly what react-scripts is doing for these operations, review the scripts in node_modules/react-scripts/scripts.
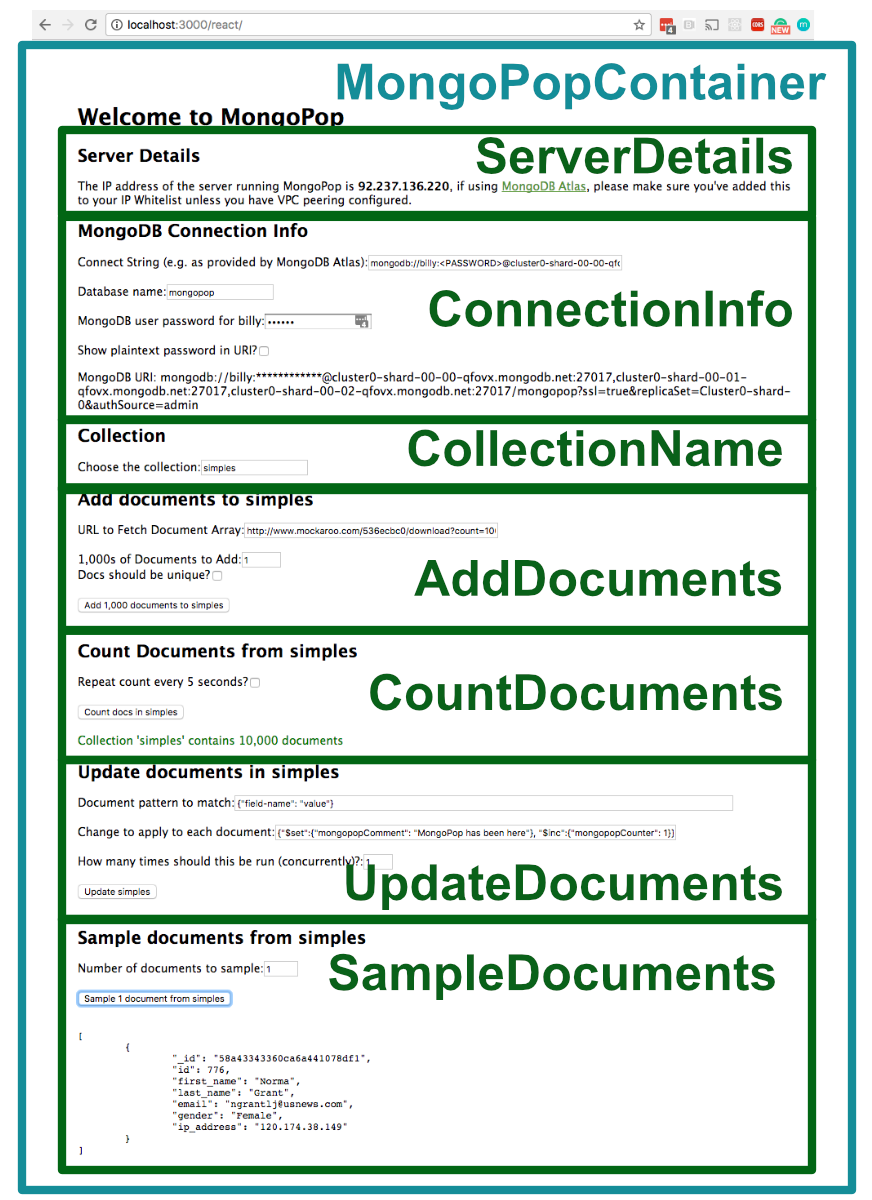
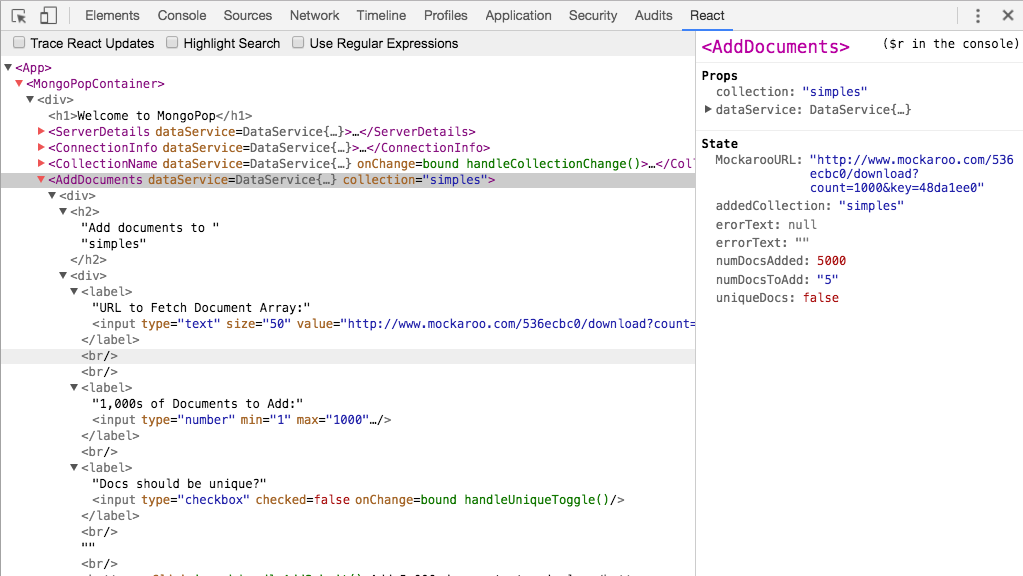
Component architecture of the Mongopop ReactJS UI
Most ReactJS applications are built from one or more, nested components – Mongopop is no exception:
ReactJS components making up the Mongopop client app
The top-level component (MongoPopContainer) renders the “Welcome to MongoPop” heading before delegating the the rest of the page to seven sub-components.
MongoPopContainer is implemented by a JSX class of the same name. The class contains the state variables for any information which must be used by more than one sub-component (e.g. the collection name). It also includes handler functions that will be used by sub-components when they make changes to any state variable passed down. The class implements the render() function which returns the expression that ReactJS must convert to HTML for rendering; in addition to the opening <h1>Welcome to MongoPop</h1>, it includes an element for each of the sub-components. As part of those element definitions, it passes down state variables (which the sub-component receives as properties):
Changes to a data value by a parent component will automatically be propagated to a child – it’s best practice to have data flow in this direction as much as possible. If a data value is changed by a child and the parent (either directly or as a proxy for one of its other child components) needs to know of the change, then the child triggers an event. That event is processed by a handler registered by the parent – the parent may then explicitly act on the change, but even if it does nothing explicit, the change flows to the other child components.
Each of the sub-components is implemented by its own JSX class – e.g. CountDocuments.
Mongopop is a reasonably flat application with only one layer of sub-components below MongoPopContainer, but more complex applications may nest deeper and reuse components.
This table details what data is passed from MongoPopContainer down to each of its children and what data change events are sent back up to MongoPopContainer (and from there, back down to the other children):
Flow of data between ReactJS components
Child component
Data passed down
Data changes passed back up
ServerDetails
Data service
ConnectionInfo
Data service
CollectionName
Data service
Collection Name
AddDocuments
Collection Name
Data service
CountDocuments
Collection Name
Data service
UpdateDocuments
Collection Name
Data service
Sample data to play with
SampleDocuments
Collection Name
Sample data to play with
Data service
What are all of these files?
To recap, the files and folders covered earlier in this series (for the back-end, under MongoDB-Mongopop folder):
package.json: Instructs the Node.js package manager (npm) what it needs to do; including which dependency packages should be installed
node_modues: Directory where npm will install packages
node_modues/mongodb-core: Low-level MongoDB driver library; available for framework developers (application developers should avoid using it directly)
javascripts/db.js: A JavaScript module we’ve created for use by our Node.js apps (in this series, it will be Express) to access MongoDB; this module in turn uses the MongoDB Node.js driver.
config.js: Contains the application–specific configuration options
bin/www: The script that starts an Express application; this is invoked by the npm start script within the package.json file. Starts the HTTP server, pointing it to the app module in app.js
app.js: Defines the main back-end application module (app). Configures:
That the application will be run by Express
Which routes there will be & where they are located in the file system (routes directory)
What view engine to use (Jade in this case)
Where to find the views to be used by the view engine (views directory)
What middleware to use (e.g. to parse the JSON received in requests)
Where the static files (which can be read by the remote client) are located (public directory)
Error handler for queries sent to an undefined route
views: Directory containing the templates that will be used by the Jade view engine to create the HTML for any pages generated by the Express application (for this application, this is just the error page that’s used in cases such as mistyped routes (“404 Page not found”))
routes: Directory containing one JavaScript file for each Express route
routes/pop.js: Contains the Express application for the /pop route; this is the implementation of the Mongopop REST API. This defines methods for all of the supported route paths.
public: Contains all of the static files that must be accessible by a remote client (e.g., our Angular to React apps).
In addition, for the ReactJS client application:
public/react The deployed ReactJS client code; e.g. the JSX code that has been compiled down into vanilla JavaScript
More significant for this post are the new files introduced under the MongoDB-Mongopop-ReactJS folder:
build: Directory containing the compiled and optmized JavaScript (to be copied to the back-end)
node-modules: Node.js modules used by the ReactJS client application (as opposed to the Express, server-side Node.js modules)
public/index.html: Outer template for the application (includes the rootdiv element)
src: Directory JSX source code files we write for the application
index.js: Top-level JSX for the client; creates the <App /> element as a placeholder to be expanded by App.js
App.js: Replaces the <App /> element from index.js with the output from the MongoPopContainer component/class. Includes the rest of the client components
X.component.js: Class implementing sub-component X
data.service.js: Service used to interact with the back-end REST API (mostly used to access the database)
package.json: Instructs the Node.js package manager (npm) what it needs to do; including which dependency packages should be installed
public/index.html defines a div element with its id set to root:
src/index.js accesses the root element from public/index.html so that it can be populated with the output from the application. It imports src/App.js and creates the <App /> element.
src/App.js defines the App class to satisfy the App element in src/index.js; that class renders the <MongoPopContainer /> element, which is made up of all of the sub-components. App.js imports each of the sub-component source files (X.component.js) so that they can implement those components. It also imports src/data.service.js to give access to the back-end Mongopop REST API:
Calling the REST API
The Data Service class hides the communication with the back-end REST API; serving two purposes:
Simplifying all of the components’ code
Shielding the components’ code from any changes in the REST API signature or behavior – that can all be handled within the DataService
The functions of the data service return promises to make working with their asynchronous behaviour simpler. Refer back to Part 2: Using MongoDB With Node.js if you need a recap on using promises.
Apply an update to all documents in a collection
which match a given pattern
This data access class uses the XMLHttpRequest API to make asynchronous HTTP requests to the REST API running in the back-end (mostly to access MongoDB).
One of the simplest functions that data.service.js provides is fetchConfig which sends an HTTP GET request to the back-end to retrieve default the client configuration parameters:
When using this API, the application registers handler functions against a number of possible events; in this case:
onreadystatechange: triggered if/when a successful HTTP response is received
onerror & onabort: triggered when there has been a problem
The method returns a promise which subsequently – via the bound-in function (processRequest & processError) – either:
Provides an object representing the received response
Raises an error with an appropriate message
The baseURL data member is set to http://localhost:3000/pop but that can be changed by editing the data service creation line in App.js:
this.dataService = new DataService("http://localhost:3000/pop");
Another of the methods sends a POST message to the REST API’s pop/addDocs route path to request the bulk addition of documents to a MongoDB collection:
The program flow is very similar to that of the previous function and, in the success case, it eventually resolves the returned promise with a count of the number of documents added.
A final method from the DataService class worth looking at is calculateMongoDBURI() which takes the MongoDB URI provided by MongoDB Atlas and converts it into one that can actually be used to access the database – replacing the <DATABASE> and <PASSWORD> placeholders with the actual values:
The function stores the final URI in the data service class’s MongoDBURI data member – to sent to the back-end when accessing the database (see sendAddDocs above). It also returns a second value (MongoDBURIRedacted) with the password masked out – to be used when displaying the URI.
A simple component that accepts data from its parent
Recall that the application consists of eight components: the top-level application which contains each of the ServerDetails, ConnectionInfo, CollectionName, AddDocuments, CountDocuments, UpdateDocuments, and SampleDocuments components.
When building a new application, you would typically start by designing the the top-level component and then working downwards. As the top-level container is, perhaps, the most complex one to understand, we’ll start at the bottom and then work up.
A simple sub-component to start with is the AddDocuments component:
ReactJS component
A central design decision for any component is what state is required (any variable data that is to be rendered by the component should either be part of the component’s state or of the properties passed by its parent component). The state is initialised in the class’s constructor:
Recall that any state variable X can be read using this.state.X but only the constructor should write to it that way – anywhere else should use the setState() function so that ReactJS is made aware of the change – enabling it to refresh any affected elements. In this class, there are six state variables:
MockarooURL: The URL from a service such as Mockaroo which will return an array containing a set of example JSON documents
numDocsToAdd: How many batches of documents should be added (with the default value of MockarooURL, each batch contains 1,000 documents)
uniqueDocs: Whether each batch should be distinct from the other batches (this significantly slows things down)
numDocsAdded: Updated with the number of added documents in the event that the operation succeeds
errorText: Updated with an error message in the event that the operation fails
addedCollection: Name of the collection that documents were last added to (initialized with the collection property passed by the parent component)
ReactJS state variables
Note that the constructor receives the properties passed down from the parent component. The constructor from the React.Component class must always be invoked within the component’s constructor: super(props).
The binds at the end of the constructor make this available for use within the class’s methods.
Further down in the class is the render() method which returns the content that ReactJS converts to HTML and JavaScript for the browser to render:
Recall that when coding in JSX, JavaScript can be embedded in the HTML by surrounding it with braces. The function uses that almost immediately to include the collection name in the component’s header: <h2>Add documents to {this.props.collection}</h2>.
The first input is initialized with this.state.MockarooURL and if the user changes the value then this.handleURLChange is invoked – which in turn updates the state value:
The same pattern holds for the inputs for numDocsToAdd & uniqueDocs.
When this component’s button is pressed, the onClick event calls this.handleAddSubmit():
This function invokes the sendAddDocs() method of the data service that was passed down from the parent component (and so is part of this.props). sendAddDocs() returns a promise and the first function in the then clause is called if/when that promise is successfully resolved – setting the numDocsAdded state to the number of added documents; if the promise is instead rejected then the second function is called – setting the error message. In either case, the state change will cause the associated element to be rerendered:
Passing data down to a sub-component (and receiving changes back)
The AddDocs component is embedded within the render()method of MongoPopContainer component class; implemented in App.js:
It passes down two items:
dataService is an instance of the DataService class and is used to access the back-end (in particular, to interact with MongoDB). Appears as part of AddDocument‘s properties and can be accessed as this.props.dataService.
collection is a string representing the collection name. Appears as part of AddDocument‘s properties and can be accessed as this.props.collection.
MongoDBCollectionName is initialized, and dataService is instantiated as part of the MongoPopContainer constructor:
Note that for a real, deployed application, http://localhost:3000/pop would be replaced with the public URL for REST API. Additionally, you should consider adding authentication to the API .
But where did the collection name get set – the constructor initialized it to an empty string but that’s not we see when running the application? There’s a clue in the constructor:
CollectionName has a single state variable – collection – which is initially set in the componentDidMount() method by fetching the default client configuration information from the back-end by calling this.props.dataService.fetchConfig(). componentDidMount is one of the component lifecycle methods that are part of any React.Component class – it is invoked after the component has been loaded into the browser, it is where you would typically fetch any data from the back-end that’s needed for the component’s starting state. After setting the collection state, the change notification function passed down by the parent component is invoked to pass up the new value:
_this.props.onChange(_this.state.collection);
Of course, the user needs to be able to change the collection name and so an input element is included. The value of the element is initialized with the collection state variable and when the user changes that value, this.handleCollectionNameChange is invoked. In turn, that method updates the component state and passes the new collection name up to the parent component by calling the change notification method provided by the parent.
Optionally empty components
It’s common that a component should only display its contents if a particular condition is met. Mongopop includes a feature to allow the user to apply a bulk change to a set of documents – selected using a pattern specified by the user. If they don’t know the typical document structure for the collection then it’s unlikely that they’ll make a sensible change. Mongopop forces them to first retrieve a sample of the documents before they’re given the option to make any changes.
This optionality is implemented through the SampleDocuments & UpdateDocuments components:
Flow of data between ReactJS components
Child component
Data passed down
Data changes passed back up
UpdateDocuments
Collection Name
Data service
Sample data to play with
SampleDocuments
Collection Name
Sample data to play with
Data service
Recall that the MongoPopContainer component class includes a state variable named DataToPlayWith which is initialized to FALSE:
That state is updated using the handleDataAvailabiltyChange method:
That method is passed down to the SampleDocuments component:
When the user fetches a sample of the documents from a collection, the SampleDocuments component invokes the change notification method (_this.props.onDataToWorkWith()), passing back TRUE if the request was a success, FALSE otherwise:
MongoPopContainer passes its state variable DataToPlayWith down to the UpdateDocuments component:
Otherwise, the rest of this component is similar to those already seen:
Periodic operations
The CountDocuments component has an extra feature – if the repeat option is checked then it will fetch and display the document count every five seconds. The function that’s called when the count button is clicked, checks the value of the state variable associated with the checkbox and if it’s set, calls setInterval() to call the countOnce() method every five seconds:
The timer is cleared (clearInterval()) if there is an error or just before the component is unmounted (in componentWillUnmount).
Other components
For completeness, this is the full top-level component, App.js, which includes the rest of the sub-components:
Now that the full MERN stack application has been implemented, you can test it from within your browser:
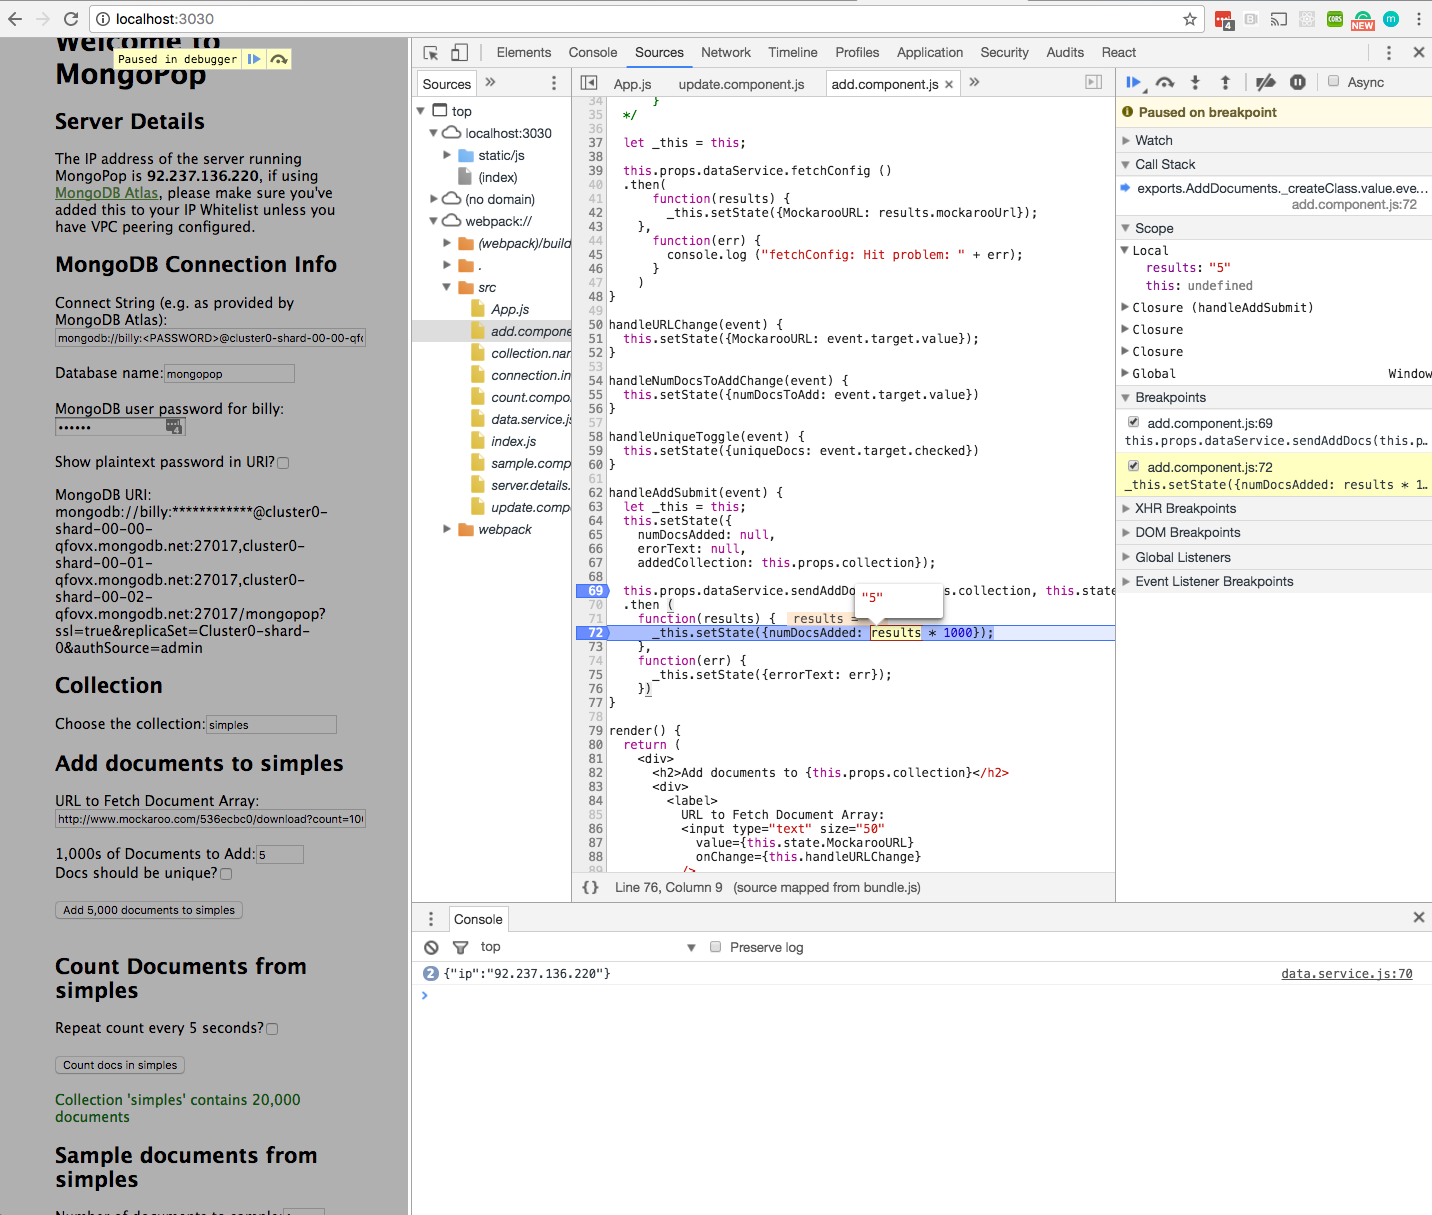
Debugging the ReactJS client is straightforward using the Google Chrome Developer Tools which are built into the Chrome browser. Despite the browser executing the transpiled JavaScript the Dev Tools allows you to navigate and set breakpoints in your JSX code:
Debug React JSX with Google Chrome Developer tools
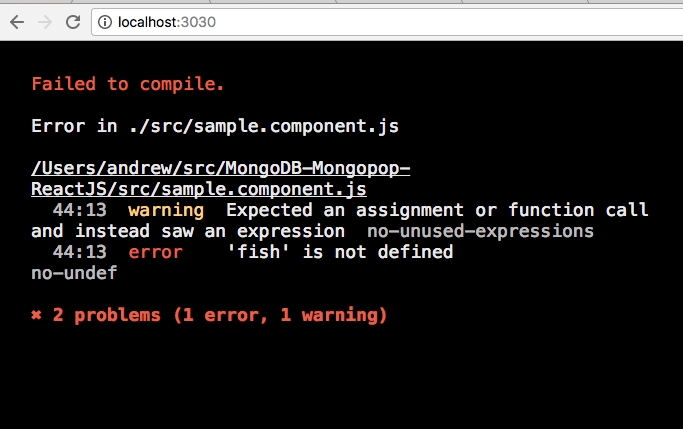
If there is a compilation error then the error is sent to the browser:
ReactJS Compile errors in Google Chrome Developer tools
So should you use Angular 2 or React for your new web application? A quick Google search will find you some fairly deep comparisons of the two technologies but in summary, Angular 2 is a little more powerful while React is easier for developers to get up to speed with and use (note how many fewer files are needed). The previous blog in this series built the Mongopop client application using Angular 2, while this one built a near-identical app using ReactJS – hopefully these posts have helped you pick a favorite.
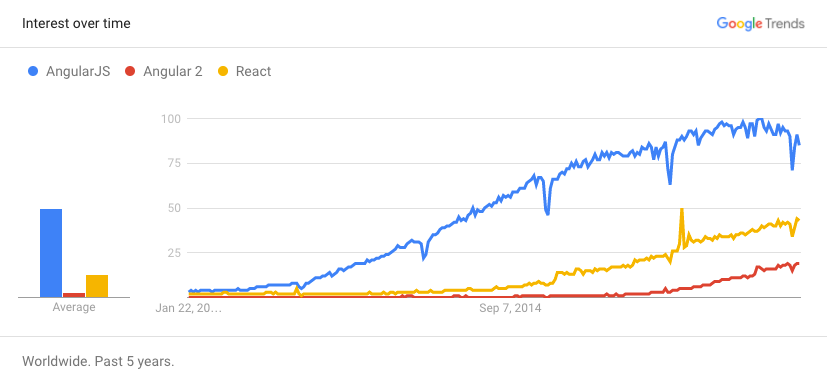
The following snapshot from Google Trends suggests that Angular has been much more common for a number of years but that React is gaining ground:
ReactJS popularity vs. Angular and Angular 2
Summary & what’s next in the series
Previous posts stepped through building the Mongopop application back-end and then the creation of an Angular 2 client application. This post described how to build a front-end client using ReactJS. At this point, we have a complete, working, MERN stack application.
The coupling between the front and back-end is loose; the client simply makes remote, HTTP requests to the back-end service – using the interface created in Part 3: Building a REST API with Express.js.
This series will finish by demonstrating alternate methods to implement front-end client applications that aren’t browser-based.
A simpler way to build your app – MongoDB Stitch, Backend as a Service
MongoDB Stitch is a backend as a service (BaaS), giving developers a REST-like API to MongoDB, and composability with other services, backed by a robust system for configuring fine-grained data access controls. Stitch provides native SDKs for JavaScript, iOS, and Android.
Built-in integrations give your application frontend access to your favorite third party services: Twilio, AWS S3, Slack, Mailgun, PubNub, Google, and more. For ultimate flexibility, you can add custom integrations using MongoDB Stitch’s HTTP service.
MongoDB Stitch allows you to compose multi-stage pipelines that orchestrate data across multiple services; where each stage acts on the data before passing its results on to the next.
Unlike other BaaS offerings, MongoDB Stitch works with your existing as well as new MongoDB clusters, giving you access to the full power and scalability of the database. By defining appropriate data access rules, you can selectively expose your existing MongoDB data to other applications through MongoDB Stitch’s API.
This is the second in a series of blog posts examining the technologies that are driving the development of modern web and mobile applications.
“Modern Application Stack – Part 1: Introducing The MEAN Stack” introduced the technologies making up the MEAN (MongoDB, Express, Angular, Node.js) and MERN (MongoDB, Express, React, Node.js) Stacks, why you might want to use them, and how to combine them to build your web application (or your native mobile or desktop app).
The remainder of the series is focussed on working through the end to end steps of building a real (albeit simple) application – MongoPop.
This post demonstrates how to use MongoDB from Node.js.
MongoDB (recap)
MongoDB provides the persistence for your application data.
MongoDB is an open-source, document database designed with both scalability and developer agility in mind. MongoDB bridges the gap between key-value stores, which are fast and scalable, and relational databases, which have rich functionality. Instead of storing data in rows and columns as one would with a relational database, MongoDB stores JSON documents in collections with dynamic schemas.
MongoDB’s document data model makes it easy for you to store and combine data of any structure, without giving up sophisticated validation rules, flexible data access, and rich indexing functionality. You can dynamically modify the schema without downtime – vital for rapidly evolving applications.
It can be scaled within and across geographically distributed data centers, providing high levels of availability and scalability. As your deployments grow, the database scales easily with no downtime, and without changing your application.
MongoDB Atlas is a database as a service for MongoDB, letting you focus on apps instead of ops. With MongoDB Atlas, you only pay for what you use with a convenient hourly billing model. With the click of a button, you can scale up and down when you need to, with no downtime, full security, and high performance.
Our application will access MongoDB via the JavaScript/Node.js driver which we install as a Node.js module.
Node.js (recap)
Node.js is a JavaScript runtime environment that runs your back-end application (via Express).
Node.js is based on Google’s V8 JavaScript engine which is used in the Chrome browser. It also includes a number of modules that provides features essential for implementing web applications – including networking protocols such as HTTP. Third party modules, including the MongoDB driver, can be installed, using the npm tool.
Node.js is an asynchronous, event-driven engine where the application makes a request and then continues working on other useful tasks rather than stalling while it waits for a response. On completion of the requested task, the application is informed of the results via a callback (or a promise or Observable. This enables large numbers of operations to be performed in parallel – essential when scaling applications. MongoDB was also designed to be used asynchronously and so it works well with Node.js applications.
The application – Mongopop
MongoPop is a web application that can be used to help you test out and exercise MongoDB. After supplying it with the database connection information (e.g., as displayed in the MongoDB Atlas GUI), MongoPop provides these features:
Accept your username and password and create the full MongoDB connect string – using it to connect to your database
Populate your chosen MongoDB collection with bulk data (created with the help of the Mockeroo service)
Count the number of documents
Read sample documents
Apply bulk changes to selected documents
Downloading, running, and using the Mongopop application
Rather than installing and running MongoDB ourselves, it’s simpler to spin one up in MongoDB Atlas:
git clone git@github.com:am-MongoDB/MongoDB-Mongopop.git
cd MongoDB-Mongopop
If you don’t have Node.js installed then that needs to be done before building the application; it can be downloaded from nodejs.org .
A file called package.json is used to control npm (the package manager for Node.js); here is the final version for the application:
The scripts section defines a set of shortcuts that can be executed using npm run <script-name>. For example npm run debug runs the Typescript transpiler (tsc) and then the Express framework in debug mode. start is a special case and can be executed with npm start.
Before running any of the software, the Node.js dependencies must be installed (into the node_modules directory):
npm install
Note the list of dependencies in package.json – these are the Node.js packages that will be installed by npm install. After those modules have been installed, npm will invoke the postinstall script (that will be covered in Part 4 of this series). If you later realise that an extra package is needed then you can install it and add it to the dependency list with a single command. For example, if the MongoDB Node.js driver hadn’t already been included then it could be added with npm install --save mongodb – this would install the package as well as saving the dependency in package.json.
The application can then be run:
npm start
Once running, browse to http://localhost:3000/ to try out the application. When browsing to that location, you should be rewarded with the IP address of the server where Node.js is running (useful when running the client application remotely) – this IP address must be added to the IP Whitelist in the Security tab of the MongoDB Atlas GUI. Fill in the password for the MongoDB user you created in MongoDB Atlas and you’re ready to go. Note that you should get your own URL, for your own data set using the Mockaroo service – allowing you to customise the format and contents of the sample data (and avoid exceeding the Mockaroo quota limit for the example URL).
What are all of these files?
package.json: Instructs the Node.js package manager (npm) what it needs to do; including which dependency packages should be installed
node_modues: Directory where npm will install packages
node_modues/mongodb: The MongoDB driver for Node.js
node_modues/mongodb-core: Low-level MongoDB driver library; available for framework developers (application developers should avoid using it directly)
javascripts/db.js: A JavaScript module we’ve created for use by our Node.js apps (in this series, it will be Express) to access MongoDB; this module in turn uses the MongoDB Node.js driver.
The rest of the files and directories can be ignored for now – they will be covered in later posts in this series.
Architecture
The MongoDB Node.js Driver provides a JavaScript API which implements the network protocol required to read and write from a local or remote MongoDB database. If using a replica set (and you should for production) then the driver also decides which MongoDB instance to send each request to. If using a sharded MongoDB cluster then the driver connects to the mongos query router, which in turn picks the correct shard(s) to direct each request to.
We implement a shallow wrapper for the driver (javascripts/db.js) which simplifies the database interface that the application code (coming in the next post) is exposed to.
Code highlights
javascripts/db.js defines an /object prototype/ (think class from other languages) named DB to provide access to MongoDB.
Its only dependency is the MongoDB Node.js driver:
var MongoClient = require('mongodb').MongoClient;
The prototype has a single property – db which stores the database connection; it’s initialised to null in the constructor:
function DB() {
    this.db = null;         // The MongoDB database connection
}
The MongoDB driver is asynchronous (the function returns without waiting for the requested operation to complete); there are two different patterns for handling this:
The application passes a callback function as a parameter; the driver will invoke this callback function when the operation has run to completion (either on success or failure)
If the application does not pass a callback function then the driver function will return a promise
This application uses the promise-based approach. This is the general pattern when using promises:
The methods of the DB object prototype we create are also asynchronous and also return promises (rather than accepting callback functions). This is the general pattern for returning and then subsequently satisfying promises:
db.js represents a thin wrapper on top of the MongoDB driver library and so (with the background on promises under our belt) the code should be intuitive. The basic interaction model from the application should be:
Connect to the database
Perform all of the required database actions for the current request
Disconnect from the database
Here is the method from db.js to open the database connection:
One of the simplest methods that can be called to use this new connection is to count the number of documents in a collection:
Note that the collection method on the database connection doesn’t support promises and so a callback function is provided instead.
And after counting the documents; the application should close the connection with this method:
Note that then also returns a promise (which is, in turn, resolved or rejected). The returned promise could be created in one of 4 ways:
The function explicitly creates and returns a new promise (which will eventually be resolved or rejected).
The function returns another function call which, in turn, returns a promise (which will eventually be resolved or rejected).
The function returns a value – which is automatically turned into a resolved promise.
The function throws an error – which is automatically turned into a rejected promise.
In this way, promises can be chained to perform a sequence of events (where each step waits on the resolution of the promise from the previous one). Using those 3 methods from db.js, it’s now possible to implement a very simple application function:
That function isn’t part of the final application – the actual code will be covered in the next post – but jump ahead and look at routes/pop.js if your curious).
It’s worth looking at the sampleCollection prototype method as it uses a database /cursor/ . This method fetches a “random” selection of documents – useful when you want to understand the typical format of the collection’s documents:
Note that [collection.aggregate](http://mongodb.github.io/ node-mongodb-native/2.0/api/Collection.html#aggregate “MongoDB aggregation from JavaScript Node.js driver”) doesn’t actually access the database – that’s why it’s a synchronous call (no need for a promise or a callback) – instead, it returns a cursor. The cursor is then used to read the data from MongoDB by invoking its toArray method. As toArray reads from the database, it can take some time and so it is an asynchronous call, and a callback function must be provided (toArray doesn’t support promises).
The rest of these database methods can be viewed in db.js but they follow a similar pattern. The Node.js MongoDB Driver API documentation explains each of the methods and their parameters.
Summary & what’s next in the series
This post built upon the first, introductory, post by stepping through how to install and use Node.js and the MongoDB Node.js driver. This is our first step in building a modern, reactive application using the MEAN and MERN stacks.
The blog went on to describe the implementation of a thin layer that’s been created to sit between the application code and the MongoDB driver. The layer is there to provide a simpler, more limited API to make application development easier. In other applications, the layer could add extra value such as making semantic data checks.
The next part of this series adds the Express framework and uses it to implement a REST API to allow clients to make requests of the MongoDB database. That REST API will subsequently be used by the client application (using Angular in Part 4 or React in Part 5).
Continue following this blog series to step through building the remaining stages of the MongoPop application:
A simpler way to build your app – MongoDB Stitch, Backend as a Service
MongoDB Stitch is a backend as a service (BaaS), giving developers a REST-like API to MongoDB, and composability with other services, backed by a robust system for configuring fine-grained data access controls. Stitch provides native SDKs for JavaScript, iOS, and Android.
Built-in integrations give your application frontend access to your favorite third party services: Twilio, AWS S3, Slack, Mailgun, PubNub, Google, and more. For ultimate flexibility, you can add custom integrations using MongoDB Stitch’s HTTP service.
MongoDB Stitch allows you to compose multi-stage pipelines that orchestrate data across multiple services; where each stage acts on the data before passing its results on to the next.
Unlike other BaaS offerings, MongoDB Stitch works with your existing as well as new MongoDB clusters, giving you access to the full power and scalability of the database. By defining appropriate data access rules, you can selectively expose your existing MongoDB data to other applications through MongoDB Stitch’s API.
This is the first in a series of blog posts examining the technologies that are driving the development of modern web and mobile applications, notably the MERN and MEAN stacks. The series will go on to step through tutorials to build all layers of an application.
Users increasingly demand a far richer experience from web sites – expecting the same level of performance and interactivity they get with native desktop and mobile apps. At the same time, there’s pressure on developers to deliver new applications faster and continually roll-out enhancements, while ensuring that the application is highly available and can be scaled appropriately when needed. Fortunately, there’s a (sometimes bewildering) set of enabling technologies that make all of this possible.
If there’s one thing that ties these technologies together, it’s JavaScript and its successors (ES6, TypeScript, JSX, etc.) together with the JSON data format. The days when the role of JavaScript was limited to adding visual effects like flashing headers or pop-up windows are past. Developers now use JavaScript to implement the front-end experience as well as the application logic and even to access the database. There are two dominant JavaScript web app stacks – MEAN (MongoDB, Express, Angular, Node.js) and MERN (MongoDB, Express, React, Node.js) and so we’ll use those as paths to guide us through the ever-expanding array of tools and frameworks.
This first post serves as a primer for many of these technologies. Subsequent posts in the series take a deep dive into specific topics – working through the end-to-end development of Mongopop – an application to populate a MongoDB database with realistic data and then perform other operations on that data.
The MEAN Stack
We’ll start with MEAN as it’s the more established stack but most of what’s covered here is applicable to MERN (swap Angular with React).
MEAN is a set of Open Source components that together, provide an end-to-end framework for building dynamic web applications; starting from top (code running in the browser) to the bottom (database). The stack is made up of:
Angular (formerly Angular.js, now also known as Angular 2): Front-end web app framework; runs your JavaScript code in the users browser, allowing your application UI to be dynamic
Express (sometimes referred to as Express.js): Back-end web application framework running on top of Node.js
Node.js : JavaScript runtime environment – lets you implement your application back-end in JavaScript
A common theme in the MEAN stack is JavaScript – every line of code you write can be in the same language. You even access the database using MongoDB’s native, IdiomaticJavaScript/Node.js driver. What do we mean by idiomatic? Using the driver feels natural to a JavaScript developer as all interaction is performed using familiar concepts such as JavaScript objects and asynchronous execution using either callback functions or promises (explained later). Here’s an example of inserting an array of 3 JavaScript objects:
Angular, originally created and maintained by Google, runs your JavaScript code within the user’s web browsers to implement a reactive user interface (UI). A reactive UI gives the user immediate feedback as they give their input (in contrast to static web forms where you enter all of your data, hit “Submit” and wait.
Version 1 of Angular was called AngularJS but it was shortened to Angular in Angular 2 after it was completely rewritten in Typescript (a superset of JavaScript) – Typescript is now also the recommended language for Angular apps to use.
You implement your application front-end as a set of components – each of which consists of your JavaScript (TypeScript) code and an HTML template that includes hooks to execute and use the results from your TypeScript functions. Complex application front-ends can be crafted from many simple (optionally nested) components.
Angular application code can also be executed on the back-end server rather than in a browser, or as a native desktop or mobile application.
Express
Express is the web application framework that runs your back-end application (JavaScript) code. Express runs as a module within the Node.js environment.
Express can handle the routing of requests to the right parts of your application (or to different apps running in the same environment).
You can run the app’s full business logic within Express and even generate the final HTML to be rendered by the user’s browser. At the other extreme, Express can be used to simply provide a REST API – giving the front-end app access to the resources it needs e.g., the database.
In this blog series, we will use Express to perform two functions:
Send the front-end application code to the remote browser when the user browses to our app
Provide a REST API that the front-end can access using HTTP network calls, in order to access the database
Node.js
Node.js is a JavaScript runtime environment that runs your back-end application (via Express).
Node.js is based on Google’s V8 JavaScript engine which is used in the Chrome browsers. It also includes a number of modules that provides features essential for implementing web applications – including networking protocols such as HTTP. Third party modules, including the MongoDB driver, can be installed, using the npm tool.
Node.js is an asynchronous, event-driven engine where the application makes a request and then continues working on other useful tasks rather than stalling while it waits for a response. On completion of the requested task, the application is informed of the results via a callback. This enables large numbers of operations to be performed in parallel which is essential when scaling applications. MongoDB was also designed to be used asynchronously and so it works well with Node.js applications.
MongoDB
MongoDB is an open-source, document database that provides persistence for your application data and is designed with both scalability and developer agility in mind. MongoDB bridges the gap between key-value stores, which are fast and scalable, and relational databases, which have rich functionality. Instead of storing data in rows and columns as one would with a relational database, MongoDB stores JSON documents in collections with dynamic schemas.
MongoDB’s document data model makes it easy for you to store and combine data of any structure, without giving up sophisticated validation rules, flexible data access, and rich indexing functionality. You can dynamically modify the schema without downtime – vital for rapidly evolving applications.
It can be scaled within and across geographically distributed data centers, providing high levels of availability and scalability. As your deployments grow, the database scales easily with no downtime, and without changing your application.
MongoDB Atlas is a database as a service for MongoDB, letting you focus on apps instead of ops. With MongoDB Atlas, you only pay for what you use with a convenient hourly billing model. With the click of a button, you can scale up and down when you need to, with no downtime, full security, and high performance.
Our application will access MongoDB via the JavaScript/Node.js driver which we install as a Node.js module.
What’s Done Where?
tl;dr – it’s flexible.
There is clear overlap between the features available in the technologies making up the MEAN stack and it’s important to decide “who does what”.
Perhaps the biggest decision is where the application’s “hard work” will be performed. Both Express and Angular include features to route to pages, run application code, etc. and either can be used to implement the business logic for sophisticated applications. The more traditional approach would be to do it in the back-end in Express. This has several advantages:
Likely to be closer to the database and other resources and so can minimise latency if lots of database calls are made
Sensitive data can be kept within this more secure environment
Application code is hidden from the user, protecting your intellectual property
Powerful servers can be used – increasing performance
However, there’s a growing trend to push more of the functionality to Angular running in the user’s browser. Reasons for this can include:
Use the processing power of your users’ machines; reducing the need for expensive resources to power your back-end. This provides a more scalable architecture, where every new user brings their own computing resources with them.
Better response times (assuming that there aren’t too many trips to the back-end to access the database or other resources)
Progressive Applications. Continue to provide (probably degraded) service when the client application cannot contact the back-end (e.g. when the user has no internet connection). Modern browsers allow the application to store data locally and then sync with the back-end when connectivity is restored.
Perhaps, a more surprising option for running part of the application logic is within the database. MongoDB has a sophisticated aggregation framework which can perform a lot of analytics – often more efficiently than in Express or Angular as all of the required data is local.
Another decision is where to validate any data that the user supplies. Ideally, this would be as close to the user as possible – using Angular to check that a provided password meets security rules allows for instantaneous feedback to the user. That doesn’t mean that there isn’t value in validating data in the back-end as well, and using MongoDB’s document validation functionality can guard against buggy software writing erroneous data.
ReactJS – Rise of the MERN Stack
An alternative to Angular is React (sometimes referred to as ReactJS), a JavaScript library developed by Facebook to build interactive/reactive user interfaces. Like Angular, React breaks the front-end application down into components. Each component can hold its own state and a parent can pass its state down to its child components and those components can pass changes back to the parent through the use of callback functions.
React components are typically implemented using JSX – an extension of JavaScript that allows HTML syntax to be embedded within the code:
React is most commonly executed within the browser but it can also be run on the back-end server within Node.js, or as a mobile app using React Native.
So should you use Angular 2 or React for your new web application? A quick google search will find you some fairly deep comparisons of the two technologies but in summary, Angular 2 is a little more powerful while React is easier for developers to get up to speed with and use. This blog series will build a near-identical web app using first the MEAN and then the MERN stack – hopefully these posts will help you find a favorite.
The following snapshot from Google Trends suggests that Angular has been much more common for a number of years but that React is gaining ground:
Why are these stacks important?
Having a standard application stack makes it much easier and faster to bring in new developers and get them up to speed as there’s a good chance that they’ve used the technology elsewhere. For those new to these technologies, there exist some great resources to get you up and running.
From MongoDB upwards, these technologies share a common aim – look after the critical but repetitive stuff in order to free up developers to work where they can really add value: building your killer app in record time.
These are the technologies that are revolutionising the web, building web-based services that look, feel, and perform just as well as native desktop or mobile applications.
The separation of layers, and especially the REST APIs, has led to the breaking down of application silos. Rather than an application being an isolated entity, it can now interact with multiple services through public APIs:
Register and log into the application using my Twitter account
Identify where I want to have dinner using Google Maps and Foursquare
Order an Uber to get me there
Have Hue turn my lights off and Nest turn my heating down
Check in on Facebook
…
Variety & Constant Evolution
Even when constraining yourself to the JavaScript ecosystem, the ever-expanding array of frameworks, libraries, tools, and languages is both impressive and intimidating at the same time. The great thing is that if you’re looking for some middleware to perform a particular role, then the chances are good that someone has already built it – the hardest part is often figuring out which of the 5 competing technologies is the best fit for you.
To further complicate matters, it’s rare for the introduction of one technology not to drag in others for you to get up to speed on: Node.js brings in npm; Angular 2 brings in Typescript, which brings in tsc; React brings in ES6, which brings in Babel; ….
And of course, none of these technologies are standing still and new versions can require a lot of up-skilling to use – Angular 2 even moved to a different programming language!
The Evolution of JavaScript
The JavaScript language itself hasn’t been immune to change.
Ecma International was formed to standardise the language specification for JavaScript (and similar language forks) to increase portability – the ideal being that any “JavaScript” code can run in any browser or other JavaScript runtime environment.
The most recent, widely supported version is ECMAScript 6 – normally referred to as ES6. ES6 is supported by recent versions of Chrome, Opera, Safari, and Node.js). Some platforms (e.g. Firefox and Microsoft Edge) do not yet support all features of ES6. These are some of the key features added in ES6:
Classes & modules
Promises – a more convenient way to handle completion or failure of synchronous function calls (compared to callbacks)
Arrow functions – a concise syntax for writing function expressions
Generators – functions that can yield to allow others to execute
Iterators
Typed arrays
Typescript is a superset of ES6 (JavaScript); adding static type checking. Angular 2 is written in Typescript and Typescript is the primary language to be used when writing code to run in Angular 2.
Because ES6 and Typescript are not supported in all environments, it is common to transpile the code into an earlier version of JavaScript to make it more portable. In this series’ Angular post, tsc is used to transpile Typescript into JavaScript while the React post uses Babel (via react-script) to transpile our ES6 code.
And of course, JavaScript is augmented by numerous libraries. The Angular 2 post in this series uses Observables from the RxJS reactive libraries which greatly simplify making asynchronous calls to the back-end (a pattern historically referred to as AJAX).
Summary & What’s Next in the Series
This post has introduced some of the technologies used to build modern, reactive, web applications – most notably the MEAN and MERN stacks. If you want to learn exactly how to use these then please continue to follow this blog series which steps through building the MongoPop application:
As already covered in this post, the MERN and MEAN stacks are evolving rapidly and new JavaScript frameworks are being added all of the time. Inevitably, some of the details in this series will become dated but the concepts covered will remain relevant.
A simpler way to build your app – MongoDB Stitch, Backend as a Service
MongoDB Stitch is a backend as a service (BaaS), giving developers a REST-like API to MongoDB, and composability with other services, backed by a robust system for configuring fine-grained data access controls. Stitch provides native SDKs for JavaScript, iOS, and Android.
Built-in integrations give your application frontend access to your favorite third party services: Twilio, AWS S3, Slack, Mailgun, PubNub, Google, and more. For ultimate flexibility, you can add custom integrations using MongoDB Stitch’s HTTP service.
MongoDB Stitch allows you to compose multi-stage pipelines that orchestrate data across multiple services; where each stage acts on the data before passing its results on to the next.
Unlike other BaaS offerings, MongoDB Stitch works with your existing as well as new MongoDB clusters, giving you access to the full power and scalability of the database. By defining appropriate data access rules, you can selectively expose your existing MongoDB data to other applications through MongoDB Stitch’s API.
KeystoneJS is an open source framework for building web applications and Content Management Systems. It’s built on top of MongoDB, Express, and Node.js – key components of the ubiquitous MEAN stack.
This post explains why MongoDB Atlas is an ideal choice for KeystoneJS and then goes on to show how to configure KeystoneJS to use it.
Why are KeystoneJS and MongoDB Atlas a Good Match
The MEAN stack is extremely popular and well supported and it’s the go to platform when developing modern applications. For its part, MongoDB brings flexible schemas, rich queries, an idiomatic Node.js driver, and simple to use high availability and scaling.
MongoDB Atlas provides all of the features of MongoDB, without the operational heavy lifting required for any new application. MongoDB Atlas is available on demand through a pay-as-you-go model and billed on an hourly basis, letting you focus on what you do best.
It’s easy to get started – use a simple GUI to select the instance size, region, and features you need. MongoDB Atlas provides:
Security features to protect access to your data
Built in replication for always-on availability, tolerating complete data center failure
Backups and point in time recovery to protect against data corruption
Fine-grained monitoring to let you know when to scale. Additional instances can be provisioned with the push of a button
Automated patching and one-click upgrades for new major versions of the database, enabling you to take advantage of the latest and greatest MongoDB features
A choice of cloud providers, regions, and billing options
Like KeystoneJS, MongoDB Atlas is a natural fit for users looking to simplify their development and operations work, letting them focus on what makes their application unique rather than commodity (albeit essential) plumbing.
Installing KeystoneJS and Configuring it to Use MongoDB Atlas
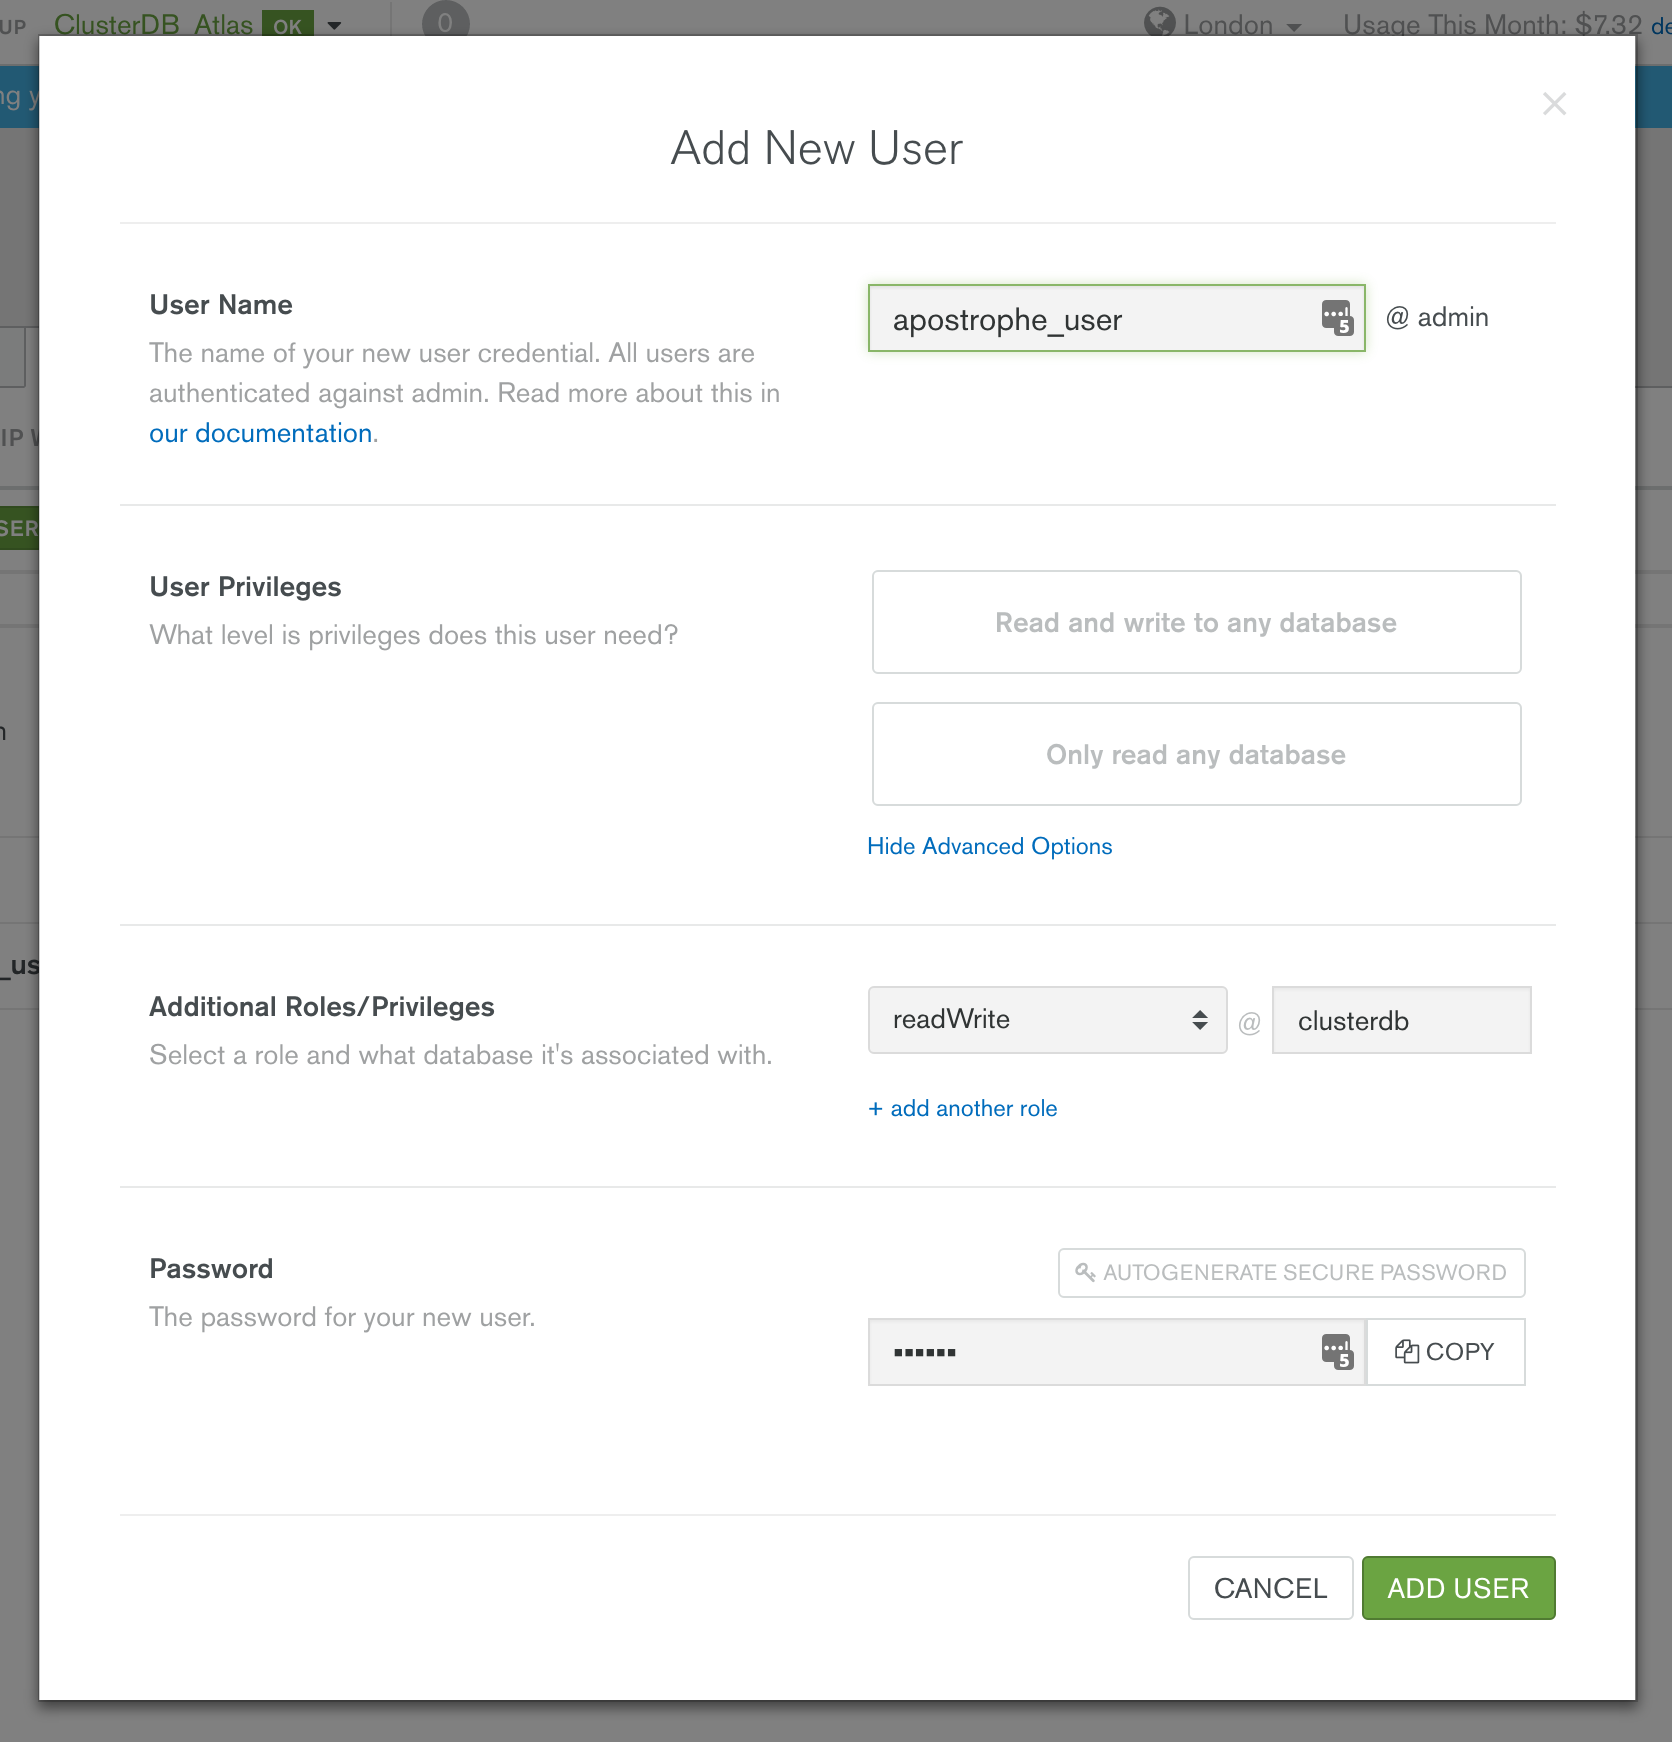
Before starting with KeystoneJS, you should launch your MongoDB cluster using MongoDB Atlas and then (optionally) create a user with read and write privileges for just the database that will be used for this project, as shown in Figure 1. You must also add the IP address of your application server to the IP Whitelist in the MongoDB Atlas security tab.
Figure 1: Creating KeystoneJS user in MongoDB Atlas
If it isn’t already installed on your system, download and install Node.js:
You should then add the bin sub-folder to your .bash_profile file and then install KeystoneJS:
Before starting KeystoneJS you need to configure it with details on how to connect to your specific MongoDB Atlas cluster. This is done by updating the MONGO_URI value within the .env file:
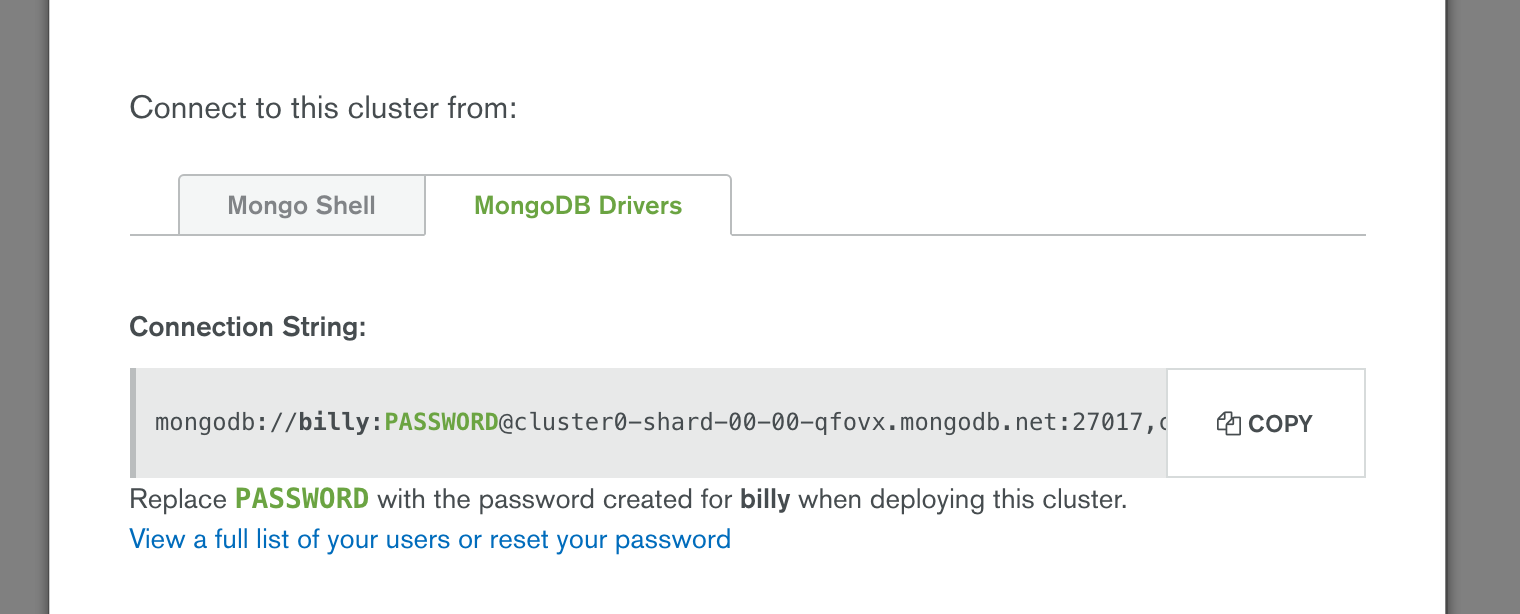
The URI contains these components:
keystonejs_user is the name of the user you created in the MongoDB Atlas UI
my_password is the password you chose when creating the user in MongoDB Atlas
cluster0-shard-00-00-qfovx.mongodb.net, cluster0-shard-00-01-qfovx.mongodb.net, & cluster0-shard-00-02-qfovx.mongodb.net are the hostnames of the instances in your MongoDB Atlas replica set (click on the “CONNECT” button in the MongoDB Atlas UI if you don’t have these)
27017 is the standard MongoDB port number
clusterdb is the name of the database (schema) that KeystoneJS will use (note that this must match the project name used when installing KeystoneJS as well as the database you granted the user access to)
To enforce security, MongoDB Atlas mandates that the ssl option is used
admin is the database that’s being used to store the credentials for keystonejs_user
Clients connect to KeystoneJS through port 3000 and so you must open that port in your firewall.
You can then start KeystoneJS:
$ node keystone
Testing the Configuration
Browse to the application at http://address-of-app-server:3000 as shown in Figure 2.
Figure 2: KeystoneJS Running on MongoDB Atlas
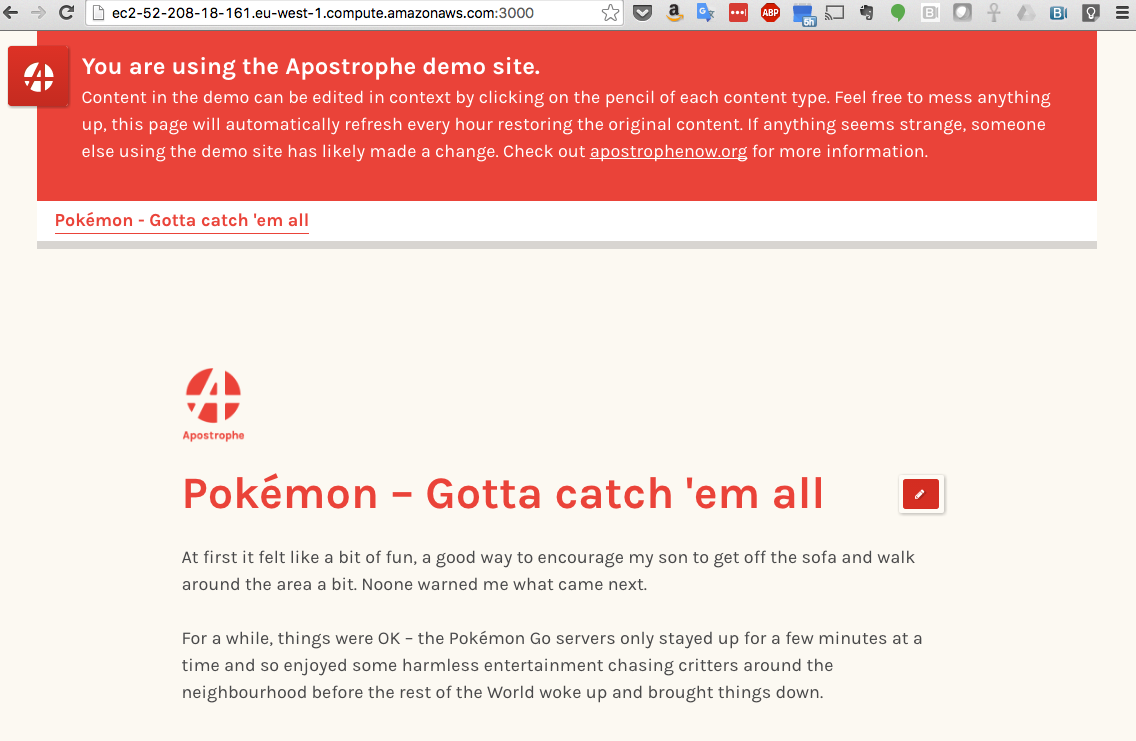
Sign in using the credentials shown and then confirm that you can upload some images to a gallery and create a new page as shown in Figure 3.
Figure 3: Create a Page in KeystoneJS with Data Stored in MongoDB Atlas
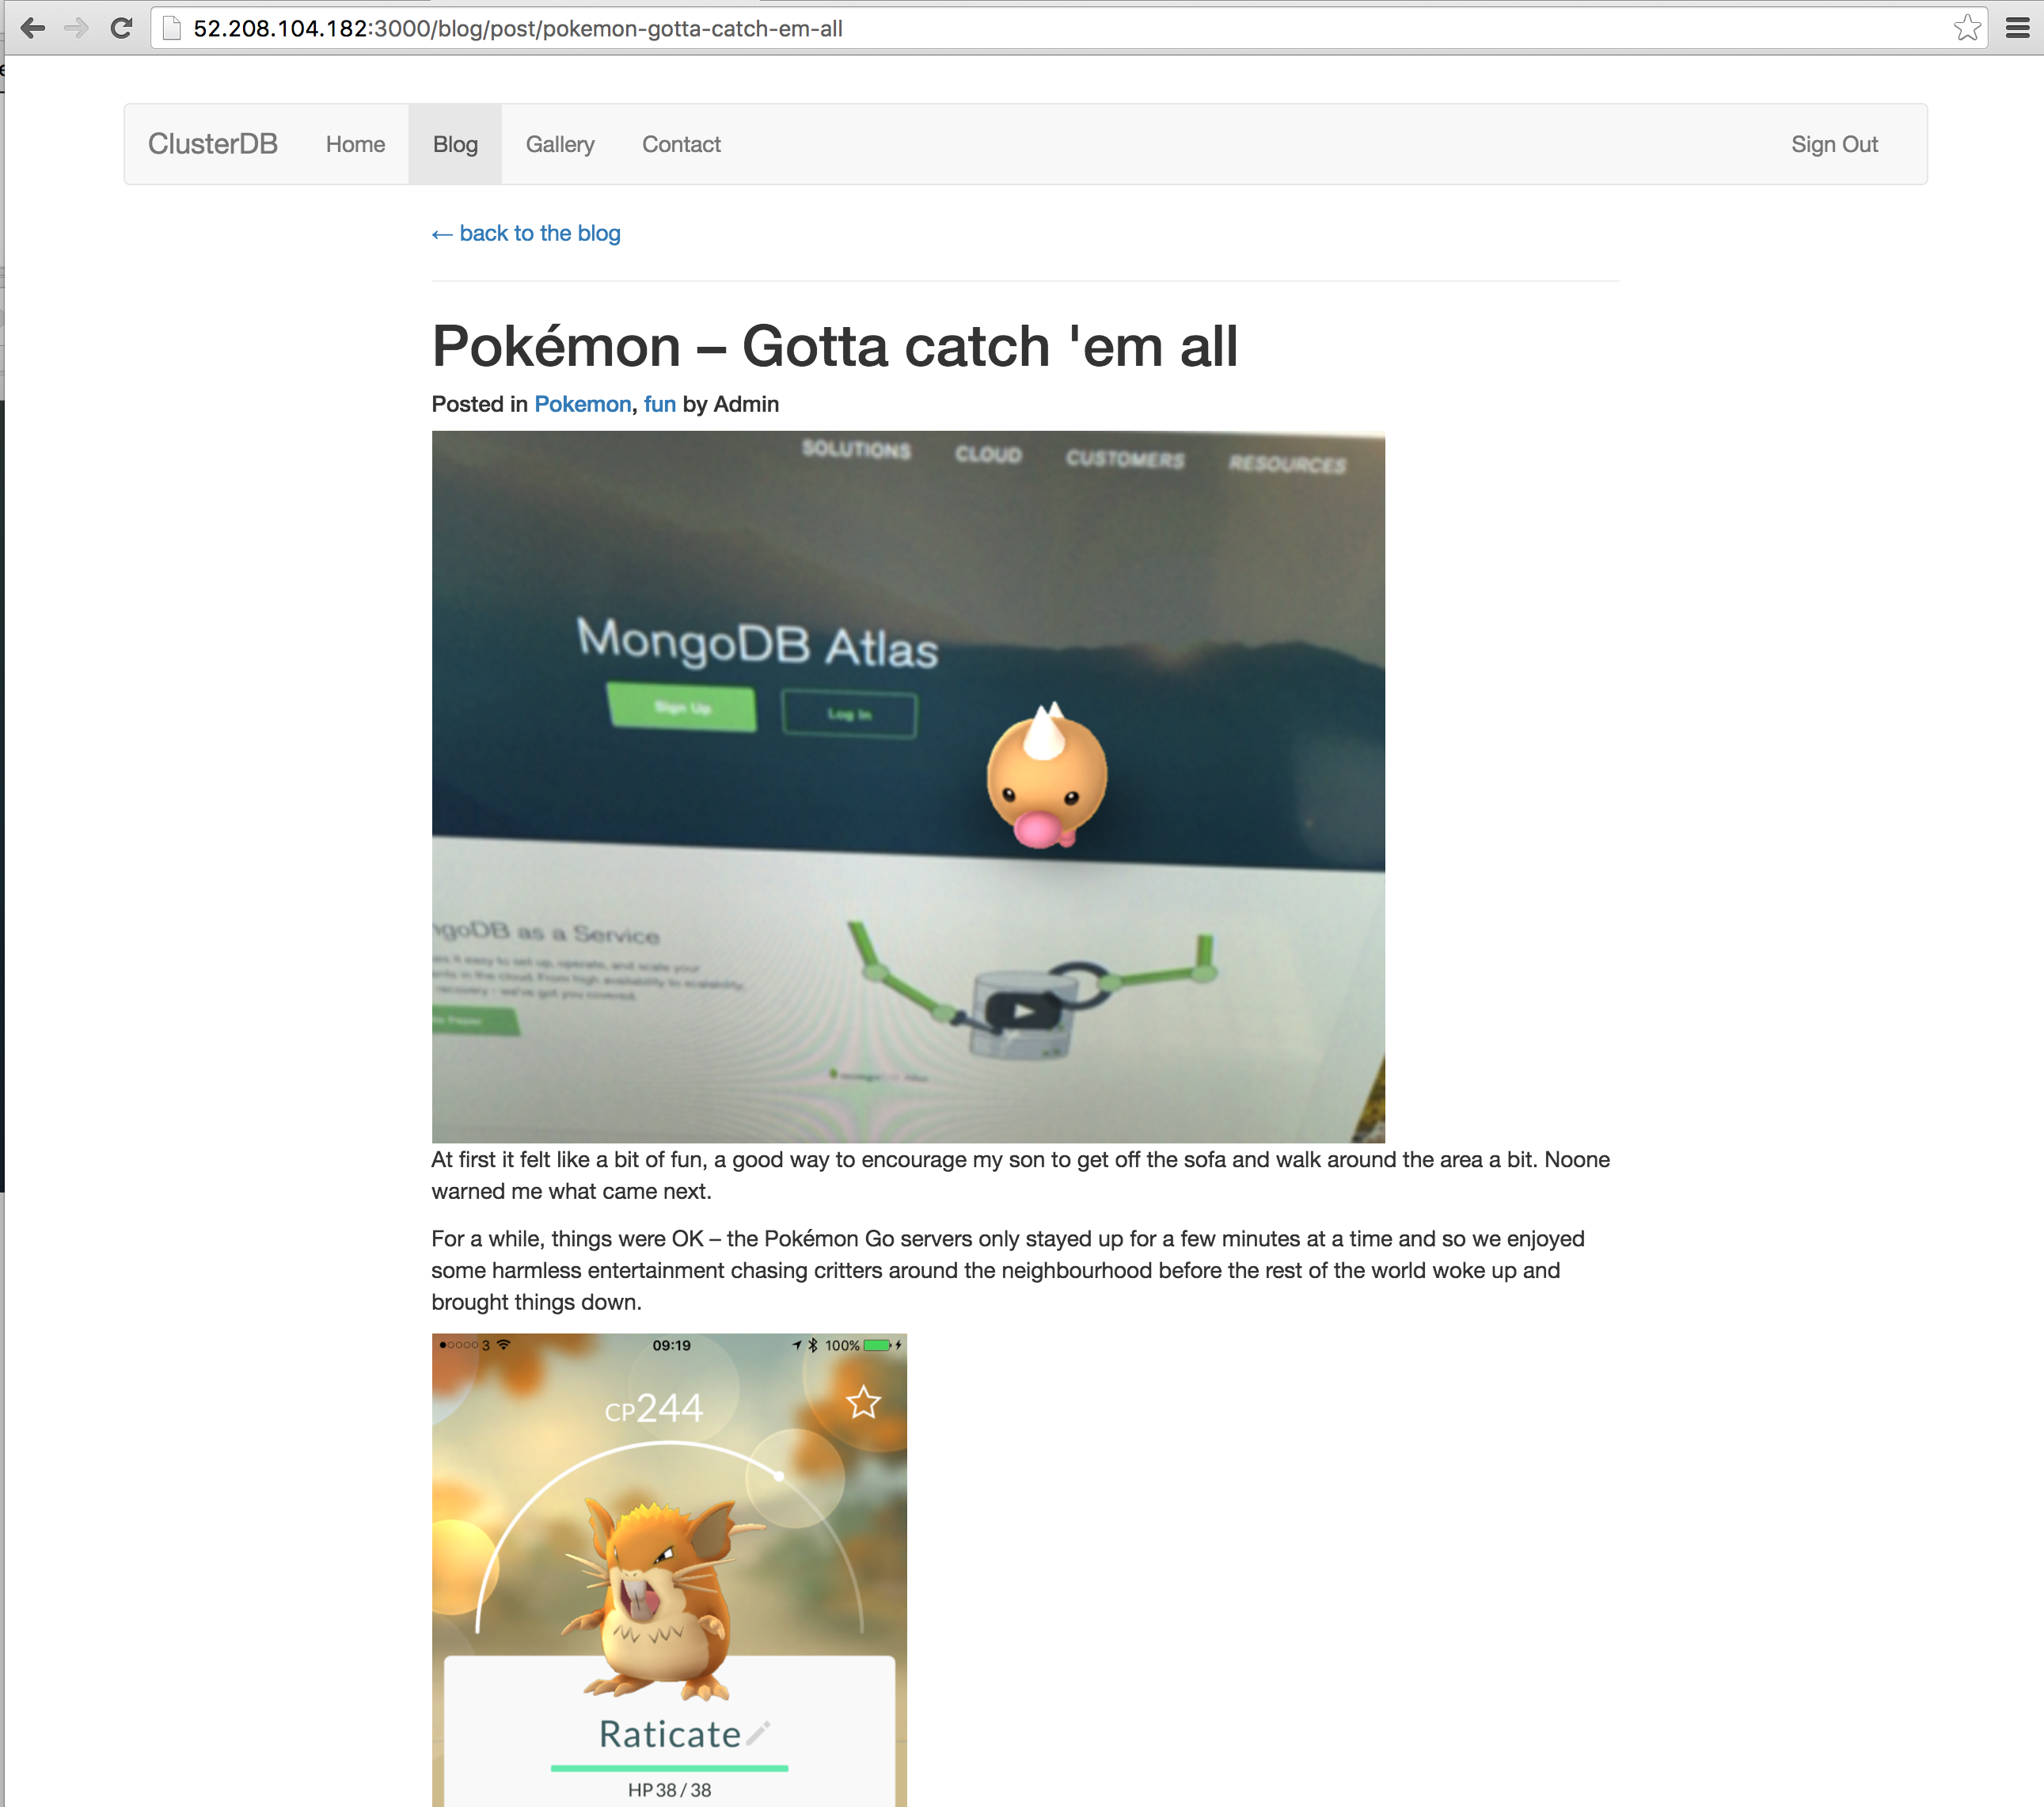
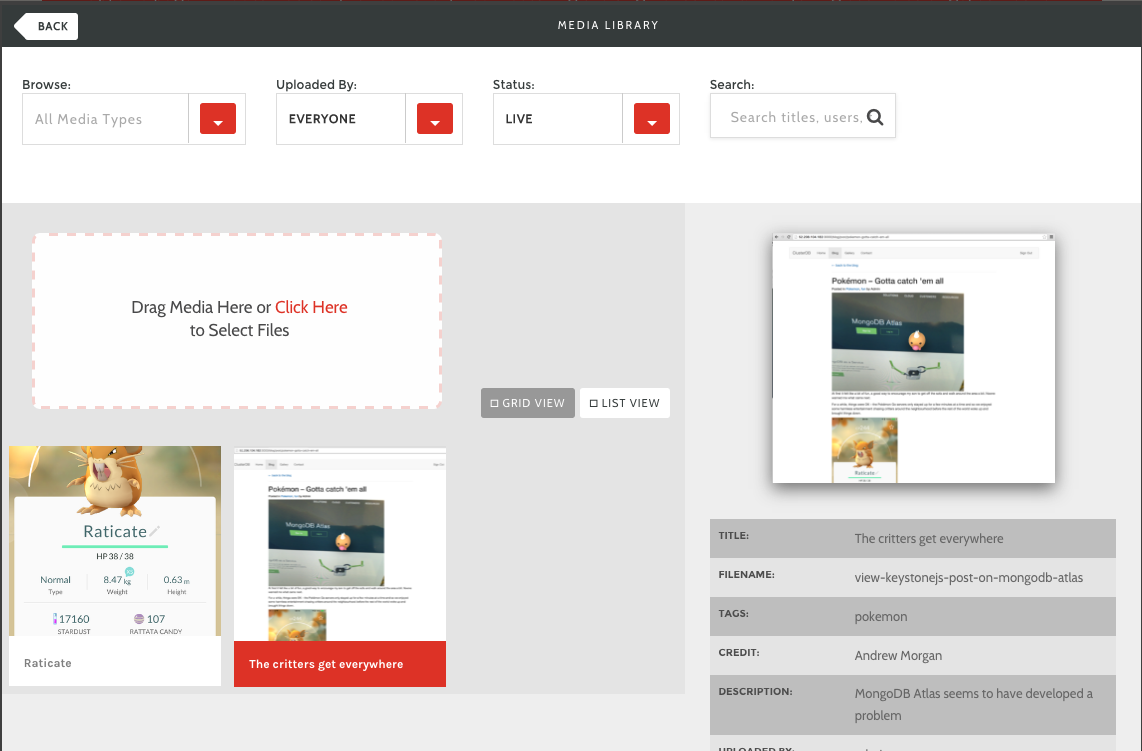
After saving the page, confirm that you can browse to the newly created post (Figure 4).
Figure 4: View KeystoneJS Post with Data Read from MongoDB Atlas
Optionally, confirm that, MongoDB Atlas really is being used by KeystoneJS, you can connect using the MongoDB shell:
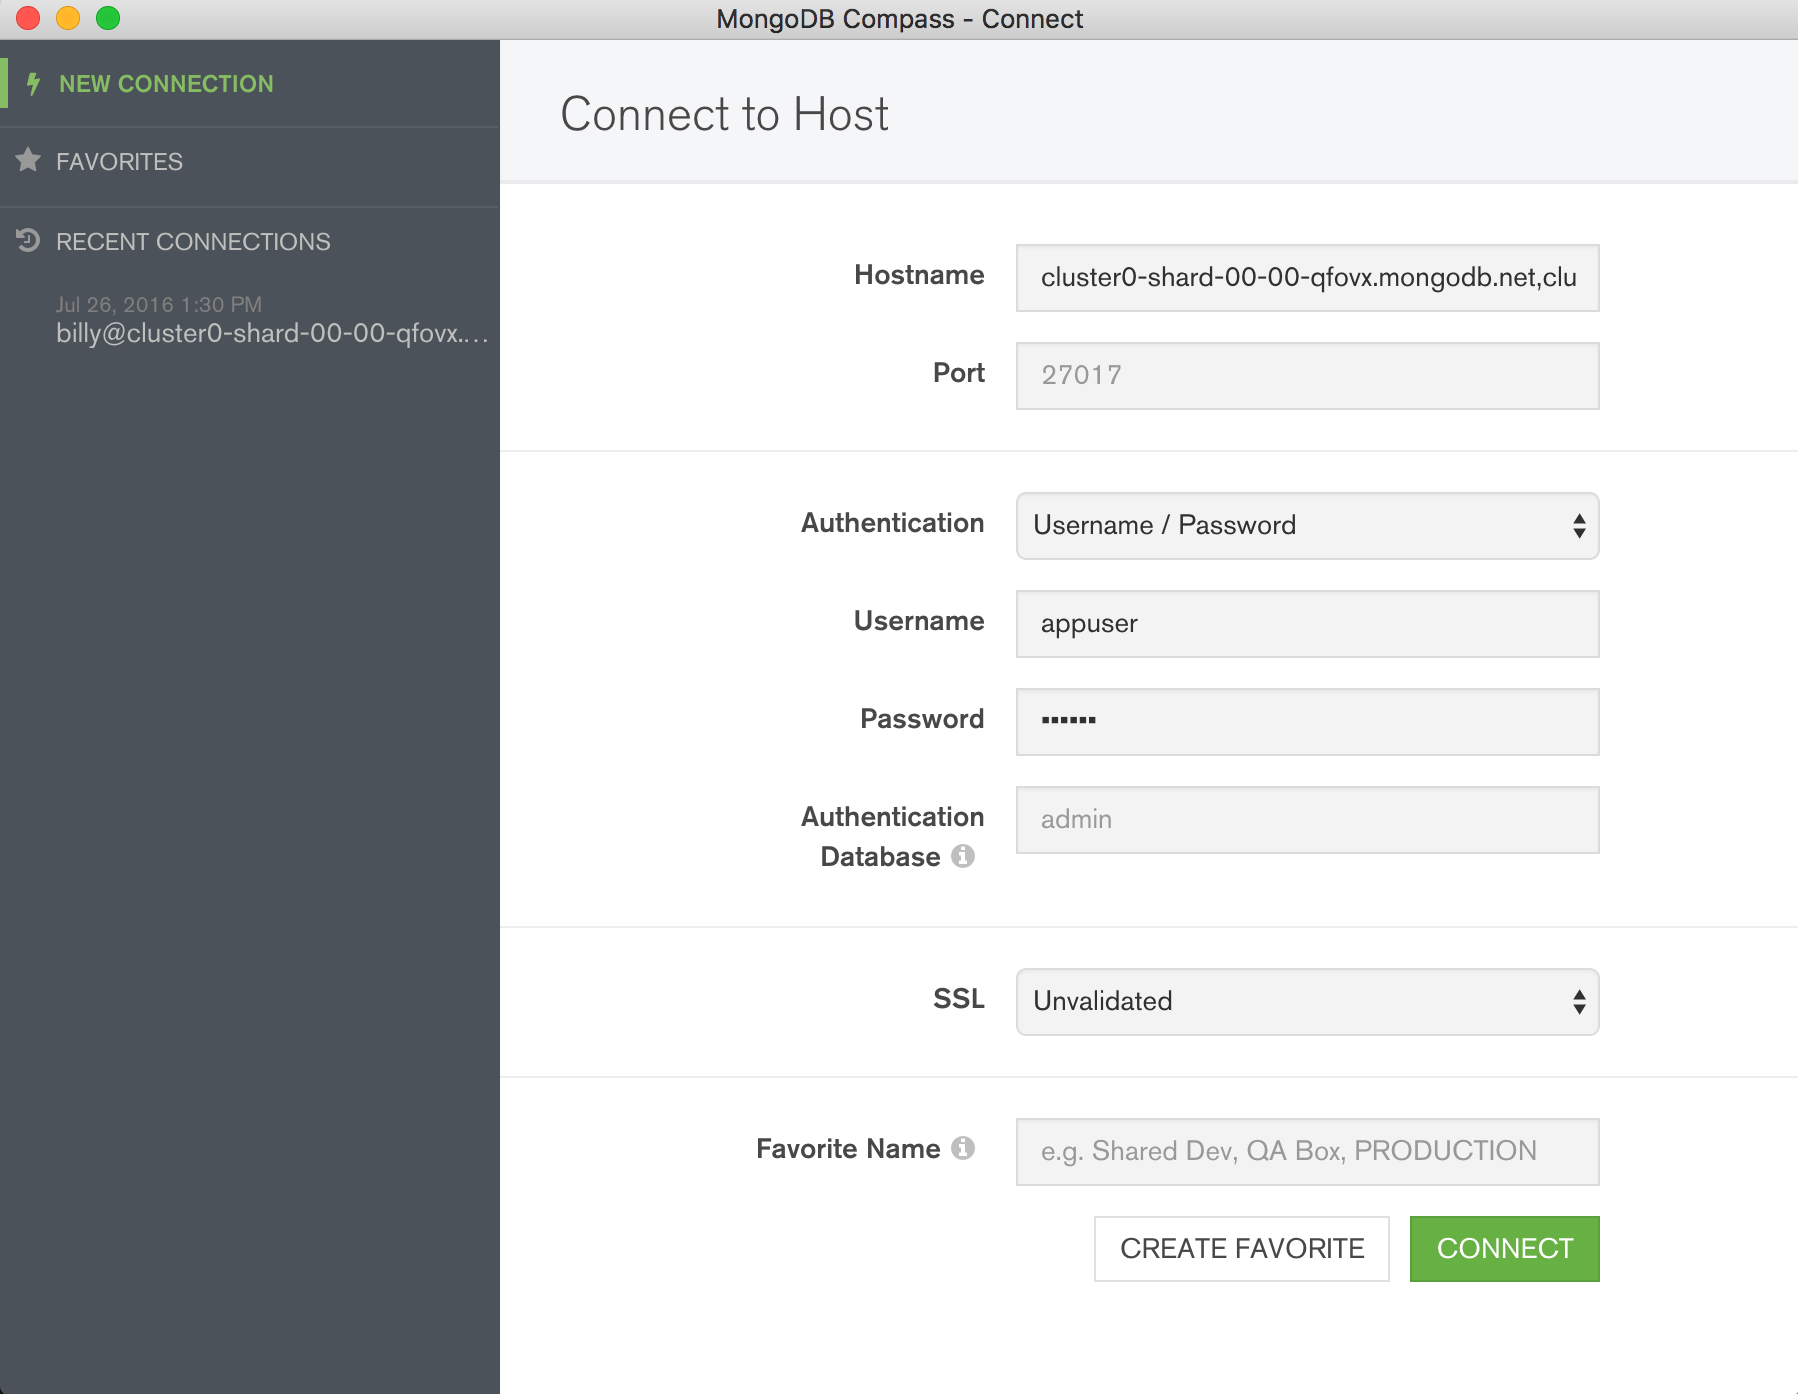
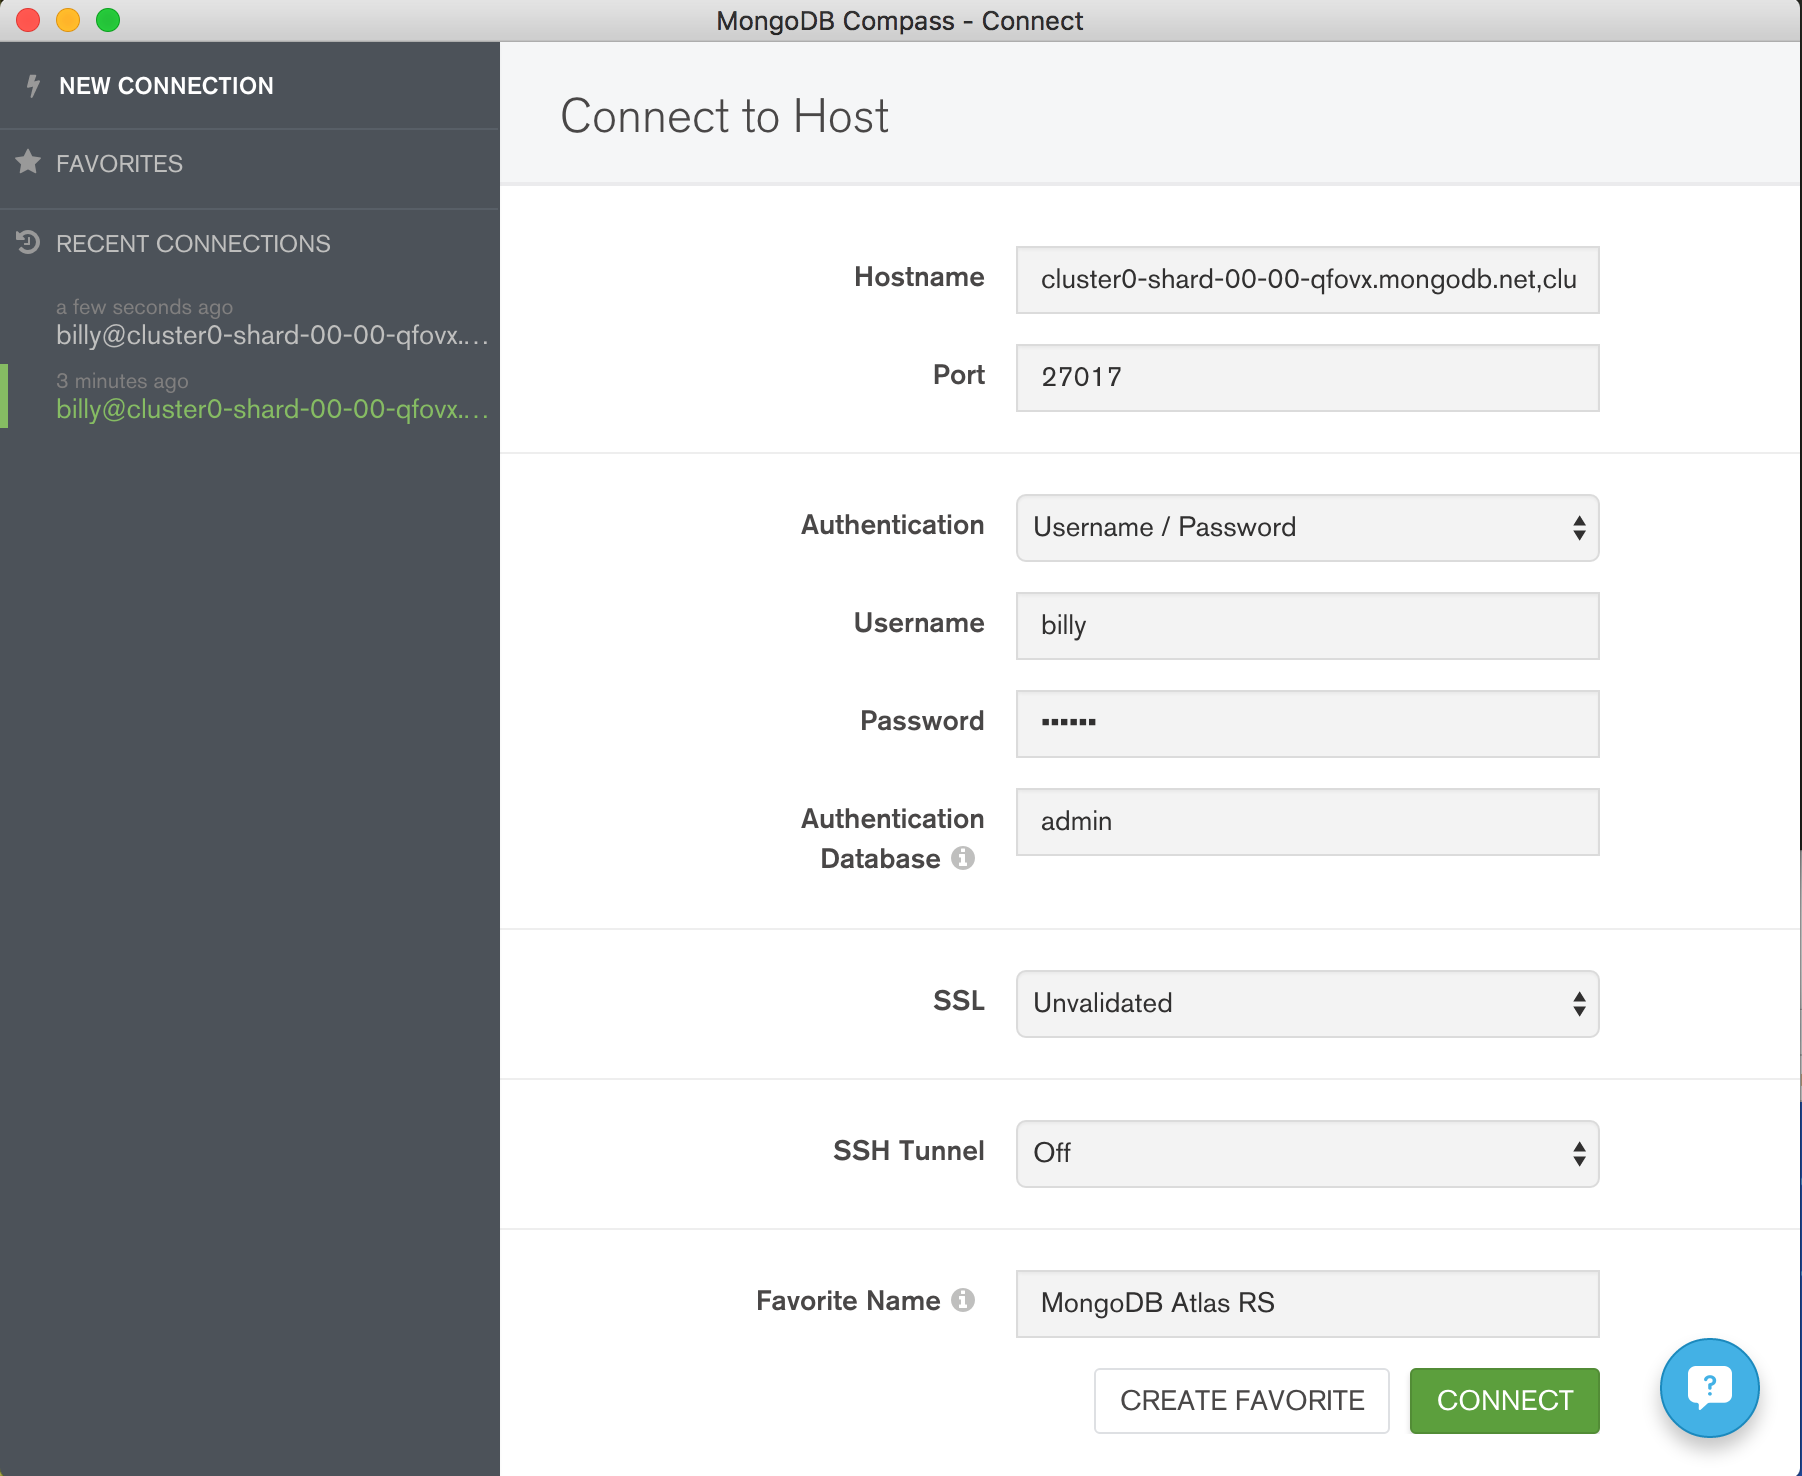
To visually navigate through the schema and data created by KeystoneJS, download and install MongoDB Compass. The same credentials can be used to connect Compass to your MongoDB database – Figure 5.
Figure 5: Connect MongoDB Compass to MongoDB Atlas Database
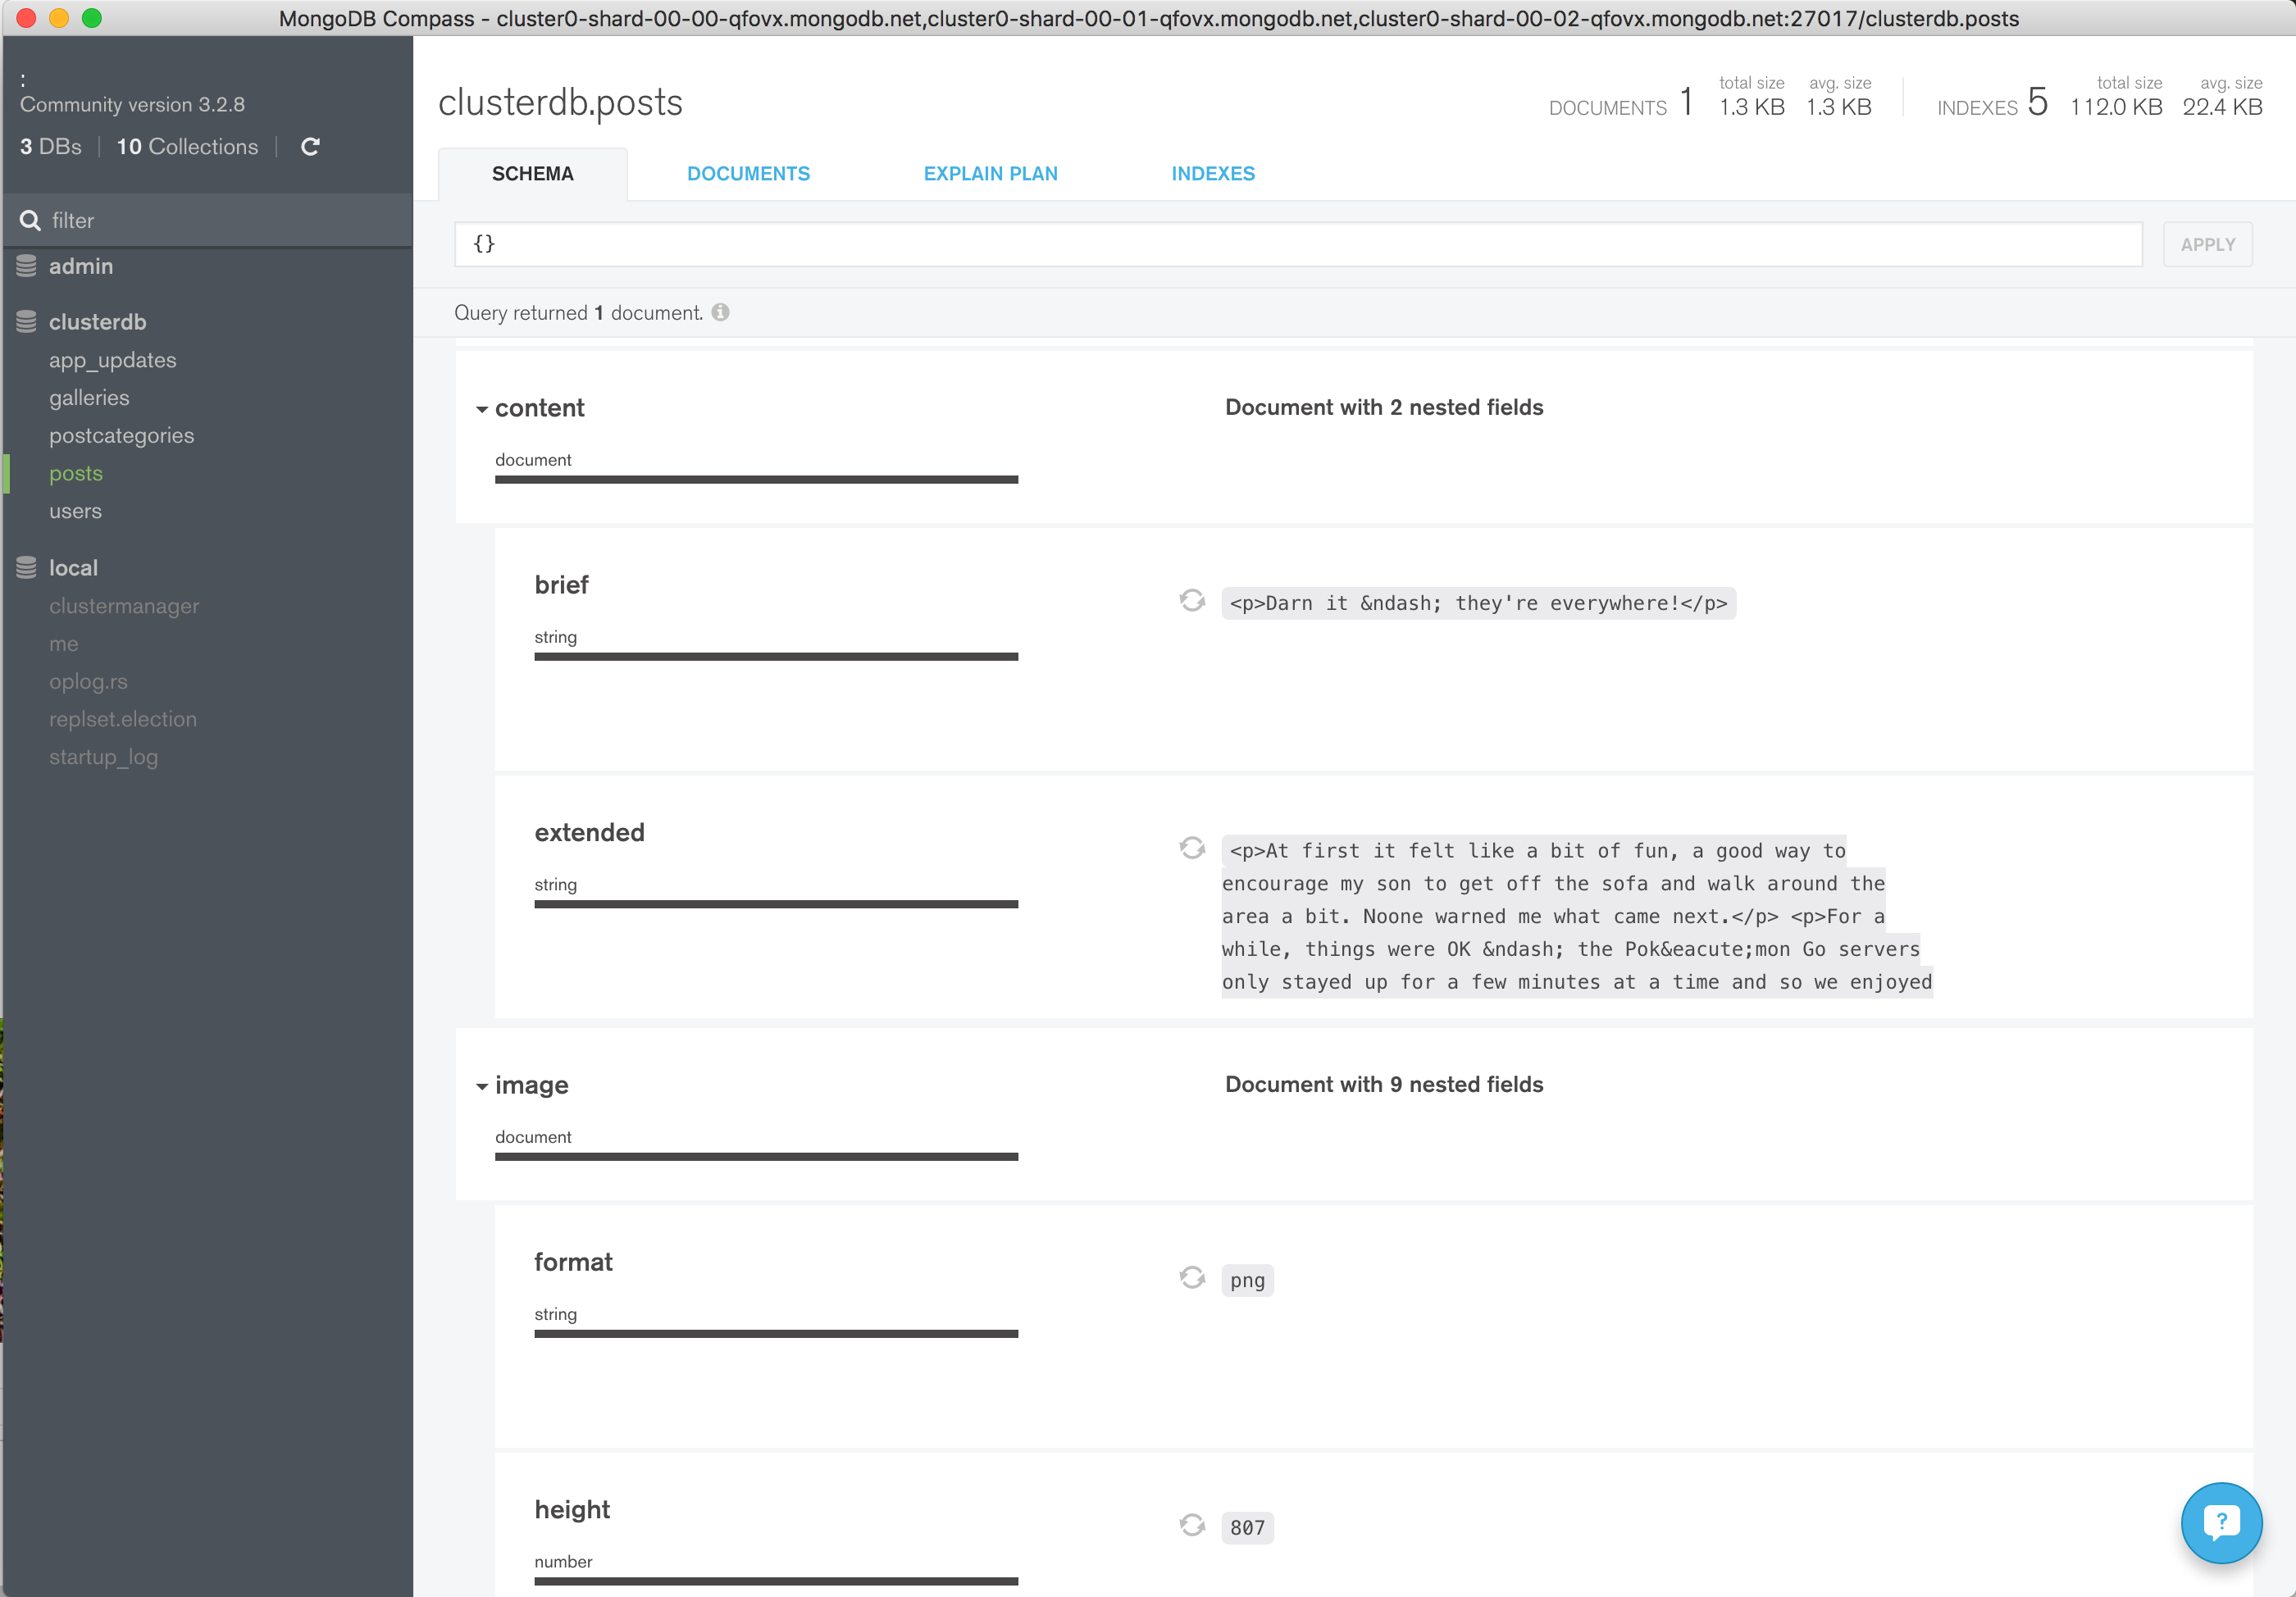
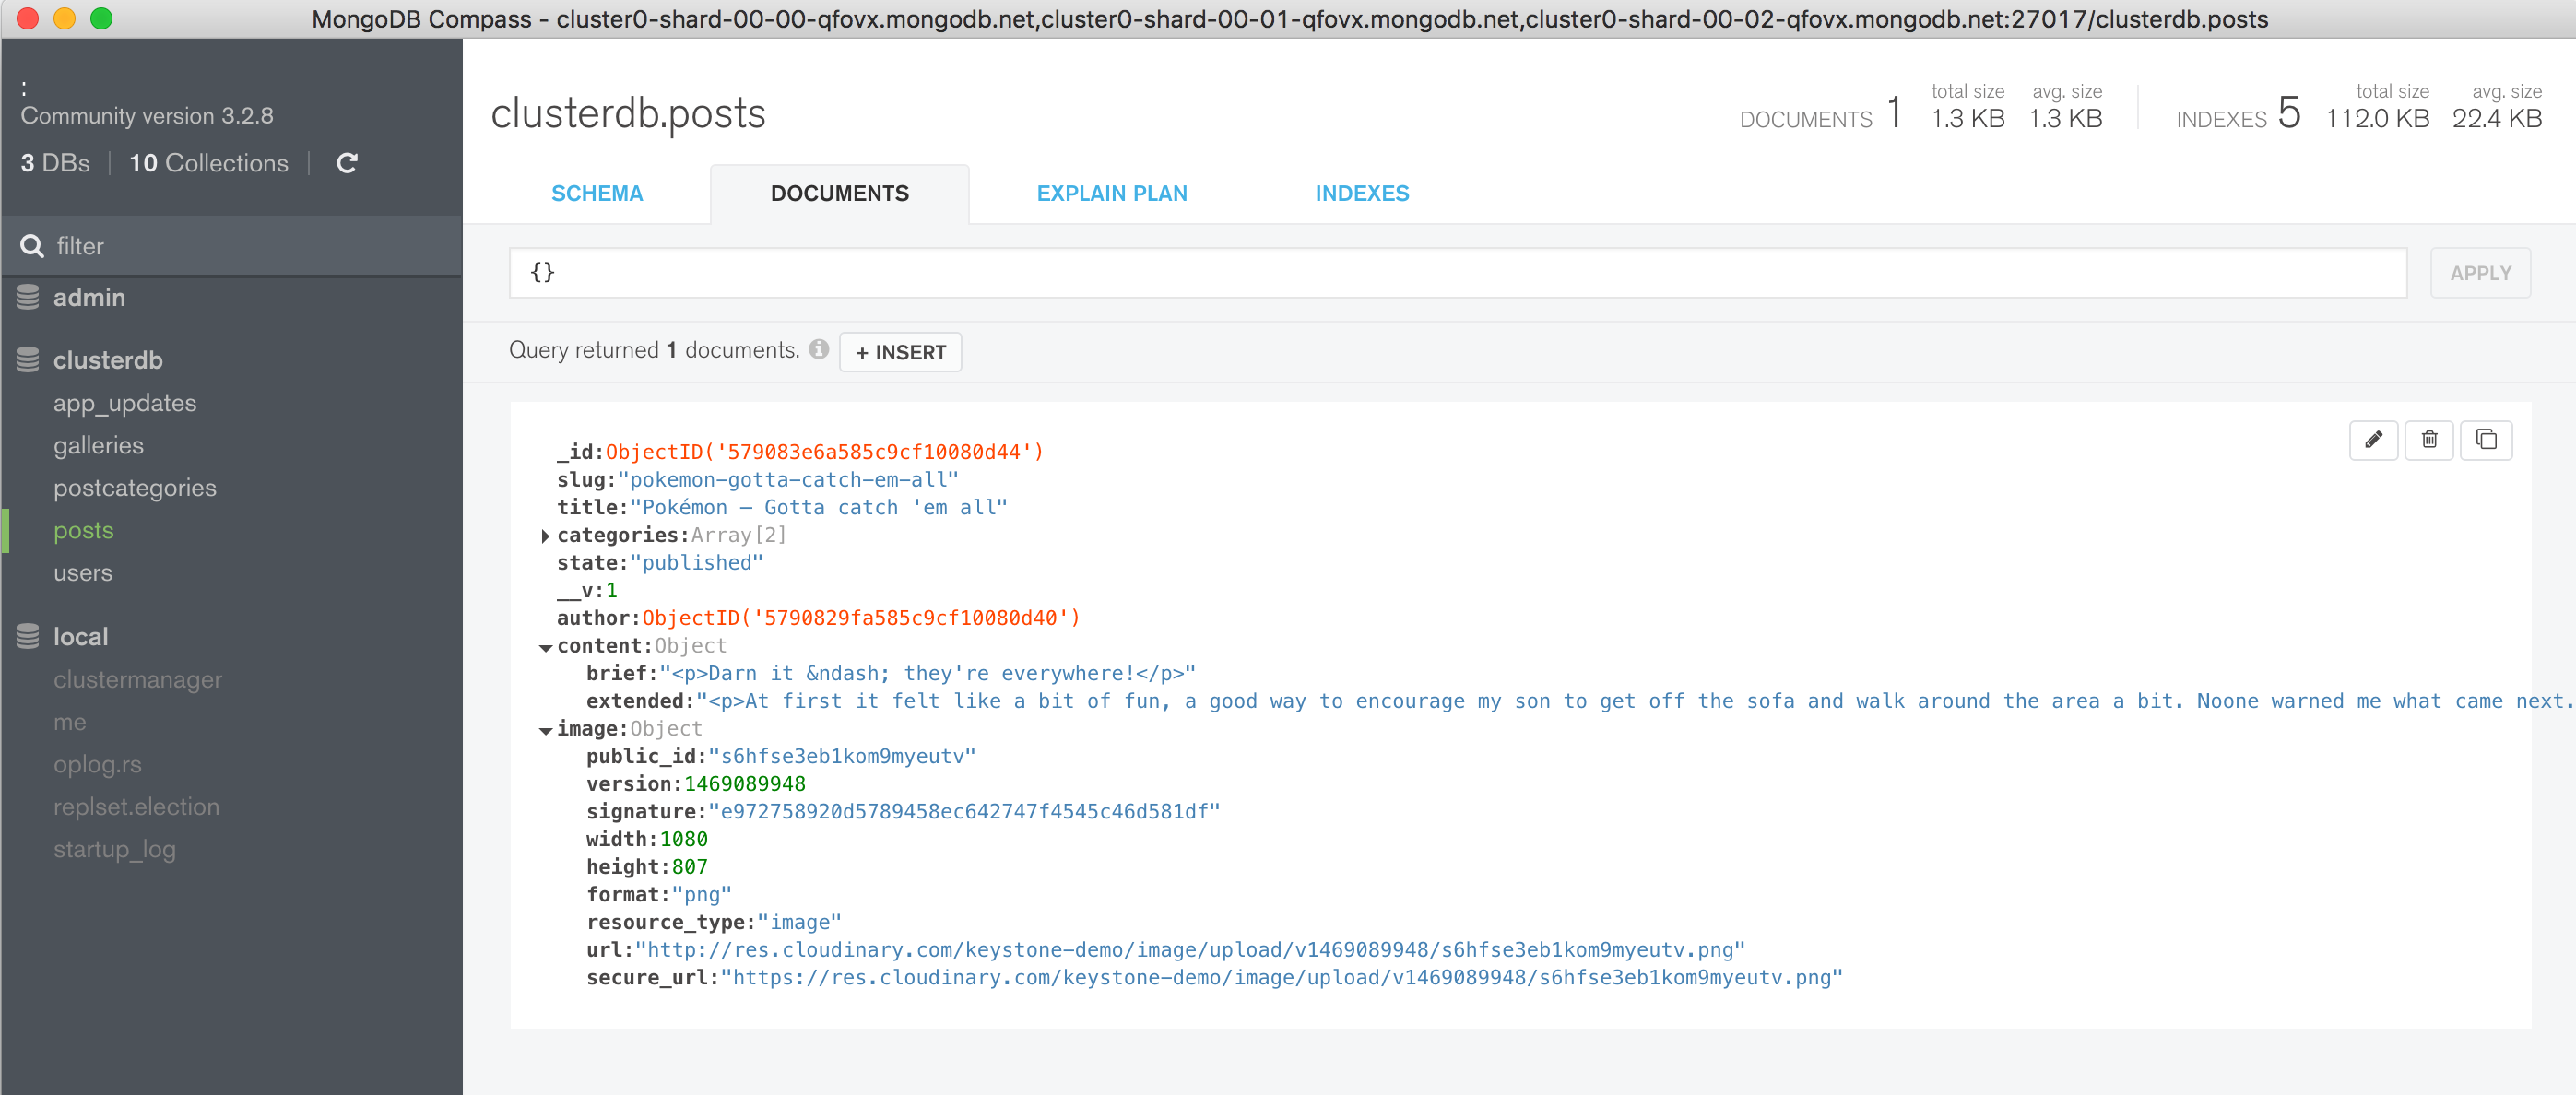
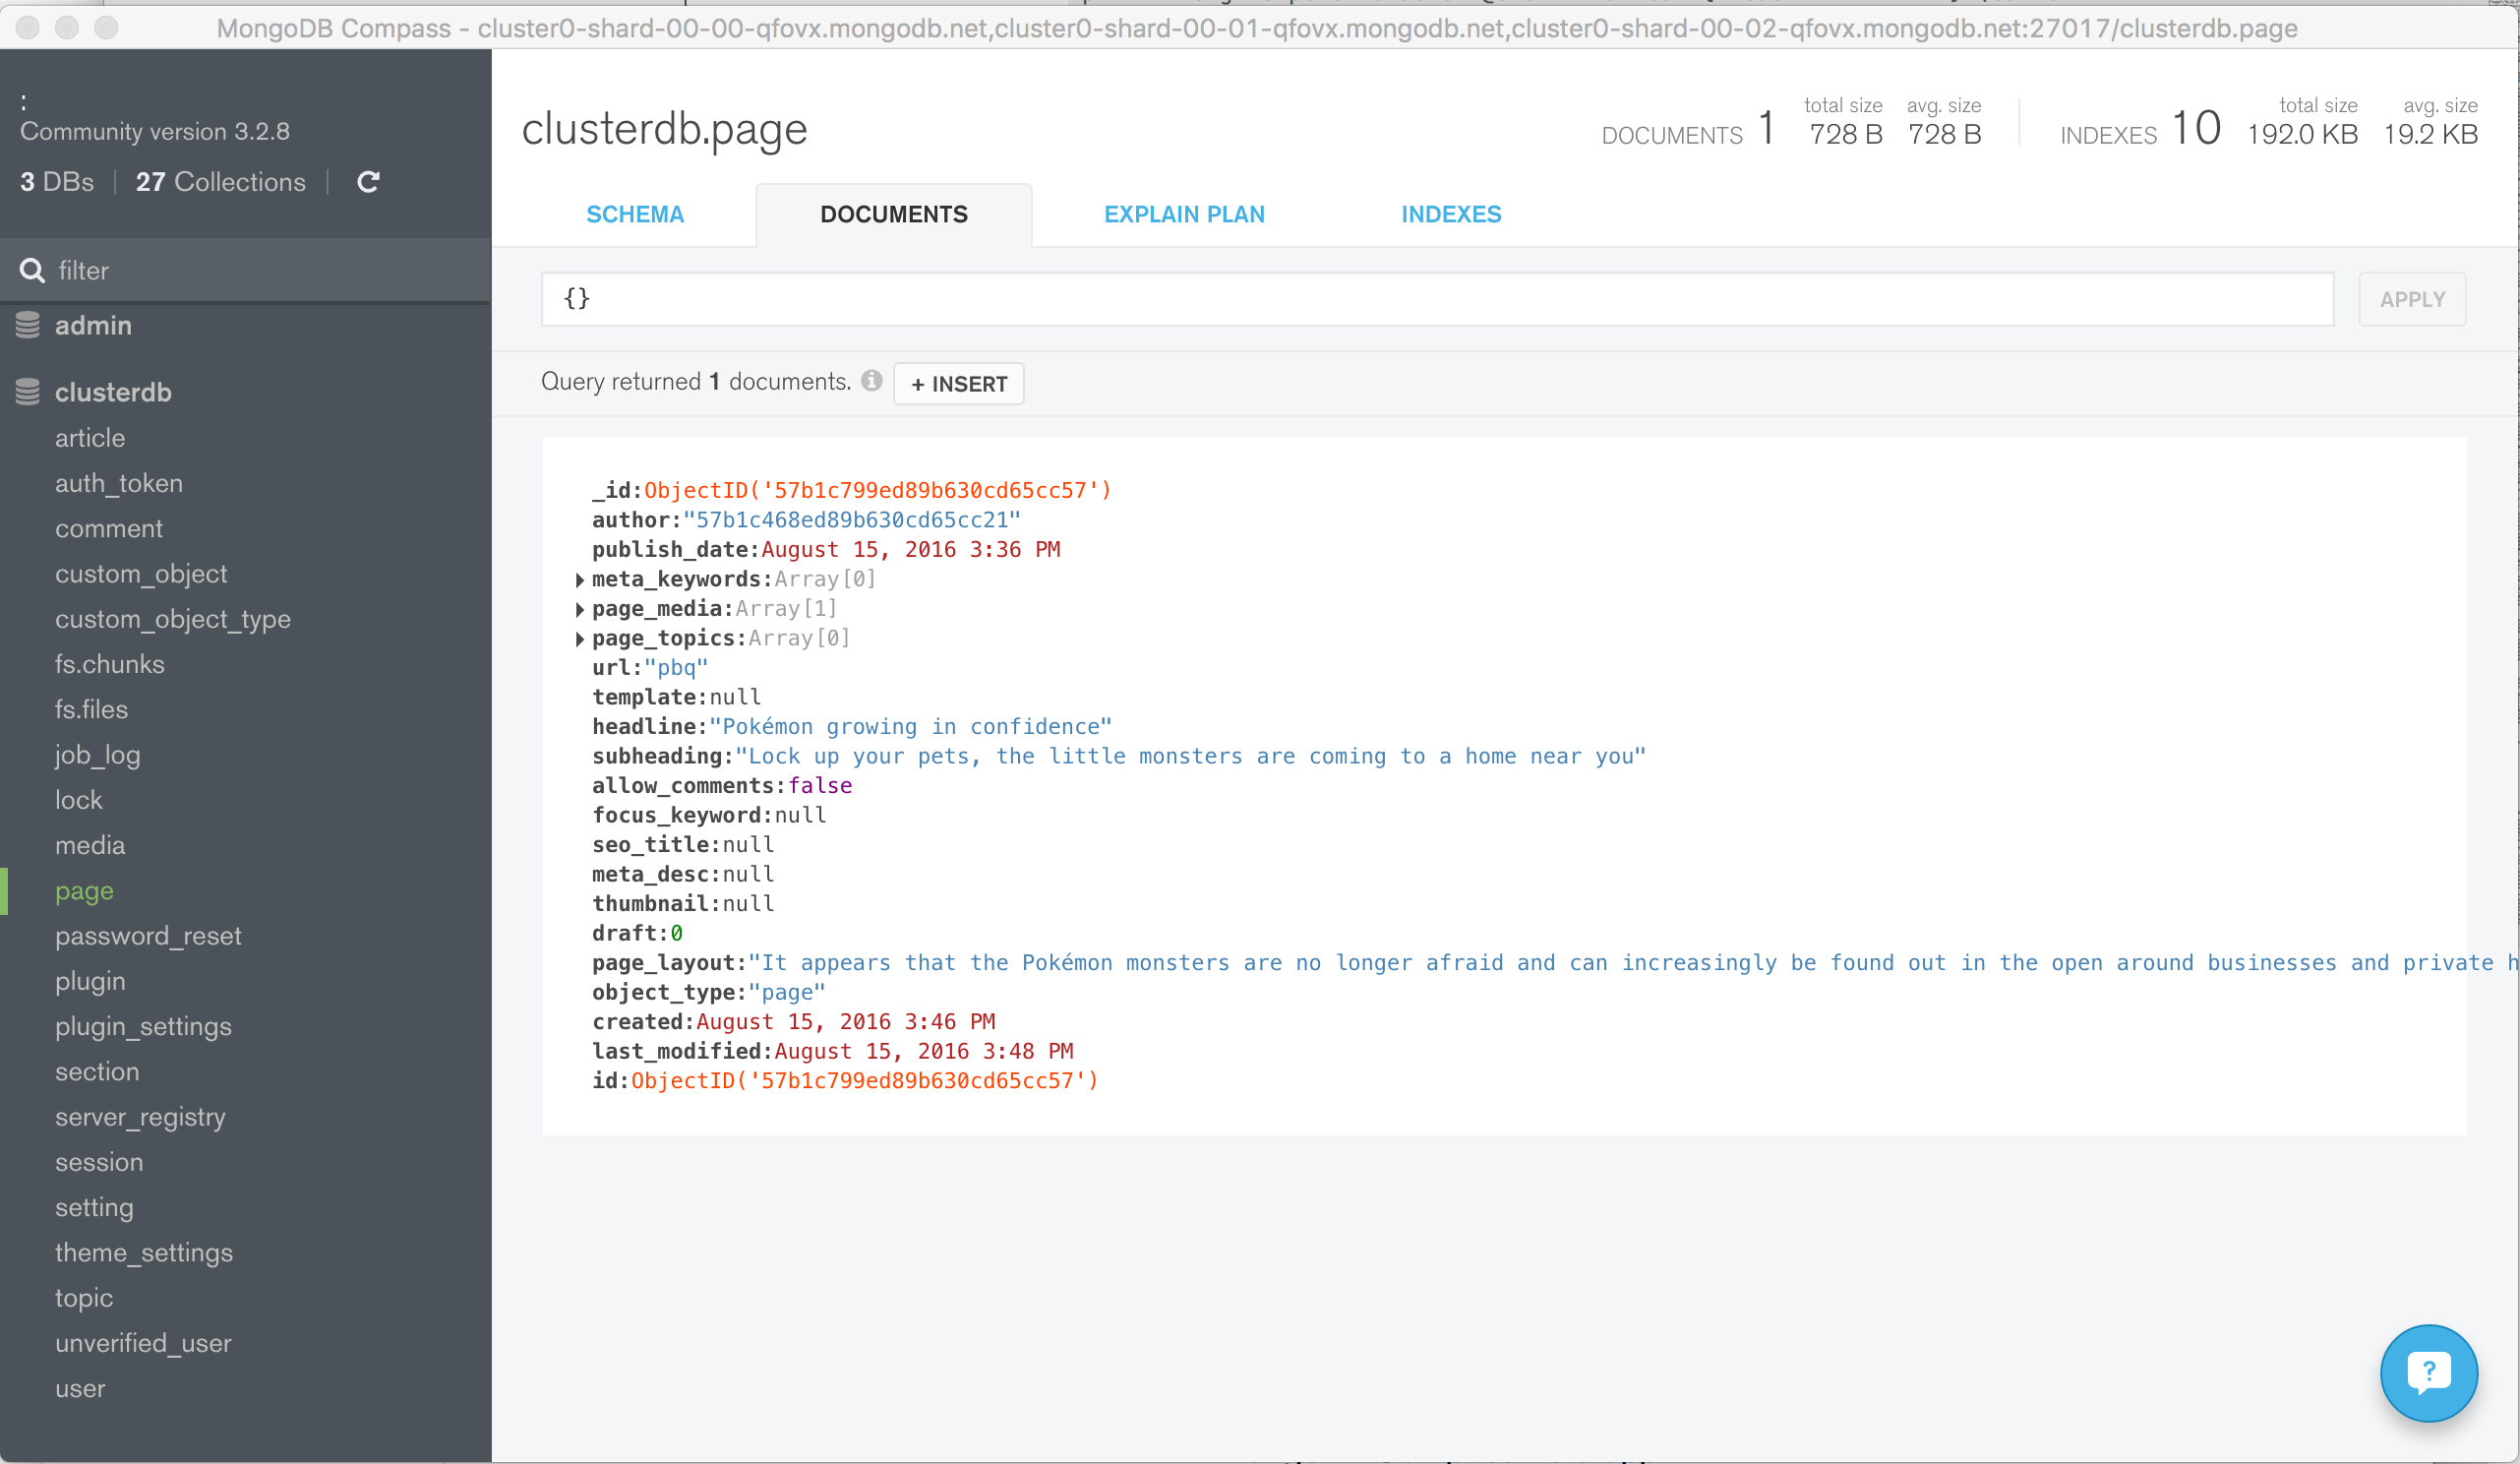
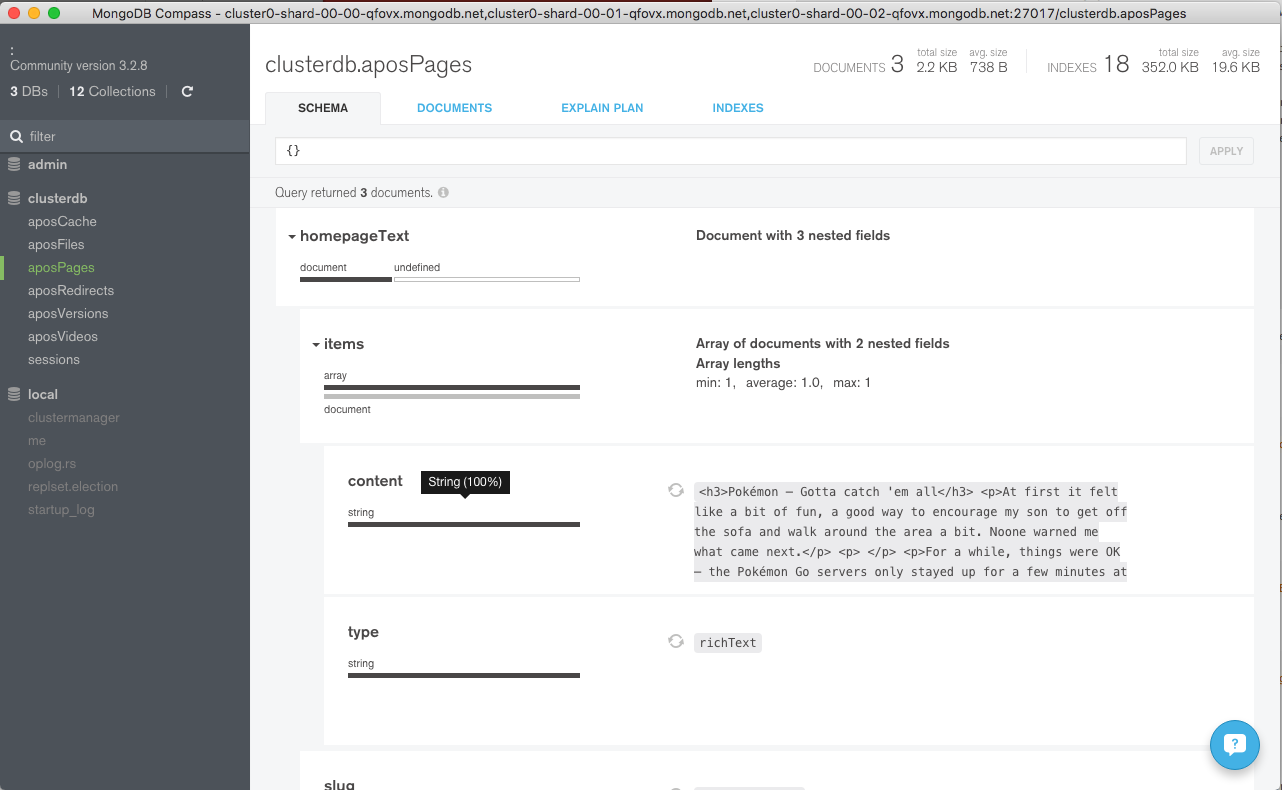
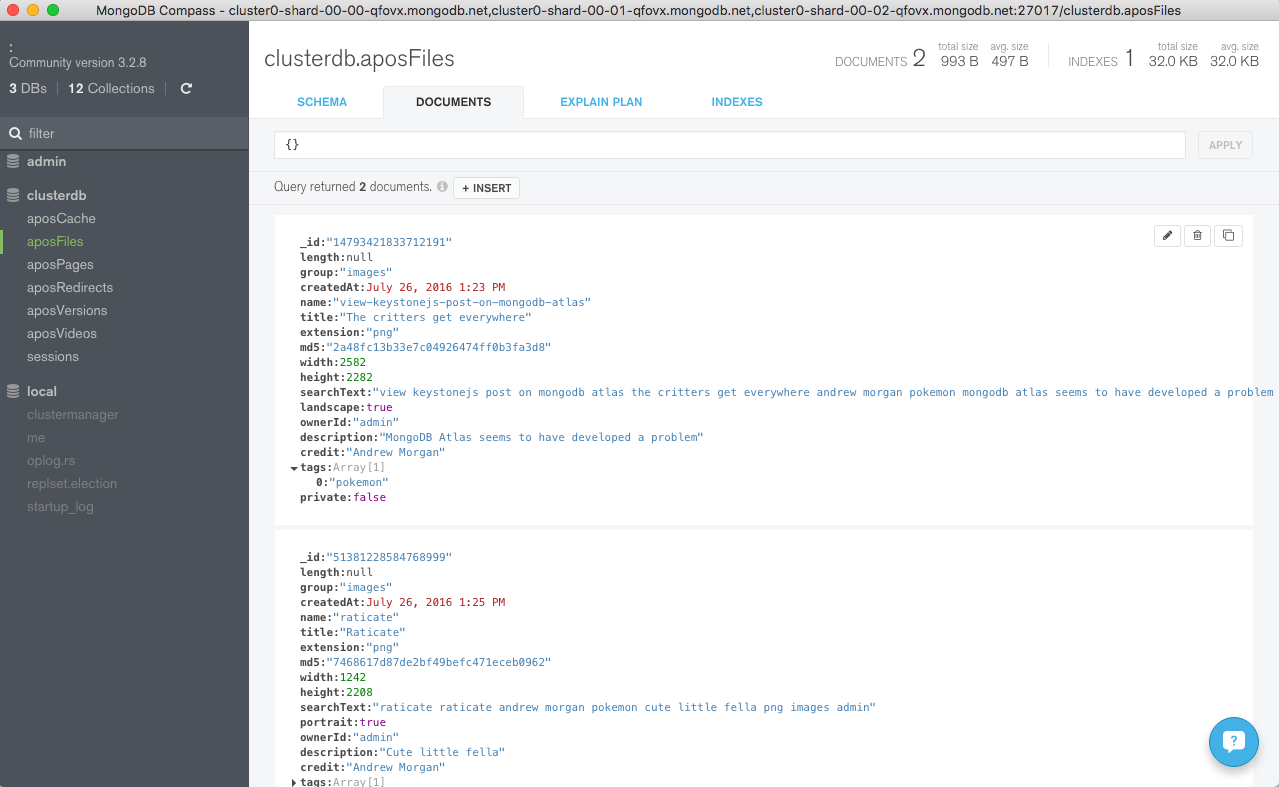
Navigate through the structure of the data in the clusterdb database (Figure 6) and view the JSON documents (Figure 7).
Figure 6: Explore KeystoneJS Schema Using MongoDB Compass
Figure 7: View Documents Stored by KeystoneJS Using MongoDB Atlas
Next Steps
While MongoDB Atlas radically simplifies the operation of MongoDB there are still some decisions to take to ensure the best performance and reliability for your application. The MongoDB Atlas Best Practices white paper provides guidance on best practices for deploying, managing, and optimizing the performance of your database with MongoDB Atlas.
The guide outlines considerations for achieving performance at scale with MongoDB Atlas across a number of key dimensions, including instance size selection, application patterns, schema design and indexing, and disk I/O. While this guide is broad in scope, it is not exhaustive. Following the recommendations in the guide will provide a solid foundation for ensuring optimal application performance.
PencilBlue is a Node.js based, open source blogging and Content Management System, targeted at enterprise grade websites.
This post explains why MongoDB Atlas is an ideal choice for PencilBlue and then goes on to show how to configure PencilBlue to use it.
Why MongoDB Atlas is the Ideal Database for PencilBlue
MongoDB delivers flexible schemas, rich queries, an idiomatic Node.js driver, and simple to use high availability and scaling. This makes it the go-to database for anyone looking to build applications on Node.js.
MongoDB Atlas provides all of the features of MongoDB, without the operational heavy lifting required for any new application. MongoDB Atlas is available on demand through a pay-as-you-go model and billed on an hourly basis, letting you focus on what you do best.
It’s easy to get started – use a simple GUI to select the instance size, region, and features you need. MongoDB Atlas provides:
Security features to protect access to your data
Built in replication for always-on availability, tolerating complete data center failure
Backups and point in time recovery to protect against data corruption
Fine-grained monitoring to let you know when to scale. Additional instances can be provisioned with the push of a button
Automated patching and one-click upgrades for new major versions of the database, enabling you to take advantage of the latest and greatest MongoDB features
A choice of cloud providers, regions, and billing options
Like PencilBlue, MongoDB Atlas is a natural fit for users looking to simplify their development and operations work, letting them focus on what makes their application unique rather than commodity (albeit essential) plumbing.
Installing PencilBlue and Connecting it to MongoDB Atlas
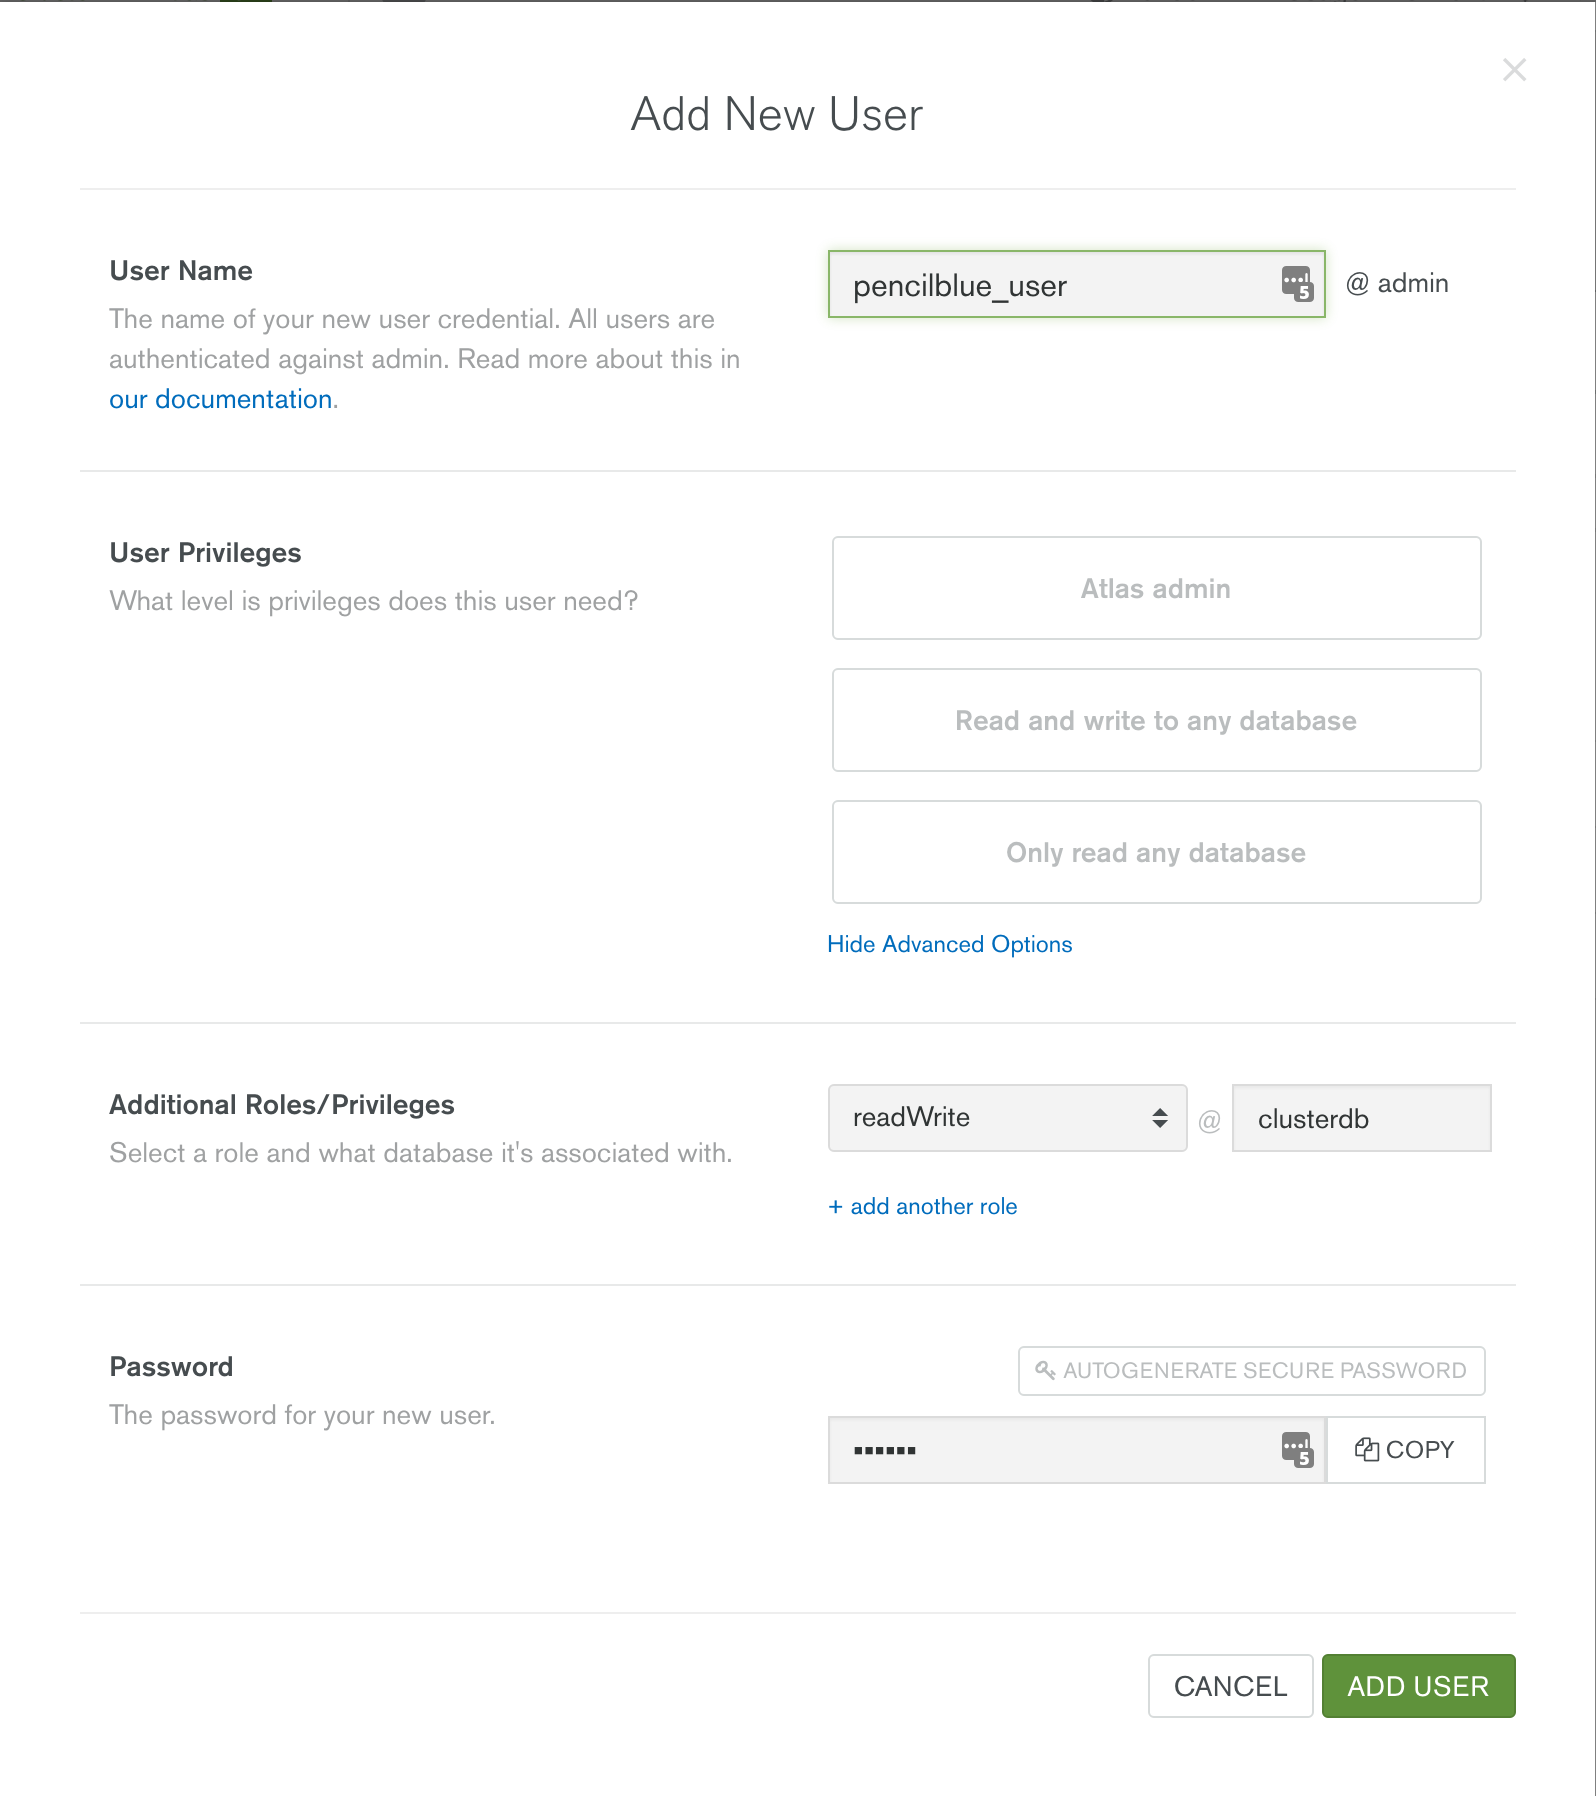
Before starting with PencilBlue, you should launch your MongoDB cluster using MongoDB Atlas and then (optionally) create a user with read and write privileges for just the database that will be used for this project, as shown in Figure 1.
Figure 1: Adding a PencilBlue User to MongoDB Atlas
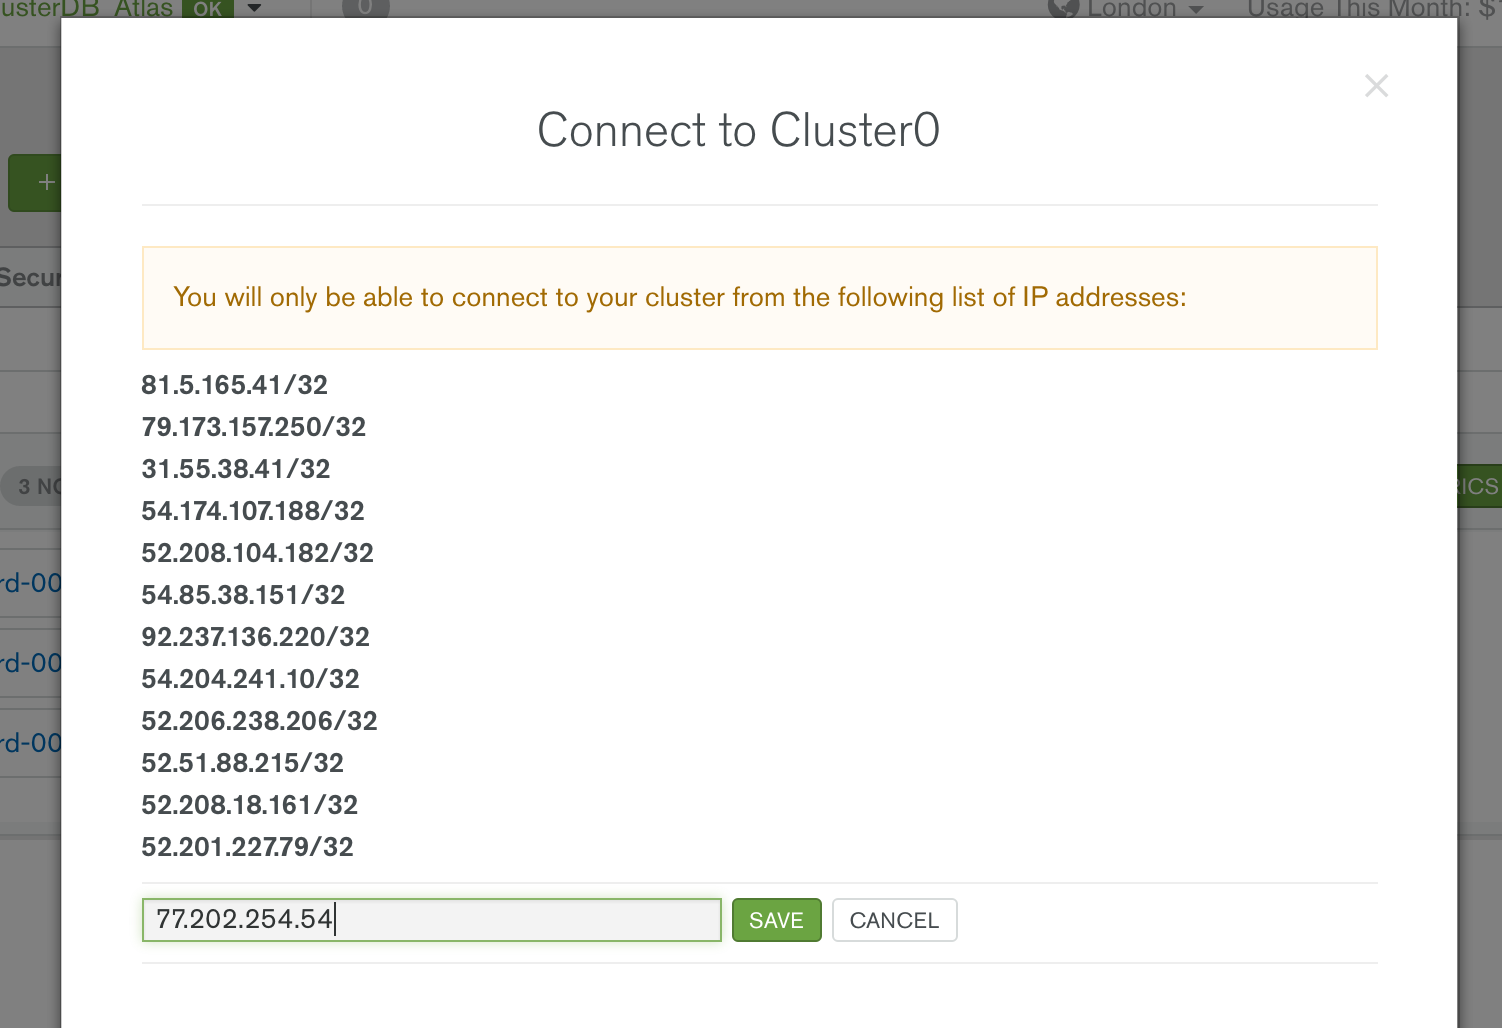
You must also add your IP address to the IP Whitelist in the MongoDB Atlas security tab (Figure 2).
Figure 2: Add IP Address to MongoDB Atlas Whitelist
If it isn’t already installed on your system, download and install Node.js:
$ curl https://nodejs.org/dist/v4.4.7/node-v4.4.7-linux-x64.tar.xz -o node.tar.xz
$ tar xf node.tar.xz
You should then add the bin sub-folder to your .bash_profile before installing the PencilBlue command line interface (CLI):
The CLI can then be used to install and configure PencilBlue itself:
$ pbctrl install PencilBlue
Site Name:  (My PencilBlue Site) PokeSite
Site Root:  (http://localhost:8080)
Address to bind to:  (0.0.0.0)
Site Port:  (8080)
MongoDB URL:  (mongodb://127.0.0.1:27017/) mongodb://pencilblue_user:my_password@cluster0-shard-00-00-qfovx.mongodb.net:27017,cluster0-shard-00-01-qfovx.mongodb.net:27017,cluster0-shard-00-02-qfovx.mongodb.net:27017/?ssl=true&authSource=admin
Database Name:  (pencilblue) clusterdb
Do you want to install Bower components?:  (y/N)
Cloning PencilBlue from github...
Cloning into 'PencilBlue'...
Installing npm modules...
...
Creating config.js...
Installation completed.
Note that if you need to change the configuration (e.g., to specify a new URL to connect to MongoDB) then edit the config.js file that was created during this step.
The MongoDB URL you provided contains these components:
pencilblue_user is the name of the user you created in the MongoDB Atlas UI
my_password is the password you chose when creating the user in MongoDB Atlas
cluster0-shard-00-00-qfovx.mongodb.net, cluster0-shard-00-01-qfovx.mongodb.net, & cluster0-shard-00-02-qfovx.mongodb.net are the hostnames of the instances in your MongoDB Atlas replica set (click on the “CONNECT” button in the MongoDB Atlas UI if you don’t have these – Figure 3)
27017 is the standard MongoDB port number
To enforce security, MongoDB Atlas mandates that the ssl option is used
admin is the database that’s being used to store the credentials for pencilblue_user
Figure 3: Find the Hostnames From the MongoDB Atlas UI
clusterdb is the name of the database (schema) that PencilBlue will use (note that unlike some frameworks, the database name is specified separately rather than being embedded in the MongoDB URL).
The PencilBlue process can now be started:
$ cd PencilBlue/
$ pbctrl start
Confirm that MongoDB Atlas is Being Used
At this point, it is possible to connect to MongoDB Atlas using the MongoDB shell (we’ll look at an easier way to navigate the data later) to confirm that the schema has been created:
$ mongo mongodb://cluster0-shard-00-00-qfovx.mongodb.net:27017,cluster0-shard-00-01-qfovx.mongodb.net:27017,cluster0-shard-00-02-qfovx.mongodb.net:27017/admin?replicaSet=Cluster0-shard-0 --ssl --username billy --password my_password

Cluster0-shard-0:PRIMARY> show dbs
admin      0.000GB
clusterdb  0.008GB
local      0.007GB

Cluster0-shard-0:PRIMARY> use clusterdb
switched to db clusterdb

Cluster0-shard-0:PRIMARY> show collections
article
auth_token
comment
custom_object
custom_object_type
fs.chunks
fs.files
job_log
lock
media
page
password_reset
plugin
plugin_settings
section
server_registry
session
setting
theme_settings
topic
unverified_user
user
Create Your First Page in PencilBlue
Browse to the application at http://localhost:8080 as shown in Figure 4 and create a user account.
Figure 4: Register User in PencilBlue
You’re then able to login and create your first page (Figure 5).
Figure 5: Create a New Page Using PencilBlue
After saving, the new page can be viewed (Figure 6).
Figure 6: View Pokémon Page in PencilBlue
To visually navigate through the PencilBlue schema and data, download and install MongoDB Compass. Use your MongoDB Atlas credentials to connect Compass to your MongoDB database – Figure 7.
Figure 7: Connect MongoDB Compass to MongoDB Atlas
Navigate through the structure of the data in the clusterdb database (Figure 8); view the JSON documents (Figure 9) and check the indexes (Figure 10).
Figure 8: Explore PencilBlue Schema Using MongoDB Compass
Figure 9: View PencilBlue Documents in MongoDB Compass
Figure 10: View PencilBlue Indexes Using MongoDB Compass
Next Steps
While MongoDB Atlas radically simplifies the operation of MongoDB there are still some decisions to take to ensure the best performance and reliability for your application. The MongoDB Atlas Best Practices white paper provides guidance on best practices for deploying, managing, and optimizing the performance of your database with MongoDB Atlas.
The guide outlines considerations for achieving performance at scale with MongoDB Atlas across a number of key dimensions, including instance size selection, application patterns, schema design and indexing, and disk I/O. While this guide is broad in scope, it is not exhaustive. Following the recommendations in the guide will provide a solid foundation for ensuring optimal application performance.
Apostrophe is a Content Management Systems that’s designed to build content-driven web sites. Because of their ease of use, Apostrophe is built upon MongoDB and Node.js.
This post explains why MongoDB Atlas is an ideal choice for Apostrophe and then goes on to show how to configure Apostrophe to use it.
Why MongoDB Atlas is the Ideal Database for Apostrophe
MongoDB delivers flexible schemas, rich queries, an idiomatic Node.js driver, and simple to use high availability and scaling. This makes it the go-to database for anyone looking to build applications on Node.js.
MongoDB Atlas provides all of the features of MongoDB, without the operational heavy lifting required for any new application. MongoDB Atlas is available on demand through a pay-as-you-go model and billed on an hourly basis, letting you focus on what you do best.
It’s easy to get started – use a simple GUI to select the instance size, region, and features you need. MongoDB Atlas provides:
Security features to protect access to your data
Built in replication for always-on availability, tolerating complete data center failure
Backups and point in time recovery to protect against data corruption
Fine-grained monitoring to let you know when to scale. Additional instances can be provisioned with the push of a button
Automated patching and one-click upgrades for new major versions of the database, enabling you to take advantage of the latest and greatest MongoDB features
A choice of cloud providers, regions, and billing options
Like Apostrophe, MongoDB Atlas is a natural fit for users looking to simplify their development and operations work, letting them focus on what makes their application unique rather than commodity (albeit essential) plumbing.
Installing Apostrophe and Setting it up to Use MongoDB Atlas
Before starting with Apostrophe, you should launch your MongoDB cluster using MongoDB Atlas and then (optionally) create a user with read and write privileges for just the database that will be used for this project, as shown in Figure 1. You must also add the IP address of your application server to the IP Whitelist in the MongoDB Atlas security tab.
Figure 1:Creating an Apostrophe user in MongoDB Atlas
If it isn’t already installed on your system, download and install Node.js:
You should then add the bin sub-folder to your .bash_profile file and then install ImageMagick (used by Apostrophe to handle image files); clone the Apostrophe Sandbox project; and then install its dependencies:
Before starting Apostrophe you need to configure it with details on how to connect to your specific MongoDB Atlas cluster. This is done by cloning the configuration file to data/local.js:
You should then edit the data/local.js file and set the uri parameter using the specific connection information provided for your MongoDB Atlas group:
The URI contains these components:
apostrophe_user is the name of the user you created in the MongoDB Atlas UI
my_password is the password you chose when creating the user in MongoDB Atlas
cluster0-shard-00-00-qfovx.mongodb.net, cluster0-shard-00-01-qfovx.mongodb.net, & cluster0-shard-00-02-qfovx.mongodb.net are the hostnames of the instances in your MongoDB Atlas replica set (click on the “CONNECT” button in the MongoDB Atlas UI if you don’t have these)
27017 is the standard MongoDB port number
clusterdb is the name of the database (schema) that Apostrophe will use (note that this must match the project name used when installing Apostrophe as well as the database you granted the user access to
To enforce security, MongoDB Atlas mandates that the ssl option is used
admin is the database that’s being used to store the credentials for apostrophe_user
Clients connect to Apostrophe through port 3000 and so you must open that port in your firewall.
You can then create the database and start Apostrophe:
Testing the Application
Browse to the application at http://address-of-app-server:3000 as shown in Figure 2 and then login using the username admin and the password demo.
Figure 2: Apostrophe Running on MongoDB Atlas
Now, go ahead and add some content (Figure 3).
Figure 3: Edit Apostrophe Home Page with Data Stored in MongoDB Atlas
Upload some images as shown in Figure 4.
Figure 4: Upload Images to Apostrophe on MongoDB Atlas
Optionally, to confirm that, MongoDB Atlas really is being used by Apostrophe, you can connect using the MongoDB shell:
To visually navigate through the schema and data created by Apostrophe, download and install MongoDB Compass. Use your MongoDB Atlas credentials to connect Compass to your MongoDB database – Figure 5.
Figure 5: Connect MongoDB Compass to MongoDB Atlas
Navigate through the structure of the data in the clusterdb database (Figure 6) and view the JSON documents (Figure 7).
Figure 6: Explore Apostrophe Schema Using MongoDB Compass
Figure 7: View Apostrophe Documents in MongoDB Compass
What Next?
While MongoDB Atlas radically simplifies the operation of MongoDB there are still some decisions to take to ensure the best performance and reliability for your application. The MongoDB Atlas Best Practices white paper provides guidance on best practices for deploying, managing, and optimizing the performance of your database with MongoDB Atlas.
The guide outlines considerations for achieving performance at scale with MongoDB Atlas across a number of key dimensions, including instance size selection, application patterns, schema design and indexing, and disk I/O. While this guide is broad in scope, it is not exhaustive. Following the recommendations in the guide will provide a solid foundation for ensuring optimal application performance.
On Thursday 12th September I co-presented a webinar on how MySQL Cluster delivers the key benefits of NoSQL Data Stores without having to give up the features that people rely on from relational databases (consistency, SQL etc.). There was a particular focus on how to use the new node.js JavaScript API which was recently released as part of MySQL Cluster 7.3. If you weren’t able to attend the live event then the webinar replay is available here. If you scroll down to the bottom of this post you’ll see a summary of the Questions and Answers from the session.
The new MySQL JavaScript Connector for Node.js is designed to deliver simplicity and high performance for JavaScript users.
Enables end-to-end JavaScript development, from the browser to the server and now to the world’s most popular open source database.
Provides native NoSQL access to the MySQL Cluster storage engine without first going through SQL transformations and parsing
This session gives you everything you need in order to get started on building highly scalable, event-driven Web, mobile, and social applications.
It discusses:
Implementation of the connector
Database connection and metadata management
Creating and executing queries
Use with InnoDB (via an internal SQL conversion) and MySQL Cluster (direct)
WHO:
Andrew Morgan, Principal Product Manager
John Duncan, Senior Software Developer
Craig Russell, Principal Software Developer
Q & A
What is the benefit of using an asynchrous run-time model? The async everywhere idea in Node.JS means the one execution thread is always doing work for a user. Never waiting on I/O. It allows you to minimize the cost of waiting on the network for i/o, and that’s a big part of how it can handle so many simultaneous requests.
Can you please ellaborate more about multi-threading in node.js? Node.js has a just one thread that runs JavaScript. Then there is also a small thread pool that handles some background i/o tasks.
Why can’t you use a synchrous model? Would there be any drawbacks? The async programming style can be hard to get used to … but in JavaScript, async is really “how things are done”. Just like browser-side JavaScript responding to a mouse event, this is server-side JS responding to a database event or a network event.
Is there also a synchronous Session function? There is a synchronous version of connect(). There are some “immediate” calls on session (which don’t have to do any waiting), but there are no synchronous calls on session that wait for anything
Most applications run as responses to requests and so most of the logic needs to be executed sequentially. How are asynchronous calls handled? Is there any mechanism to wait and join multiple asynch call for a particular section of logic? If you have multiple database operations to execute, you can use the batch feature which will wait for all operations to complete and then call back. If you have other operations you need to have your own synchronization mechanism.
It was mentioned that you can use this APi to access the MySQL Cluster data nodes directly or MyISAM/InnoDB data via SQL and a MySQL server – how do I configure that? In the connection properties for your database connection, you use adapter=ndb for a native NDB connection, or adapter=mysql for a MySQL connection.
Are results mapped into objects? Yes. When the inner layer reads a row from the database, it creates a JavaScript object (according to the mapping) and it calls your Constructor with no arguments and with this set to the newly created object.
So there is seperate mapping for tables and for results? No, a single mapping.
Does the object mapping support the entity relationships like in JPA implementations? Can it be referenced with JSON ojects with one-to-one, one-to-many, etc relationships? The current release does not support relationships/JOINs.
JavaScript is weakly typed. How are different data types handled with the same reffrence? Dynamic typing means that values (objects, exspanssions) have types (i.e. a set of available operations and properties) but not variables, so a variable can, over time, refer to values of different types.
Are there sql like transaction through the Node.js NoSQL API? Yes, the API looks something like this: session.currentTransaction().begin() … define operations … session.currentTransaction.commit()
So, we can use session to track any transaction? Right, a session owns its single transaction. If you don’t call begin() on the transaction, then your operation will run “auto-commit”.
Is this library similar to what mongoose is to mongodb? I’m not very familiar with mongoose — but it is broadly similar to many object-to-database mapping layers.
So, just for clarification, the chief advantage of this is it’s moving the heavy lifting from the server side (like with PHP) to the client side? Not quite, node.js is server-side javascript. The main advantage is an asynchronous processing of requests that never block. In contrast, a large number of server-threads need to be provided with requests that can block.
Node.js runs on V8 which developed by google, its run fast any browser or only in Chrome? Node.js actually runs in the app server rather than in your browser and so it will play nicely when accessed via any browser (or other client)
On Thursday 12th September I’ll be co-presenting a free webinar on how MySQL Cluster delivers the key benefits of NoSQL Data Stores without having to give up the features that people rely on from relational databases (consistency, SQL etc.). There will be particular focus on how to use the new node.js JavaScript API which was recently released as part of MySQL Cluster 7.3. As usual the webinar is free but you should register in advance here.
The new MySQL JavaScript Connector for Node.js is designed to deliver simplicity and high performance for JavaScript users.
Enables end-to-end JavaScript development, from the browser to the server and now to the world’s most popular open source database.
Provides native NoSQL access to the MySQL Cluster storage engine without first going through SQL transformations and parsing
This session gives you everything you need in order to get started on building highly scalable, event-driven Web, mobile, and social applications.
It discusses:
Implementation of the connector
Database connection and metadata management
Creating and executing queries
Use with InnoDB (via an internal SQL conversion) and MySQL Cluster (direct)
WHO:
Andrew Morgan, Principal Product Manager
John Duncan, Senior Software Developer
Craig Russell, Principal Software Developer
WHEN:
Thu, Sep 12: 09:00 Pacific time (America)
Thu, Sep 12: 10:00 Mountain time (America)
Thu, Sep 12: 11:00 Central time (America)
Thu, Sep 12: 12:00 Eastern time (America)
Thu, Sep 12: 16:00 UTC
Thu, Sep 12: 17:00 Western European time
Thu, Sep 12: 18:00 Central European time
Thu, Sep 12: 19:00 Eastern European time
Thu, Sep 12: 21:30 India, Sri Lanka
Fri, Sep 13: 00:00 Singapore/Malaysia/Philippines time
We’re very pleased to announce that MySQL Cluster 7.3 has gone GA; for a full run-down of the new features and enhancements, take a look at the "MySQL Cluster 7.3 New Features for Internet-Scale Performance with Carrier-Grade Availability" white paper but this post will focus on just one of the features – the MySQL Cluster JavaScript Driver for Node.js. The post will step you through setting everything up so that you can get your first Node.js code reading and writing from MySQL Cluster.
Background
MySQL Cluster is a distributed, shared nothing database that provides linear scalability, 99.999% availability and high read/write throughput with low latency. SQL is just one way of accessing data stored in MySQL Cluster – there are also a number of native NoSQL APIs that go straight to the data without any interim conversion to SQL. These APIs include C++, Memcached, Java, JPA and REST – in MySQL Cluster 7.3 JavaScript/Node.js is added to the list.
Node.js (typically referred to simply as "Node") is a platform for running fast, scalable applications using JavaScript. For maximum performance, Node.js is built around a non-blocking, event-driven architecture – just like MySQL Cluster and so they fit together very well.
The MySQL Cluster JavaScript Driver for Node.js is just what it sounds like it is – it’s a connector that can be called directly from your JavaScript code to read and write your data. As it accesses the data nodes directly, there is no extra latency from passing through a MySQL Server and need to convert from JavaScript code//objects into SQL operations. If for some reason, you’d prefer it to pass through a MySQL Server (for example if you’re storing tables in InnoDB) then that can be configured.
As with all of the other APIs that we offer, you’re able to mix & match access methods; while you access the database using JavaScript objects, these will be mapped to rows in database tables and this same data can simultaneously be accessed by other NoSQL API or through SQL.
MySQL Cluster Auto-Installer
Installing MySQL Cluster
Obviously, to try out our JavaScript code we’ll need a database to access. The simplest way to do this is to use the new auto-installer that’s part of MySQL Cluster 7.3; this provides a browser-based GUI that configures and runs a MySQL Cluster database that’s been configured for your application and environment. Using this installer is described in the "MySQL Cluster Auto-Installer" post.
Setting up the Database
Tables with Foreign Key constraint
A simple database schema is being used – a single table would really be enough but we’ll actually create two in order to demonstrate that Foreign Key constraints (Foreign Keys are another new feature in MySQL Cluster 7,3) are still enforced when using the NoSQL APIs.
These two tables are set up as follows:
[billy@bob]$ mysql --protocol=tcp -u root
Welcome to the MySQL monitor.  Commands end with ; or g.
Your MySQL connection id is 2
Server version: 5.6.10-ndb-7.3.1-cluster-gpl MySQL Cluster Community Server (GPL)

Copyright (c) 2000, 2013, Oracle and/or its affiliates. All rights reserved.

Oracle is a registered trademark of Oracle Corporation and/or its
affiliates. Other names may be trademarks of their respective
owners.

Type 'help;' or 'h' for help. Type 'c' to clear the current input statement.

mysql> CREATE TABLE test.counties (county VARCHAR(30) NOT NULL PRIMARY KEY,
country VARCHAR(30)) ENGINE=ndb;
Query OK, 0 rows affected (1.17 sec)

mysql> CREATE TABLE test.towns (town VARCHAR(30) NOT NULL PRIMARY KEY, county VARCHAR(30),
INDEX county_county_index (county), CONSTRAINT county_town FOREIGN KEY (county) REFERENCES counties(county)
ON DELETE RESTRICT ON UPDATE RESTRICT) ENGINE=ndb;
Query OK, 0 rows affected (1.00 sec)
If you’re using Windows then the MSI will guide you through the process – though when you’ve finished you’ll need to manually run the following from the cmd prompt:
npm install -g node-gyp
On Linux, you’ll need to manually build and install Node.js after you’ve downloaded it:
[root@bob node-v0.10.7]# ./configure
[root@bob node-v0.10.7]# make
[root@bob node-v0.10.7]# make install
Building mysql-js (the JavaScript driver for MySQL Cluster)
Regardless of what operating system is being used, the driver must be built before it can be used. Furthermore, to build the driver you need to have a local MySQL Cluster package (so that it can access the NDB API client library).
Depending on the exact Linux distro and version being used, some dependencies may need to be installed first:
Once that has been done, the driver can be built – the following should be run from within the share/nodejs directory within the MySQL Cluster package:
To begin with, the complete code is provided and then each component is explained.
var nosql = require('..');

var Town = function(name, county) {
    if (name) this.town = name;
    if (county) this.county = county;
};

// create basic object<->table mapping
var annotations = new nosql.TableMapping('towns').applyToClass(Town);

//check results of find
var onFind = function(err, result) {
    console.log('onFind.');
    if (err) {
        console.log(err);
    } else {
        console.log('Found: ' + JSON.stringify(result));
    }
    process.exit(0);
};

//check results of insert
var onInsert = function(err, object, session) {
    console.log('onInsert.');
    if (err) {
        console.log(err);
    } else {
        console.log('Inserted: ' + JSON.stringify(object));

        // Now read the data back out from the database
        session.find(Town, 'Maidenhead', onFind);
    }
};

// insert an object
var onSession = function(err, session) {
    console.log('onSession.');
    if (err) {
    console.log('Error onSession.');
        console.log(err);
        process.exit(0);
    } else {
        var data = new Town('Maidenhead', 'Berkshire');
        session.persist(data, onInsert, data, session);
    }
};

var dbProperties = nosql.ConnectionProperties('ndb');

console.log('Openning session');

// connect to the database
nosql.openSession(dbProperties, Town, onSession);

console.log('Openned session');
Step 1 Import API software
The first step is for your JavaScript application to specify that it will use the new API (mysql-js); this will work if this file is stored in a directory under cluster-install/share/nodejs:
var nosql = require('mysql-js');
Step 2 Define JavaScript class
A class should be defined that will be used by the application and will also be mapped to the towns table that has already been created. The class is defined through the specification of its constructor:
var Town = function(name, county) {
    if (name) this.town = name;
    if (county) this.county = county;
};
Step 3 Define schema mappings
MySQL Cluster is a relational database while JavaScript works with objects. To get the best of both worlds, mappings can be set up between MySQL tables (or individual columns) and JavaScript objects – in this case it’s kept very simple and the Town class is mapped to the towns table:
var annotations = new nosql.TableMapping('towns').applyToClass(Town);
In this step, the application connects to the database to indicate that it wants to access the data nodes directly rather than via the MySQL Server (and hidden conversion to SQL), the ConnectionProperties is set to ndb (rather than mysql). Additionally, a callback function (onSession) is passed as an argument. Recall that this is an event-driven, non-blocking, asynchronous API and so after calling openSession, control will be immediately returned to the application – without waiting for the session to actually be established – the application can then go away and perform other useful work. Once the session has been created, the callback function (onSession) will be invoked, allowing the application to take the next steps.
var dbProperties = nosql.ConnectionProperties('ndb');
nosql.openSession(dbProperties, annotations, onSession);
Step 5 Store some data
Note that the code in this step is the implementation of the call back function (onSession) that we passed in as a parameter to openSession in the previous step. This function simply instantiates a Town JavaScript object and then writes it to MySQL Cluster through the persist method. Once more, a callback function is passed in (onInsert) which will be invoked once the data has been stored in the database. Note that any objects specified after the callback function in the parameter list (in this case, the Town object data) will be provided as parameters to the callback function when it’s executed – note that the session parameter is also included and the framework will pass that as a parameter to the onInsert callback function.
var onSession = function(err, session) {
    if (err) {...} else {
        var data = new Town('Maidenhead', 'Berkshire');
        session.persist(data, onInsert, data, session);
    }
};
Step 6 Verify insert succeeded & initiate reading of data from the database
Next, our callback function (onInsert) is called and the object parameter contains the Town that had been passed into the persist method in the previous step, together with the session variable. This function simply checks that there wasn’t an error and then displays the Town that has been stored in the database. Again, a callback function is provided – onFind – that will be called once the data has been found.
Step 7 Process the data read back from the database
Finally, onFind is called-back and it handles the processing of the results (whether it is an error or the Town object in the form of the result parameter).
The example code should be stored in a file called my-test.js in a directory under cluster-install/share/nodejs/my_samples. To run the application, just run the following (spoiler – there will be a database error!):
This error is seen because the code is attempting to add an object/row to the towns table where the county doesn’t already have an entry in the counties table – this breaks the Foreign Key constraint that was included when the tables were created.
To get around this, the required row should be added to the counties table:
[billy@bob my_samples]$ mysql --protocol=tcp -u root
Welcome to the MySQL monitor.  Commands end with ; or g.
Your MySQL connection id is 3
Server version: 5.6.10-ndb-7.3.1-cluster-gpl MySQL Cluster Community Server (GPL)

Copyright (c) 2000, 2013, Oracle and/or its affiliates. All rights reserved.

Oracle is a registered trademark of Oracle Corporation and/or its
affiliates. Other names may be trademarks of their respective
owners.

Type 'help;' or 'h' for help. Type 'c' to clear the current input statement.

mysql> REPLACE INTO test.counties VALUES ('Berkshire', 'England');
Query OK, 1 row affected (0.25 sec)
The code can then be executed again – this time successfully:
Please give this a try – especially with your own code – and let us know how you get on. We’re especially interested in what features you’d like to see added – embedded objects, lists, joins….