Earlier this week, I presented a webinar on developing web and mobile applications using the MERN and MEAN stacks – the replay and slides are now available.
Details
Users increasingly demand a far richer experience from web applications – expecting the same level of performance and interactivity they get with native desktop and mobile apps.
At the same time, there’s pressure on developers to deliver new applications faster and continually roll-out enhancements, while ensuring that the application is highly available and can be scaled appropriately when needed.
Fortunately, there’s a set of open source technologies using JavaScript that make all of this possible.
Join this webinar to learn about the two dominant JavaScript web app stacks – MEAN (MongoDB, Express, Angular, Node.js) and MERN (MongoDB, Express, React, Node.js).
These technologies are also used outside of the browser – delivering the best user experience, regardless of whether accessing your application from the desktop, from a mobile app, or even using your voice.
By attending the webinar, you will learn:
What these technologies and how they’re used in combination:
NodeJS
MongoDB
Express
Angular2
ReactJS
How to get started building your own apps using these stacks
Some of the decisions to take:
Angular vs Angular2 vs ReactJS
Javascript vs ES6 vs Typescript
What should be implemented in the front-end vs the back-end
I’ll be presenting a webinar on Thursday at 11:00 BST. It’s worth registering even if you can’t attend live, as you’ll be sent a link to the replay.
Details
March 30, 2017
11am BST | 12pm CEST | 3:30pm IST
Users increasingly demand a far richer experience from web applications – expecting the same level of performance and interactivity they get with native desktop and mobile apps.
At the same time, there’s pressure on developers to deliver new applications faster and continually roll-out enhancements, while ensuring that the application is highly available and can be scaled appropriately when needed.
Fortunately, there’s a set of open source technologies using JavaScript that make all of this possible.
Join this webinar to learn about the two dominant JavaScript web app stacks – MEAN (MongoDB, Express, Angular, Node.js) and MERN (MongoDB, Express, React, Node.js).
These technologies are also used outside of the browser – delivering the best user experience, regardless of whether accessing your application from the desktop, from a mobile app, or even using your voice.
By attending the webinar, you will learn:
What these technologies and how they’re used in combination:
NodeJS
MongoDB
Express
Angular2
ReactJS
How to get started building your own apps using these stacks
Some of the decisions to take:
Angular vs Angular2 vs ReactJS
Javascript vs ES6 vs Typescript
What should be implemented in the front-end vs the back-end
This session will include a live Q&A for you to have your questions answered by an expert. Register for the webinar now to learn more.
This is the sixth and final blog post in a series examining technologies such as MongoDB and REST APIs that are driving the development of modern web and mobile applications.
Modern Application Stack – Part 1: Introducing The MEAN Stack introduced the technologies making up the MEAN (MongoDB, Express, Angular, Node.js) and MERN (MongoDB, Express, React, Node.js) stacks: why you might want to use them, and how to combine them to build your web application (or your native mobile or desktop app).
Subsequent posts focused on working through the end to end steps of building a real (albeit simple) application – MongoPop.
Part 2: Using MongoDB With Node.js created an environment where we could work with a MongoDB database from Node.js; it also created a simplified interface to the MongoDB Node.js Driver.
Once your application back-end exposes a REST API, there are limitless ways that you or other developers can access it:
A dedicated browser-based client, as seen in posts 4 and 5
A standalone native iOS or Android mobile app
Voice controlled appliances, such as Amazon’s Echo
IoT-enabled devices, such as remote sensors
Integrations with 3rd party applications
This post takes a look at some of these approaches. Unlike some of the earlier posts, this one aims to go wide rather than deep – touching on many technologies rather than diving too deeply into any one.
Prerequisite – the REST API
Everything that follows assumes that you have the Mongopop REST API running – if not, skip back to Part 3: Building a REST API with Express.js. Additionally, that API has been extended with 3 new routes (already included in the latest GitHub repository):
Additional Express routes implemented for the Mongopop REST API
/pop/lastCheckIn depends on a new method that has been added to javascripts/db.js:
The configuration file config.js is also extended – note that you should replace the value associated with the makerMongoDBURI field if you’re not running MongoDB on your local machine (e.g. with the URI provided by MongoDB Atlas:
The implementation of these methods follows the same pattern as already seen – refer back to Part 3 for details – and so is not explained here.
Repurposing Angular & ReactJS code for native applications
There are frameworks for both Angular and ReactJS that enable web client application designs (and in some cases, code) to be reused for creating native iOS and Android apps.
One option for Angular is NativeScript, in which you use Typescript/JavaScript with Angular to build native apps for multiple platforms from the same source code. Of course, to get the most out of those platforms, you may want or need to add platform-specific code.
React developers will find React Native code very familiar, and applications are built from declarative components in the same way. The most obvious difference is that React Native code uses its own native components (e.g. <View> and <Text> rather that HTML elements such as <div> and <p>):
React Native provides the Fetch API to make network requests; it follows a similar patter to XMLHttpRequest (React Native also includes XMLHttpRequest which can be used directly).
While it’s not as simple as just rebuilding your ReactJS or Angular code to produce native apps, the reuse of designs, skills and (some) code make it much more efficient than starting from scratch.
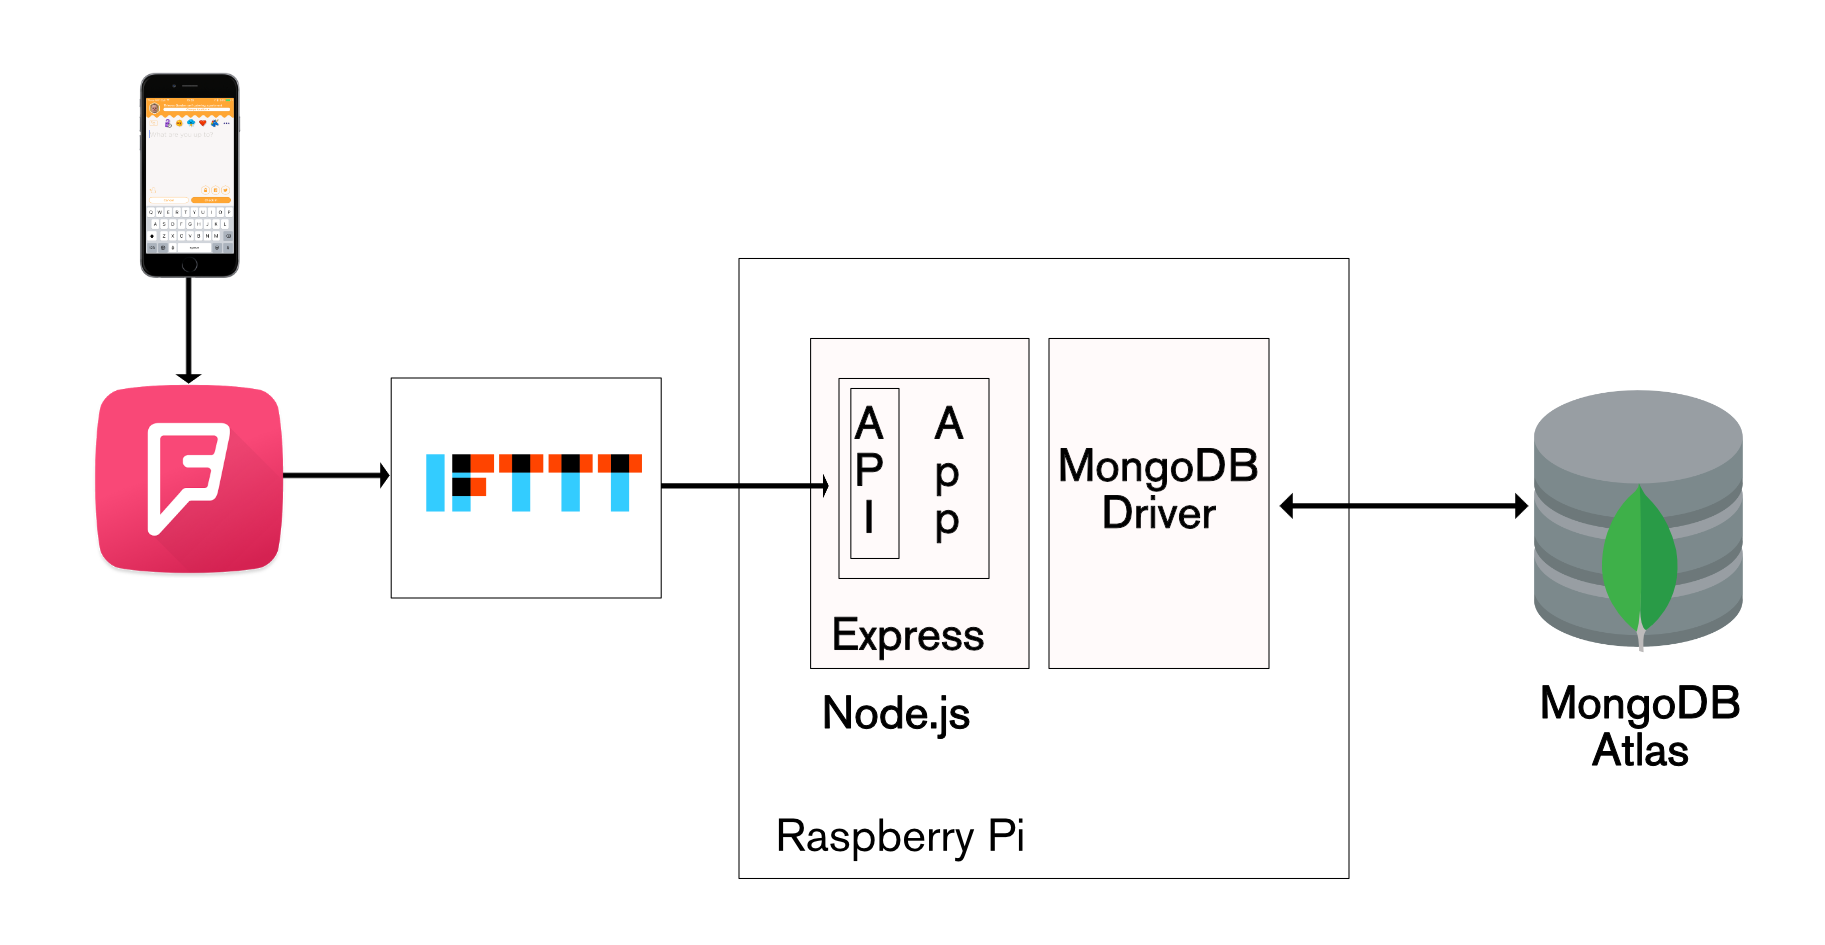
Combining cloud services – IFTTT
IFTTT (IF This Then That) is a free cloud service which allows you to automate tasks by combining existing services (Google Docs, Facebook, Instagram, Hue lights, Nest thermostats, GitHub, Trello, Dropbox,…). The name of the service comes from the simple pattern used for each Applet (automation rule): “IF This event occurs in service x Then trigger That action in service y”.
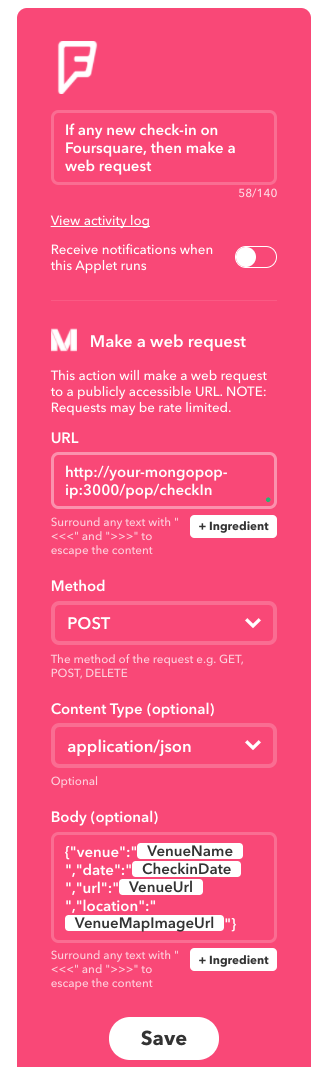
IFTTT includes a Maker service which can handle web requests (triggers) or send web requests (actions). In this case, I use it to invoke the pop/checkIn POST method from the Mongopop REST API whenever I check in using the Swarm (Foursquare) app:
Create Foursquare applet to make HTTP POST over REST API in IFTTT
Note that the applet makes a POST request to the http://your-mongopop-ip:3000/pop/checkIn route. The body of the POST includes the required parameters – provided as a JSON document. Each of the VenueName, CheckinDate, VenueUrl, and VenueMapImageURL values are /ingredients/ from the trigger (Foursquare) event.
We can confirm that the MongoDB collection has been updated after this check-in:
Cluster0-shard-0:PRIMARY> use maker
switched to db maker

Cluster0-shard-0:PRIMARY> db.foursq.find().sort({_id: -1}).limit(1).pretty()
{
    "_id" : ObjectId("58c272f842067a03283be544"),
    "venueName" : "Redroofs Theatre School",
    "date" : "March 10, 2017 at 09:23AM",
    "url" : "http://4sq.com/htwamV",
    "mapRef" : "http://maps.google.com/maps/api/staticmap?center=51.52212258991317,-0.7358344376428089&zoom=16&size=710x440&maptype=roadmap&sensor=false&markers=color:red%7C51.52212258991317,-0.7358344376428089"
}
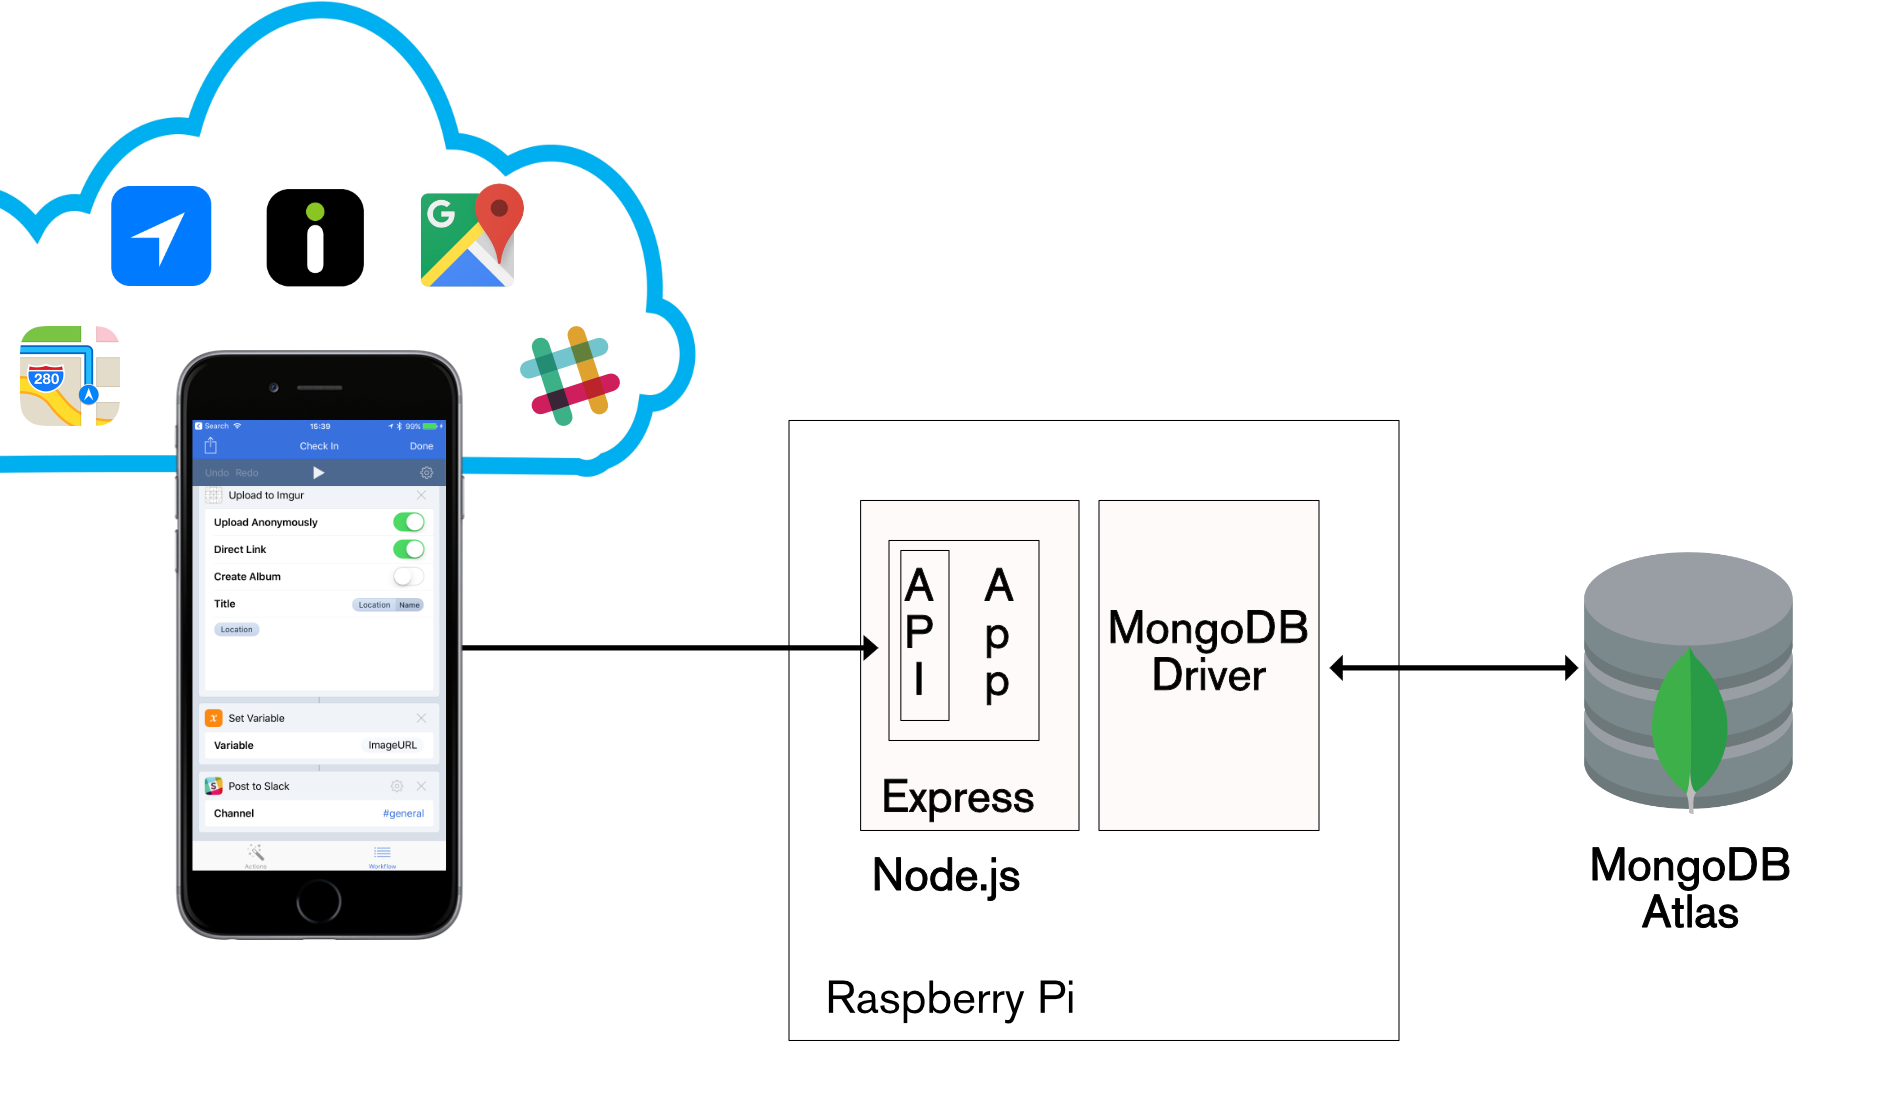
Constructing an iOS/Apple Watch App to automate workflows
The first example showed how to record a check-in into our own service as a side effect of checking into an existing service (Foursquare).
What if we wanted to create new, independent check-ins, from a mobile device? What if we also wanted to augment the check-ins with additional data? Another requirement could be to let our team know of the check-in through a Slack channel.
A valid approach would be to build a new mobile client using React Native or NativeScript. Slack and Google Maps have their own REST APIs and so the new App could certainly integrate with them in addition to our Mongopop API. Before investing in that development work, it would be great to prototype the concept and see if it proves useful.
This is where we turn to the iOS Workflow app. Workflow has a number of similarities to IFTTT but there are also some significant differences:
Workflow runs on your iOS device rather than in the cloud.
Workflows are triggered by events on your iOS device (e.g. pressing a button) rather than an event in some cloud service.
Workflow allows much more complex patterns than “IF This event occurs in service A Then trigger That action in service B”; it can loop, invoke multiple services, perform calculations, access local resources (e.g. camera and location information) on your device, and much more.
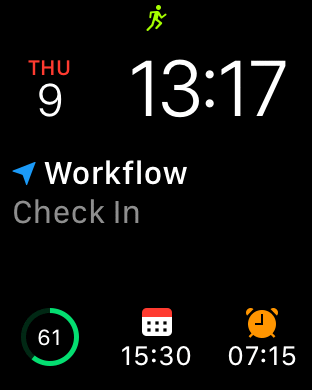
Both applications/Workflows that we build here can be run on an iPad, iPhone, or Apple Watch.
The first Workflow, CheckIn, performs these steps:
Send a POST request to the /pop/checkIn Mongopop route
The request includes the location, date/time, URL (either from the venue or Apple Maps), and the StreetView image
Post the location and URL to Slack
Display error messages if anything fails
iOS Workflow stack to make REST API calls
Implementing a Workflow involves dragging actions into the work area and then adding attributes to those actions (such as the address of the Mongopop API). The result of one action is automatically used as the input to the next action in the workflow. Results can also be stored in variables for use by later actions.
This is the Check In workflow:
iOS Workflow check-in code for REST API call
This video demonstrates the use of the app when run on an iPhone:
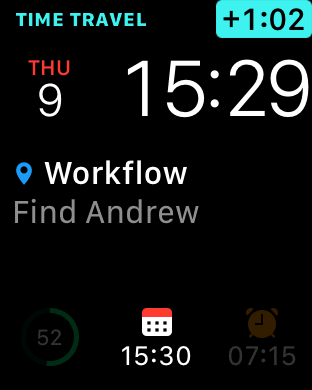
The same app/workflow can be run from an Apple Watch:
Check-in via REST API with Apple Watch and iOS Workflow app
We can confirm that check-in record has been stored as a document in MongoDB Atlas (note that the database and collection names are defined in config.js):
Cluster0-shard-0:PRIMARY> use maker
switched to db maker
Cluster0-shard-0:PRIMARY> db.foursq.find().sort({_id: -1}).limit(1).pretty()
{
    "_id" : ObjectId("58c1505742067a03283be541"),
    "venueName" : "77-79 King St, Maidenhead SL6 1DU, UK",
    "date" : "9 Mar 2017, 12:53",
    "url" : "http://maps.apple.com/?q=77-79%20King%20St,%20Maidenhead%20SL6%201DU,%20UK&ll=51.520409,-0.722196",
    "mapRef" : "http://i.imgur.com/w3KyIVU.jpg"
}
The second app/workflow retrieves and displays details of the most recent check-in. It performs these steps:
Read from the /pop/latestCheckIn Mongopop REST API Route using GET.
If the results indicate a successful operation then:
Extract the location from the results
Display the location and prompt the user if they’d like to:
See the location data (image)
Follow the location’s URL (typically an Apple Maps link)
Finish
If the Mongopop operation fails, display an appropriate error.
The full workflow is shown here:
Find the latest check-in using REST API using Apple Watch
Running the app on an iPad produces these results:
Again, the same app can be run from an Apple Watch:
Find the latest check-in using REST API from Apple Watch
Hands-free – Amazon Alexa Skills
Two of today’s biggest industry trends are machine learning and serverless computing. Amazon’s Alexa service (typically accessed through Amazon’s Echo device) is at the forefront of both. In addition to interpreting voice commands for Amazon’s own services (e.g. ordering more coffee beans or playing a particular song), developers can implement their own skills. Many are publicly available from 3rd parties such as Nest, Harmony, and Spotify, but you’re free to implement and test your own – submitting it for review and public use when ready.
The business logic behind Alexa skills are typically run within Amazon’s serverless computing service – AWS Lambda. Lambda is a great product for services that handle low or bursty levels of traffic – rather than paying a flat rate for a physical or virtual server, you pay a small fee for every event handled (and you even get a low-medium level of throughput for free). If your service really takes off then Lambda automatically scales out.
Assuming that you decide to use Lambda, there are three main components to your skill:
The set of intents – instructions that a user can give to Alexa
For each intent, a set of utterances that the user might say in order to signal that intent
The actual logic which is invoked whenever the user signals an intent – implemented as a Lambda function
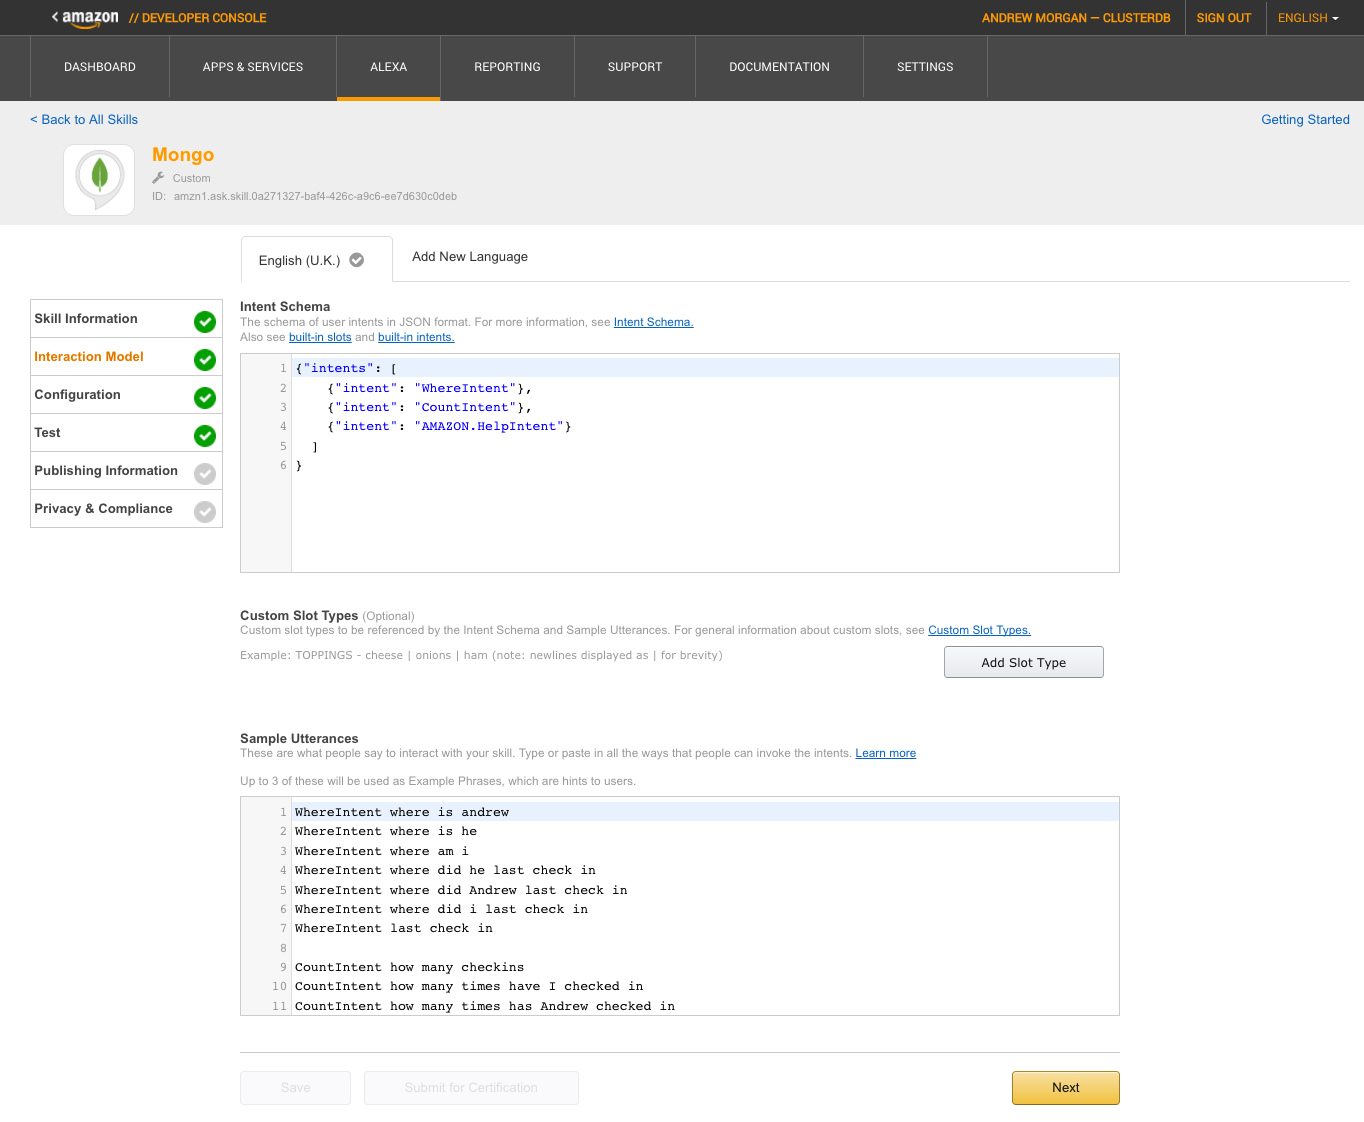
The Mongo Alexa skill has 3 intents/commands:
WhereIntent: Find the most recent location that I checked in to
CountIntent: Count how many times I’ve checked in
HelpIntent: Explain what the available commands/intents are
The utterances for each of those intents must also be defined:
WhereIntent where is andrew
WhereIntent where is he
WhereIntent where am i
WhereIntent where did he last check in
WhereIntent where did Andrew last check in
WhereIntent where did i last check in
WhereIntent last check in

CountIntent how many checkins
CountIntent how many times have I checked in
CountIntent how many times has Andrew checked in
CountIntent how many times has he checked in
CountIntent how many check ins
CountIntent check in count
Note that no utterances need to be added for the AMAZON.HelpIntent as that intent is built in.
The skill is created in the Amazon Developer Console using the Alexa wizard; where the intentions and utterances can be added:
Add Alexa intentions and utterances
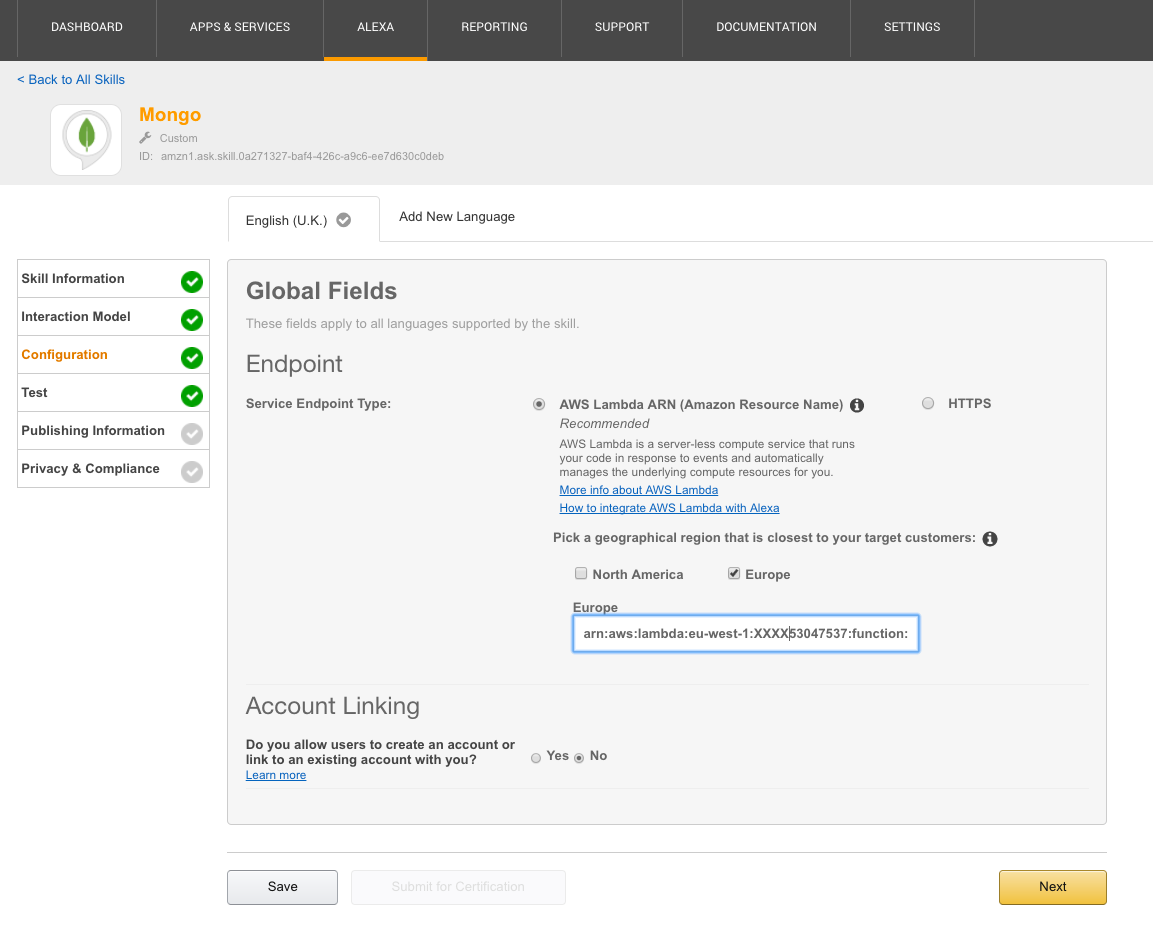
In the next screen, you indicate where the the skill’s business logic runs; in this case, I provide the Amazon Resource Name (ARN) of my Lambda function:
As explained earlier, the aim of this post is to cover a broad set of technologies rather than going too deeply into any one but explaining a few concepts may help you understand what this code is doing:
A handler is implemented for each of the intents; that handler is invoked when the user speaks one of the utterances associated with that intent
The handlers for the CountIntent and WhereIntent makes calls to the Mongopop REST API using the request function
The emit method is how the handlers can send results or errors back to the user (via Alexa)
The card, referred to by tellWithCard, is visual content (text and images) that are displayed in the Alexa app
Note that this is a simple skill which receives a request and sends a single response. It is also possible to implement an interactive state machine where there’s a conversation between the user and Alexa – in those skills, the logic uses both the latest intent and the past context in deciding how to respond. Note that the Lambda function is always stateless and so all data should be stored in a database such as MongoDB.
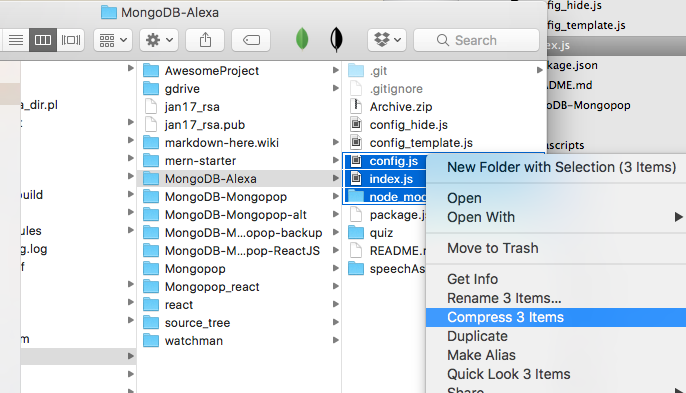
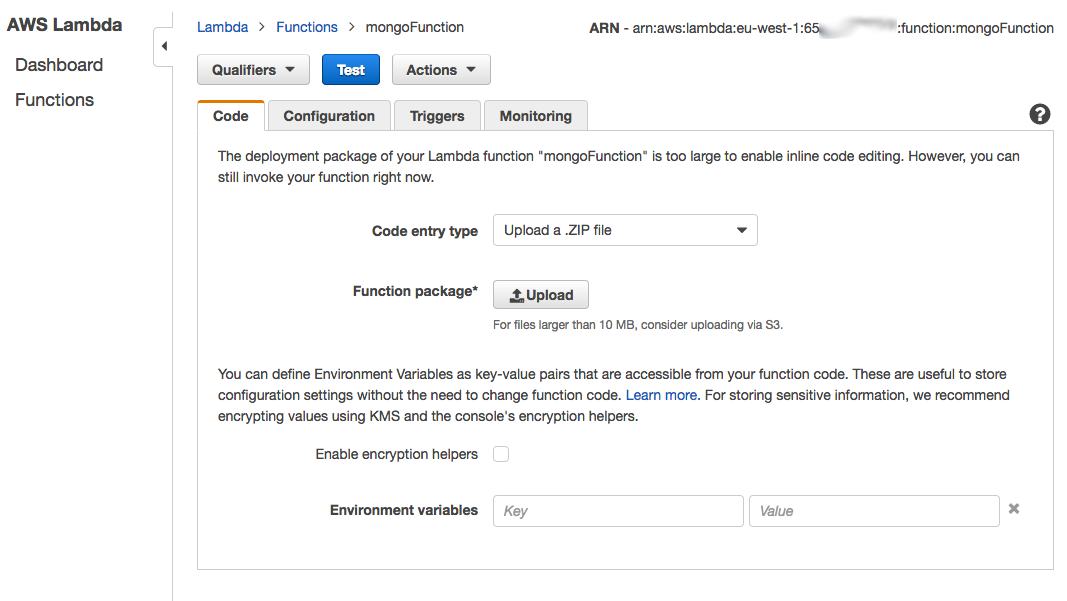
The skill is deployed to AWS Lambda through the AWS Management Console. The index.js, config.js and node_modules directory (created by running npm install) should be archived into a single Zip file which is then uploaded to AWS:
Create zip file for Alexa skill to upload to AWS Lambda
Upload zip file for Alexa skill to AWS Lambda
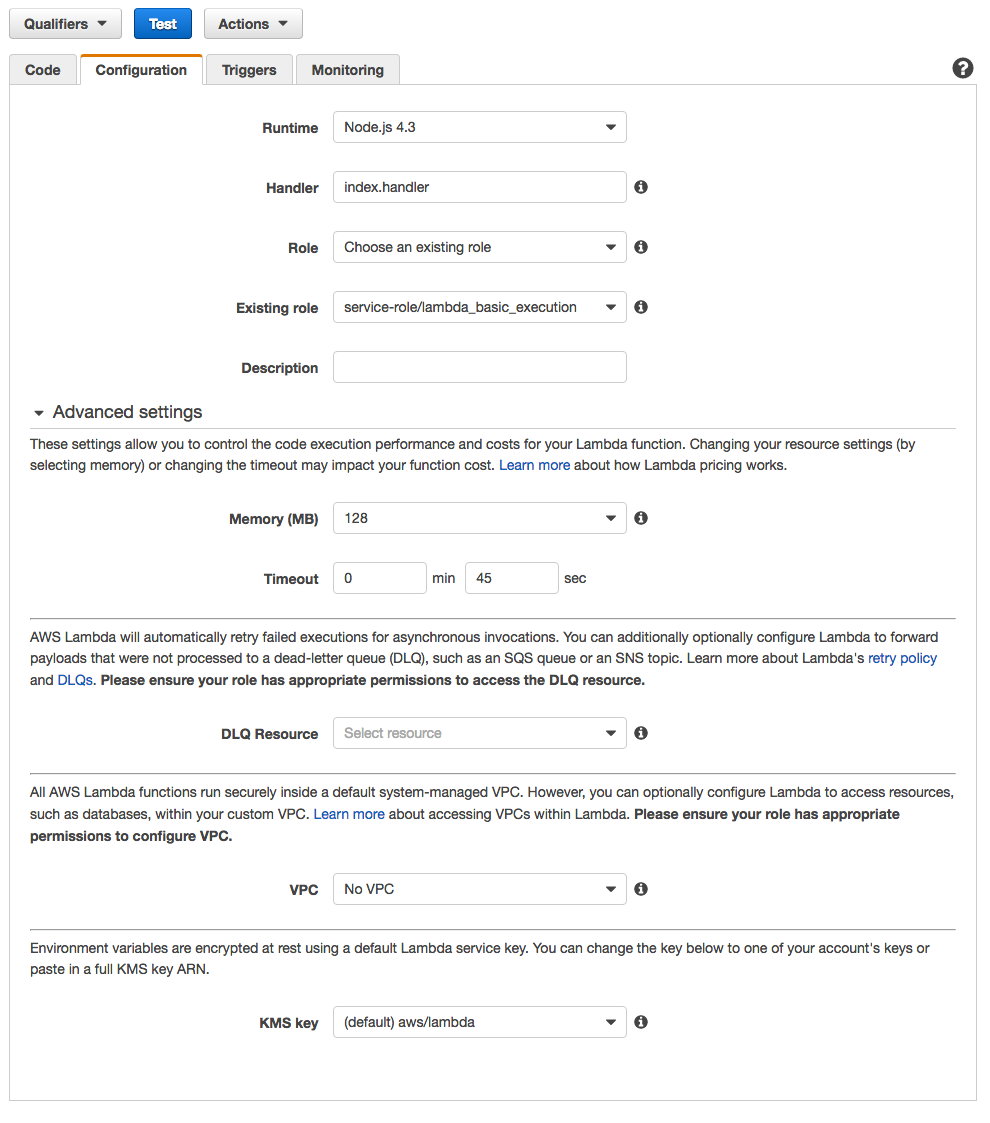
There are a number of extra configuration options – such as the runtime environment to use (Node.js), the user role, the amount of memory to be made available to the function, and how long each invocation of the function should be allowed to run (the function is making external HTTP requests and so it may need a few seconds):
Configure AWS Lambda function for Amazon Alexa skill
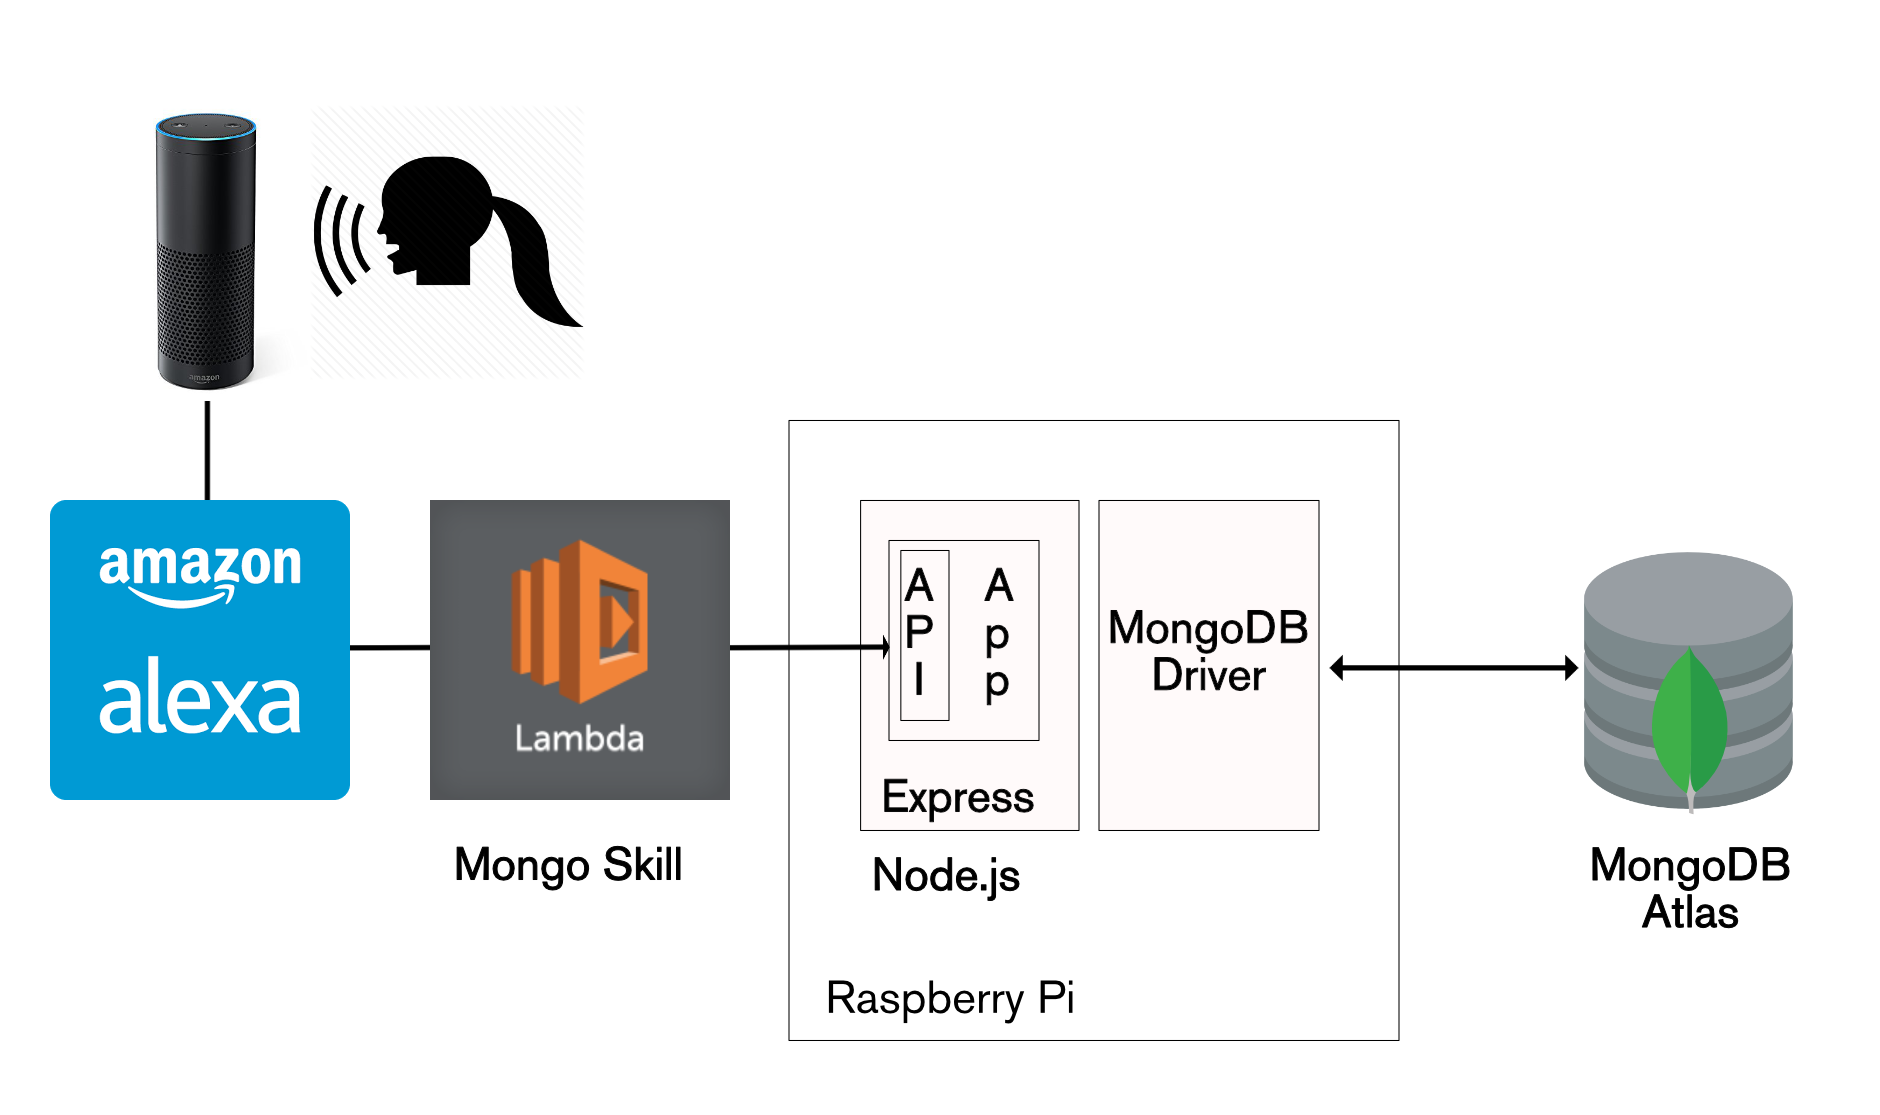
As a reminder, the user speaks to the Amazon Echo device, then the Alexa application invokes an AWS Lambda function, which implements the business logic for the Mongo skill, which then interacts with the MongoDB database via the Mongopop REST API:
Stack to have Alexa make REST API calls to Mongopop
To start, test the simplest intent – asking the Mongo skill for help:
Note that the visual card can contain more information than Alexa’s spoken response. For example, if there is an error in the Mongopop back-end, the returned error message is displayed on the card.
Next, we can ask Alexa how many times I’ve checked in and where my last check-in was. Note that I could have used any of the utterances associated with these intents (and Alexa will automatically convert similar phrases):
Summary
Previous posts stepped through building the Mongopop application back-end and then the creation of web client applications using Angular 2 and ReactJS.
This post explored some alternative ways to build client applications; in particular, it showed how to combine existing cloud services with a bit of new logic to create something brand new. We looked at a number of technologies to help build applications quickly and efficiently:
IFTTT: Make events in one cloud service trigger actions in another
Workflow: Automate complex tasks involving multiple services on an iOS device
Amazon Alexa: Implement your own voice-controlled skills
AWS Lambda: Host and scale your business logic in the cloud while only paying for the transactions you process
Increasingly, applications leverage multiple services (if only to allow the user to share their efforts on different social media networks). The key to all of these integrations is the REST APIs provided by each service. If you’ve jumped straight to this post then consider reading parts 1 through 3 to learn how to build your own REST API:
A simpler way to build your app – MongoDB Stitch, Backend as a Service
MongoDB Stitch is a backend as a service (BaaS), giving developers a REST-like API to MongoDB, and composability with other services, backed by a robust system for configuring fine-grained data access controls. Stitch provides native SDKs for JavaScript, iOS, and Android.
Built-in integrations give your application frontend access to your favorite third party services: Twilio, AWS S3, Slack, Mailgun, PubNub, Google, and more. For ultimate flexibility, you can add custom integrations using MongoDB Stitch’s HTTP service.
MongoDB Stitch allows you to compose multi-stage pipelines that orchestrate data across multiple services; where each stage acts on the data before passing its results on to the next.
Unlike other BaaS offerings, MongoDB Stitch works with your existing as well as new MongoDB clusters, giving you access to the full power and scalability of the database. By defining appropriate data access rules, you can selectively expose your existing MongoDB data to other applications through MongoDB Stitch’s API.