Introduction
This blog post demonstrates how to build and deploy an application on AWS Elastic Beanstalk, and have that application connect to MongoDB Atlas as its back-end database service:
- Introducing the example MongoPop application
- Connecting applications to your MongoDB Atlas cluster; including IP address whitelisting
- Downloading and testing MongoPop locally and on AWS Elastic Beanstalk
- Populating your database with thousands of realistic documents
- Explaining key parts of the application code
- Adapting and redeploying applications
- Graphically exploring your schema and data with MongoDB Compass
AWS Elastic Beanstalk is a service offered by Amazon to make it simple for developers to deploy and manage their cloud-based applications. After you’ve uploaded your application, Elastic Beanstalk automatically takes care of:
- Capacity provisioning, adding more instances as needed
- Load balancing
- Health monitoring
MongoDB Atlas provides all of the features of the MongoDB database, without the operational heavy lifting. MongoDB Atlas is available on demand through a pay-as-you-go model and billed on an hourly basis, letting you focus on your application code.
It’s easy to get started – use a simple GUI to select the instance size, region, and features you need. MongoDB Atlas provides:
- Security features to protect access to your data
- Built in replication for always-on availability, tolerating complete data center failure
- Backups and point in time recovery to protect against data corruption
- Fine-grained monitoring to let you know when to scale. Additional instances can be provisioned with the push of a button
- Automated patching and one-click upgrades for new major versions of the database, enabling you to take advantage of the latest and greatest MongoDB features
- A choice of cloud providers, regions, and billing options
There is clearly a lot of synergy between these technologies – both of them handling the enabling infrastructure, letting the developer spend their precious time on writing great applications. To continue in the spirit of developer productivity, the application used in this post is developed using Node.js, the Express web application framework, and the Pug (formerly Jade) template engine.
The Application – MongoPop
Let’s start by taking a look at what the new Mongopop application provides.
Getting your MongoDB Atlas cluster up and running is a breeze but what do you do with it next? Wouldn’t it be great to populate it with some realistic data so that you can start experimenting? This is what MongoPop does – even letting you tailor the format and contents of the data using the Mockaroo service.
Mockaroo is a flexible service, allowing you to define a rich schema and then generate realistic sample data sets. Supported types include:
- Email address
- City
- European first name
- JSON array
- Branded drug names
- Custom types defined by you, based on regular expressions
Data files can be downloaded from Mockaroo in multiple formats, including: JSON, CSV, and SQL.
MongoPop pulls data from Mockaroo and then automatically writes the data to your database. It defaults to our example Mockaroo schema but you can replace that with a URL for any schema that you’ve defined in Mockaroo (or any other service providing arrays of JSON documents). Mockaroo takes care of connecting to MongoDB Atlas and runs multithreaded, speeding up the process of loading large datasets into MongoDB.
Using MongoPop
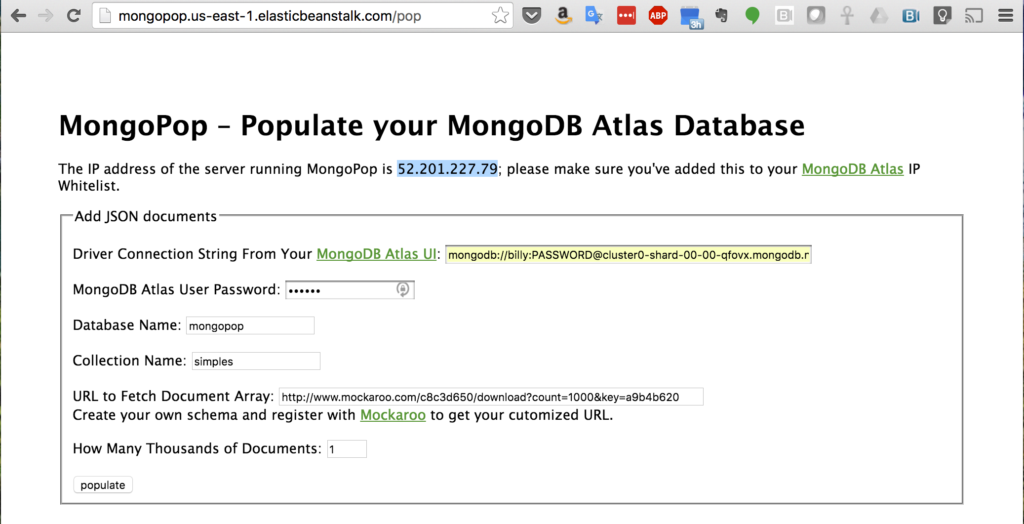
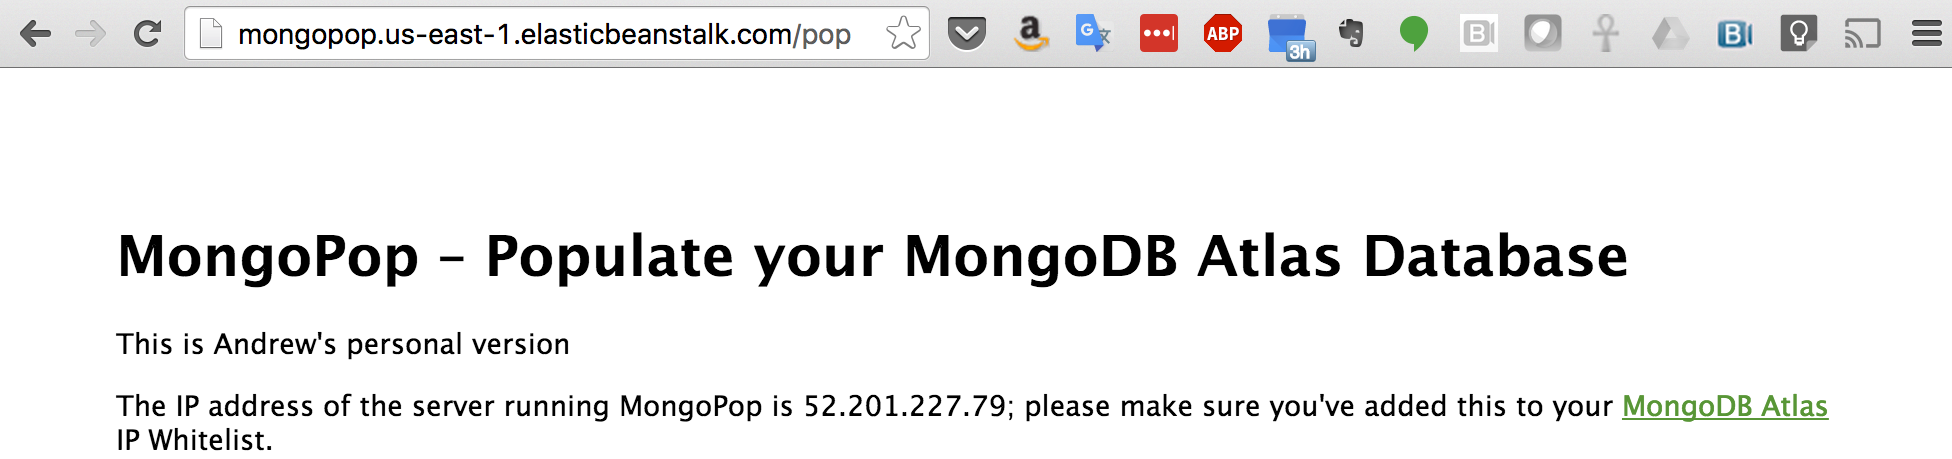
Figure 1: Identify IP Address of MongoPop Server for MongoDB Atlas IP Whitelisting
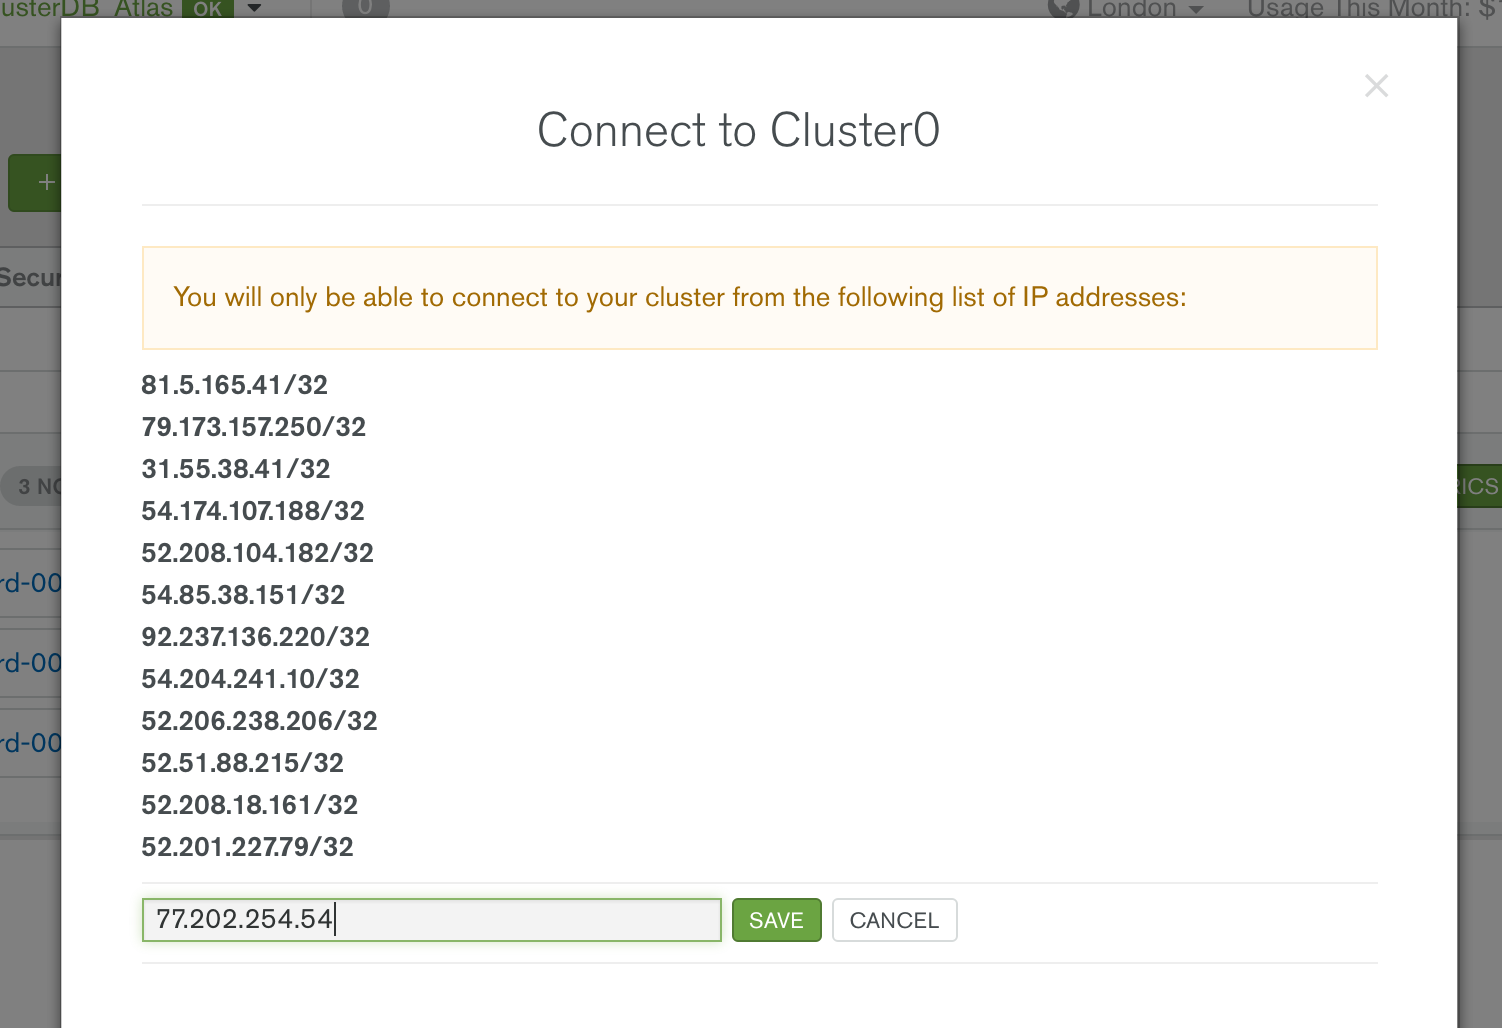
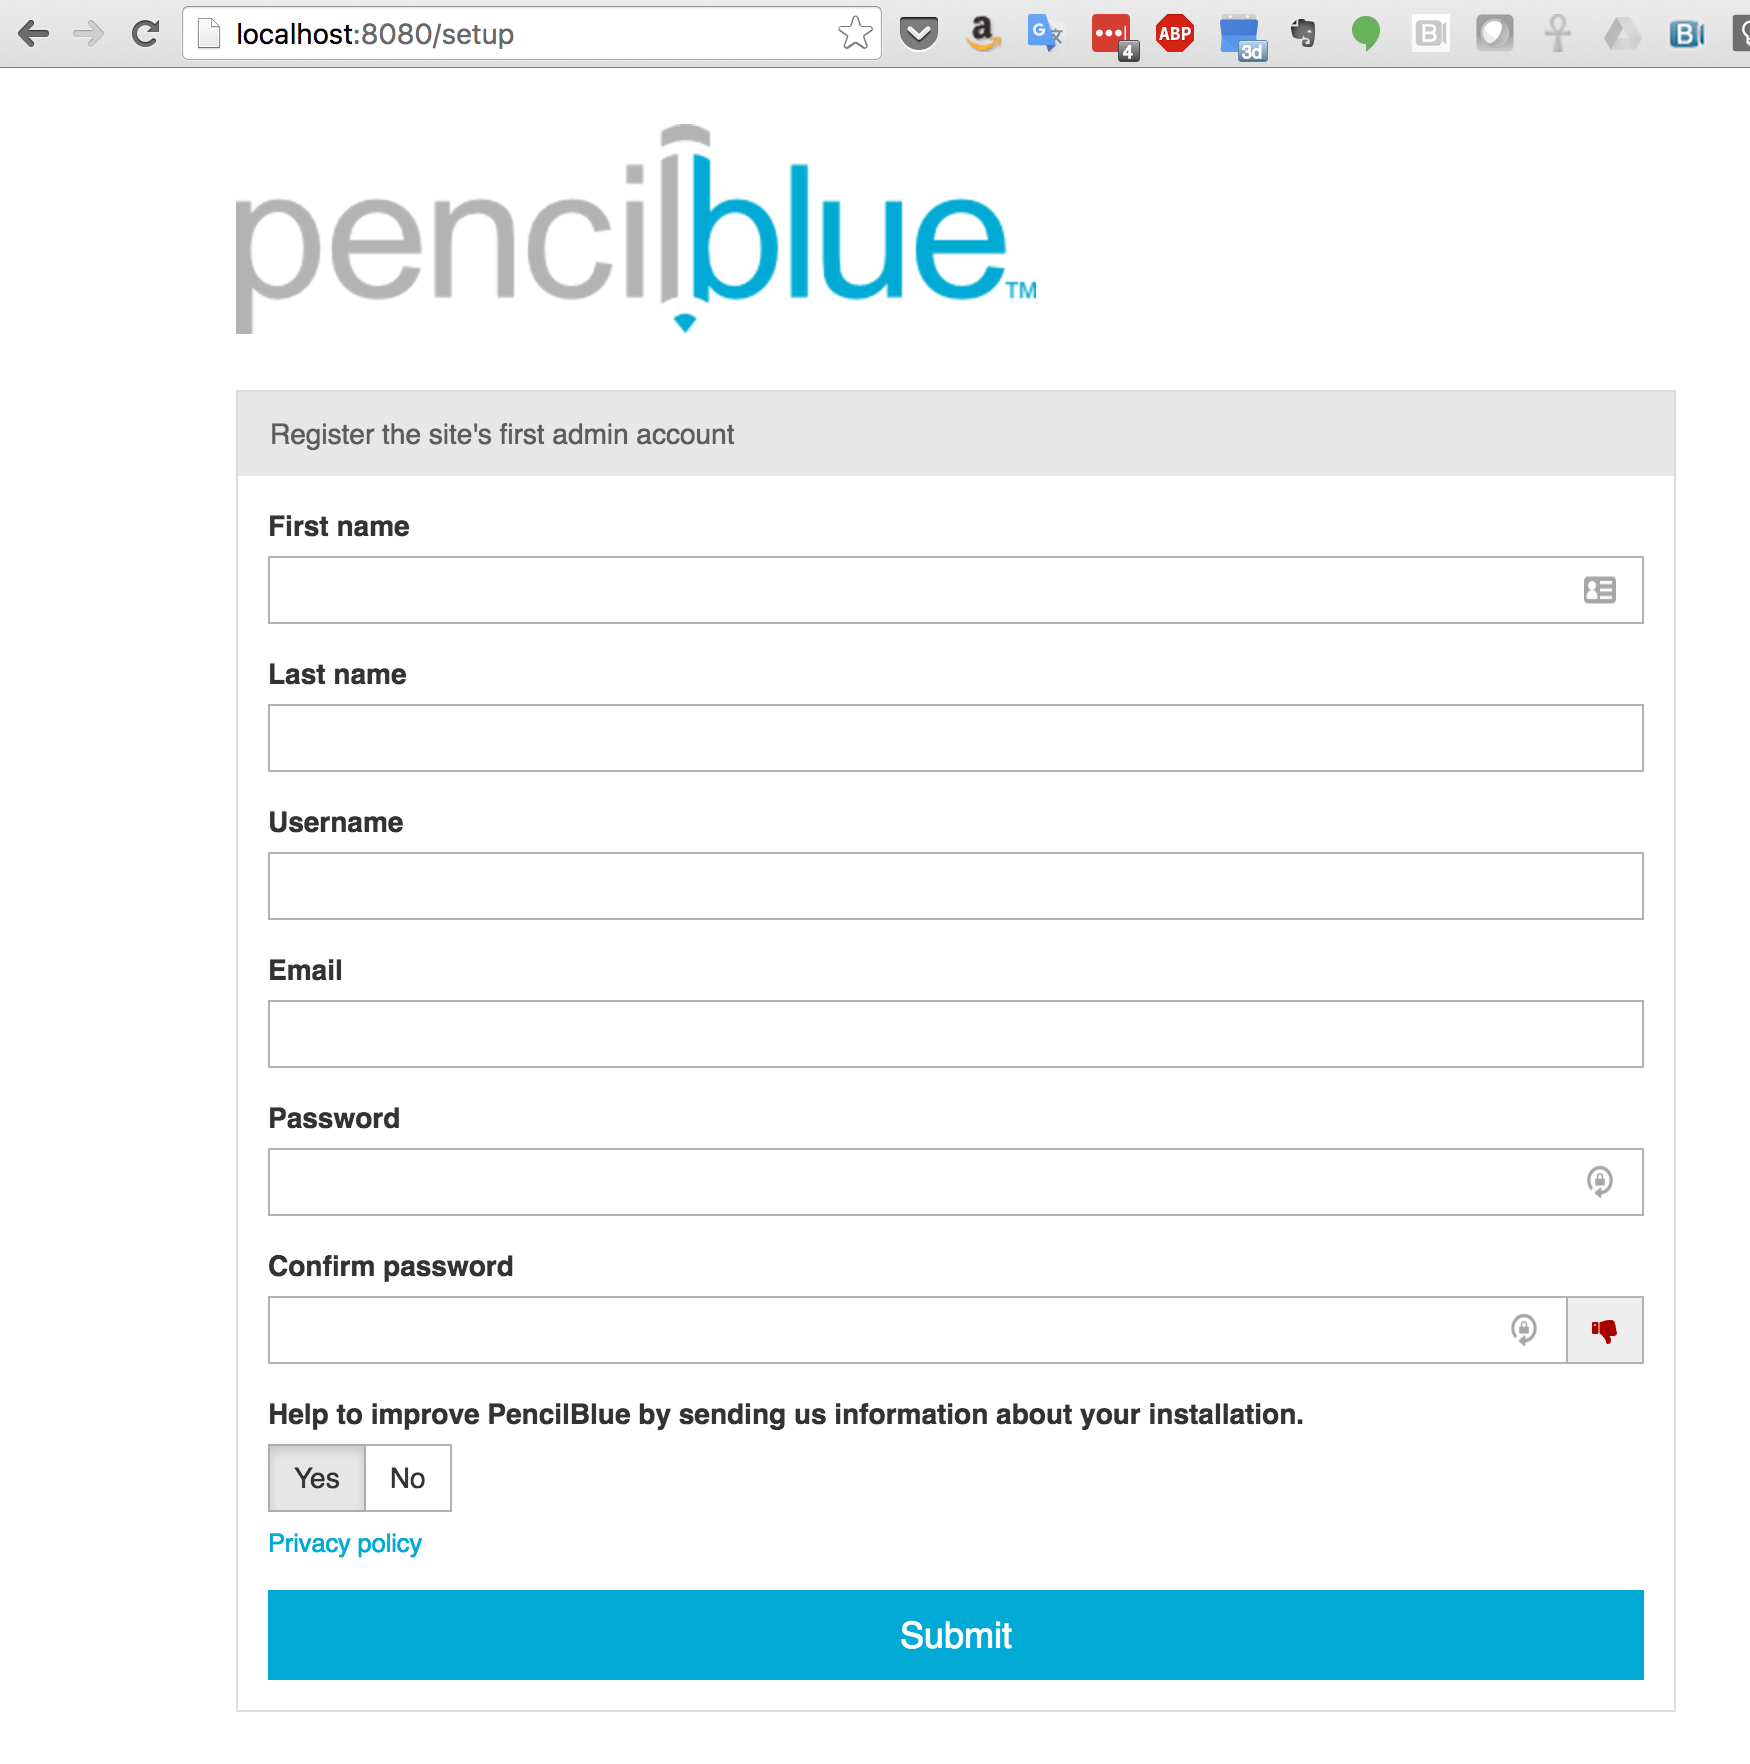
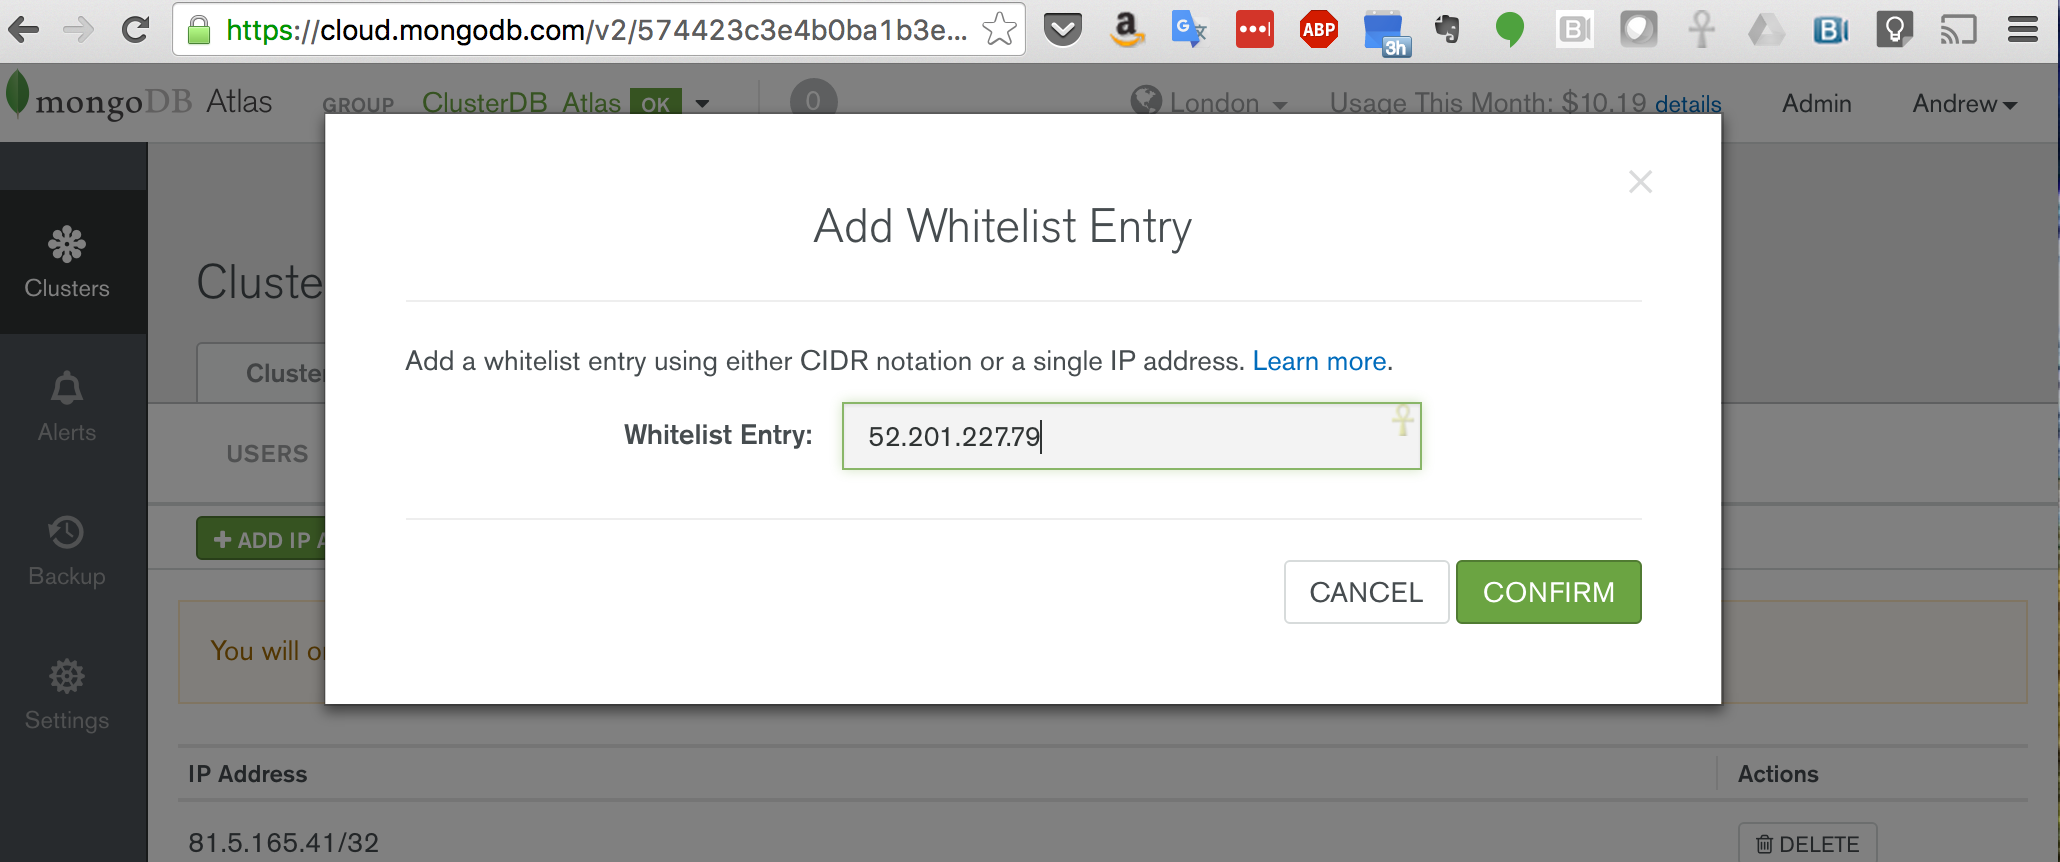
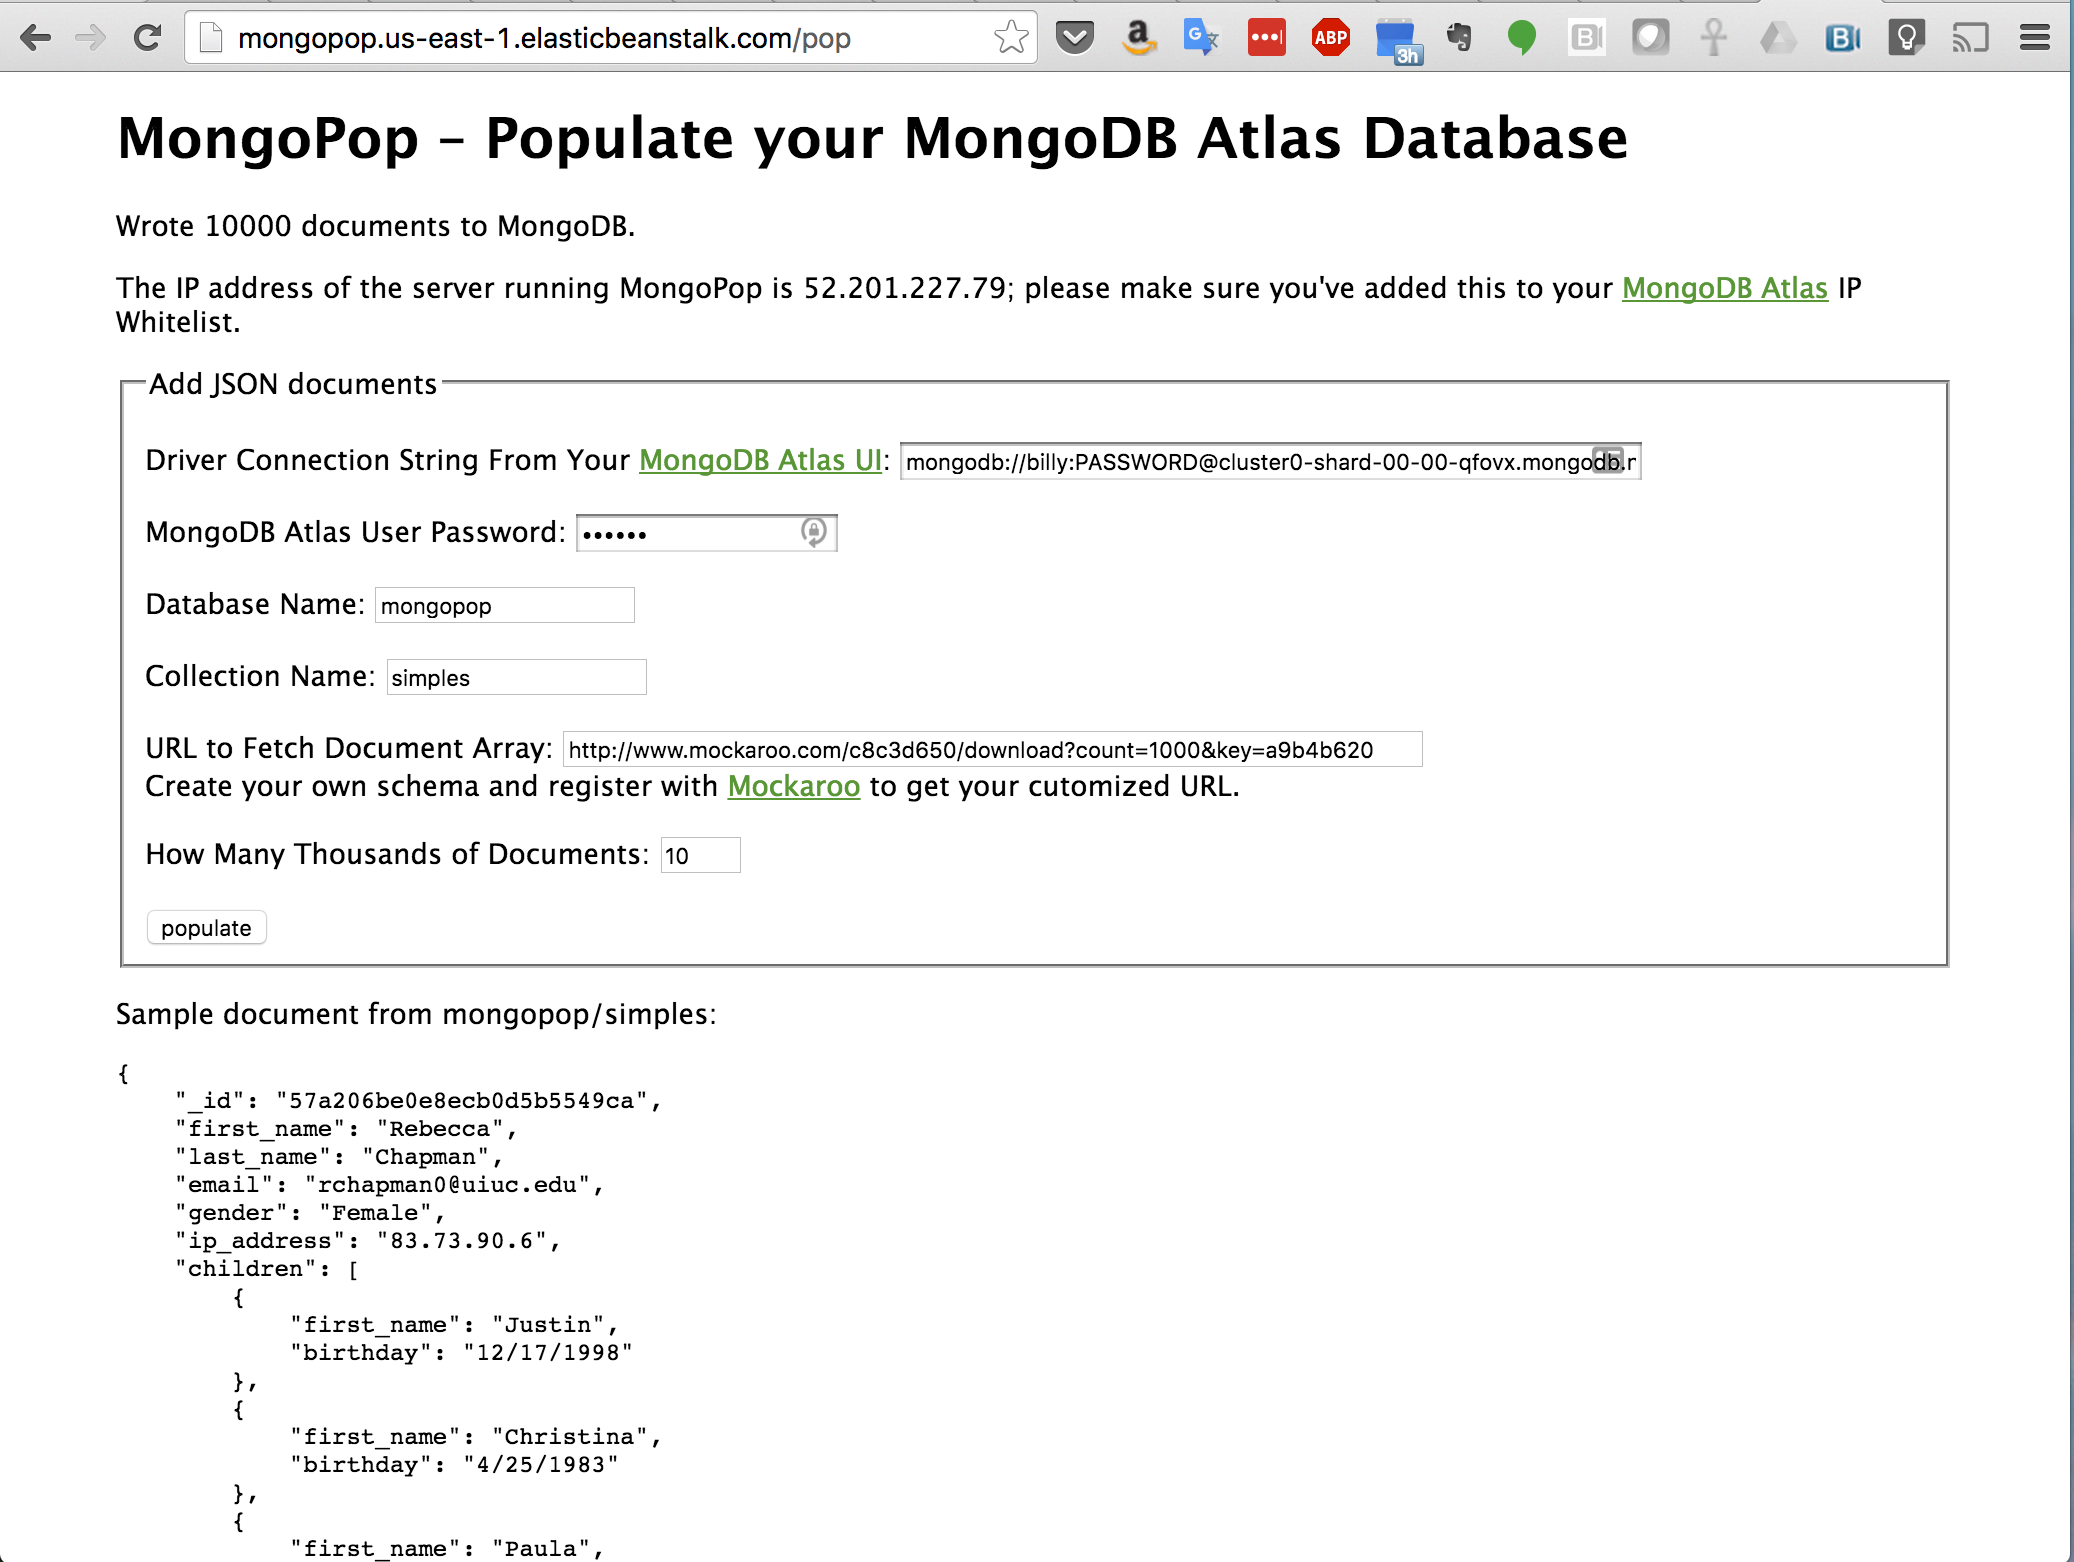
When you first access MongoPop (Figure 1), you’re presented with a form to provide details on how to connect to your MongoDB Atlas instance, and what you’d like the data to look like. Before completing the form, take a note of the IP address that’s displayed. This IP address needs to be added to the whitelist for your group, which is done through the security tab of the MongoDB Atlas UI (Figure 2).

Figure 2: Add MongoPop IP Address to MongoDB Atlas Group Whitelist
In a production Elastic Beanstalk environment, the IP whitelisting can be a little more involved – that will be covered later in this post.
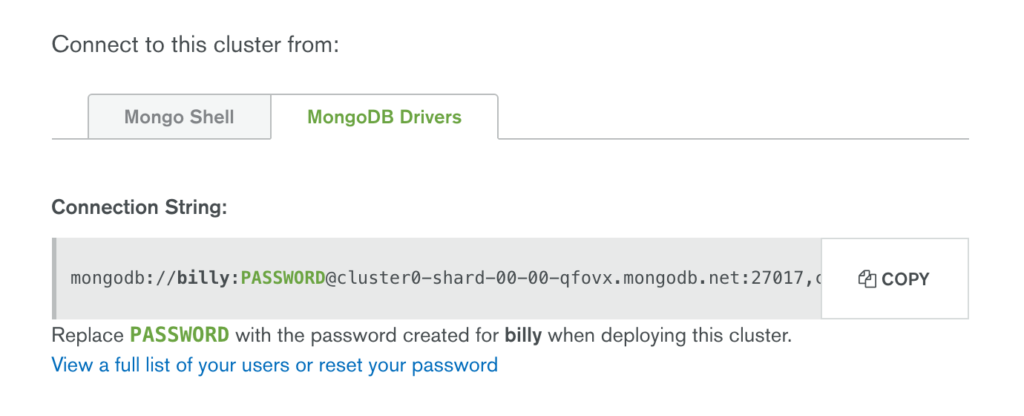
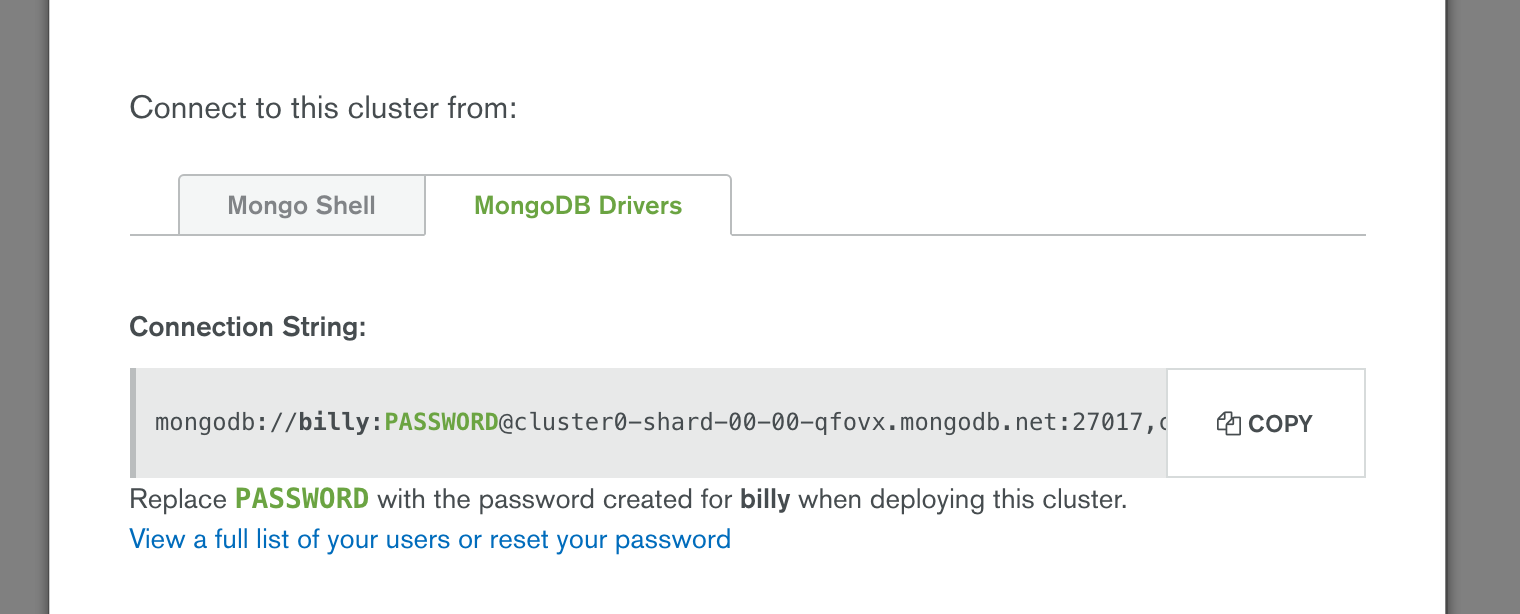
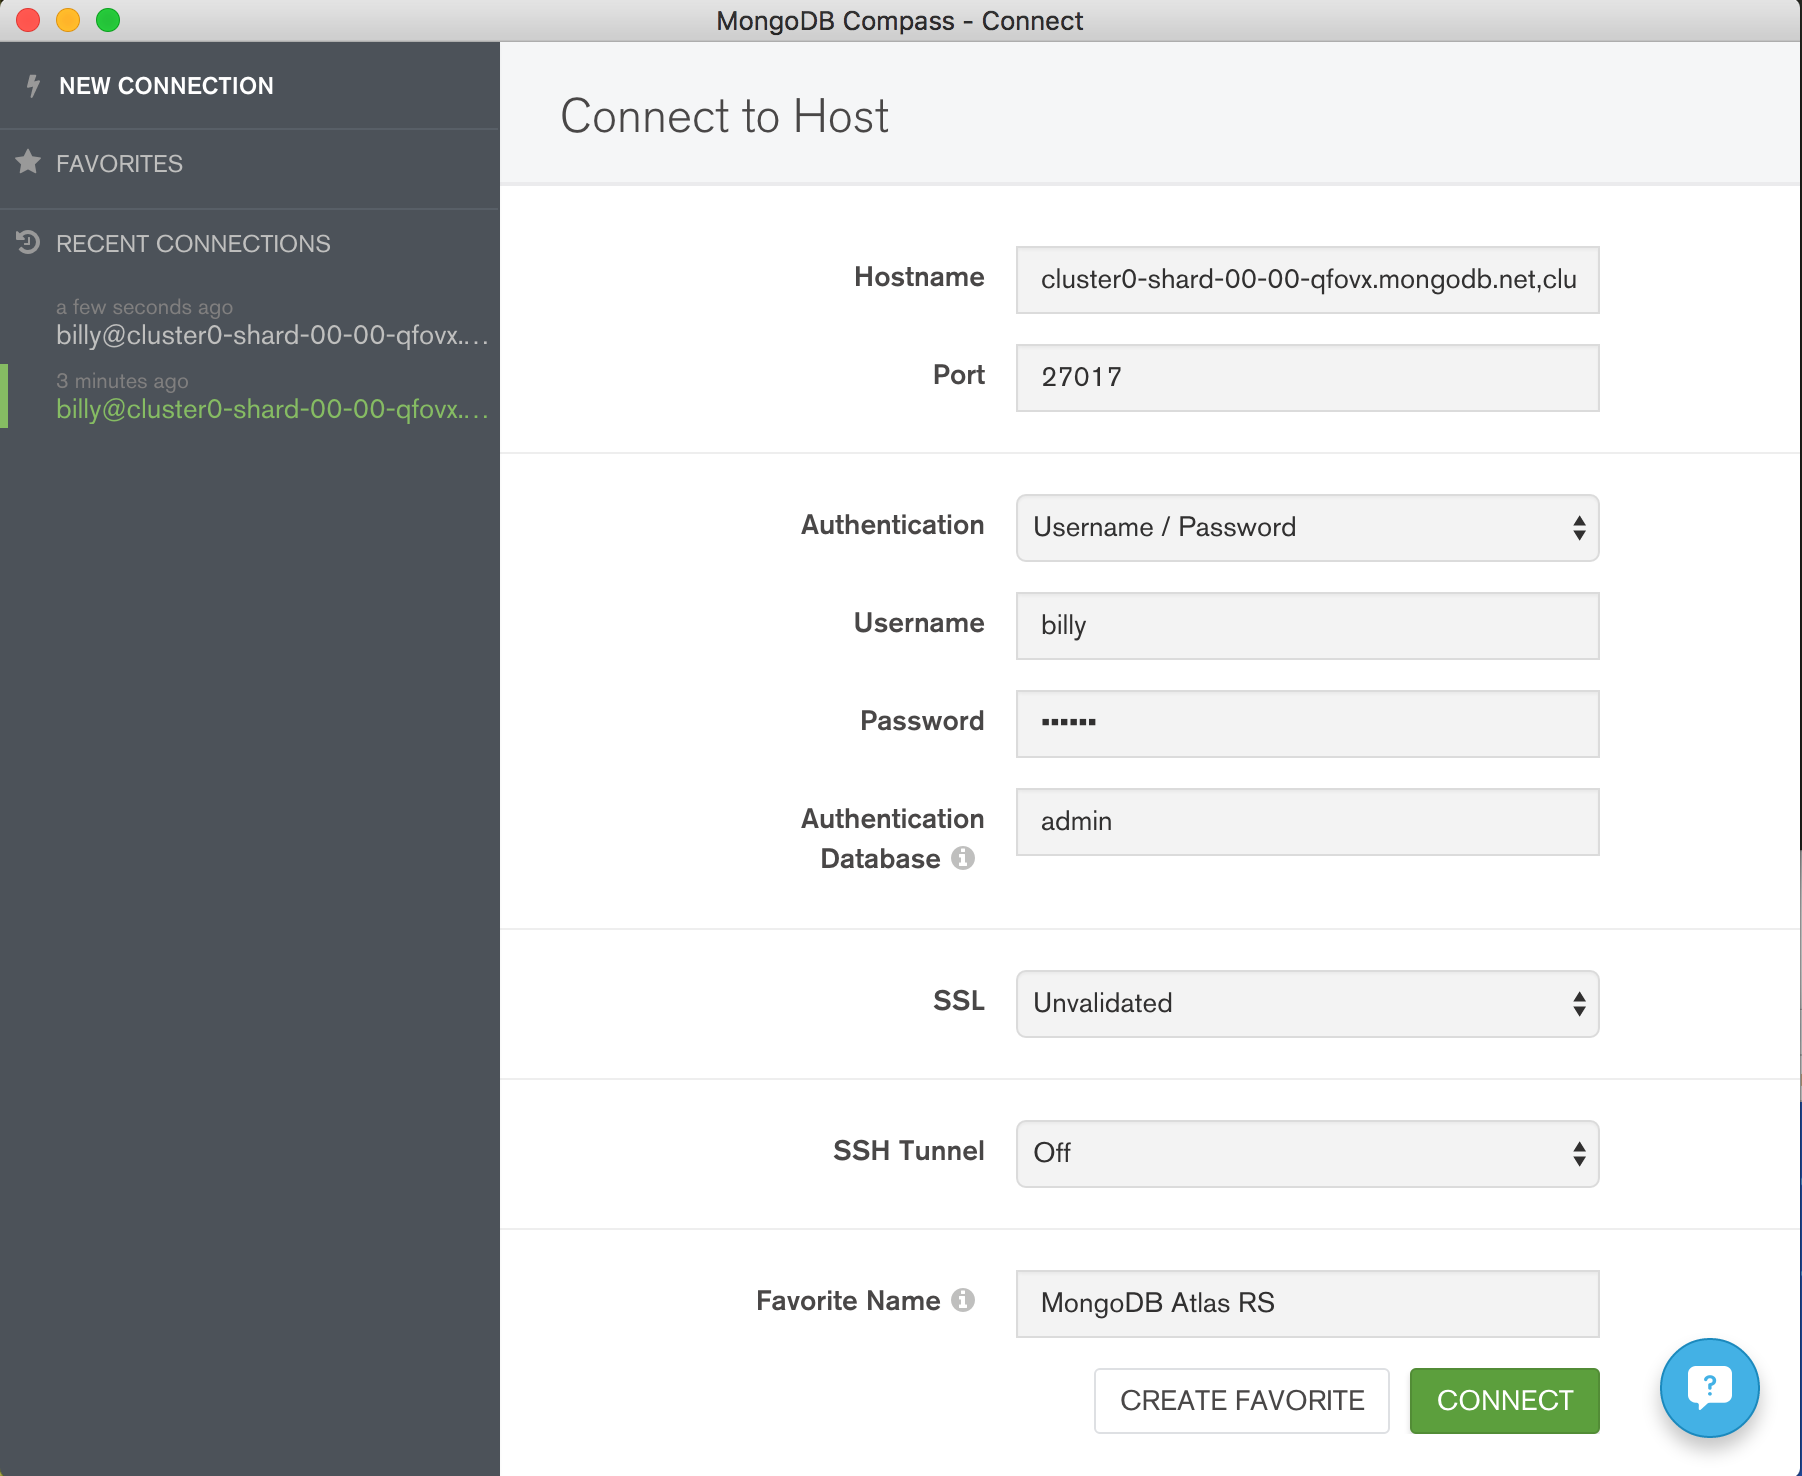
Figure 3: Find the Node.js Driver Connect String in MongoDB Atlas
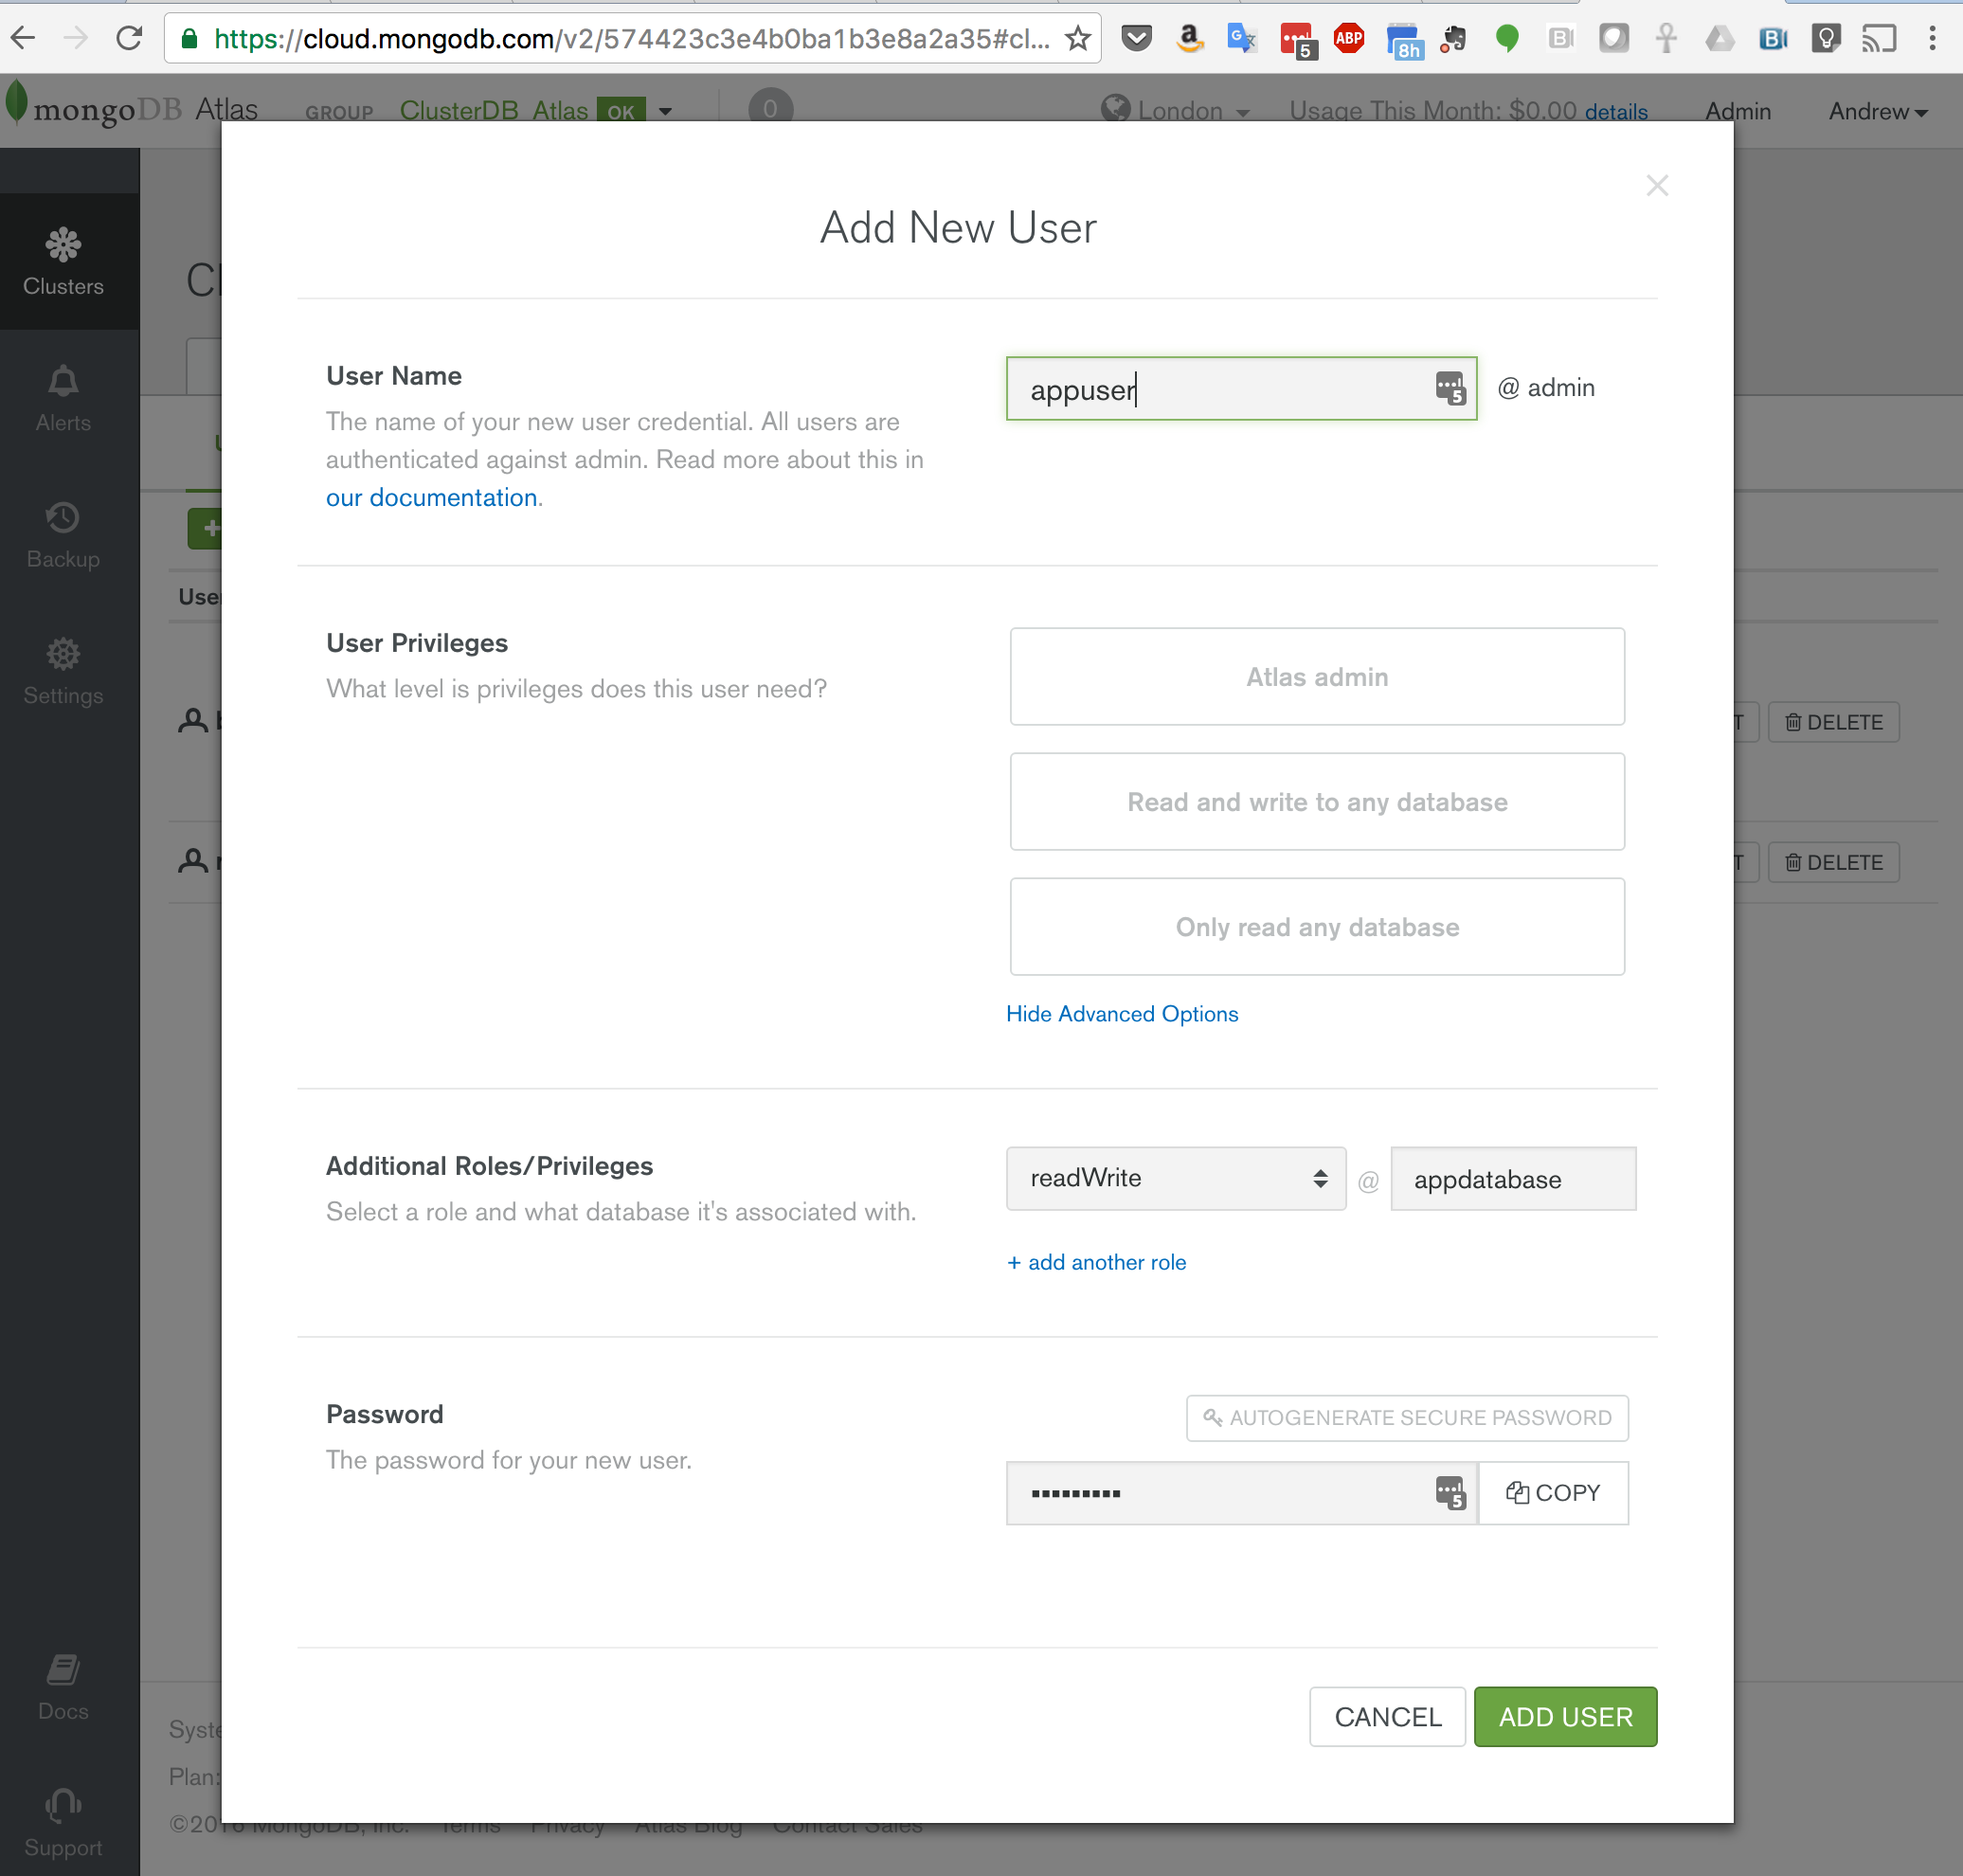
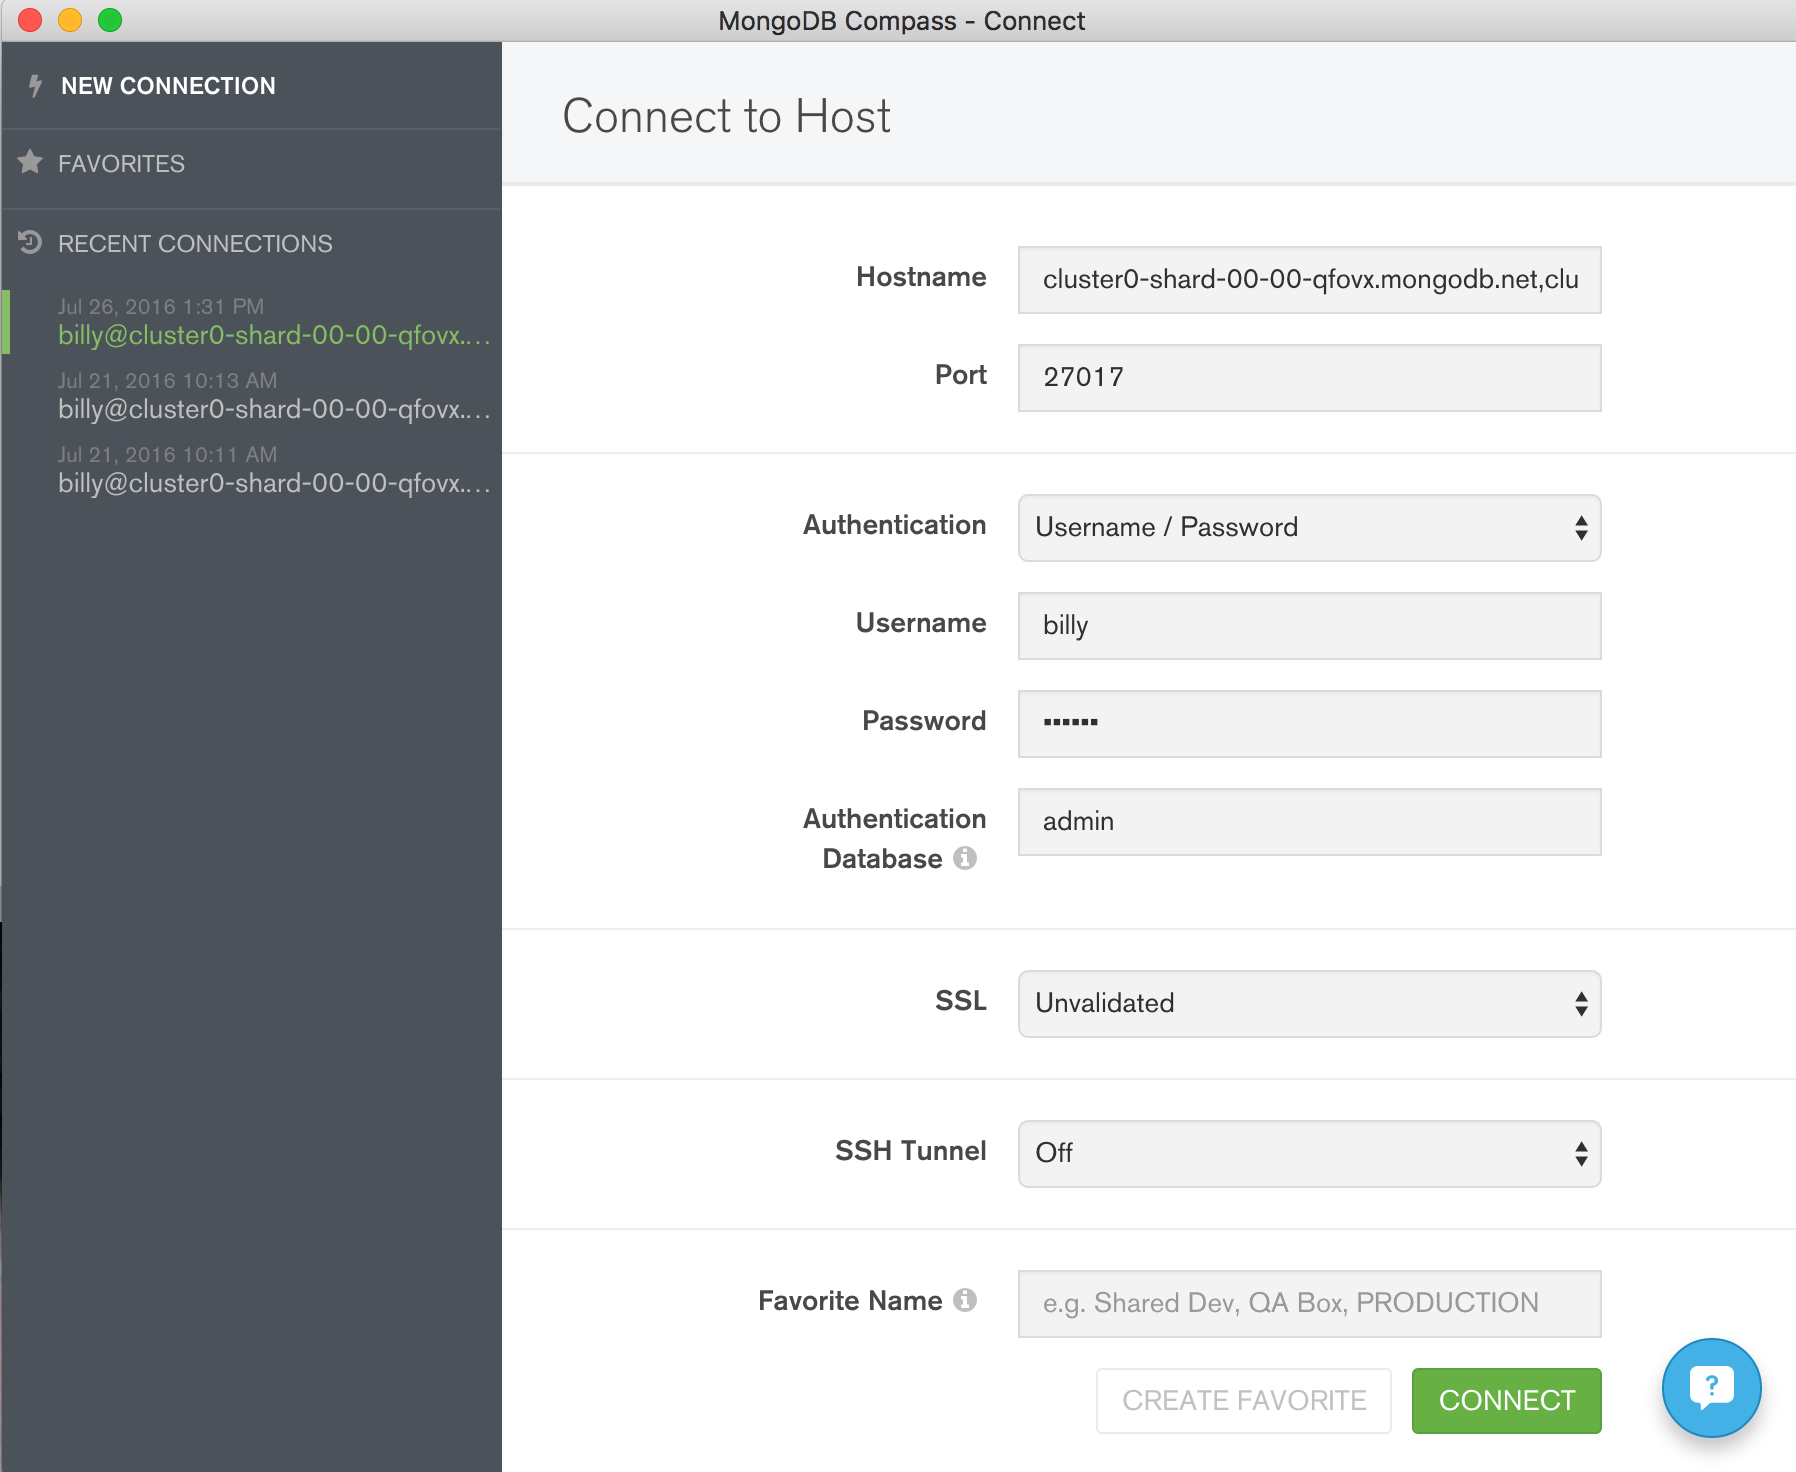
While in the MongoDB Atlas UI, click the “CONNECT” button, select the “MongoDB Drivers” tab and then the “COPY” button (Figure 3). Paste the copied URI directly into MongoPop. You should also enter the password and the database you want to use.
Note that the URI needs editing before it’s actually used but MongoPop handles that using the password and database name you provide; the final URI will take this form: mongodb://mongodb_user:my_password@cluster0-shard-00-00-qfovx.mongodb.net:27017,cluster0-shard-00-01-qfovx.mongodb.net:27017,cluster0-shard-00-02-qfovx.mongodb.net:27017/mongopop?ssl=true&authSource=admin.
This URI contains these components:
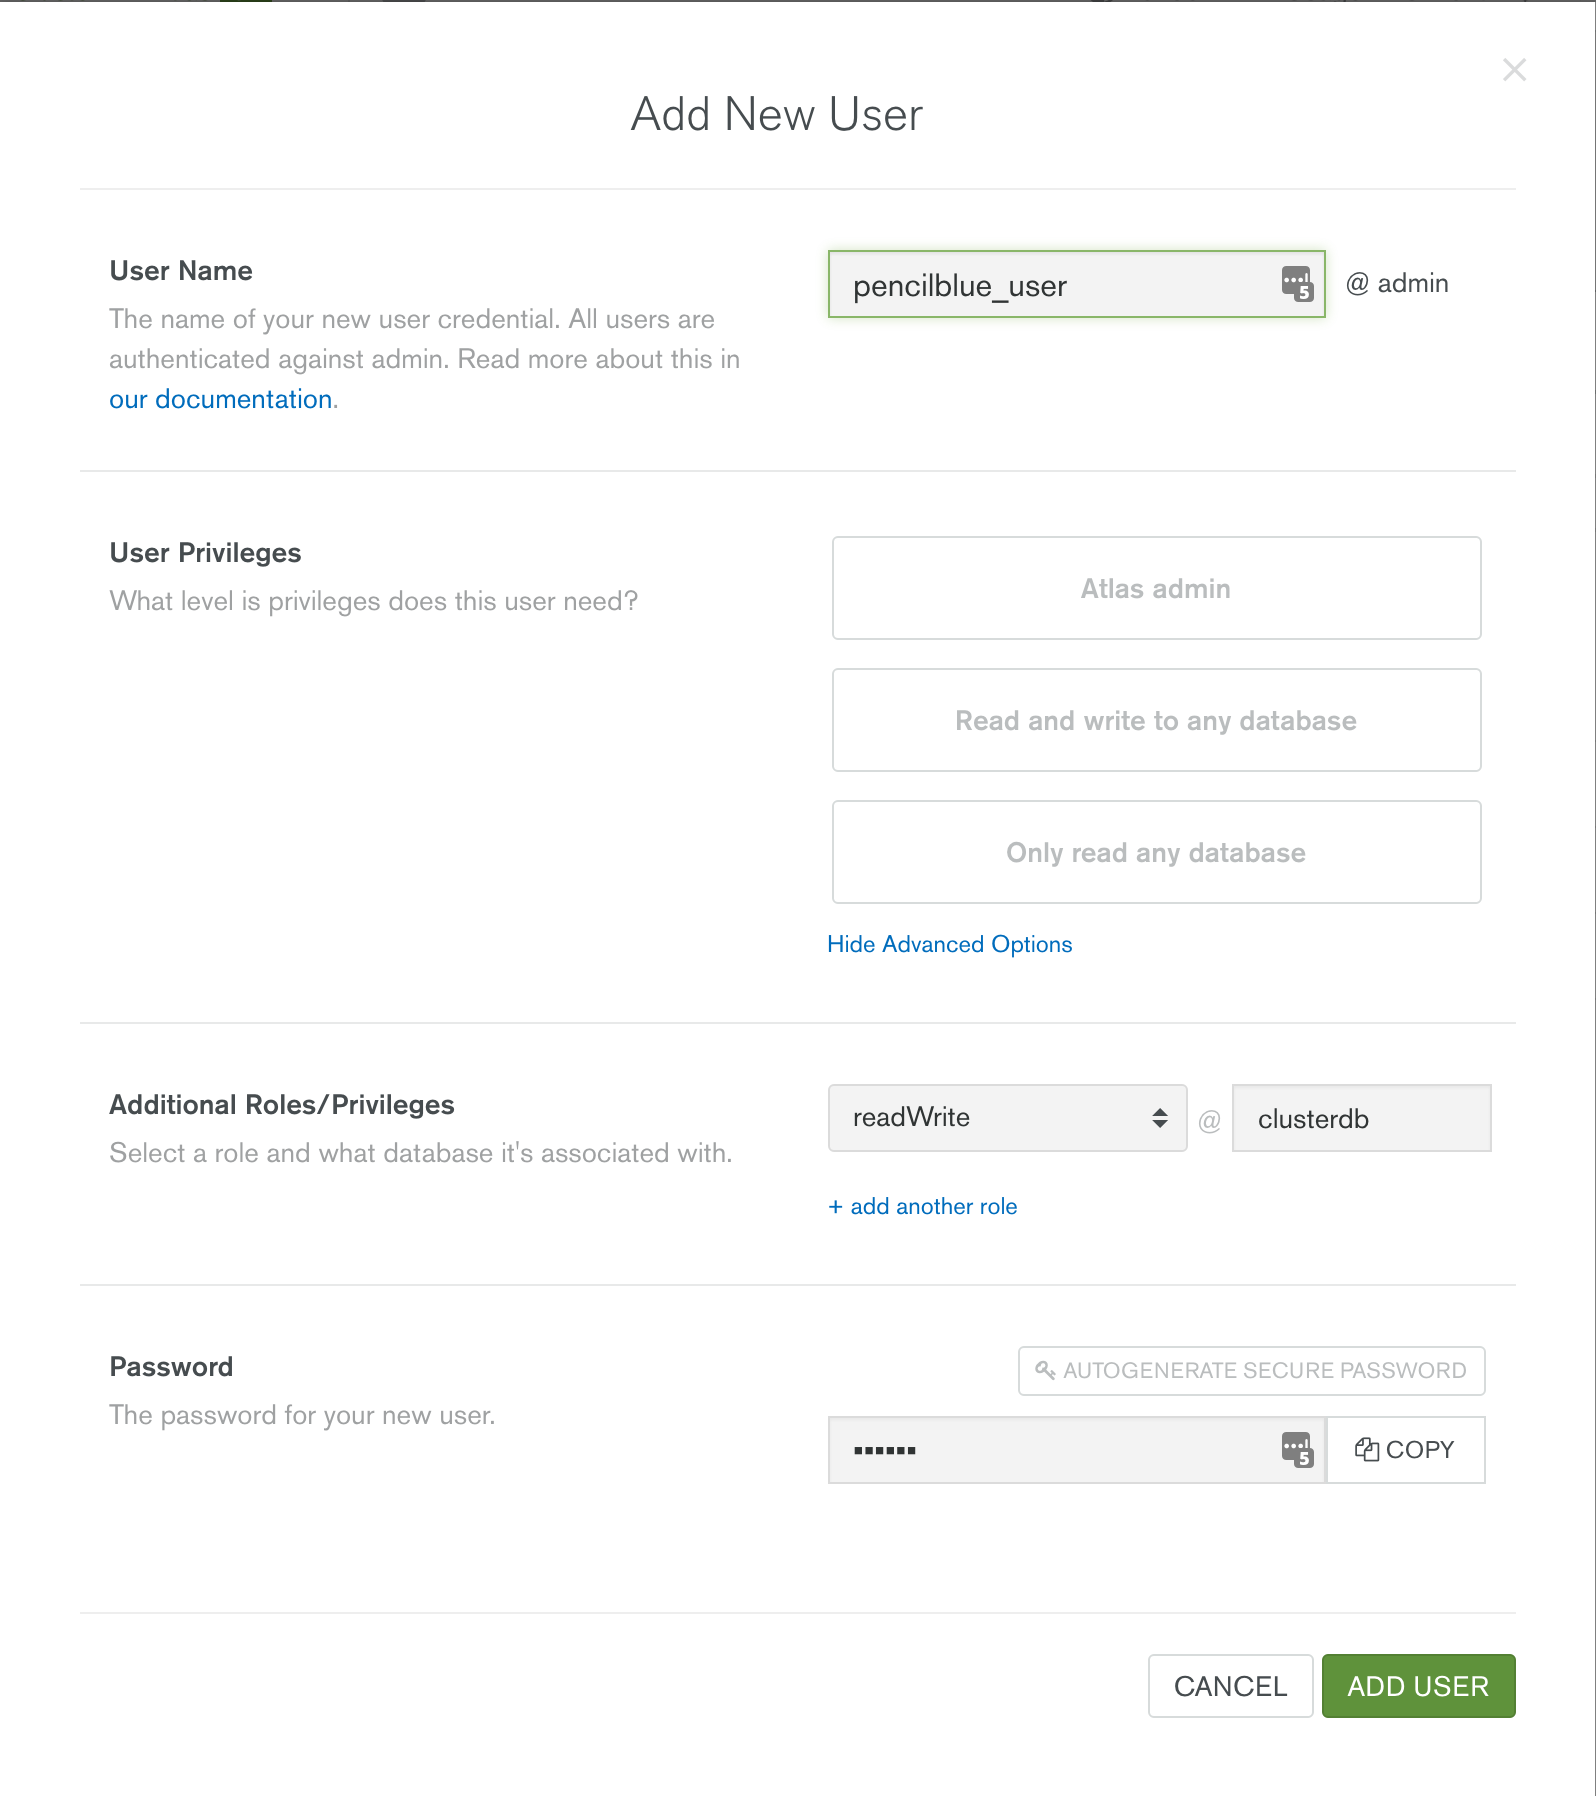
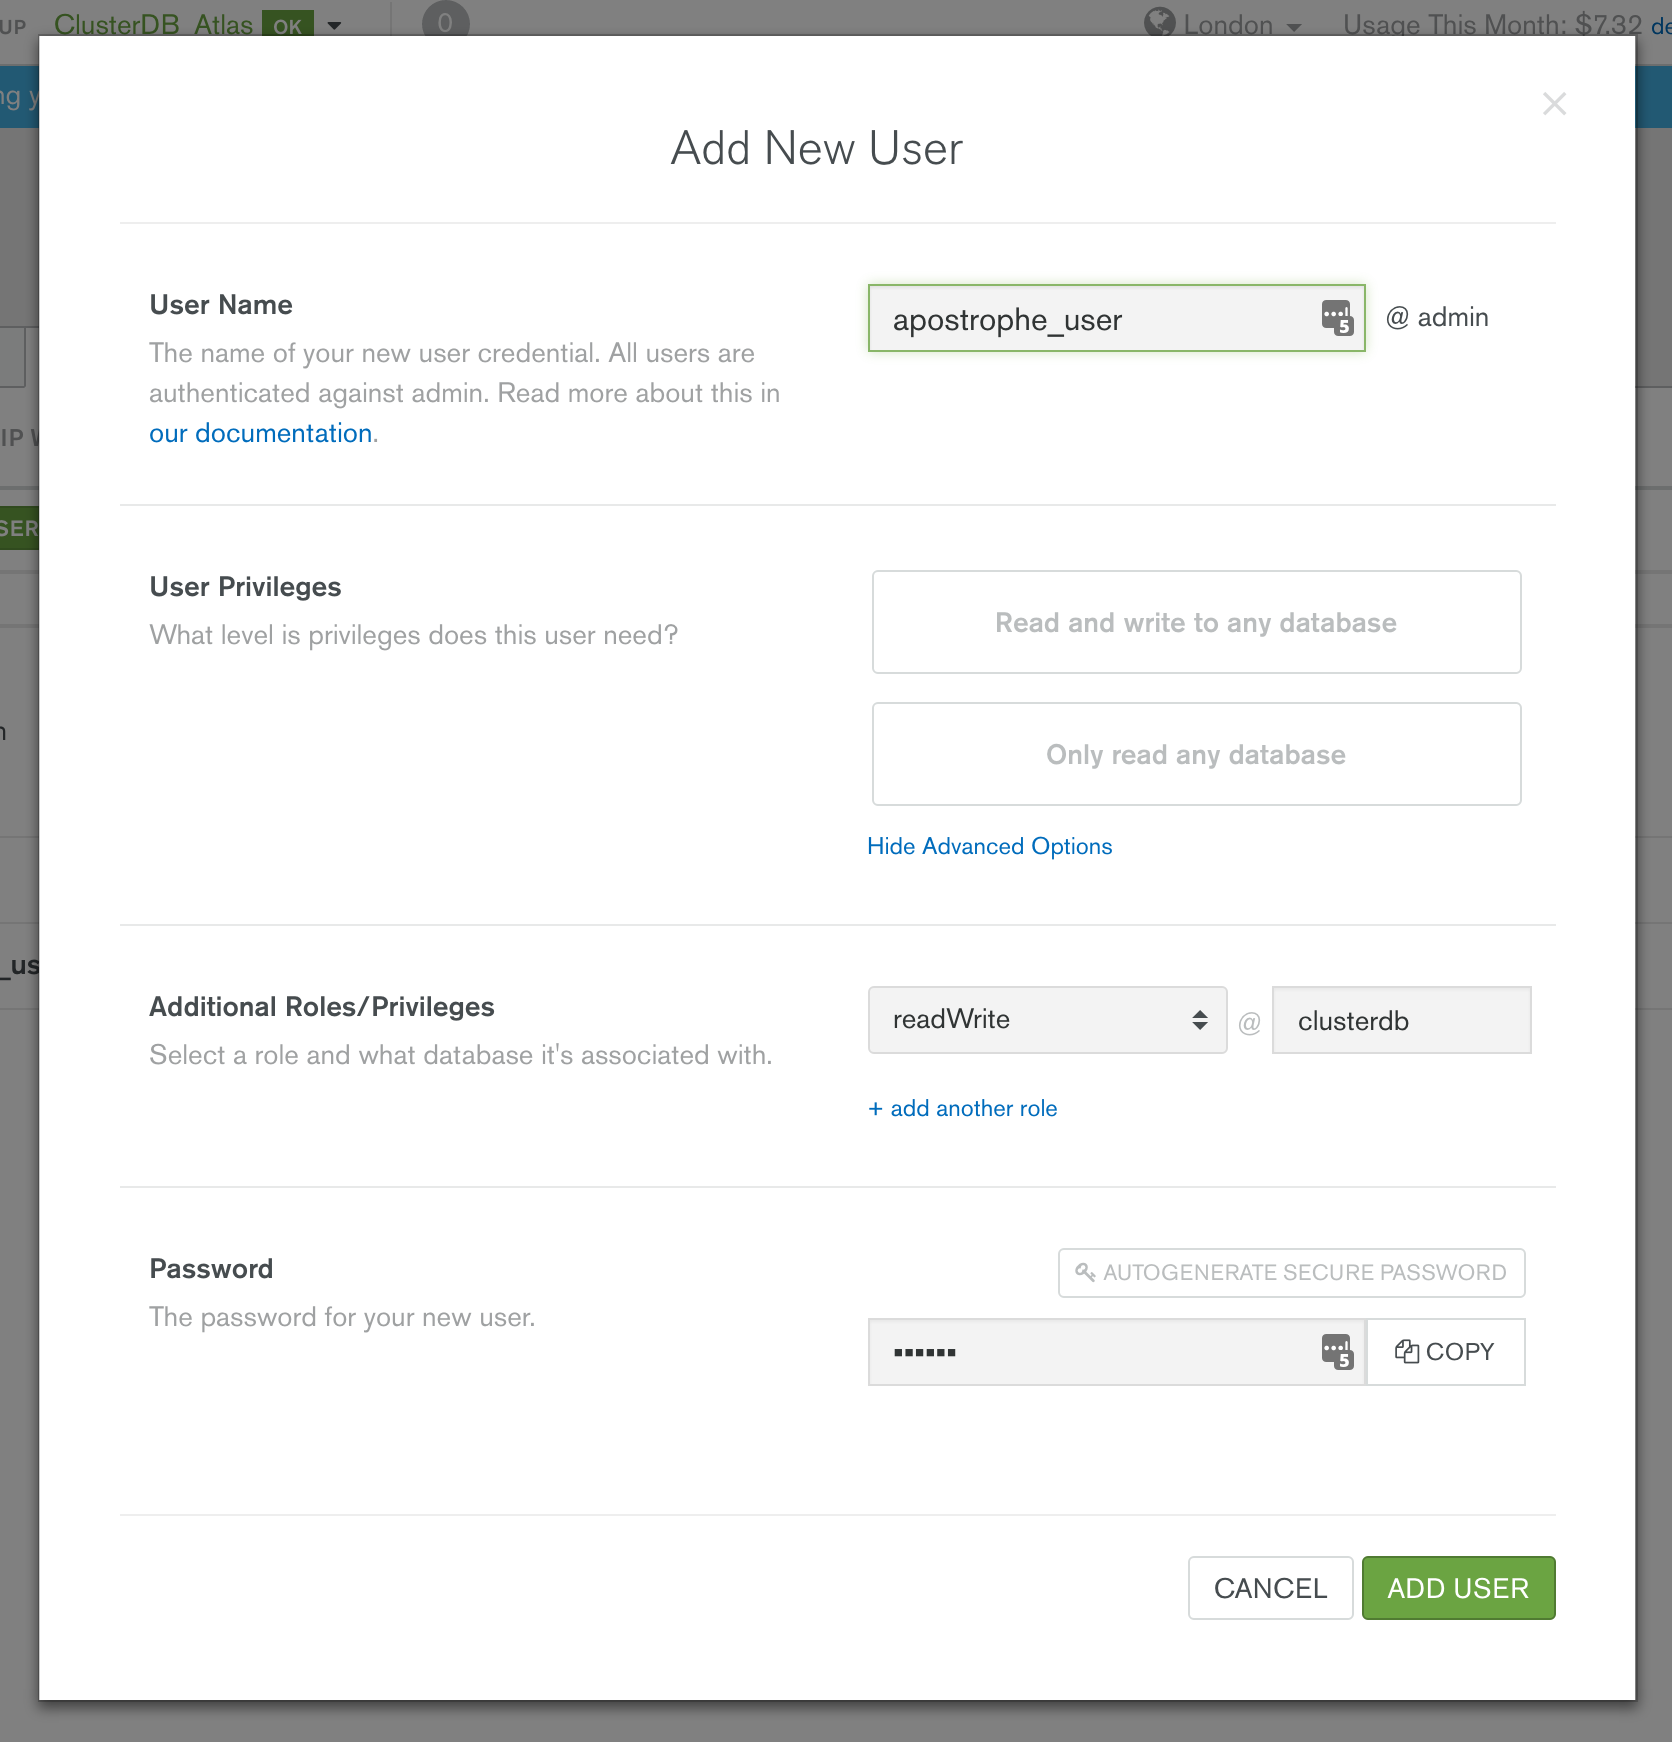
mongodb_user is the name of the user you gave when creating the group in the MongoDB Atlas UI. Alternatively, create a new user in the MongoDB Atlas UI with more restricted privileges.my_password is the password you chose when creating the user in MongoDB Atlas.cluster0-shard-00-00-qfovx.mongodb.net, cluster0-shard-00-01-qfovx.mongodb.net, & cluster0-shard-00-02-qfovx.mongodb.net are the hostnames of the instances in your MongoDB Atlas replica set.27017 is the default MongoDB port number.mongopop is the name of the database (schema) that MongoPop will use.- To enforce over-the-wire encryption, MongoDB Atlas mandates that the
ssl option is used.
admin is the database that’s being used to store the credentials for mongodb_user.
The remaining fields define the collection to store the documents, the source of the document schema, and the number of documents (in thousands) to be added. The source URL defaults to a document format already defined but you can create your own by registering at the Mockaroo site, defining the document structure and then using the URL provided.
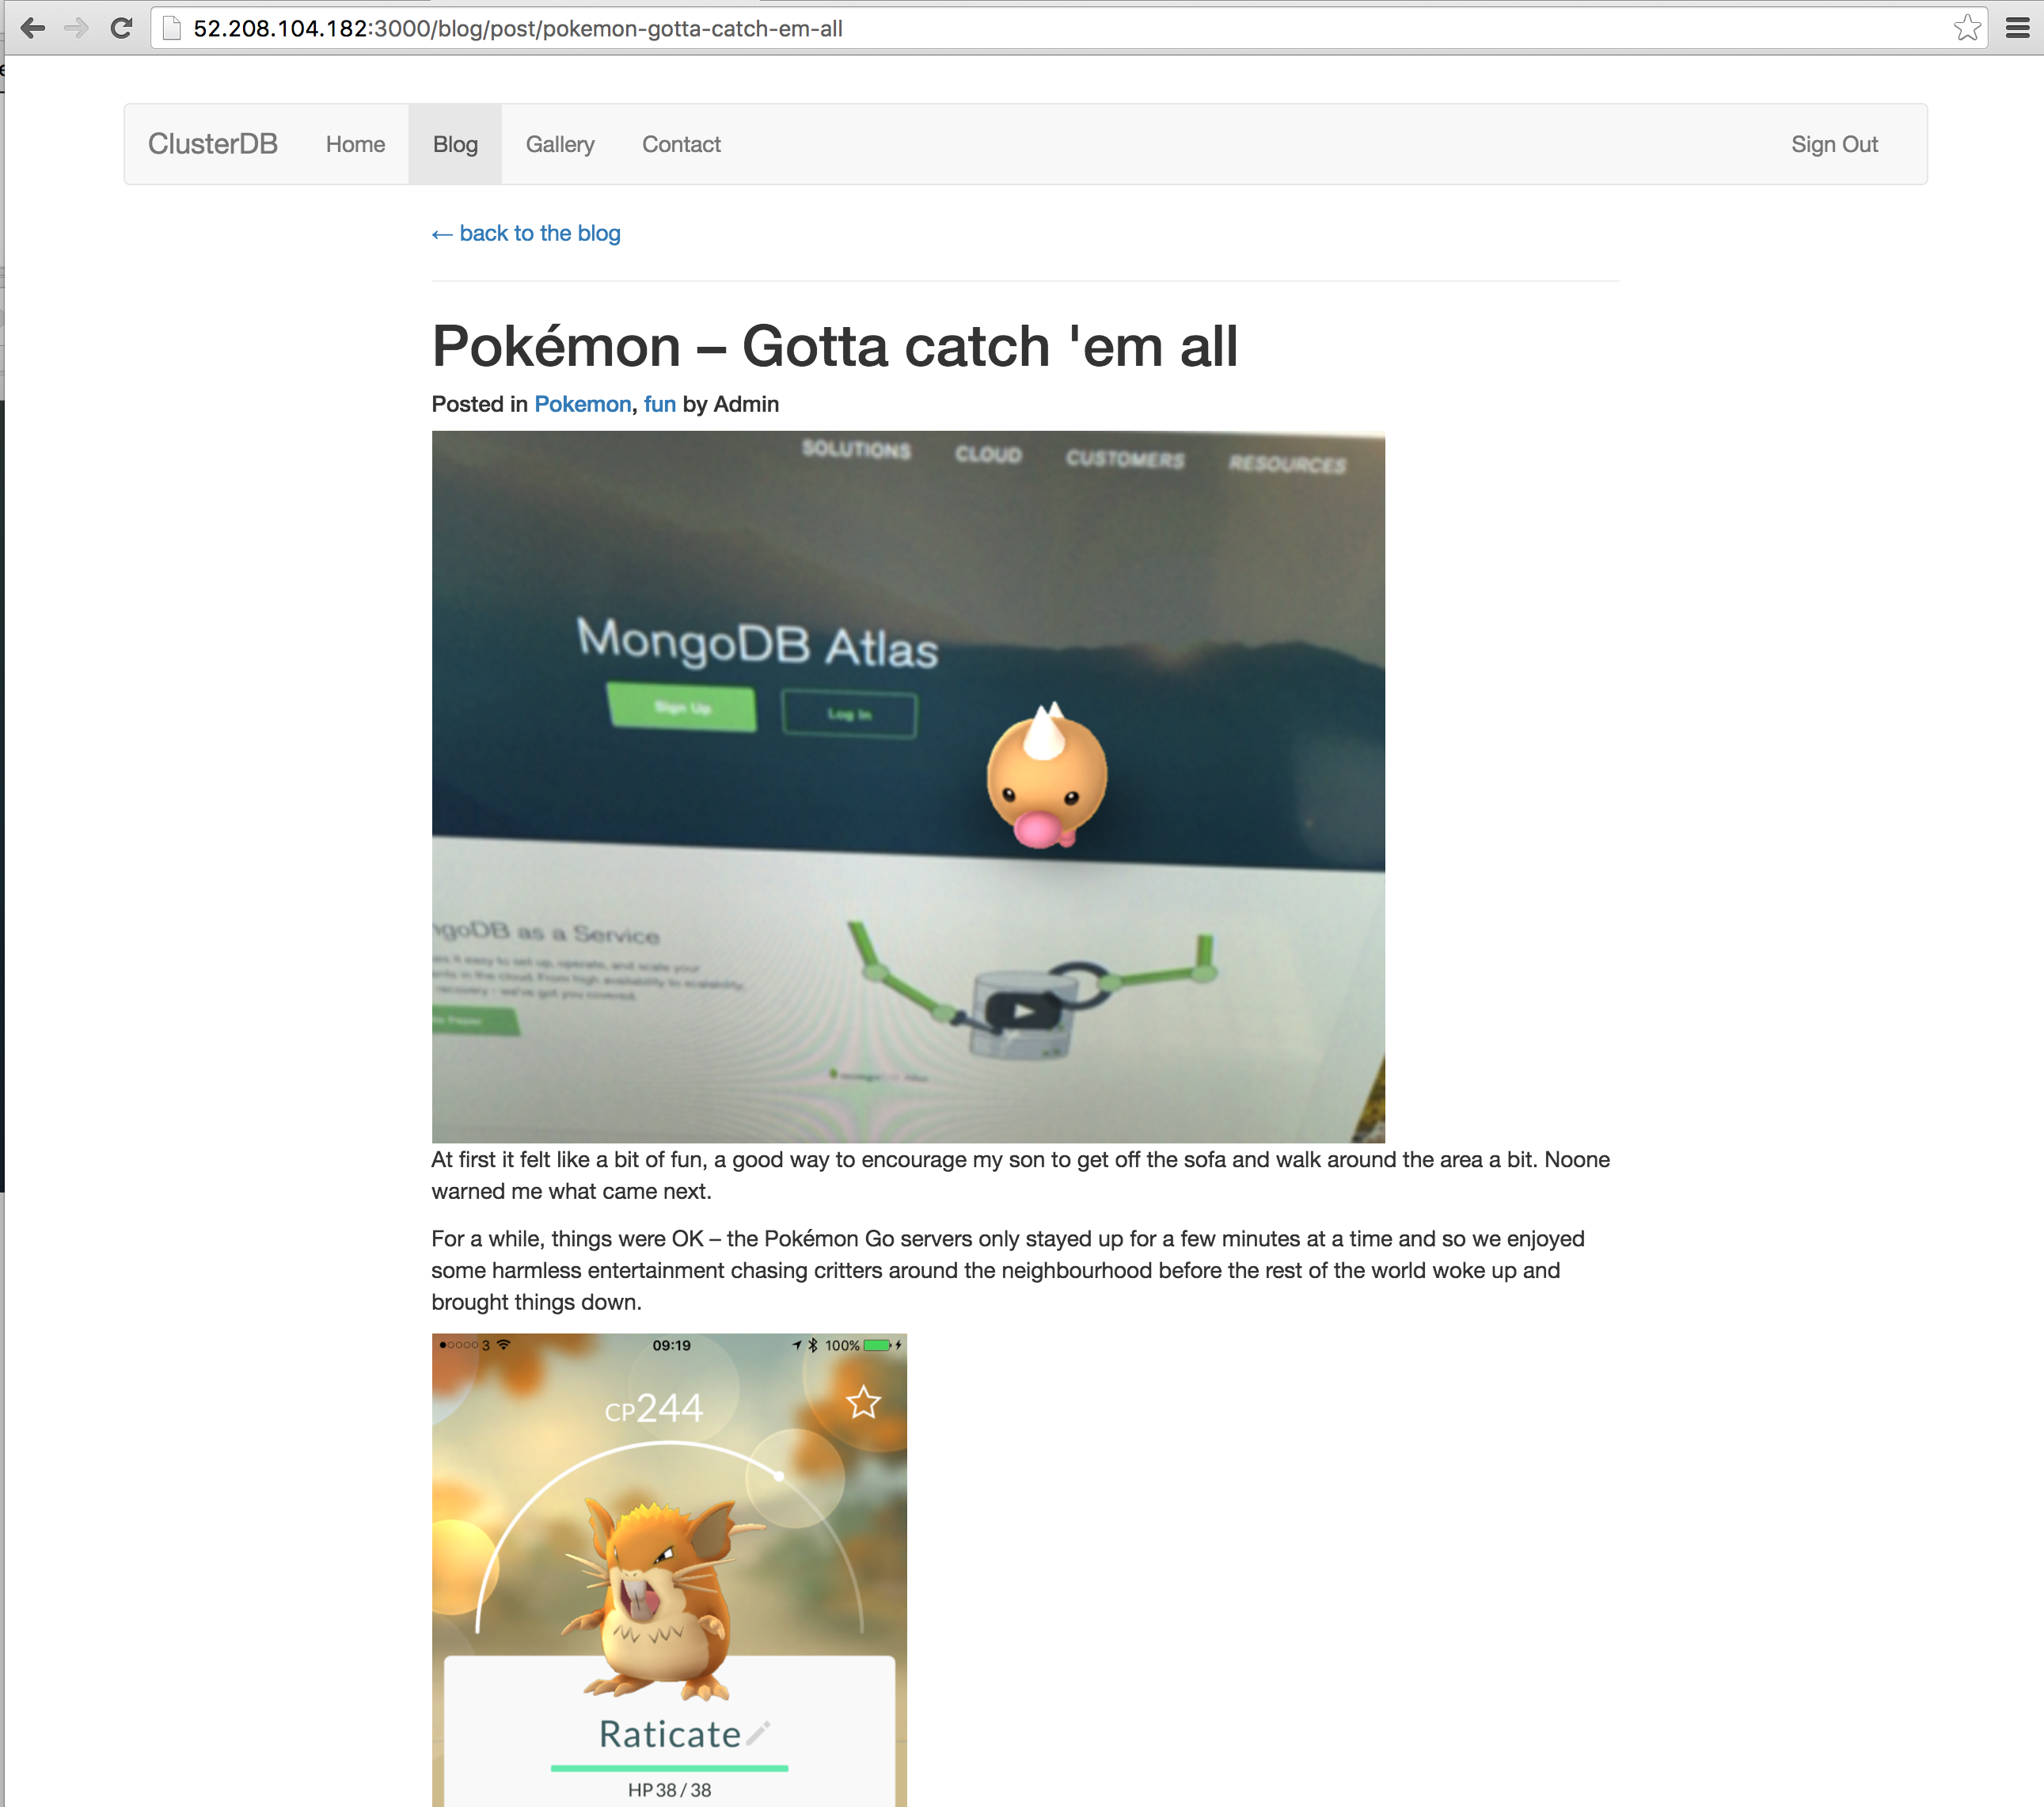
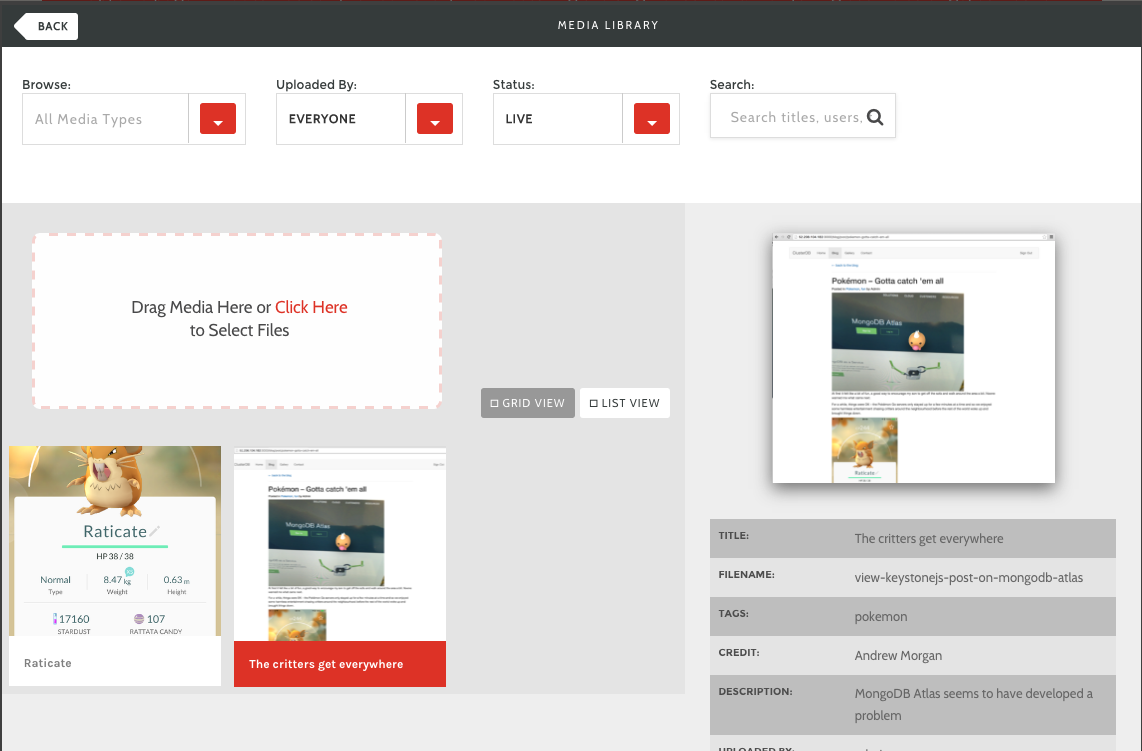
After clicking the “populate” button, MongoPop fetches the data set(s) from Mockaroo and then adds the documents to your MongoDB Atlas collection. Once the data has been added, the page refreshes and you’re shown a sample of the documents now stored in your collection (Figure 4).
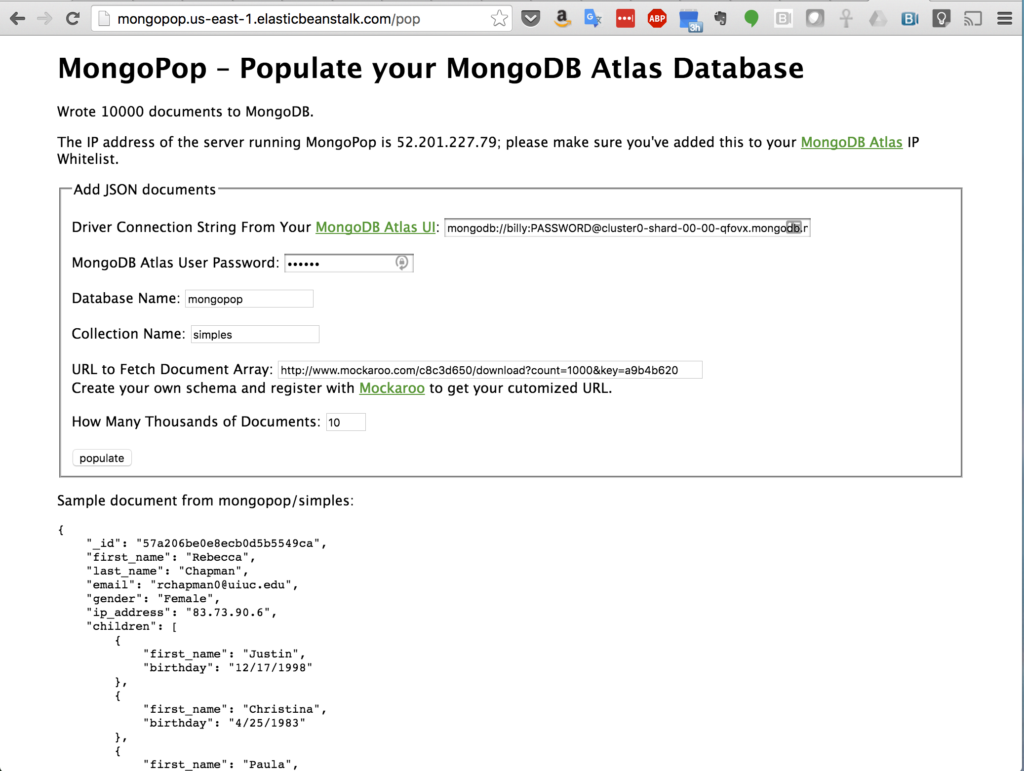
Figure 4: Sample of Data Added to MongoDB Atlas Collection
MongoDB Compass
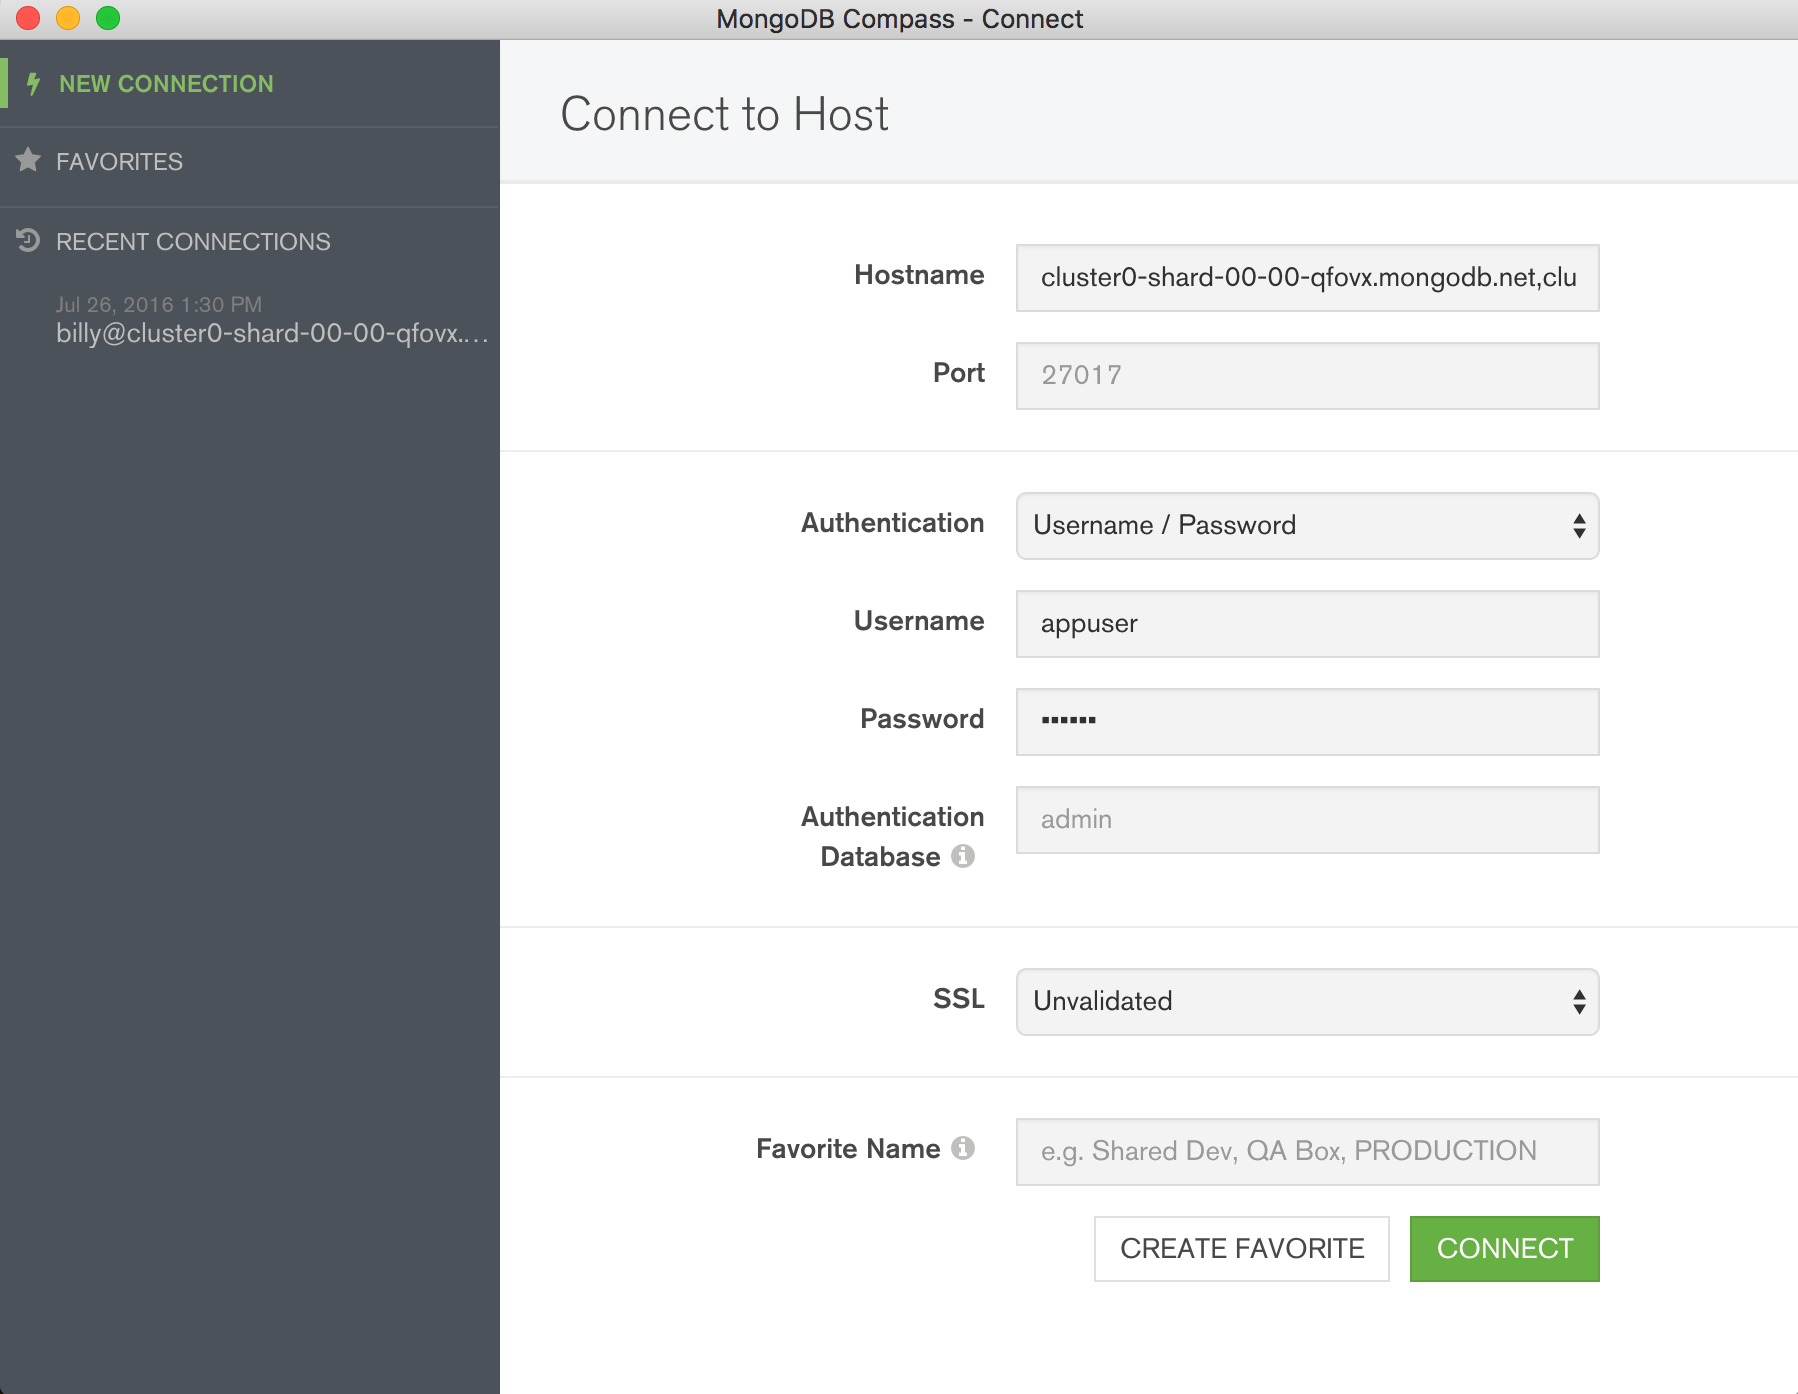
Congratulations, you now have some data in your database! An optional step is to start exploring that data using MongoDB Compass. The same credentials can be used to connect Compass to your MongoDB database (Figure 5).
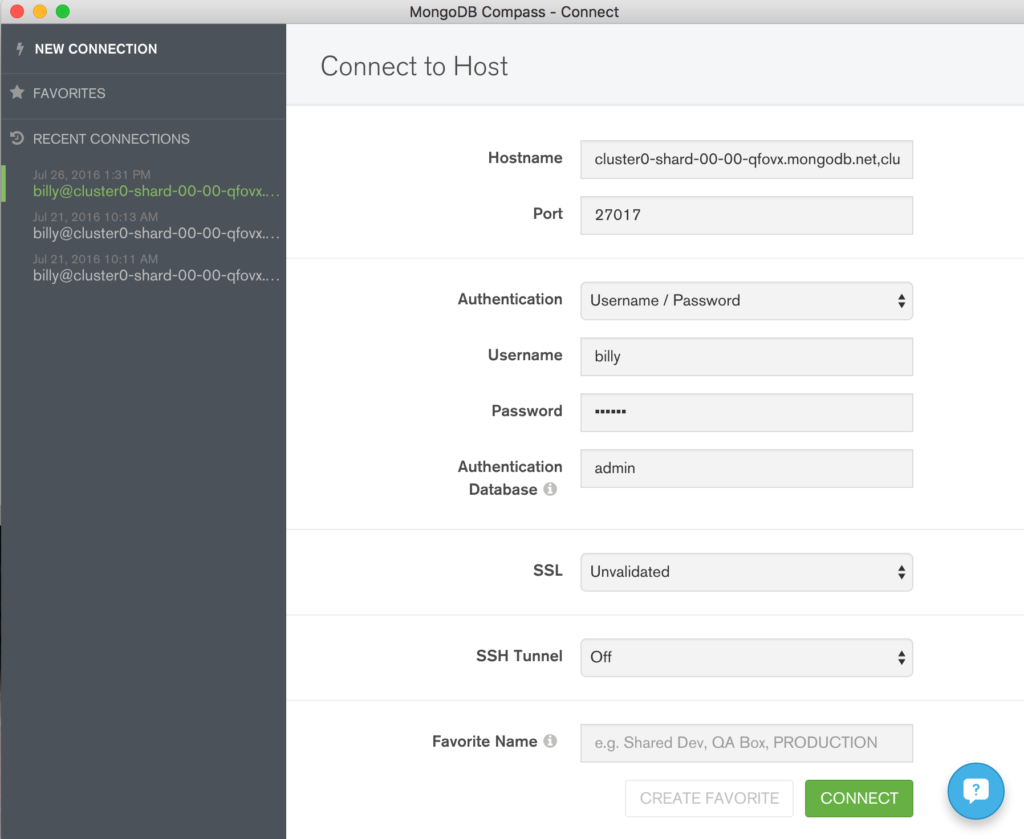
Figure 5: Connect MongoDB Compass to MongoDB Atlas
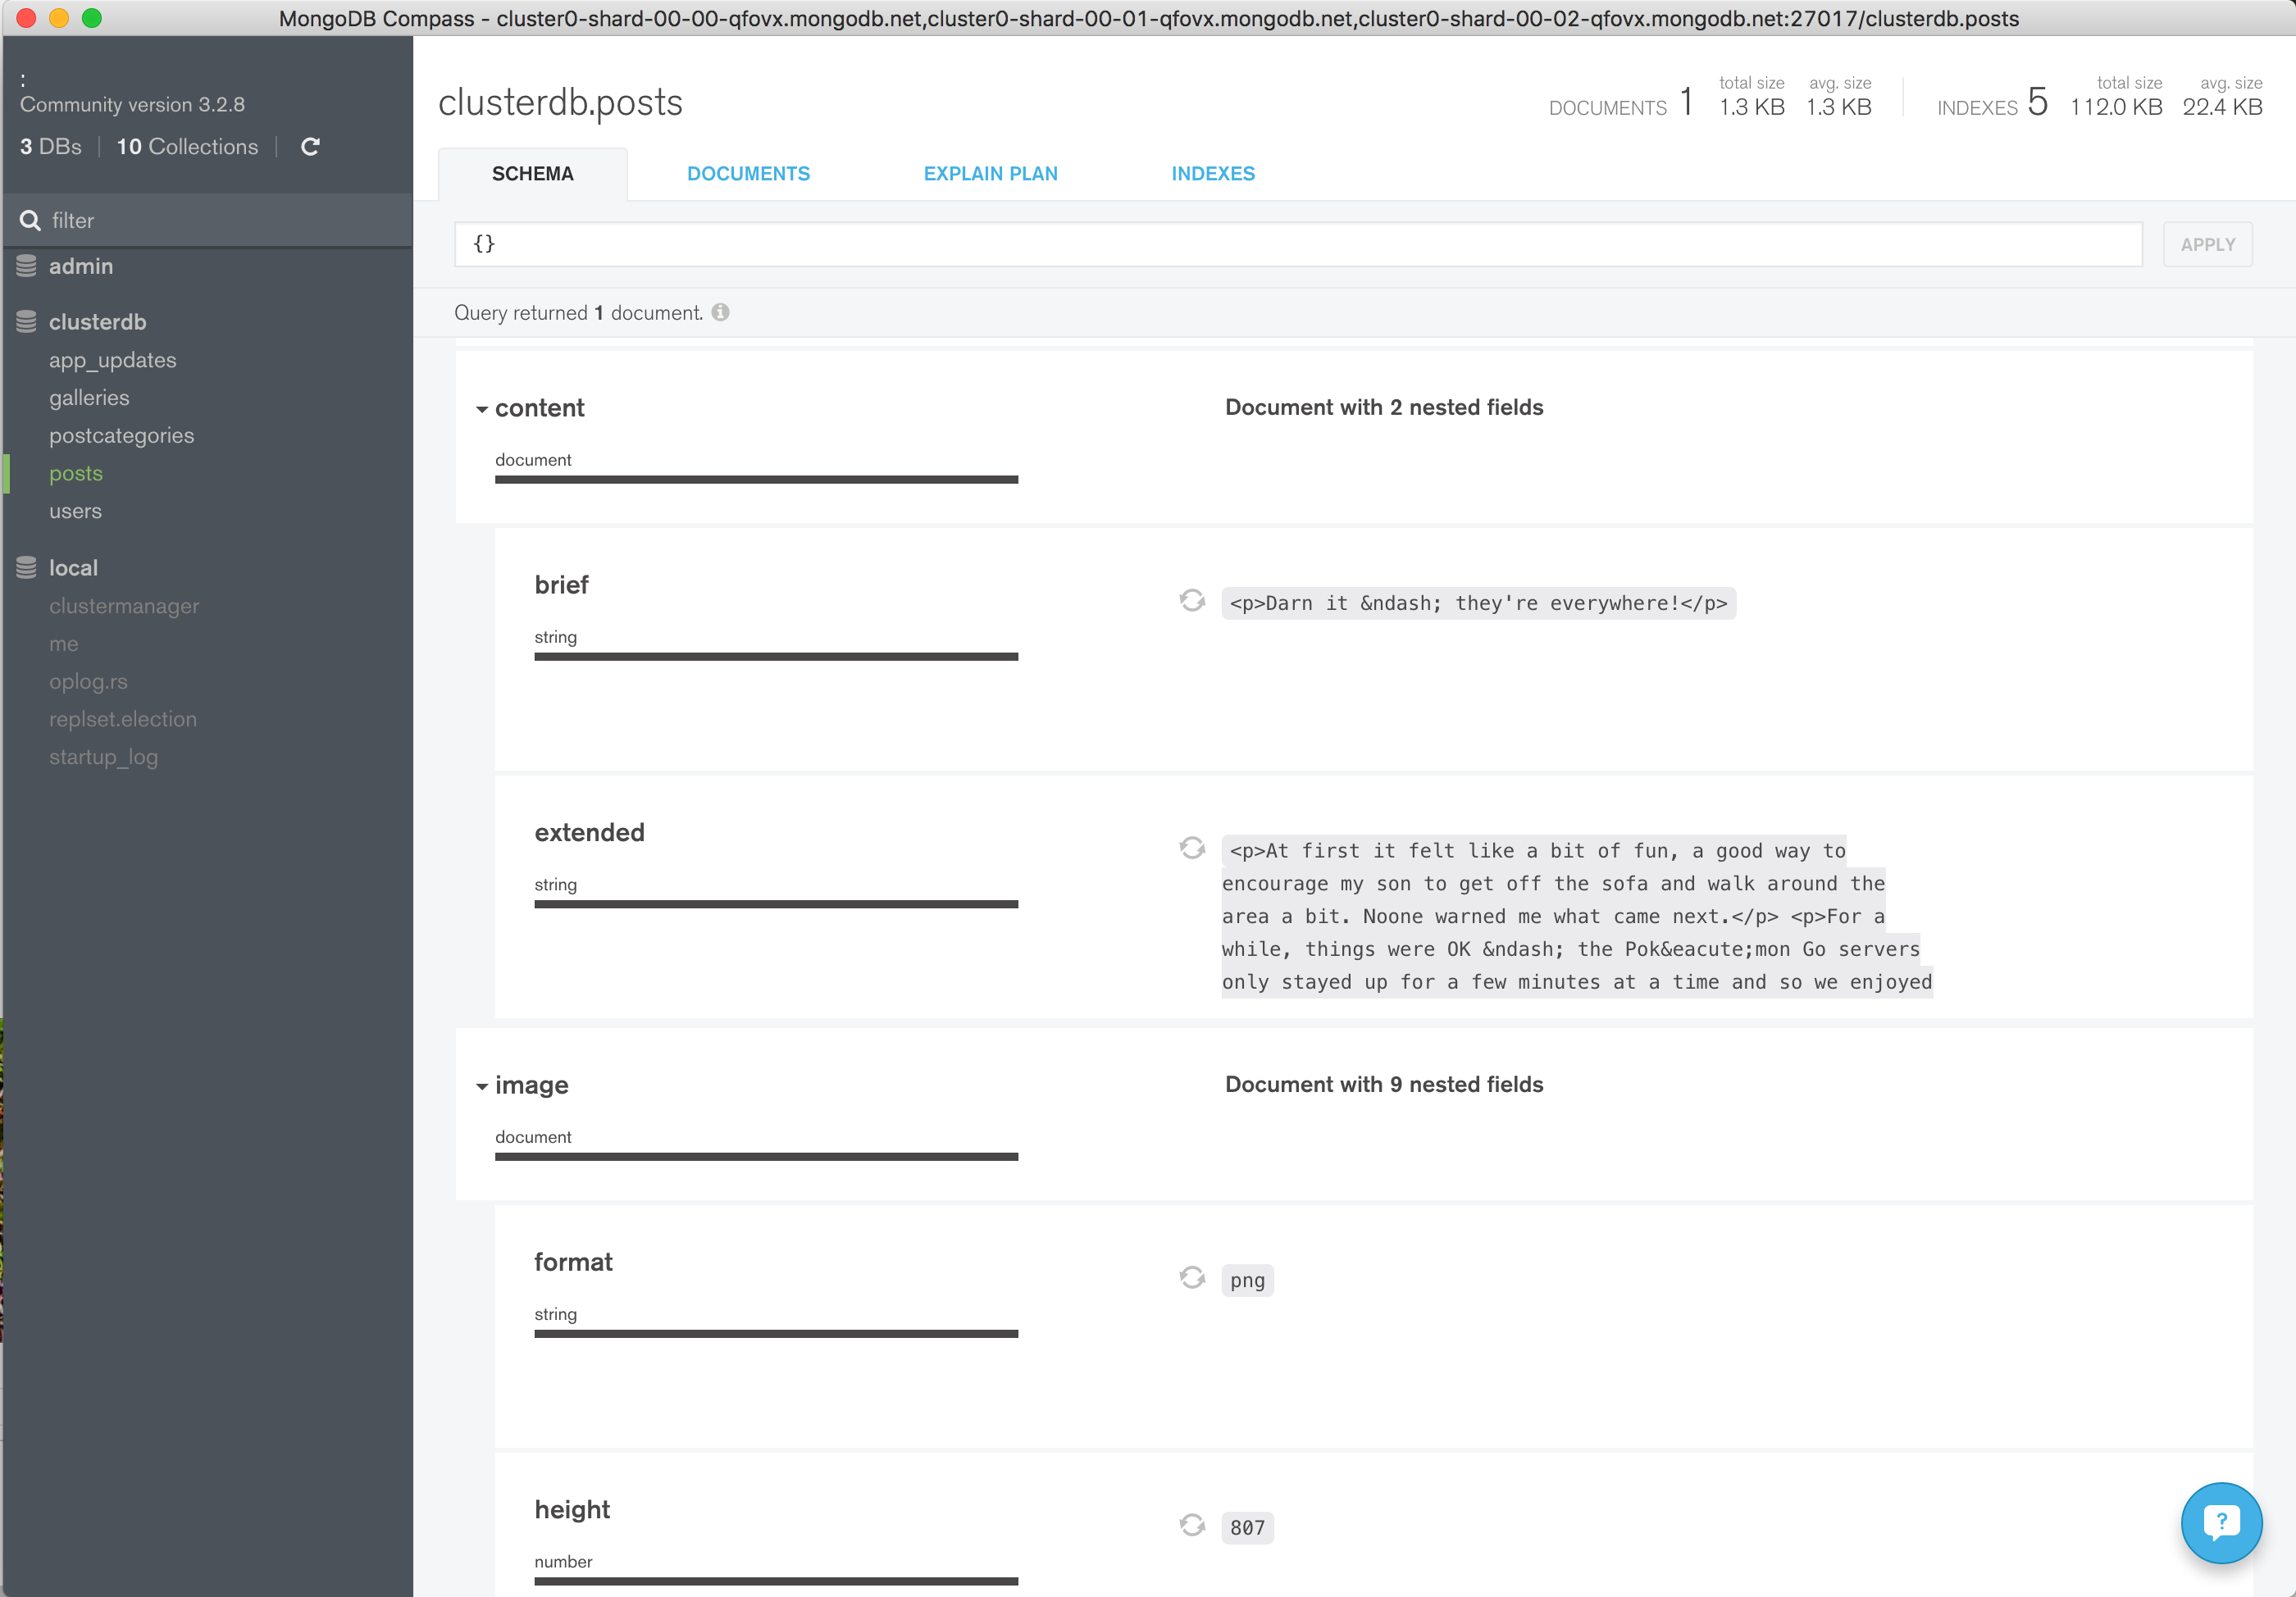
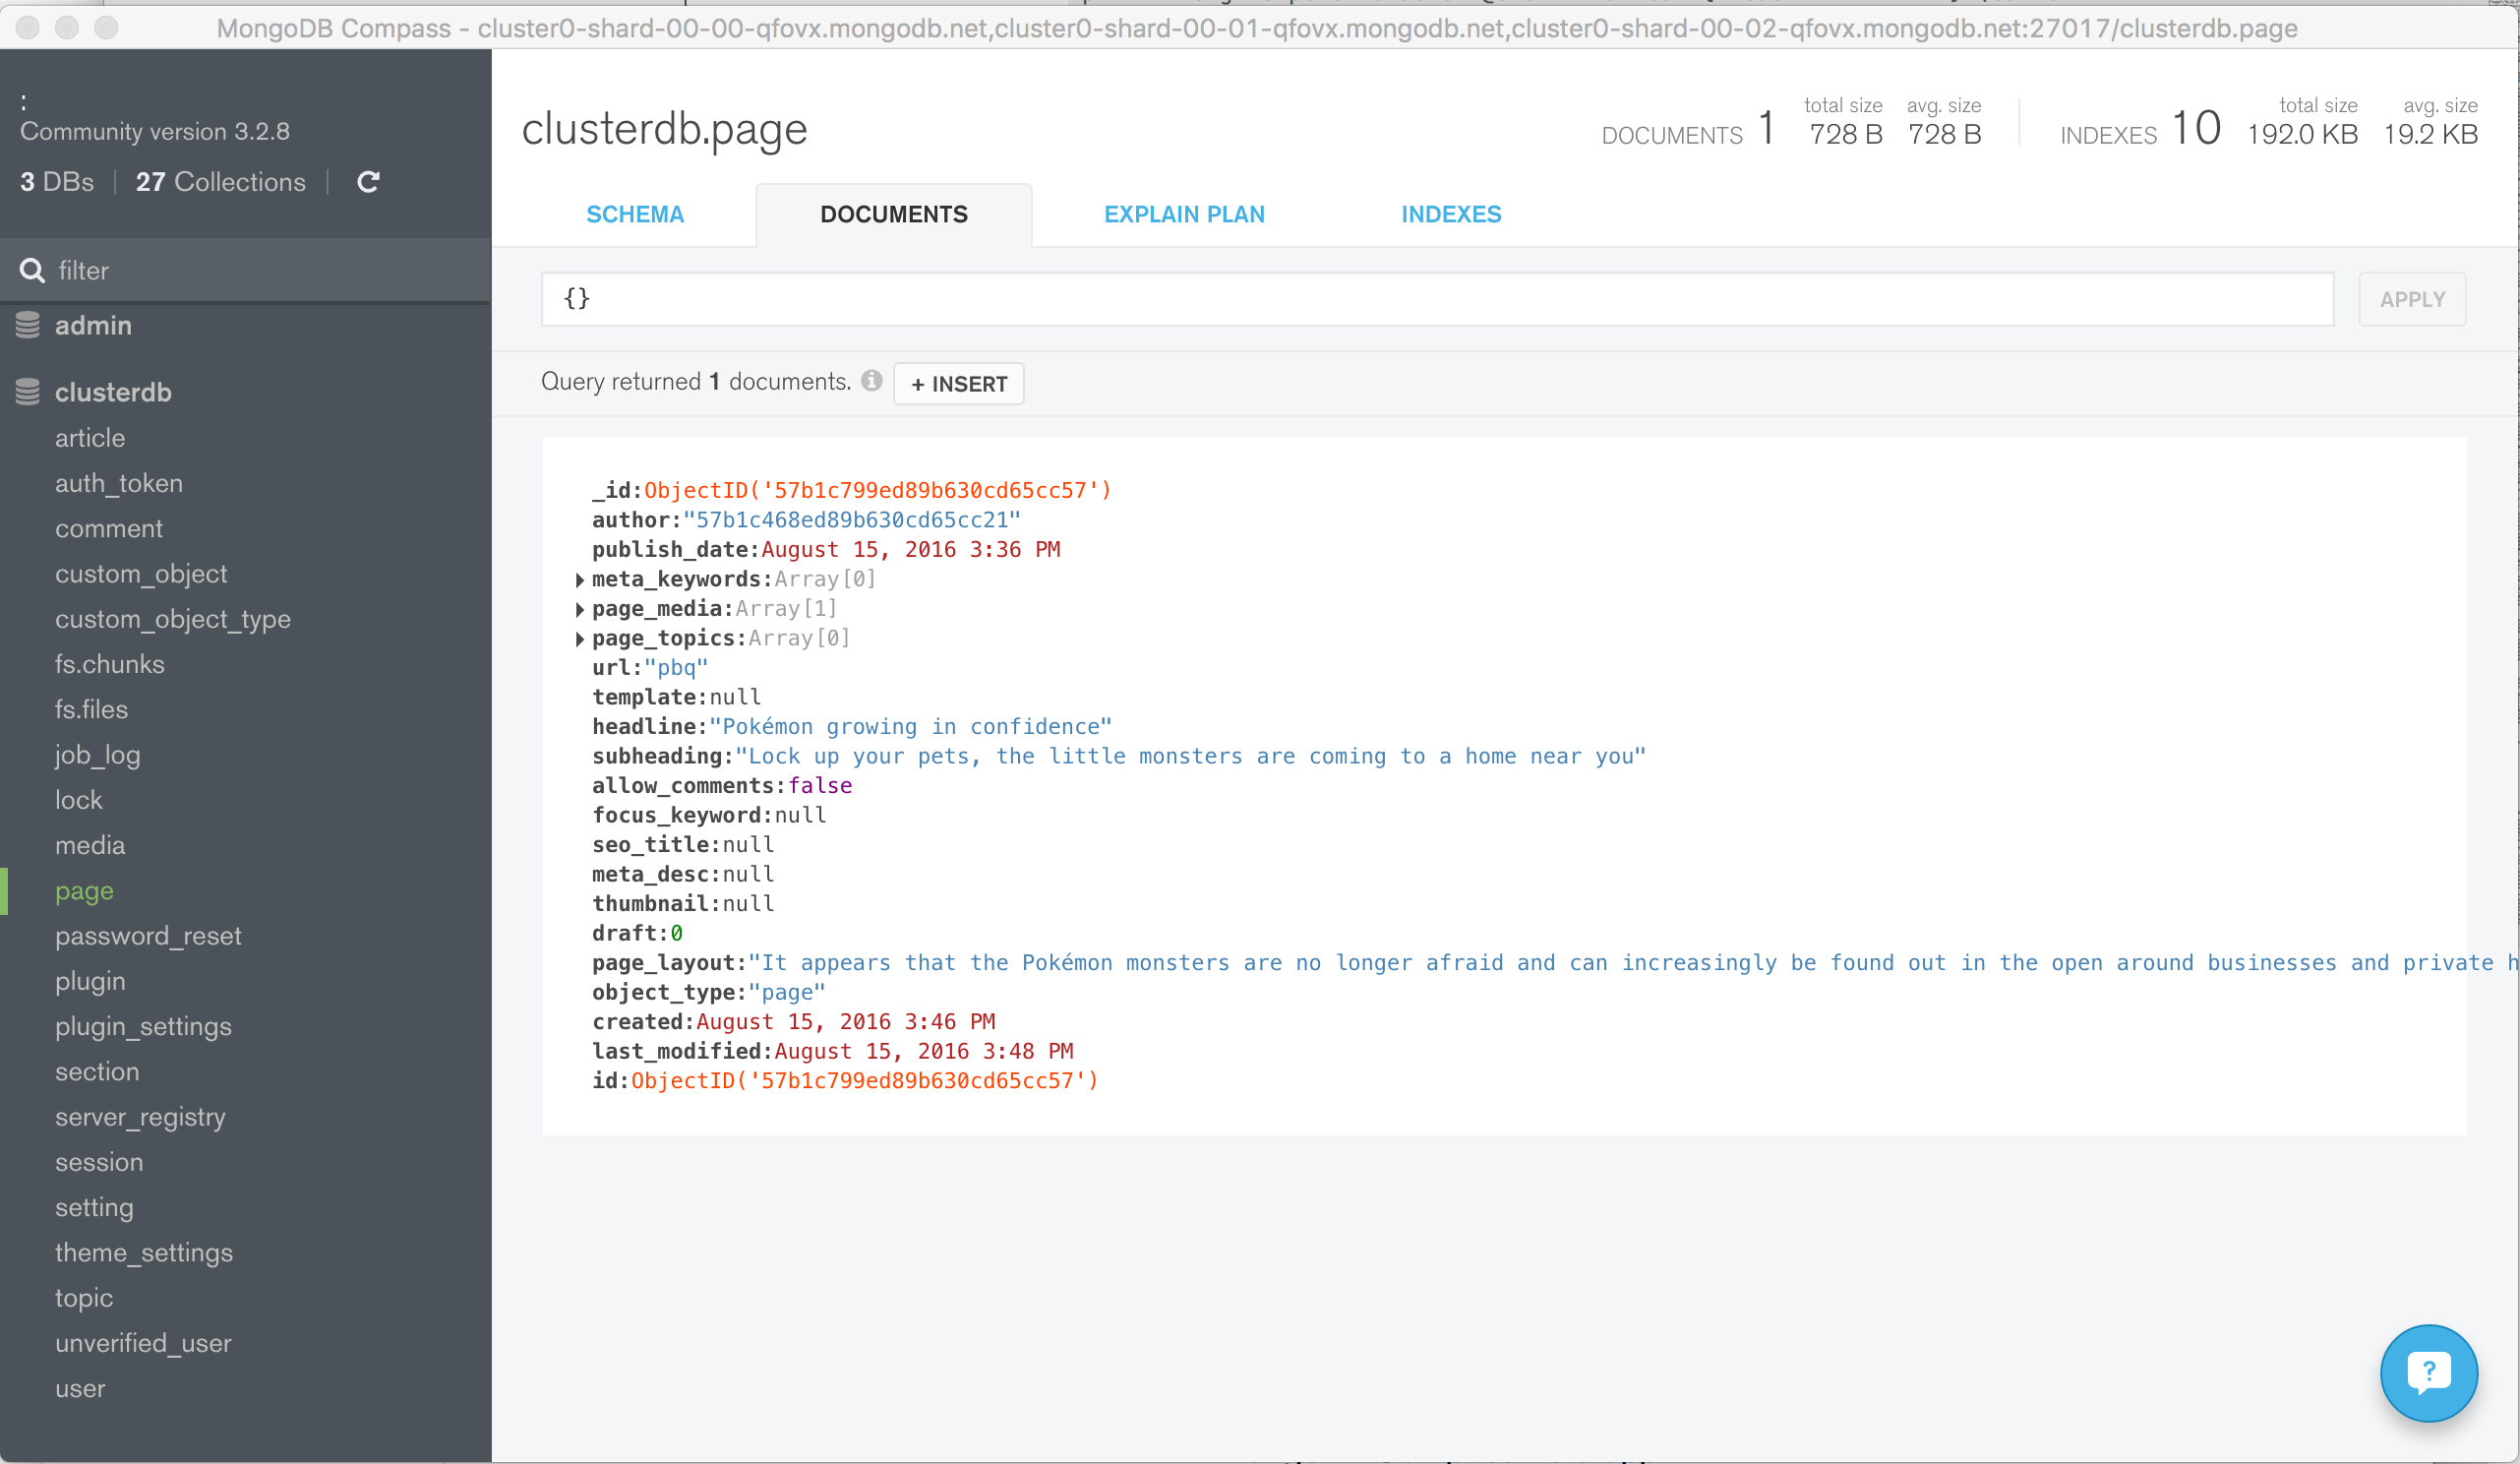
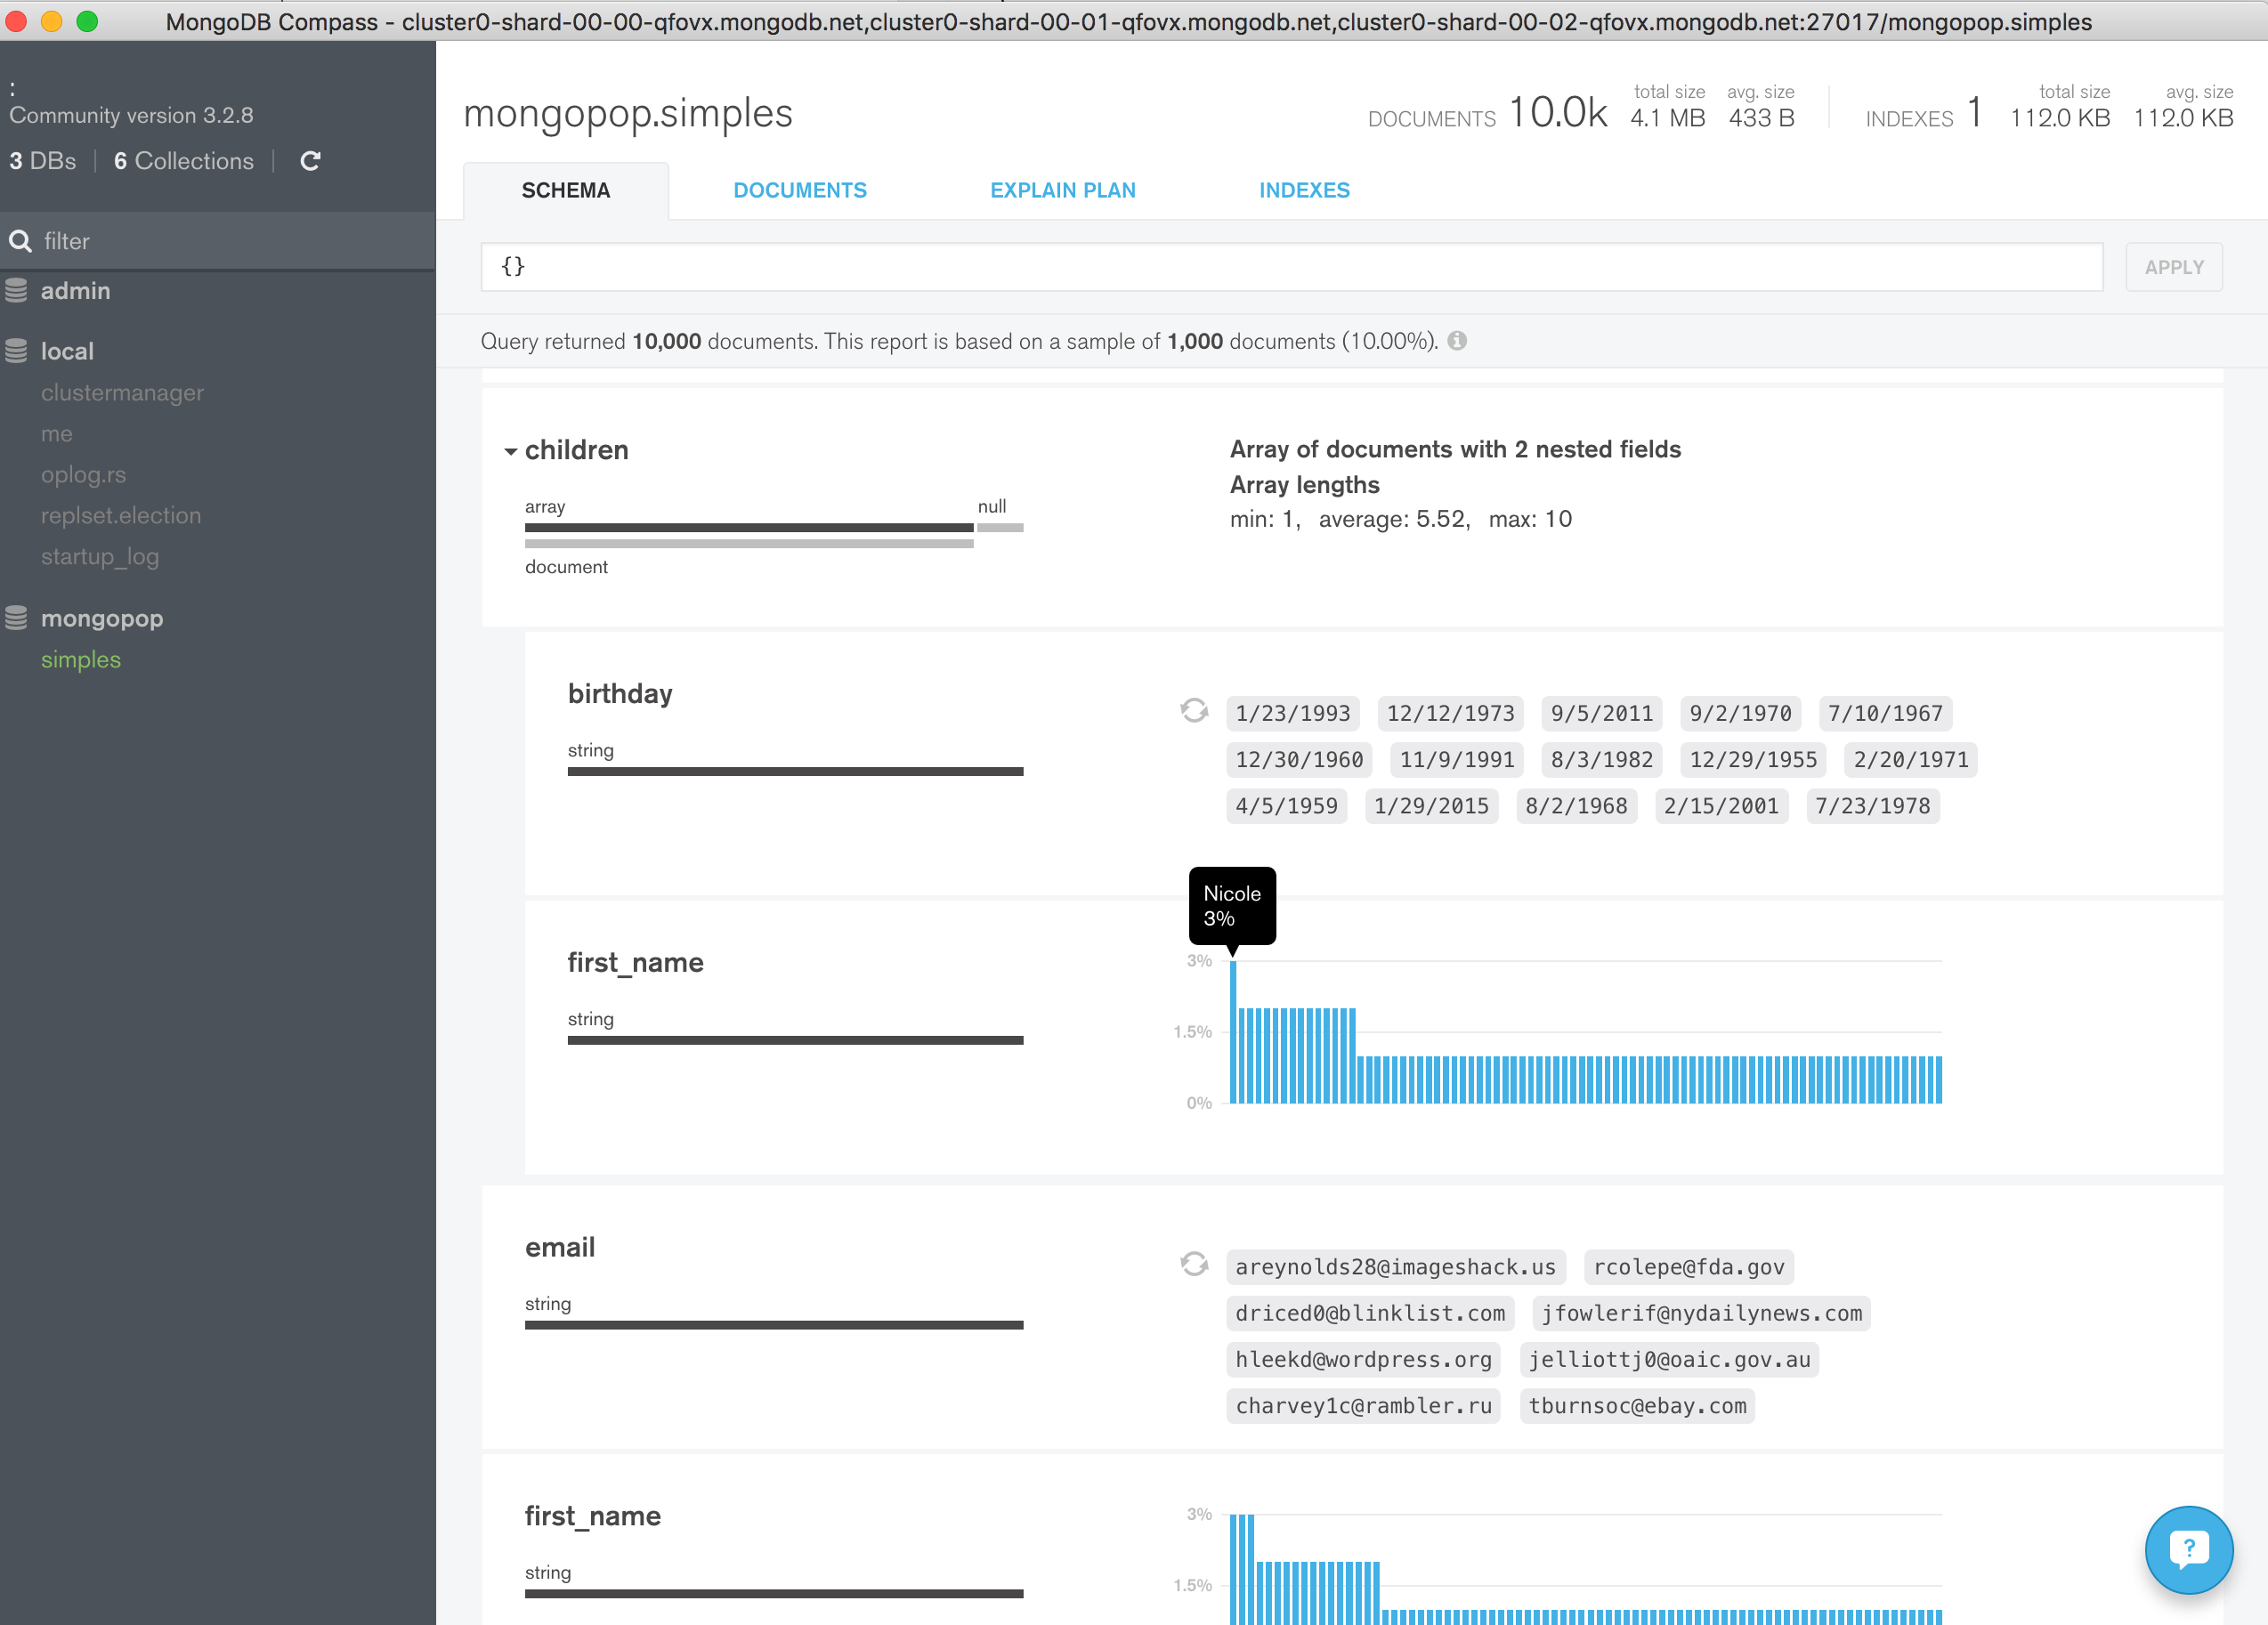
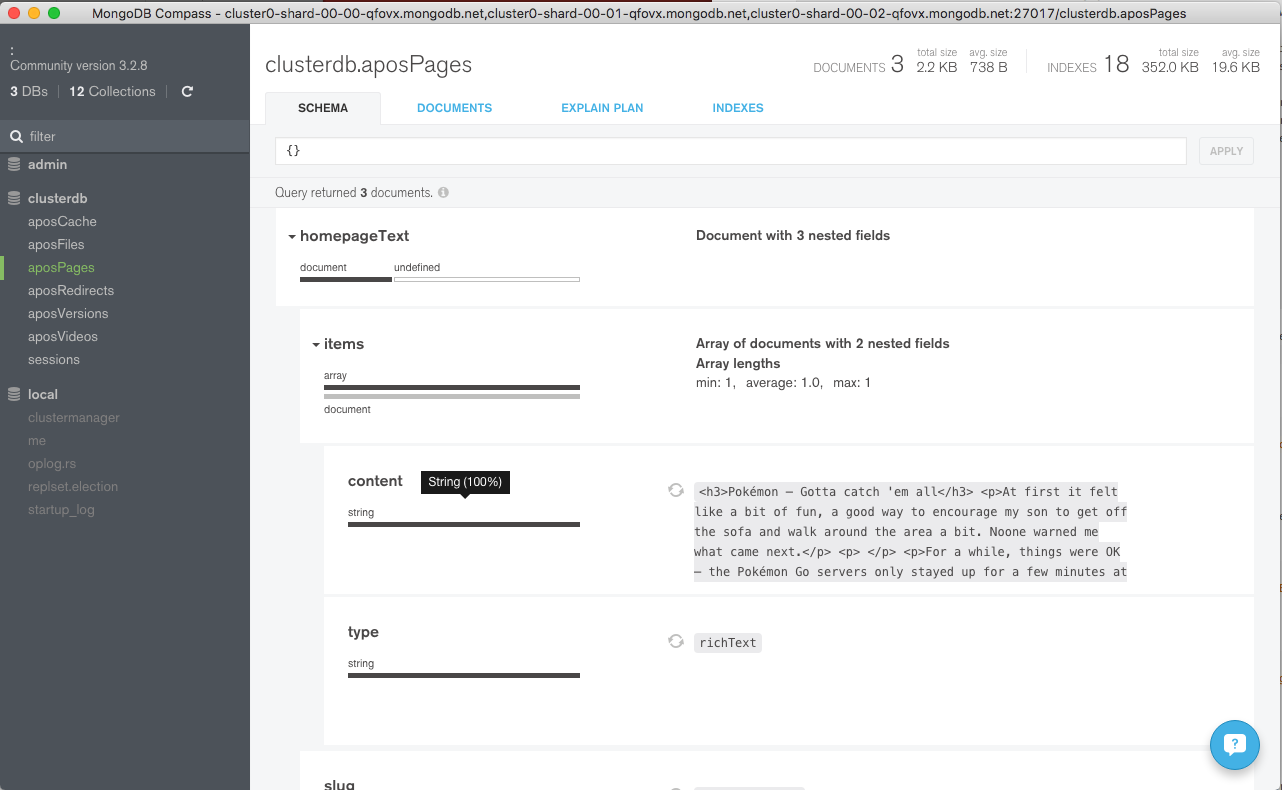
Once connected, explore the data added to the collection (Figure 6).

Figure 6: Explore MongoDB Atlas Data Using MongoDB Compass
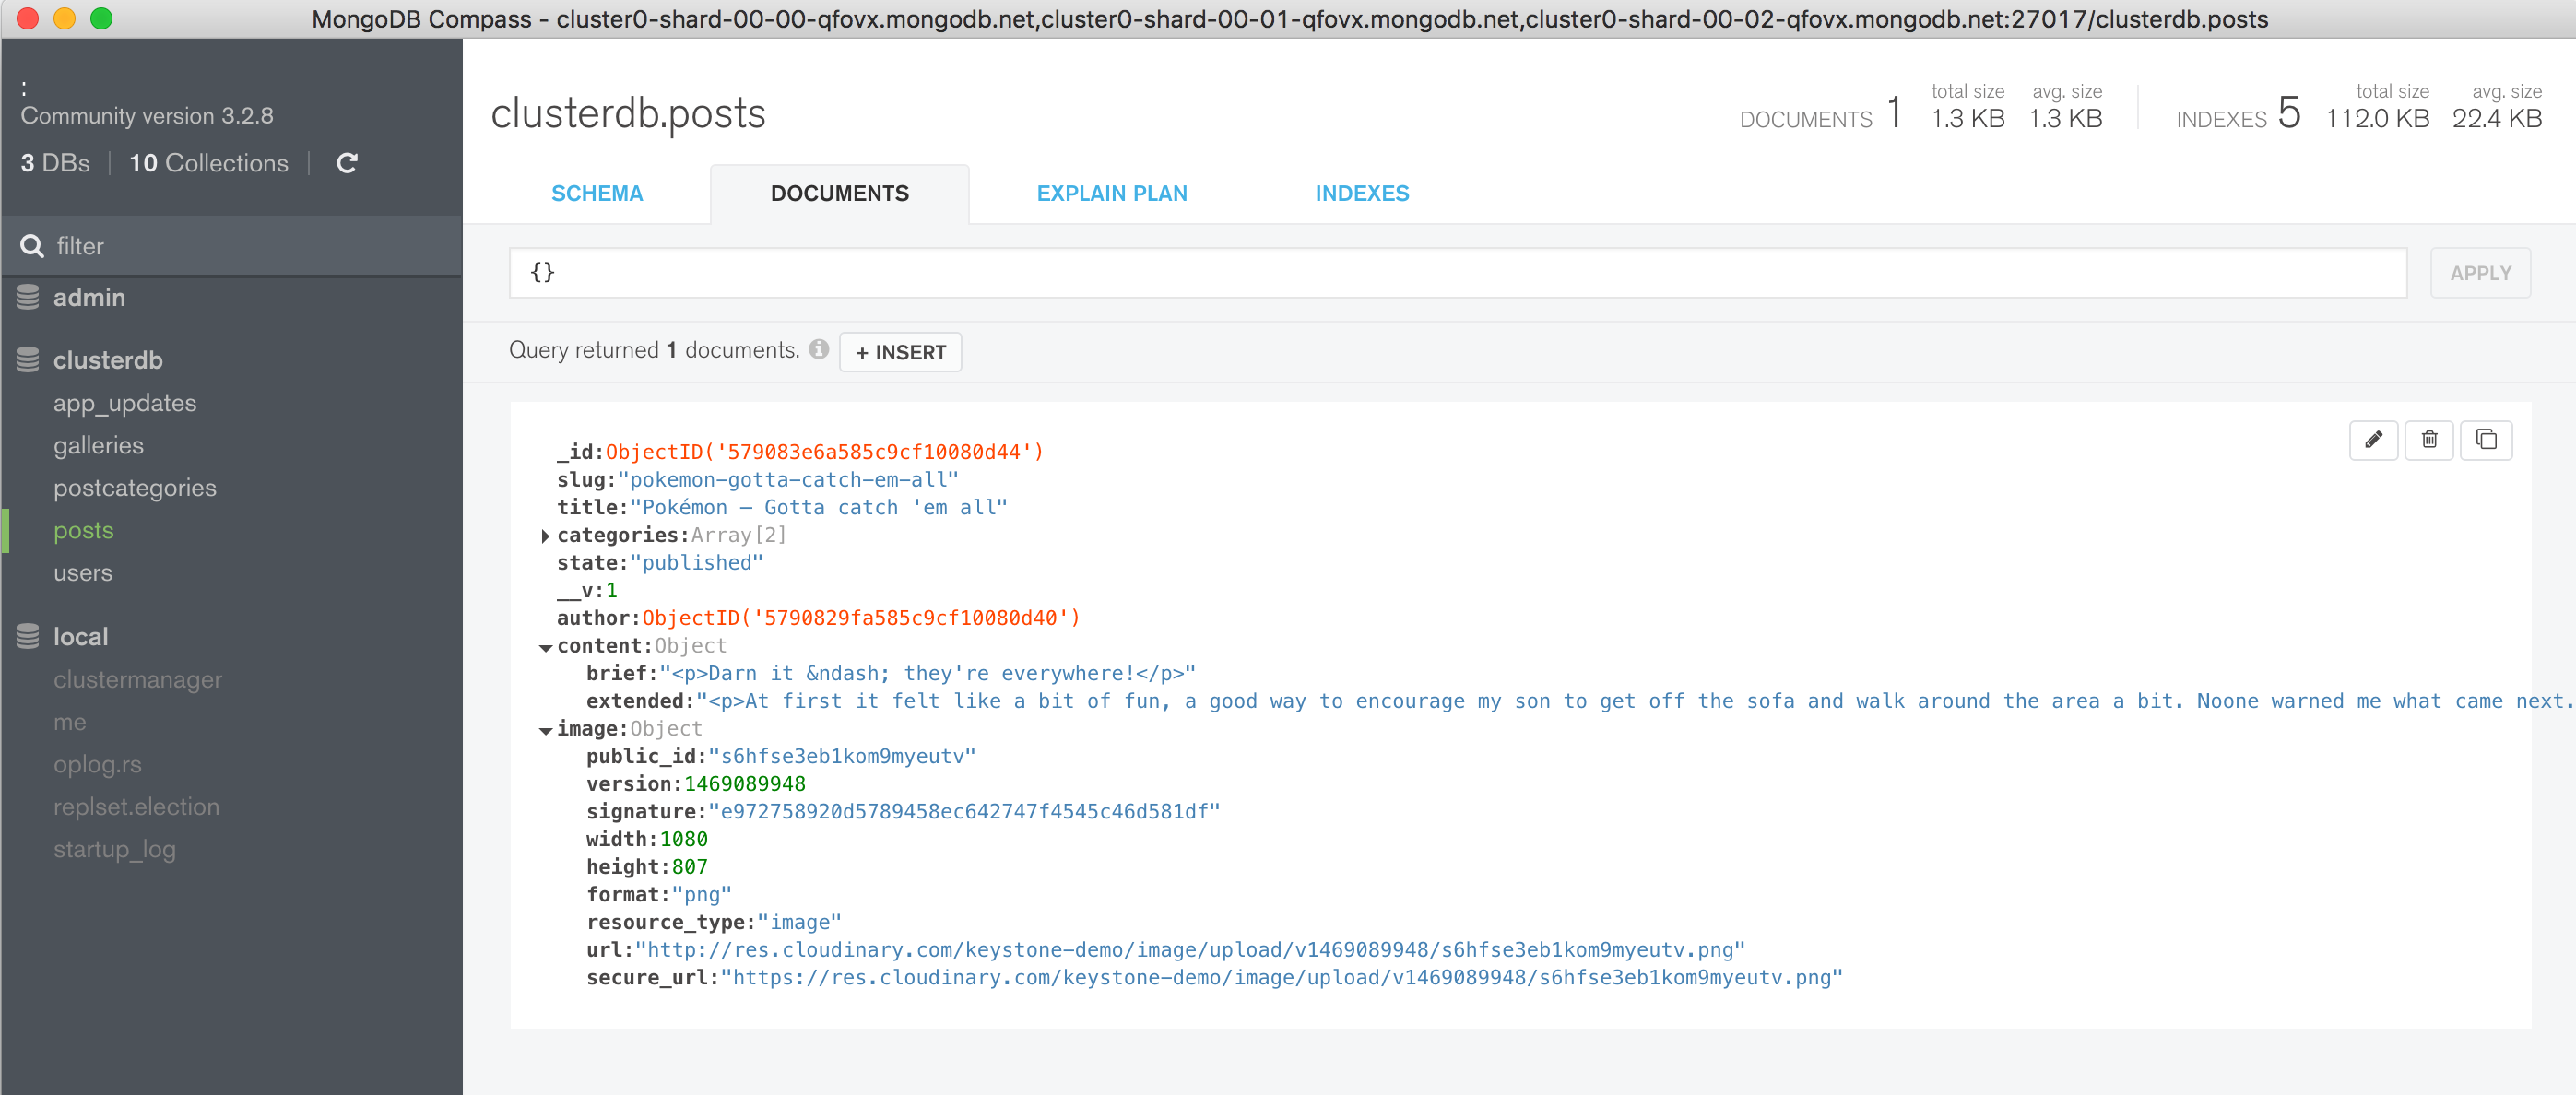
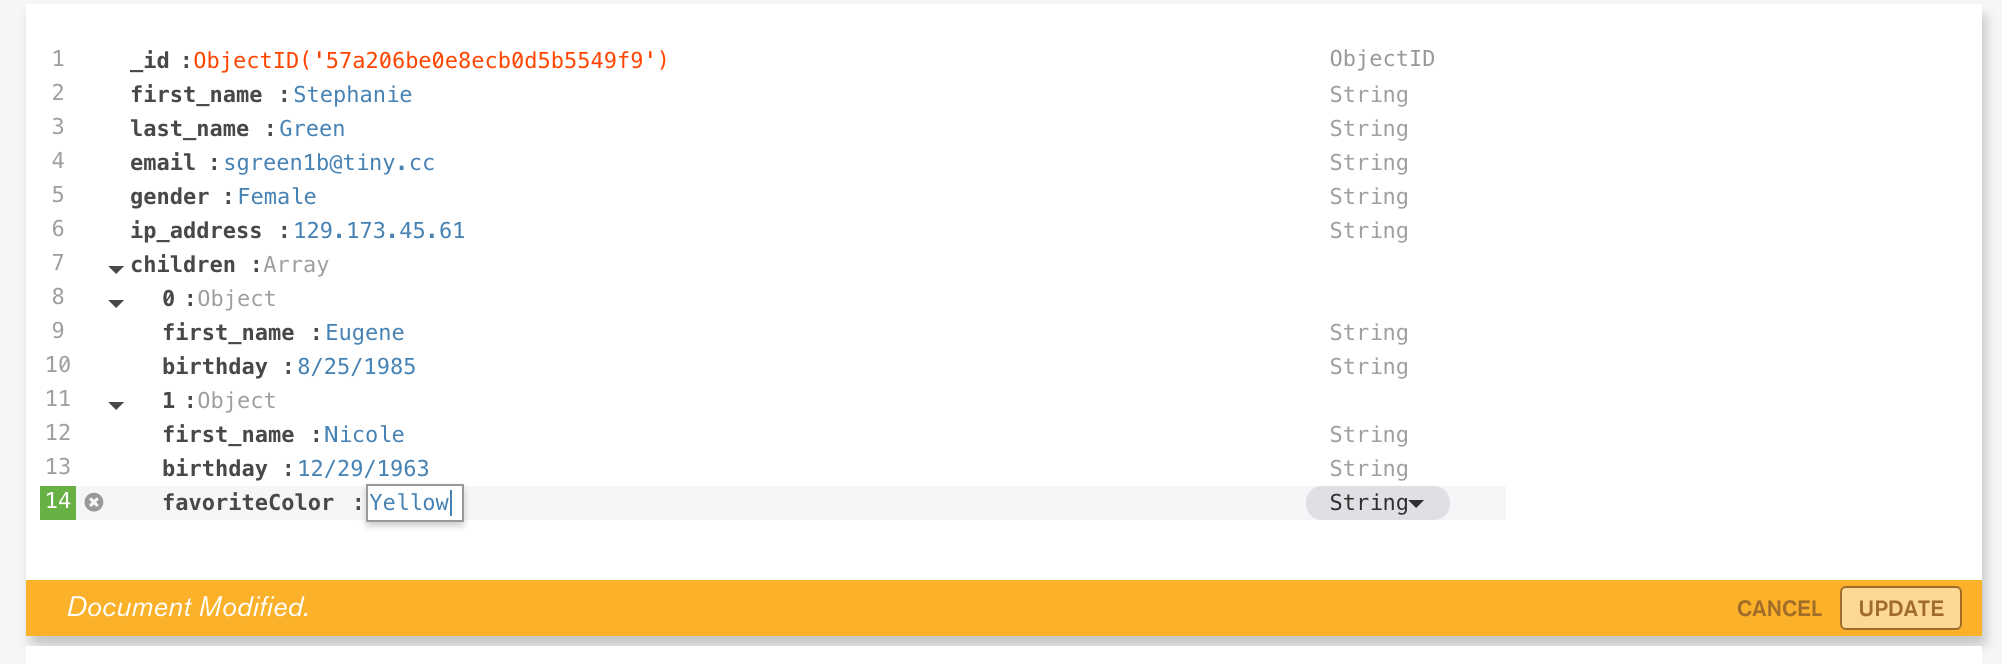
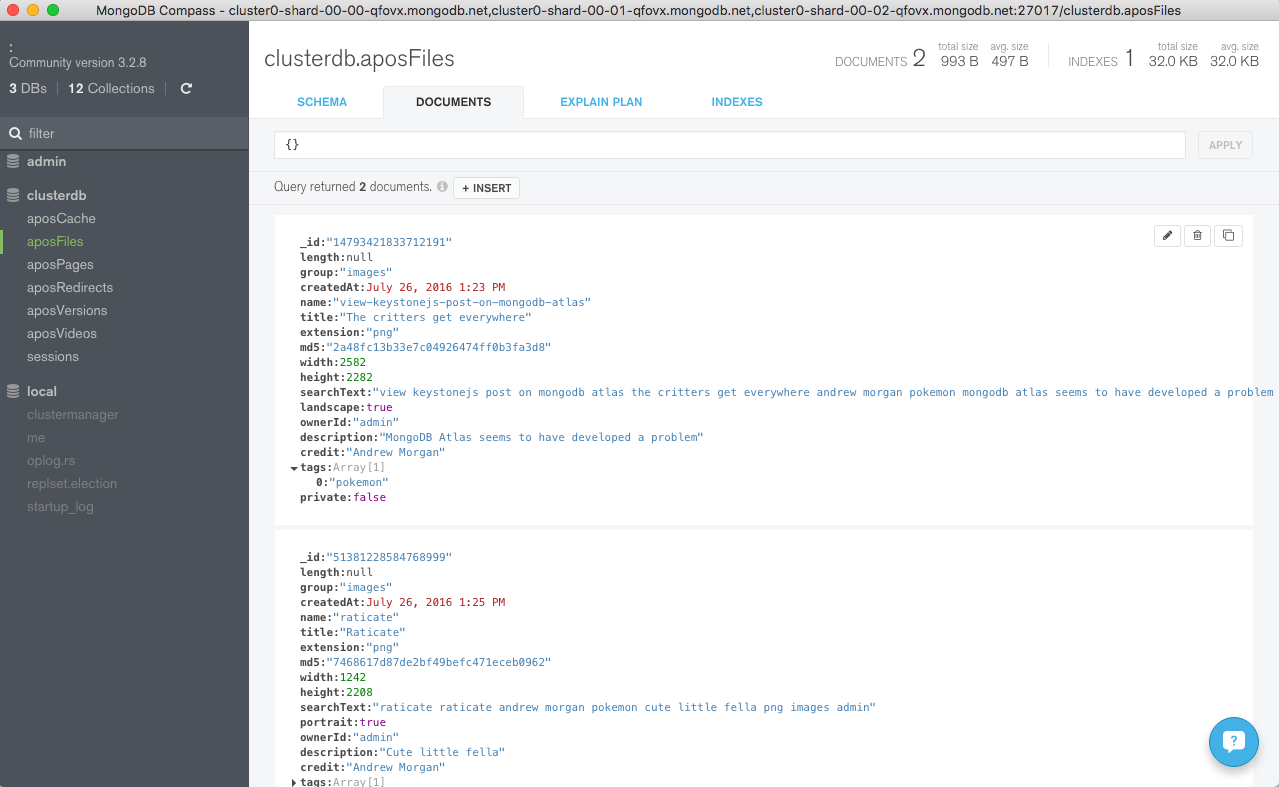
In this version (1.3) of MongoDB Compass (currently in beta), it is also possible to add, delete, and modify documents (Figure 7).

Figure 7: Modify a Document in MongoDB Compass
You can verify that the document has really been updated from the MongoDB shell:
Downloading the Application
The tools for deploying your application to AWS Elastic Beanstalk integrate with git, which makes it the best way to get the code. Assuming that git is already installed, downloading the code is simple:
If you then want to refresh your local repository with the latest version:
Alternatively, simply download the zip file.
Testing The Application Locally
Deploying to Elastic Beanstalk is straightforward but there is a delay each time you update and redeploy your application. For that reason, it’s still useful to be able to test and debug locally.
After downloading the application, installing its dependencies and then running it is trivial (this assumes that you already have Node.js installed):
npm_install installs all of the required dependencies (which are described in package.json). npm start starts the application – once it it running browse to http://localhost:3000/pop to try it out.
Deploying to AWS Elastic Beanstalk
You can create your Elastic Beanstalk environment and deploy and monitor your application from the AWS console. If you don’t already have an account then that’s where you would create it. If you already have an account, and a copy of your Access Key ID and Secret Access Key, then using the EB CLI provides a more efficient workflow.
The method for installing the EB CLI varies by platform but if you already have Homebrew installed on OS X then it’s as simple as:
eb init sets default values for Elastic Beanstalk applications created with the EB CLI by prompting you with a series of questions:
eb create creates a new environment and deploys the current application to that environment:
Finally, eb open connects to the MongoPop app from your browser.
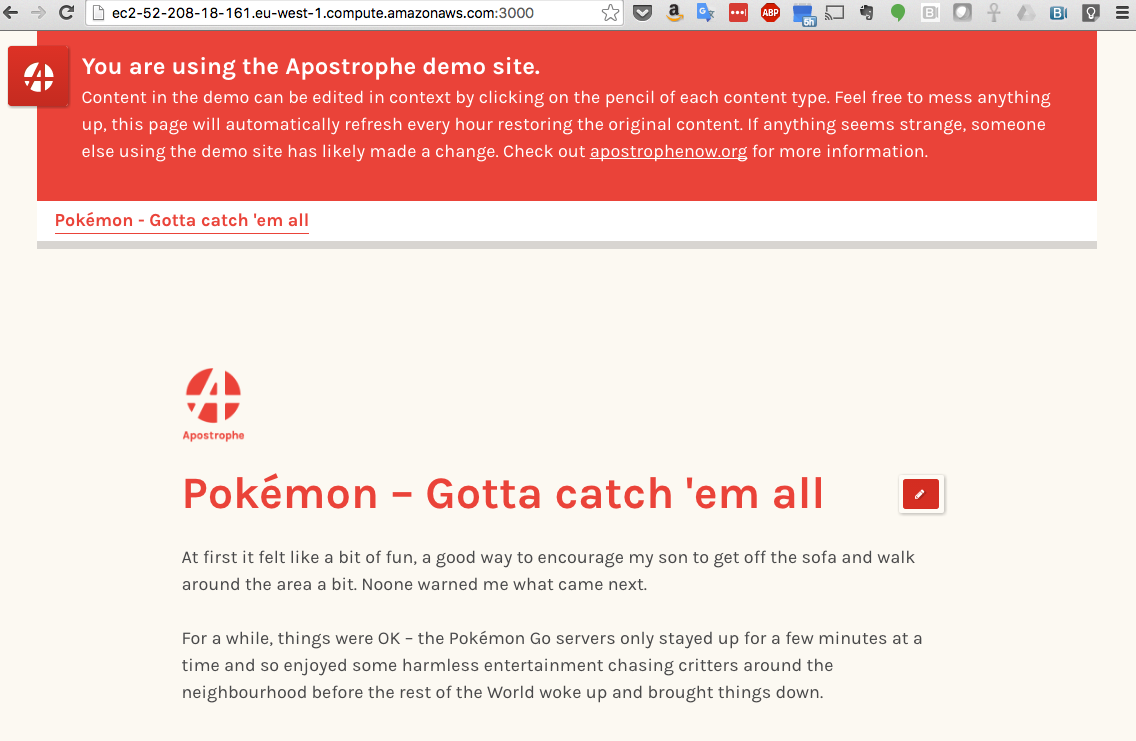
If you want to make changes to the application then the EB CLI makes it simple to redeploy the new version. As an example, edit the views/pop.jade file to add an extra paragraph after the title:
The EB CLI integrates with git and so update git with the change and then redeploy:

Figure 8: Personalized Version of MongoPop Deployed to AWS EBS
When you’re finished with the application, the environment can be deleted with a single command:
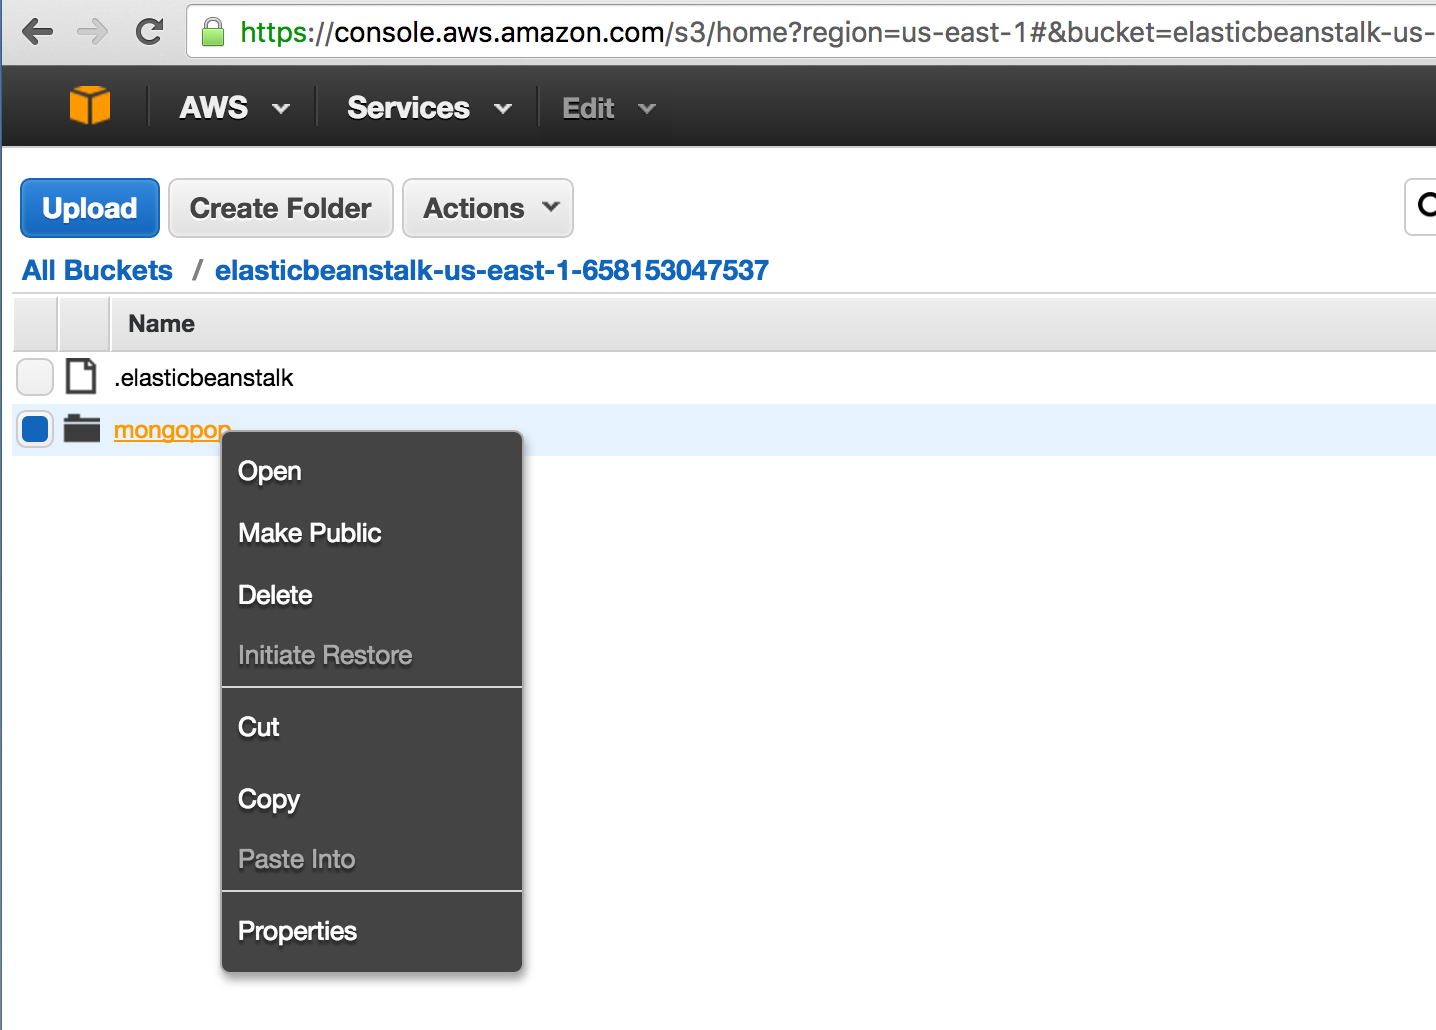
Note that this doesn’t remove the application deployment files that Elastic Beanstalk keeps in AWS S3 storage. To avoid continuing charges, delete those files through the AWS console (Figure 9).

Figure 9: Remove Deployment Files From AWS S3 Storage
Code Highlights
The full code for MongoPop can be found in GitHub but this section presents some snippets that are specific to MongoDB and MongoDB Atlas.
Firstly, constructing the final URI to access the database (from views/pop.js):
Connecting to the database and working with the collection (javascripts/db.js):
All of the dependencies (including the MongoDB Node.js driver) are defined in package.json:
The IP Address Whitelisting Challenge
IP address whitelisting is a key MongoDB Atlas security feature, adding an extra layer to prevent 3rd parties from accessing your data. Clients are prevented from accessing the database unless their IP address has been added to the IP whitelist for your MongoDB Atlas group.
VPC Peering for MongoDB Atlas is under development and will be available soon, offering a simple, robust solution. It will allow the whitelisting of an entire AWS Security Group within the VPC containing your application servers.
If you need to deploy a robust, scalable application before VPC peering becomes available, some extra steps may be required.
In our example application, the public IP address of the AWS EC2 instance running MongoPop was added to the MongoDB Atlas whitelist for the group.
That works fine but what happens if that EC2 instance fails and is rescheduled – its IP Address changes and so it would not be able to connect to MongoDB Atlas until it was whitelisted. That scenario can be remedied by assigning an Elastic IP address (which survives rescheduling) to the EC2 instance using the AWS Console.
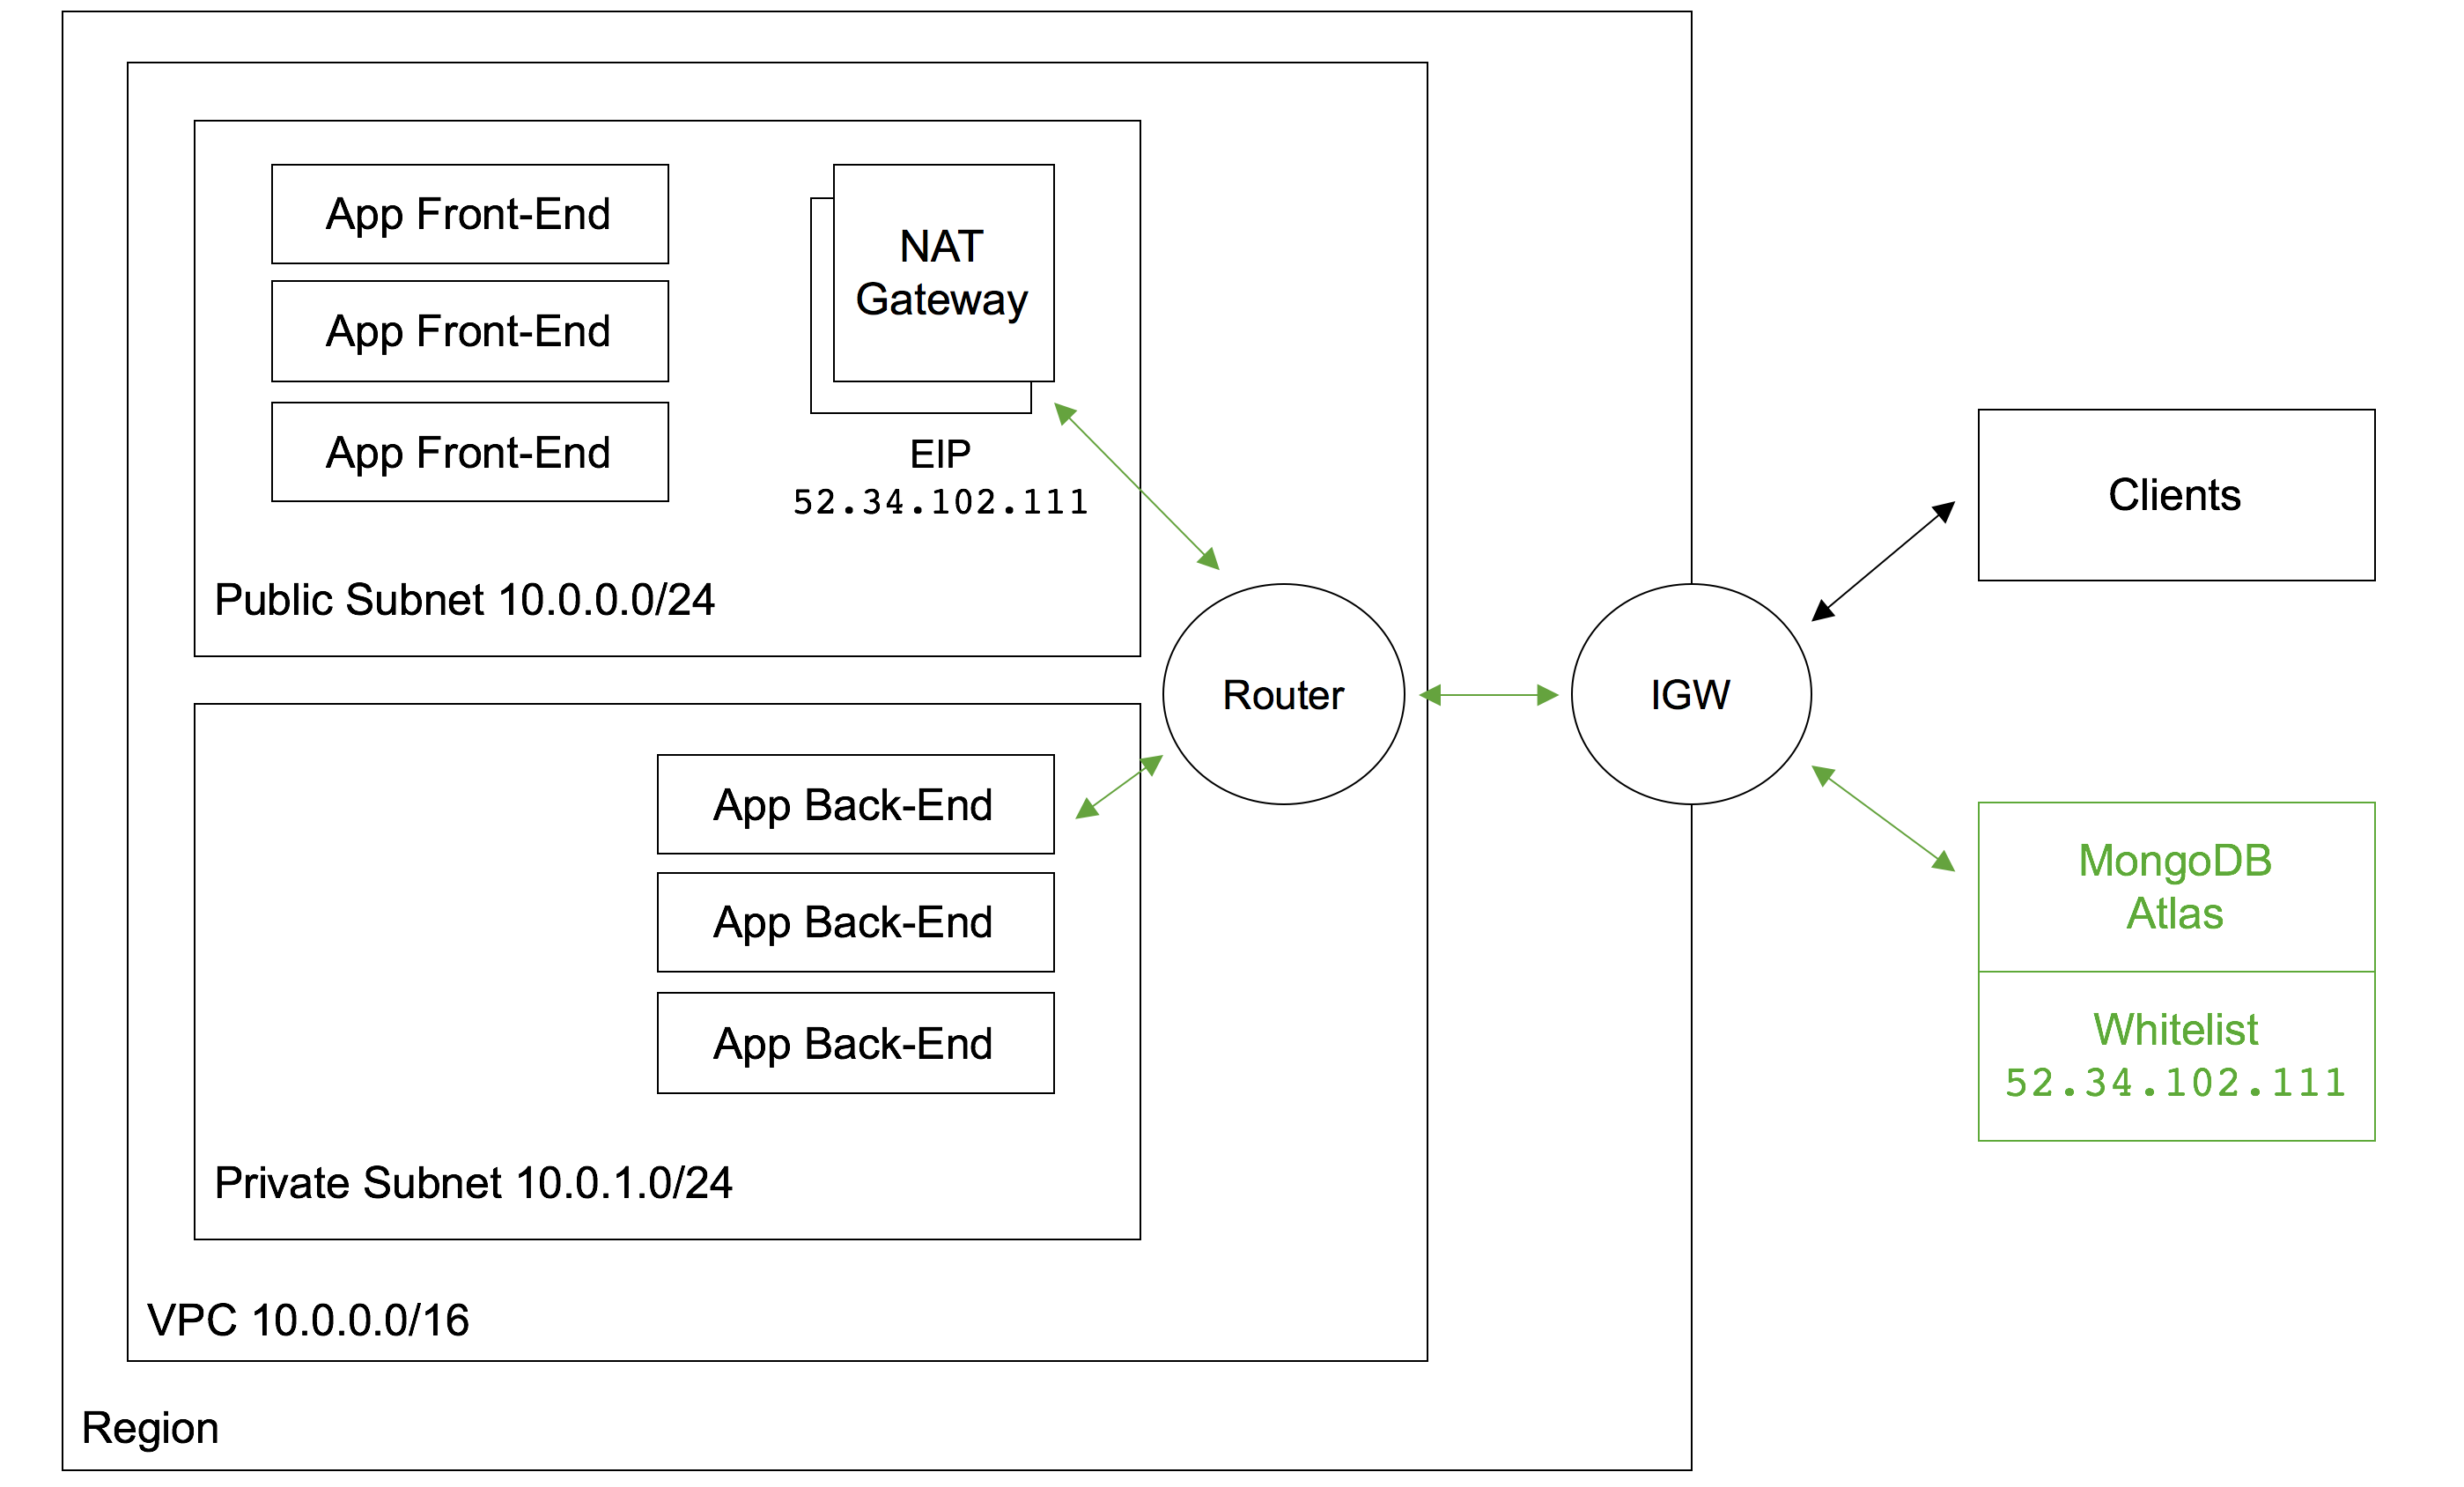
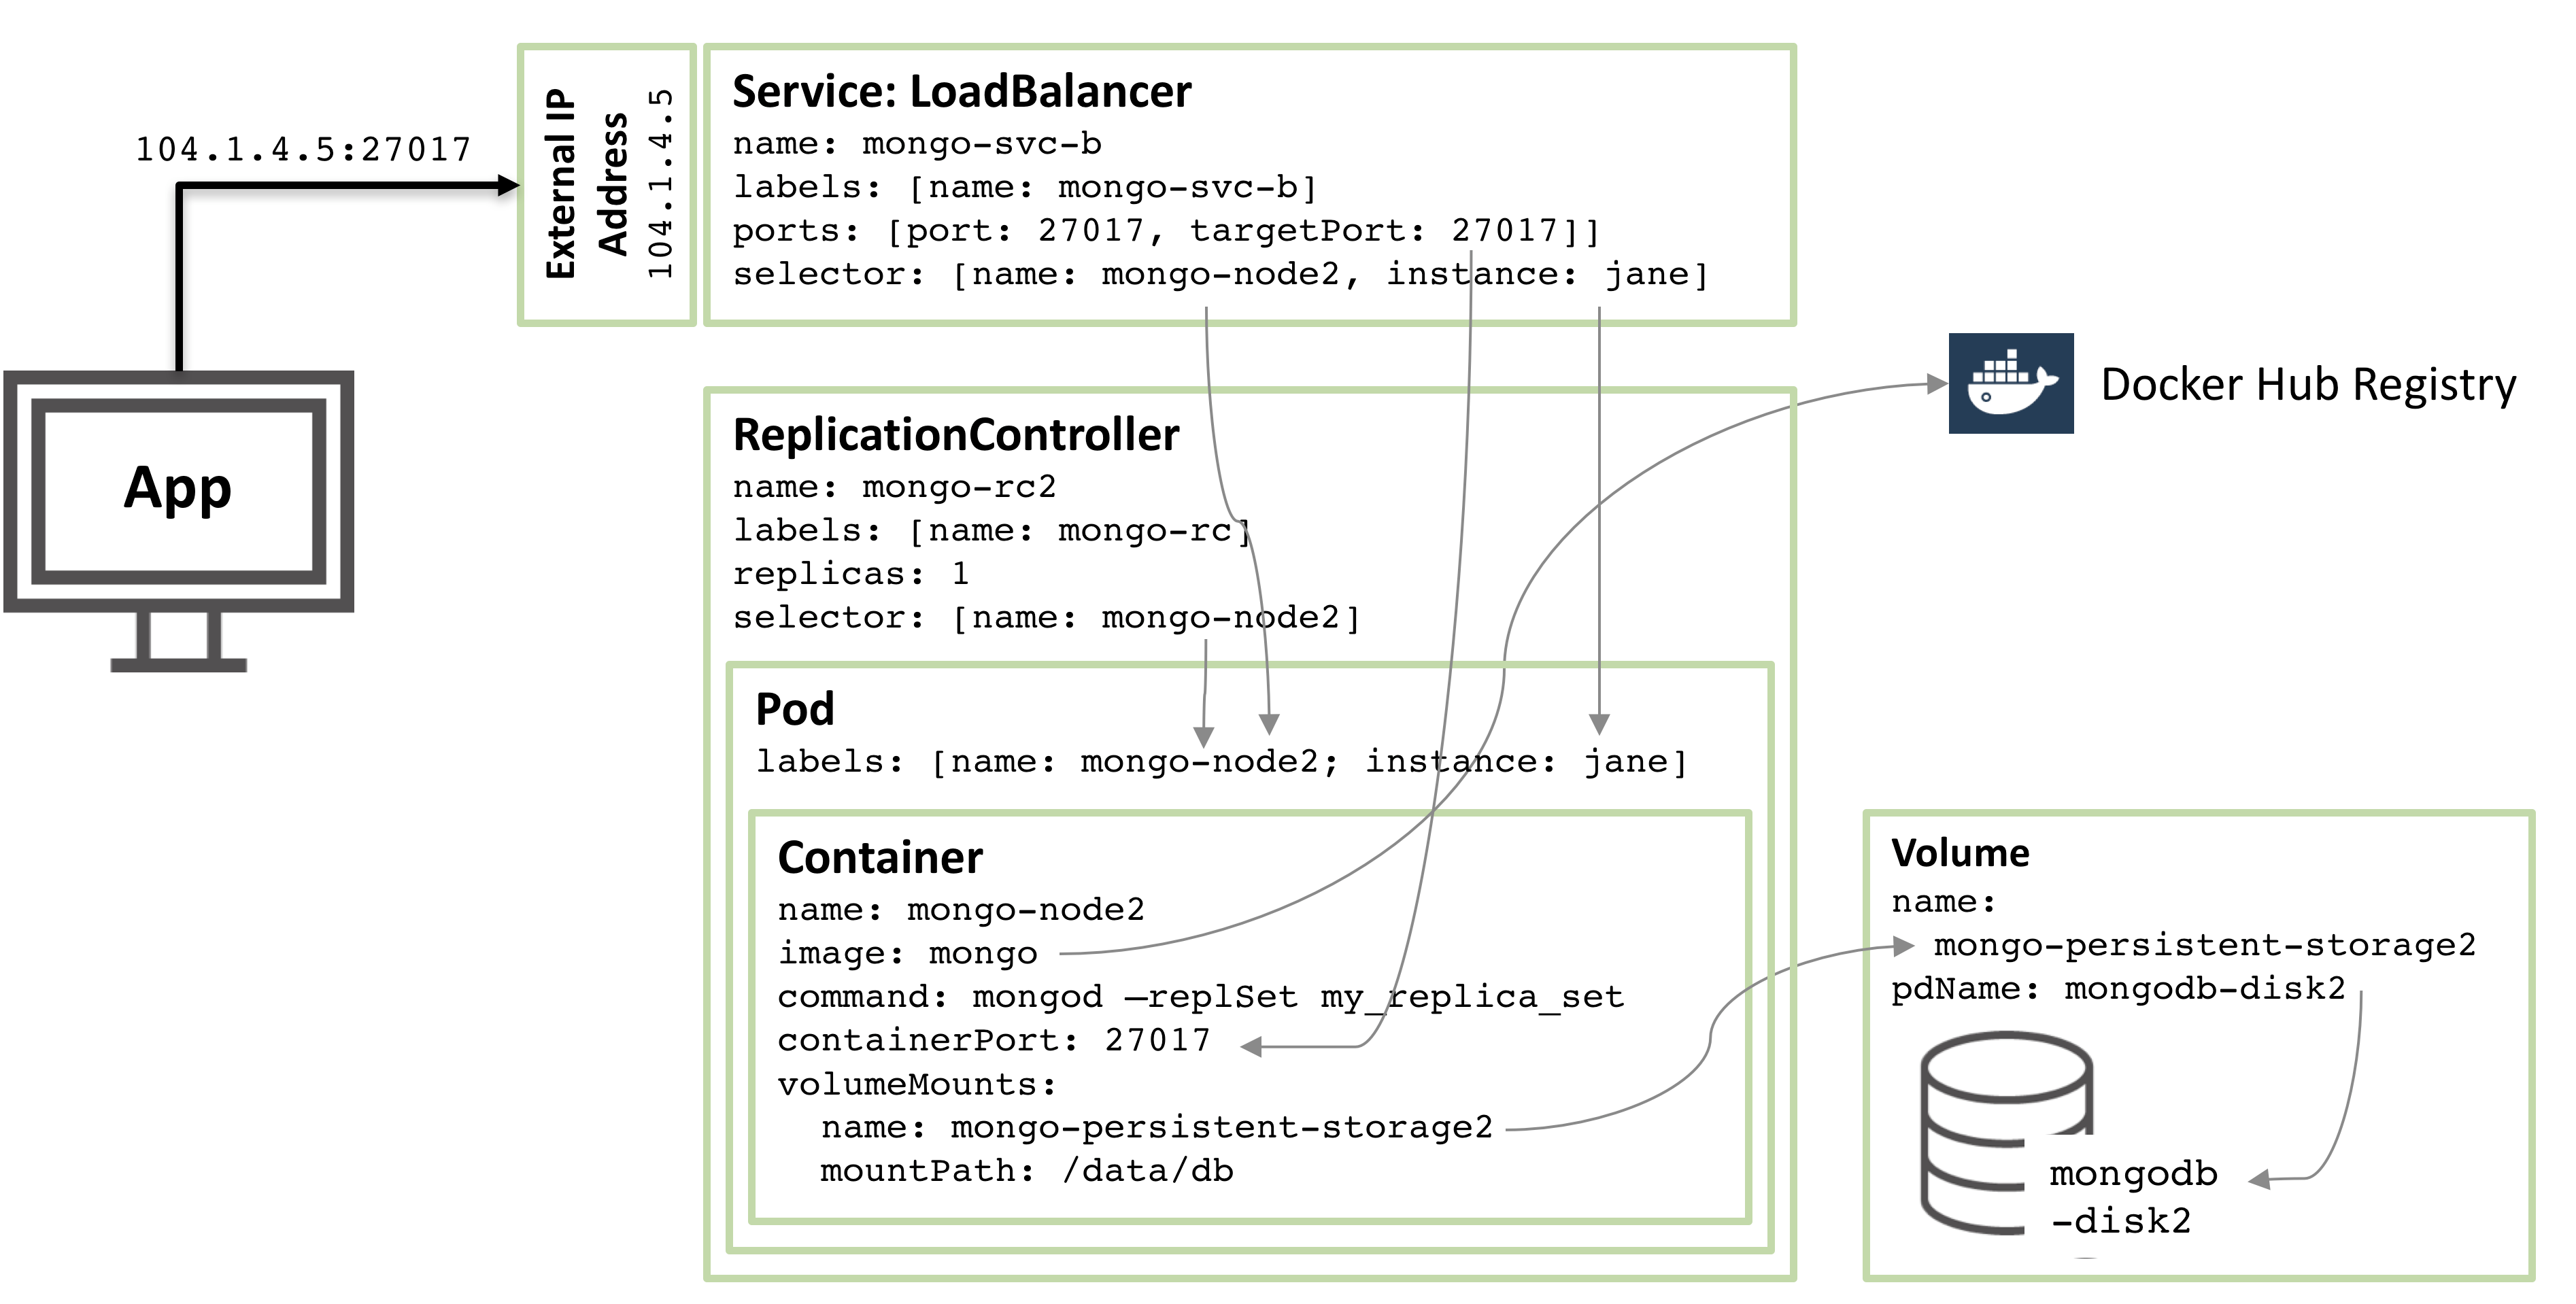
What if demand for your application grows and Elastic Beanstalk determines that it needs to add an extra EC2 instance? Again, that instance will have an IP Address that hasn’t yet been added to the MongoDB Atlas whitelist. To cover that scenario (as well as rescheduling), the AWS NAT Gateway service can be used. Figure 10 illustrates a configuration using a NAT Gateway.

Figure 10: Presenting a Single IP Address Using an AWS NAT Gateway
Two subnets are created within the AWS Virtual Private Cloud (VPC):
- The public subnet contains the front-end servers which external clients access via an Elastic IP Address attached to the Internet Gateway (IGW). It also contains the NAT Gateway service.
- The private subnet contains the back-end servers which will access MongoDB Atlas.
Routing tables must be created to route all messages from the private subnet destined for public IP addresses through the NAT Gateway. The NAT Gateway has its own Elastic IP Address which all of the outgoing messages that pass through it appear to originate from – this IP Address must be added to the MongoDB Atlas whitelist.
Messages between the front-end and back-end servers use local IP Addresses and so are routed directly, without passing through the NAT Gateway. Messages from external clients are routed from the IGW to the front-end servers.
Clearly this configuration adds cost and complexity (e.g., the application needs breaking into front and back-end components).
An alternative is to add extra logic to your application so that it automatically adds its IP address to the whitelist using the MongoDB Atlas Public API. If taking that approach, then also consider how to remove redundant IP addresses as the whitelist is limited to 20 entries.
What Next?
While MongoDB Atlas radically simplifies the operation of MongoDB there are still some decisions to take to ensure the best performance and reliability for your application. The MongoDB Atlas Best Practices white paper provides guidance on best practices for deploying, managing, and optimizing the performance of your database with MongoDB Atlas.
The guide outlines considerations for achieving performance at scale with MongoDB Atlas across a number of key dimensions, including instance size selection, application patterns, schema design and indexing, and disk I/O. While this guide is broad in scope, it is not exhaustive. Following the recommendations in the guide will provide a solid foundation for ensuring optimal application performance.
Learn more about the capabilities of MongoDB Atlas and try it out for yourself here.