Archive for September 26, 2018

Sending Text Messages with MongoDB Stitch & Twilio

When creating a well-rounded app, there are lots of table stakes features that make the app more useful but have already been implemented thousands of times before. Having the application backend send a text message informing your customer of an event is a classic example of such a “commodity” feature.

Think about using a website or app to book a taxi, where you give your phone number so that you get sent a text message when the taxi’s on its way. Why would the writers of that taxi app want to waste time writing text messaging code? There’s nothing extra they can do to differentiate it from other apps – so why not just consume it as a service from something like Twilio?

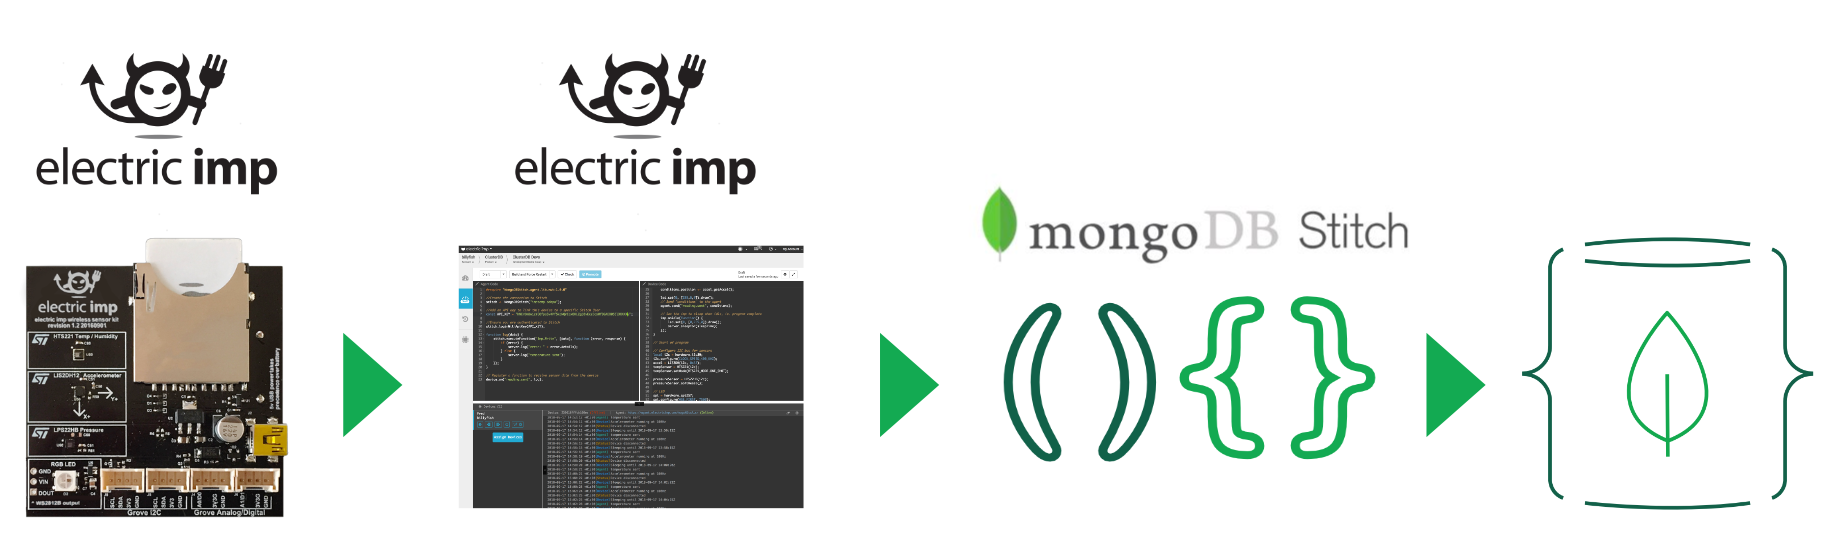
MongoDB Stitch makes it even less work to add this kind of feature. Rather than standing up an app server, figuring out how to use the Twilio API, writing the code, and possibly creating a REST API, just configure the Twilio service in Stitch.

Using MongoDB Stitch to send SMS text messages via Twilio

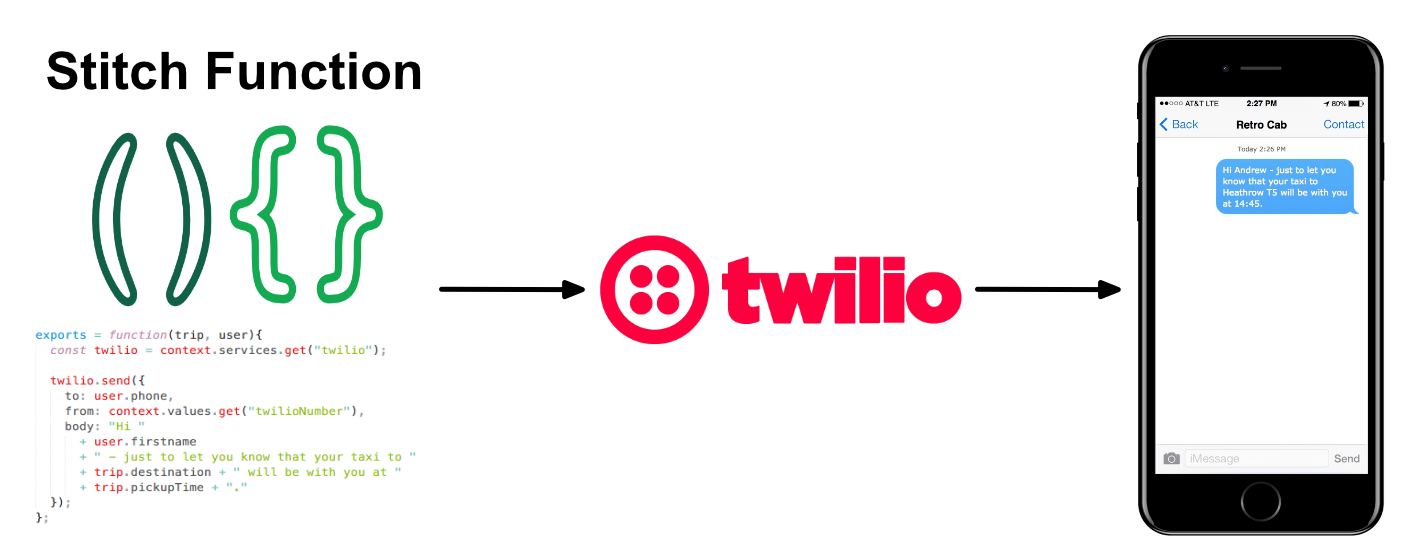
When configuring the Stitch Twilio serving, you supply the Account ID and Auth Token from your Twilio account. All that’s left is to write the Stitch function to invoke the service:

exports = function(trip, user){
  const twilio = context.services.get("twilio");

  twilio.send({
    to: user.phone,
    from: context.values.get("twilioNumber"),
    body: "Hi " 
      + user.firstname 
      + " - just to let you know that your taxi to " 
      + trip.destination + " will be with you at " 
      + trip.pickupTime + "."
  });
};

You can also have your application react when receiving a text message by configuring incoming webhooks for the Twilio service.

Creating your first Stitch app? Start with one of the Stitch tutorials.

Want to learn more about MongoDB Stitch? Read the white paper.


Testing & Debugging MongoDB Stitch Functions

When discussing serverless computing (Functions as a Service) with developers, a common concern that arises is the complexity of testing and debugging your functions. Fortunately, the MongoDB Stitch UI makes this simple.

It’s a bit old school, but if you want to display debug info from your functions, then it’s as simple as adding console.log() commands to your code. If testing the function through the Stitch UI, the output appears in the Results panel. When executed normally, the output appears in the Stitch logs.

To test a Stitch function from the UI, select a user for the function to run as (that way the function can access whatever data the user is entitled to). In the Console panel, call exports(<parameters>), including any parameters that the function expects – these could be simple values or complex documents.

The results of the function call (the returned data + any console.log() output) appear in the Results panel.

Demo of testing a MongoDB Stitch Function

If you want to check on what’s happening in your production apps, check out the Logs panel in the Stitch UI.

Creating your first Stitch app? Start with one of the Stitch tutorials.

Want to learn more about MongoDB Stitch? Read the white paper.


Building a REST API with MongoDB Stitch

One of the great things about MongoDB Stitch is that it often removes the need to build REST APIs to grant access to your data from frontend applications – simply use Stitch QueryAnywhere to make MongoDB queries from your frontend code. However, there are often cases where you need to open up some of your data to other applications which don’t use the Stitch SDK – fortunately, Stitch makes it incredibly easy to build REST APIs for these occasions.

I enjoy tracking my location by checking into Swarm/FourSquare, but I want to get some extra value from that data – that means getting it into a MongoDB collection.

FourSquare provides an IFTTT service that’s triggered whenever you check in – by linking that to the Maker service to send an HTTP POST request, I can forward that check-in data to Stitch. This is where Stitch comes in; a simple Stitch HTTP service webhook receives that POST request and writes the data to MongoDB:

exports = function(payload) {
  var queryArg = payload.query.arg || '';
  var body = {};
  if (payload.body) {
  body = EJSON.parse(payload.body.text());
  }

  var owner_id = context.functions.execute("ownerFromEmail", body.email);
  var checkin = {
    owner_id: owner_id.owner_id,
    email: body.email,
    venueName: body.venue,
    date: body.checkinDate,
    url: body.url,
    locationImg: body.location + "&key=" + context.values.get("GoogleMapsStaticKey")
  };

  return context.functions.execute("checkin", checkin);
};

The webhook uses the checkin function:

exports = function(checkin){
    var atlas = context.services.get("mongodb-atlas");
    var checkinColl = atlas.db("trackme").collection("checkins");
    try {
      checkinColl.insertOne(checkin);
    } catch (e) {
      console.log("Error inserting checkin doc: " + e);
      return e.message();
    }
};

Note that when configuring the HTTP service, I set an API key that the requestor must include as a secret query parameter:

Secure Stitch webhook with secret

IFTTT FourSquare applet

Now that the data is in MongoDB, there’s no limit to what I can do with it. For example, I want a dashboard for my check-in data, and one thing I want to include is a graph on my most frequent check-ins:

Foursquare check-in grapsh

To implement that, I write a new Stitch function:

exports = function(limit){
    var atlas = context.services.get("mongodb-atlas");
    var checkinColl = atlas.db("trackme").collection("checkins");
    var checkins = checkinColl.aggregate([
      {$match: {owner_id: context.user.id}},
      {$group: {
        _id: "$venueName",
        count: {$sum: 1}
      }},
      {$sort: {count: -1}},
      {$limit: limit},
      {$project: {
        venue: "$_id",
        _id: 0,
        count: 1
      }}
    ]).toArray();
    return checkins;
};

From the frontend application, it then takes a single method call to retrieve the data:

this.props.stitchClient
    .executeFunction('popularCheckins', 10)
    .then(
      checkinData => {
        this.setState({checkins: checkinData});
        this.createBarChart();
      },
      error => {
        console.log(
          "Failed to fetch most popular check-ins: "
          + error)
    })

You can recreate this Stitch and frontend app for your self by downloading the app from GitHub and importing it into Stitch.

Creating your first Stitch app? Start with one of the Stitch tutorials.

Want to learn more about MongoDB Stitch? Read the white paper.


Recording sensor data with MongoDB Stitch & Electric Imp

Old school IoT

My early experiments with IoT involved standalone sensors, breakout boards, Arduinos, Raspberry Pis, and a soldering iron. It was a lot of fun, but it took ages to build even the simplest of projects.

Therefore, I was super excited when I discovered that Electric Imp had a self-contained IoT hardware developer kit and a library to access MongoDB Stitch directly.

Electric Imp impExplorer IoT development kit

My first experiment with Electric Imp took sensor data (temperature, humidity, air pressure, light level, and orientation) from the device, and stored it in MongoDB.

The Electric Imp code (written in Squirrel) is split into 2 parts:
– On-device code – sends sensor data to the agent
– Agent code, running in Electric Imp’s cloud – forwards the data to Stitch

This post focuses on the integration between the Electric Imp agent code and Stitch, but those interested can view the device code.

The agent code receives the readings from the device, and then it uses the Electric Imp MongoDB Stitch library to forward them to Stitch:

#require "MongoDBStitch.agent.lib.nut:1.0.0"

//Create the connection to Stitch
stitch <- MongoDBStitch("imptemp-sobpa");

//Add an API key to link this device to a specific Stitch User
const API_KEY = "hNErDmBw1zYGOfpaSv4Pf5kaNQrIaxOHLZgj0vExzDcxWf9GAEX055l1mXXX";

//Ensure you are authenticated to Stitch
stitch.loginWithApiKey(API_KEY);

function log(data) {
    stitch.executeFunction("Imp_Write", [data], function (error, response) {
        if (error) {
            server.log("error: " + error.details);
        } else {
            server.log("temperature sent");
        }
    });
}

// Register a function to receive sensor data from the device
device.on("reading.sent", log);

Note that you will need to create the API_KEY through the Stitch UI.

impExplorer sends readings to Electric Imp agent which sends them to MongoDB Stitch to store in MongoDB Atlas

The Imp_Write function receives the readings from the agent, retrieves outside weather data from DarkSky.net, and stores the data in the TempData MongoDB Atlas collection:

exports = function(data){

  //Get the current time
  var now = new Date();

  var darksky = context.services.get("darksky");
  var mongodb = context.services.get("mongodb-atlas");
  var TempData = mongodb.db("Imp").collection("TempData");

  // Fetch the current weather from darksky.net

  darksky.get({"url": "https://api.darksky.net/forecast/" + 
    context.values.get("DarkSkyKey") + '/' + 
    context.values.get("DeviceLocation") +
    "?exclude=minutely,hourly,daily,alerts,flags&units=auto"
  }).then(response => {
    var darkskyJSON = EJSON.parse(response.body.text()).currently;

    var status =
      {
        "Timestamp": now.getTime(),
        "Date": now,
        "Readings": data,
        "External": darkskyJSON,
      };
    status.Readings.light = (100*(data.light/65536));
    context.functions.execute("controlHumidity", data.temp, data.humid);
    TempData.insertOne(status).then(
      results => {
        console.log("Successfully wrote document to TempData");
      },
      error => {
        console.log("Error writing to TempData collection: " + error);
      });
  });
};

ImpWrite also calls the controlHumidity method – find more on that in this post.

You can recreate the Stitch app for yourself by downloading the app from GitHub and importing it into Stitch. You’ll need to set some of your own keys first (including the details of your IFTTT webhook address) – details are in the README. The repo also includes the Electric Imp code for the agent and device.

Creating your first Stitch app? Start with one of the Stitch tutorials.

Want to learn more about MongoDB Stitch? Read the MongoDB Stitch white paper.


Controlling humidity with a MongoDB Stitch HTTP service and IFTTT

I’ve long been a fan of using IFTTT as a quick and easy way to automate my home/life by connecting cloud and IoT services. My IFTTT Applets are what make my study lights flash when my Amazon Alexa timer expires in the kitchen; they’re what add my FourSquare check-ins to my Google calendar and MongoDB database.

I have a dumb dehumidifier in my study, and I wanted to make it a bit smarter using MongoDB Stitch. I use an ElectricImp IoT device to send periodic temperature and humidity sensor readings to my Stitch app. The Stitch app then fetches weather data from DarkSky.net and stores the combined data in a MongoDB collection. I have a dashboard that lets me view that data over time.

Based on the latest humidity and temperature, a Stitch function decides whether to turn the humidifier on or off. The function then uses a Stitch HTTP service I created to send a request an IFTTT Maker service webhook with the desired state (on|off).

exports = function(temp, humidity){

  var IFTTT = context.services.get("IFTTT");

  // The humidifier is very inefficient if room is too cold, so only turn
  // it on if the humidity is too high and temperature is high enough

  var state = "dry";

  if (temp > context.values.get("minTemp")) {
    if (humidity > context.values.get("maxHumidity")) {
        state = "damp";
    }
  }

  IFTTT.get({"url": "https://maker.ifttt.com/trigger/" + 
    state + "/with/key/" + 
    context.values.get("MakerIFTTKey")})
  .then(() => {
    console.log("Sent IFTTT request");
  });
};

The webhook uses the TP-Link Kasa IFTTT service to send an on|off request to my smart plug:

IFTTT Webhook to turn plug onn

You can recreate this Stitch app for your self by downloading the app from GitHub and importing into Stitch. You’ll need to set some of your own keys first (including the details of your IFTTT webhook address) – details are in the README. The repo also includes the ElectricImp device and agent code.

Creating your first Stitch app? Start with one of the Stitch tutorials.

Want to learn more about MongoDB Stitch? Read the white paper.