Earlier this week, I presented a webinar on developing web and mobile applications using the MERN and MEAN stacks – the replay and slides are now available.
Details
Users increasingly demand a far richer experience from web applications – expecting the same level of performance and interactivity they get with native desktop and mobile apps.
At the same time, there’s pressure on developers to deliver new applications faster and continually roll-out enhancements, while ensuring that the application is highly available and can be scaled appropriately when needed.
Fortunately, there’s a set of open source technologies using JavaScript that make all of this possible.
Join this webinar to learn about the two dominant JavaScript web app stacks – MEAN (MongoDB, Express, Angular, Node.js) and MERN (MongoDB, Express, React, Node.js).
These technologies are also used outside of the browser – delivering the best user experience, regardless of whether accessing your application from the desktop, from a mobile app, or even using your voice.
By attending the webinar, you will learn:
What these technologies and how they’re used in combination:
NodeJS
MongoDB
Express
Angular2
ReactJS
How to get started building your own apps using these stacks
Some of the decisions to take:
Angular vs Angular2 vs ReactJS
Javascript vs ES6 vs Typescript
What should be implemented in the front-end vs the back-end
This is the sixth and final blog post in a series examining technologies such as MongoDB and REST APIs that are driving the development of modern web and mobile applications.
Modern Application Stack – Part 1: Introducing The MEAN Stack introduced the technologies making up the MEAN (MongoDB, Express, Angular, Node.js) and MERN (MongoDB, Express, React, Node.js) stacks: why you might want to use them, and how to combine them to build your web application (or your native mobile or desktop app).
Subsequent posts focused on working through the end to end steps of building a real (albeit simple) application – MongoPop.
Part 2: Using MongoDB With Node.js created an environment where we could work with a MongoDB database from Node.js; it also created a simplified interface to the MongoDB Node.js Driver.
Once your application back-end exposes a REST API, there are limitless ways that you or other developers can access it:
A dedicated browser-based client, as seen in posts 4 and 5
A standalone native iOS or Android mobile app
Voice controlled appliances, such as Amazon’s Echo
IoT-enabled devices, such as remote sensors
Integrations with 3rd party applications
This post takes a look at some of these approaches. Unlike some of the earlier posts, this one aims to go wide rather than deep – touching on many technologies rather than diving too deeply into any one.
Prerequisite – the REST API
Everything that follows assumes that you have the Mongopop REST API running – if not, skip back to Part 3: Building a REST API with Express.js. Additionally, that API has been extended with 3 new routes (already included in the latest GitHub repository):
Additional Express routes implemented for the Mongopop REST API
/pop/lastCheckIn depends on a new method that has been added to javascripts/db.js:
The configuration file config.js is also extended – note that you should replace the value associated with the makerMongoDBURI field if you’re not running MongoDB on your local machine (e.g. with the URI provided by MongoDB Atlas:
The implementation of these methods follows the same pattern as already seen – refer back to Part 3 for details – and so is not explained here.
Repurposing Angular & ReactJS code for native applications
There are frameworks for both Angular and ReactJS that enable web client application designs (and in some cases, code) to be reused for creating native iOS and Android apps.
One option for Angular is NativeScript, in which you use Typescript/JavaScript with Angular to build native apps for multiple platforms from the same source code. Of course, to get the most out of those platforms, you may want or need to add platform-specific code.
React developers will find React Native code very familiar, and applications are built from declarative components in the same way. The most obvious difference is that React Native code uses its own native components (e.g. <View> and <Text> rather that HTML elements such as <div> and <p>):
React Native provides the Fetch API to make network requests; it follows a similar patter to XMLHttpRequest (React Native also includes XMLHttpRequest which can be used directly).
While it’s not as simple as just rebuilding your ReactJS or Angular code to produce native apps, the reuse of designs, skills and (some) code make it much more efficient than starting from scratch.
Combining cloud services – IFTTT
IFTTT (IF This Then That) is a free cloud service which allows you to automate tasks by combining existing services (Google Docs, Facebook, Instagram, Hue lights, Nest thermostats, GitHub, Trello, Dropbox,…). The name of the service comes from the simple pattern used for each Applet (automation rule): “IF This event occurs in service x Then trigger That action in service y”.
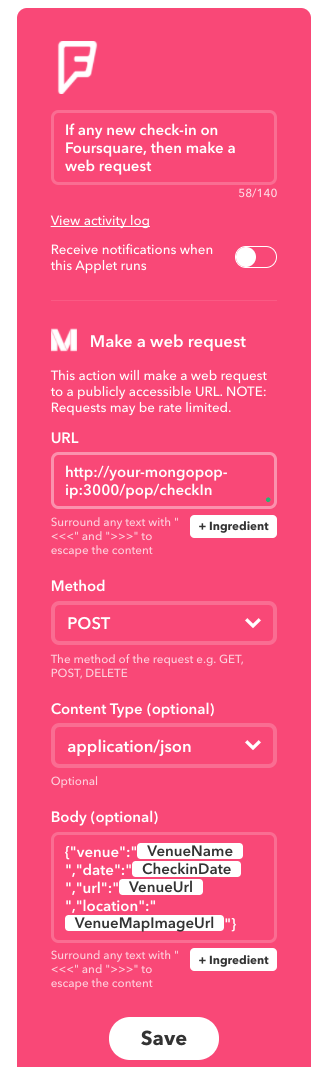
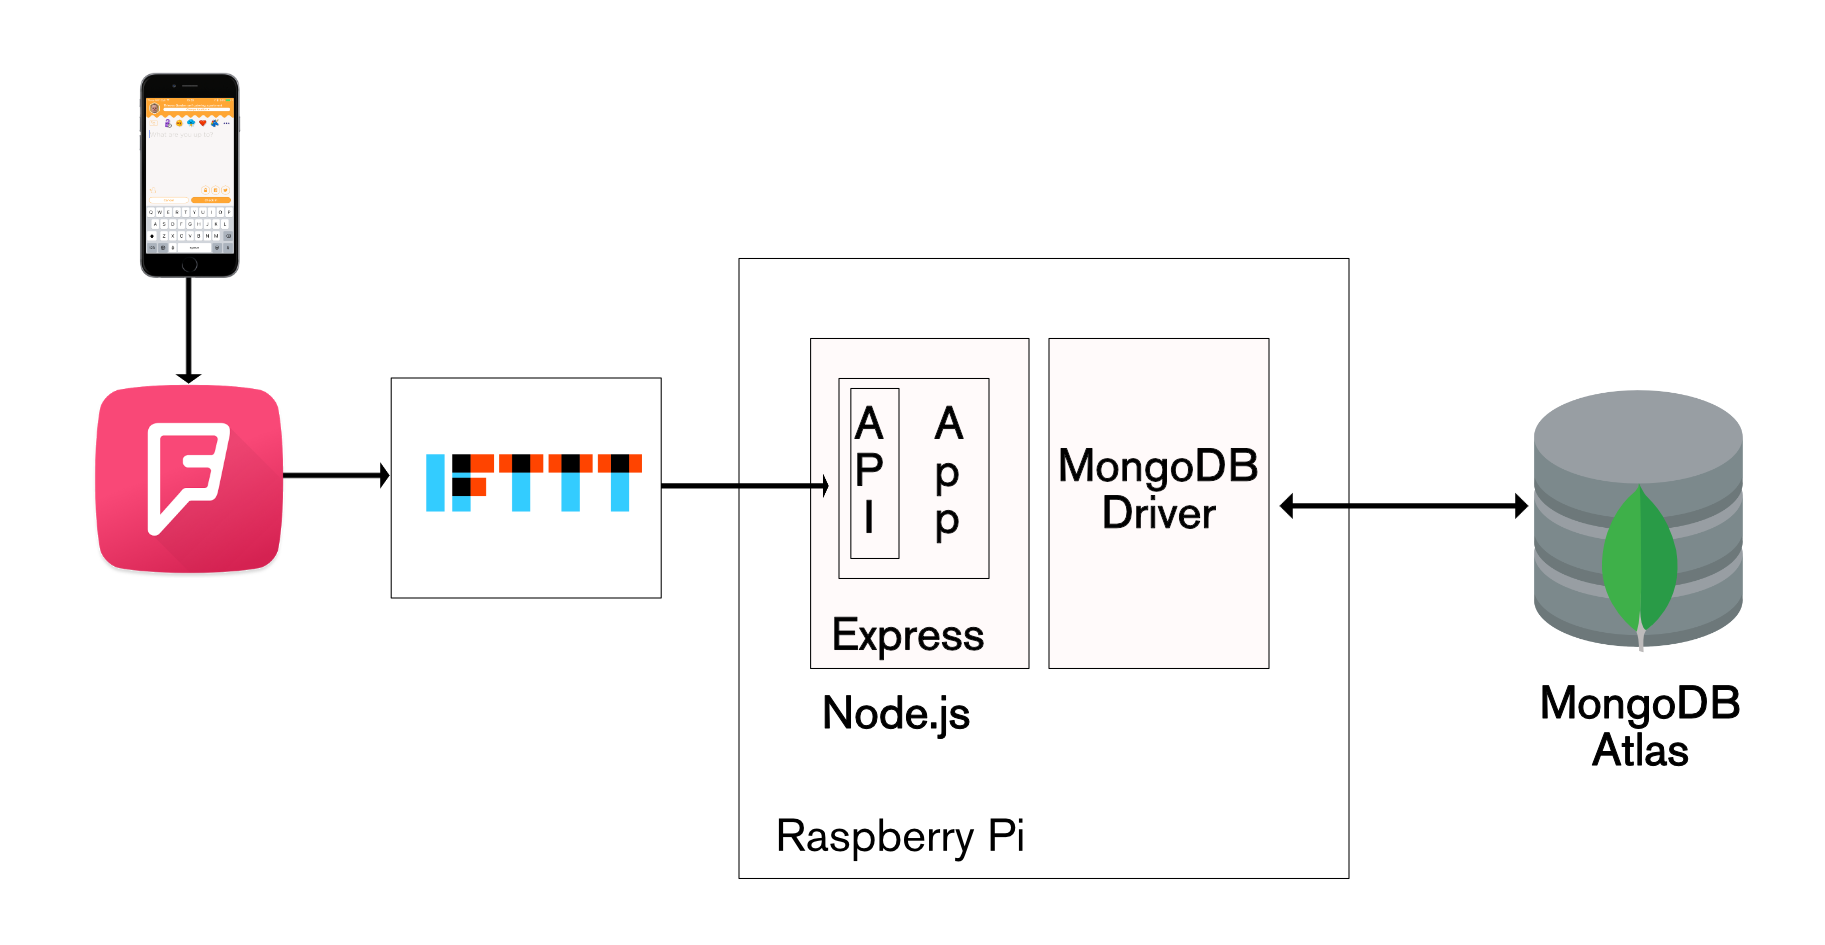
IFTTT includes a Maker service which can handle web requests (triggers) or send web requests (actions). In this case, I use it to invoke the pop/checkIn POST method from the Mongopop REST API whenever I check in using the Swarm (Foursquare) app:
Create Foursquare applet to make HTTP POST over REST API in IFTTT
Note that the applet makes a POST request to the http://your-mongopop-ip:3000/pop/checkIn route. The body of the POST includes the required parameters – provided as a JSON document. Each of the VenueName, CheckinDate, VenueUrl, and VenueMapImageURL values are /ingredients/ from the trigger (Foursquare) event.
We can confirm that the MongoDB collection has been updated after this check-in:
Cluster0-shard-0:PRIMARY> use maker
switched to db maker

Cluster0-shard-0:PRIMARY> db.foursq.find().sort({_id: -1}).limit(1).pretty()
{
    "_id" : ObjectId("58c272f842067a03283be544"),
    "venueName" : "Redroofs Theatre School",
    "date" : "March 10, 2017 at 09:23AM",
    "url" : "http://4sq.com/htwamV",
    "mapRef" : "http://maps.google.com/maps/api/staticmap?center=51.52212258991317,-0.7358344376428089&zoom=16&size=710x440&maptype=roadmap&sensor=false&markers=color:red%7C51.52212258991317,-0.7358344376428089"
}
Constructing an iOS/Apple Watch App to automate workflows
The first example showed how to record a check-in into our own service as a side effect of checking into an existing service (Foursquare).
What if we wanted to create new, independent check-ins, from a mobile device? What if we also wanted to augment the check-ins with additional data? Another requirement could be to let our team know of the check-in through a Slack channel.
A valid approach would be to build a new mobile client using React Native or NativeScript. Slack and Google Maps have their own REST APIs and so the new App could certainly integrate with them in addition to our Mongopop API. Before investing in that development work, it would be great to prototype the concept and see if it proves useful.
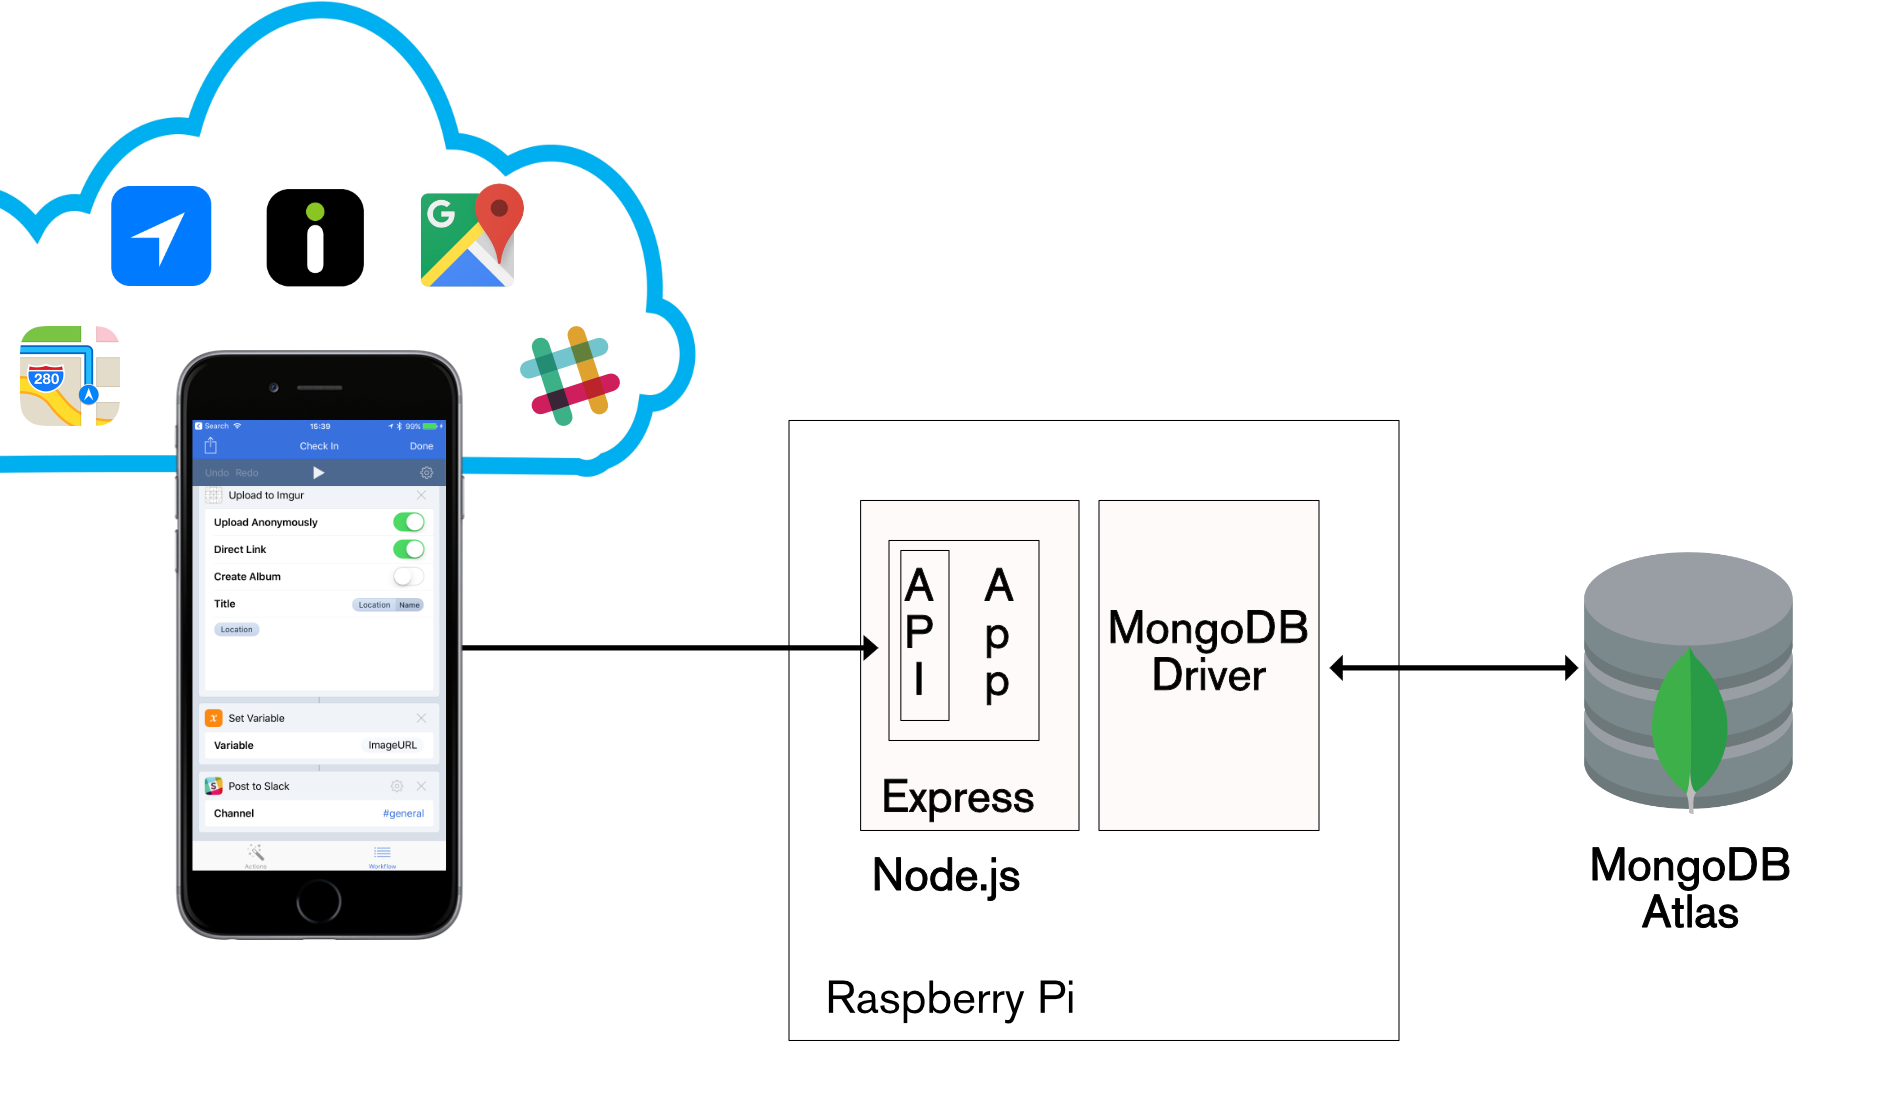
This is where we turn to the iOS Workflow app. Workflow has a number of similarities to IFTTT but there are also some significant differences:
Workflow runs on your iOS device rather than in the cloud.
Workflows are triggered by events on your iOS device (e.g. pressing a button) rather than an event in some cloud service.
Workflow allows much more complex patterns than “IF This event occurs in service A Then trigger That action in service B”; it can loop, invoke multiple services, perform calculations, access local resources (e.g. camera and location information) on your device, and much more.
Both applications/Workflows that we build here can be run on an iPad, iPhone, or Apple Watch.
The first Workflow, CheckIn, performs these steps:
Send a POST request to the /pop/checkIn Mongopop route
The request includes the location, date/time, URL (either from the venue or Apple Maps), and the StreetView image
Post the location and URL to Slack
Display error messages if anything fails
iOS Workflow stack to make REST API calls
Implementing a Workflow involves dragging actions into the work area and then adding attributes to those actions (such as the address of the Mongopop API). The result of one action is automatically used as the input to the next action in the workflow. Results can also be stored in variables for use by later actions.
This is the Check In workflow:
iOS Workflow check-in code for REST API call
This video demonstrates the use of the app when run on an iPhone:
The same app/workflow can be run from an Apple Watch:
Check-in via REST API with Apple Watch and iOS Workflow app
We can confirm that check-in record has been stored as a document in MongoDB Atlas (note that the database and collection names are defined in config.js):
Cluster0-shard-0:PRIMARY> use maker
switched to db maker
Cluster0-shard-0:PRIMARY> db.foursq.find().sort({_id: -1}).limit(1).pretty()
{
    "_id" : ObjectId("58c1505742067a03283be541"),
    "venueName" : "77-79 King St, Maidenhead SL6 1DU, UK",
    "date" : "9 Mar 2017, 12:53",
    "url" : "http://maps.apple.com/?q=77-79%20King%20St,%20Maidenhead%20SL6%201DU,%20UK&ll=51.520409,-0.722196",
    "mapRef" : "http://i.imgur.com/w3KyIVU.jpg"
}
The second app/workflow retrieves and displays details of the most recent check-in. It performs these steps:
Read from the /pop/latestCheckIn Mongopop REST API Route using GET.
If the results indicate a successful operation then:
Extract the location from the results
Display the location and prompt the user if they’d like to:
See the location data (image)
Follow the location’s URL (typically an Apple Maps link)
Finish
If the Mongopop operation fails, display an appropriate error.
The full workflow is shown here:
Find the latest check-in using REST API using Apple Watch
Running the app on an iPad produces these results:
Again, the same app can be run from an Apple Watch:
Find the latest check-in using REST API from Apple Watch
Hands-free – Amazon Alexa Skills
Two of today’s biggest industry trends are machine learning and serverless computing. Amazon’s Alexa service (typically accessed through Amazon’s Echo device) is at the forefront of both. In addition to interpreting voice commands for Amazon’s own services (e.g. ordering more coffee beans or playing a particular song), developers can implement their own skills. Many are publicly available from 3rd parties such as Nest, Harmony, and Spotify, but you’re free to implement and test your own – submitting it for review and public use when ready.
The business logic behind Alexa skills are typically run within Amazon’s serverless computing service – AWS Lambda. Lambda is a great product for services that handle low or bursty levels of traffic – rather than paying a flat rate for a physical or virtual server, you pay a small fee for every event handled (and you even get a low-medium level of throughput for free). If your service really takes off then Lambda automatically scales out.
Assuming that you decide to use Lambda, there are three main components to your skill:
The set of intents – instructions that a user can give to Alexa
For each intent, a set of utterances that the user might say in order to signal that intent
The actual logic which is invoked whenever the user signals an intent – implemented as a Lambda function
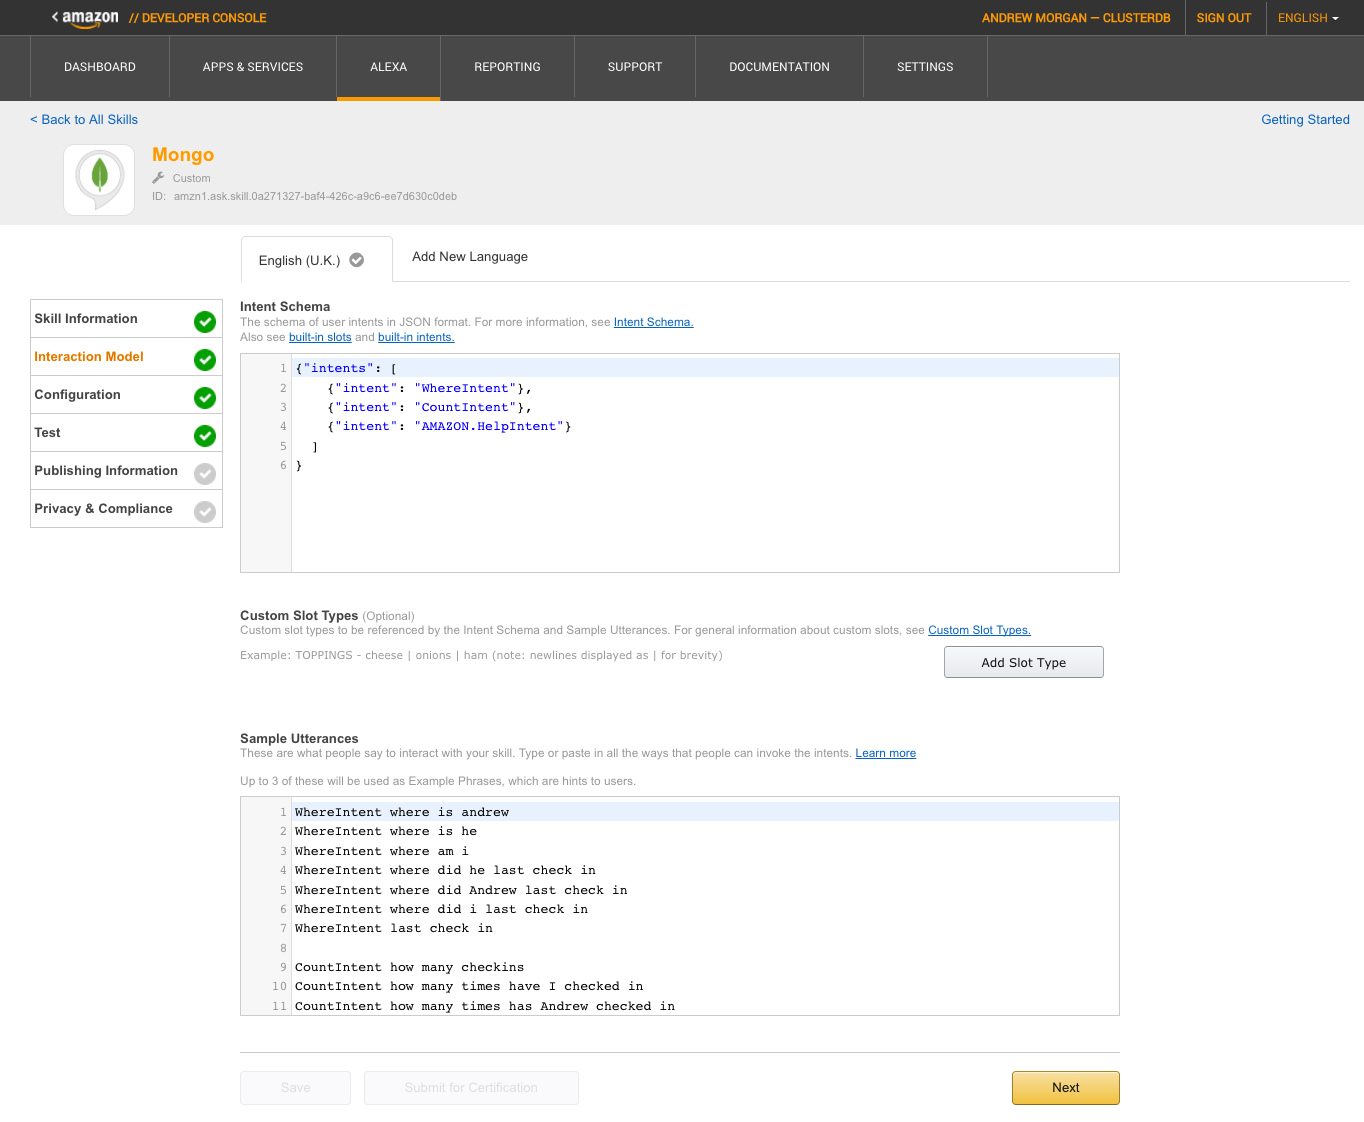
The Mongo Alexa skill has 3 intents/commands:
WhereIntent: Find the most recent location that I checked in to
CountIntent: Count how many times I’ve checked in
HelpIntent: Explain what the available commands/intents are
The utterances for each of those intents must also be defined:
WhereIntent where is andrew
WhereIntent where is he
WhereIntent where am i
WhereIntent where did he last check in
WhereIntent where did Andrew last check in
WhereIntent where did i last check in
WhereIntent last check in

CountIntent how many checkins
CountIntent how many times have I checked in
CountIntent how many times has Andrew checked in
CountIntent how many times has he checked in
CountIntent how many check ins
CountIntent check in count
Note that no utterances need to be added for the AMAZON.HelpIntent as that intent is built in.
The skill is created in the Amazon Developer Console using the Alexa wizard; where the intentions and utterances can be added:
Add Alexa intentions and utterances
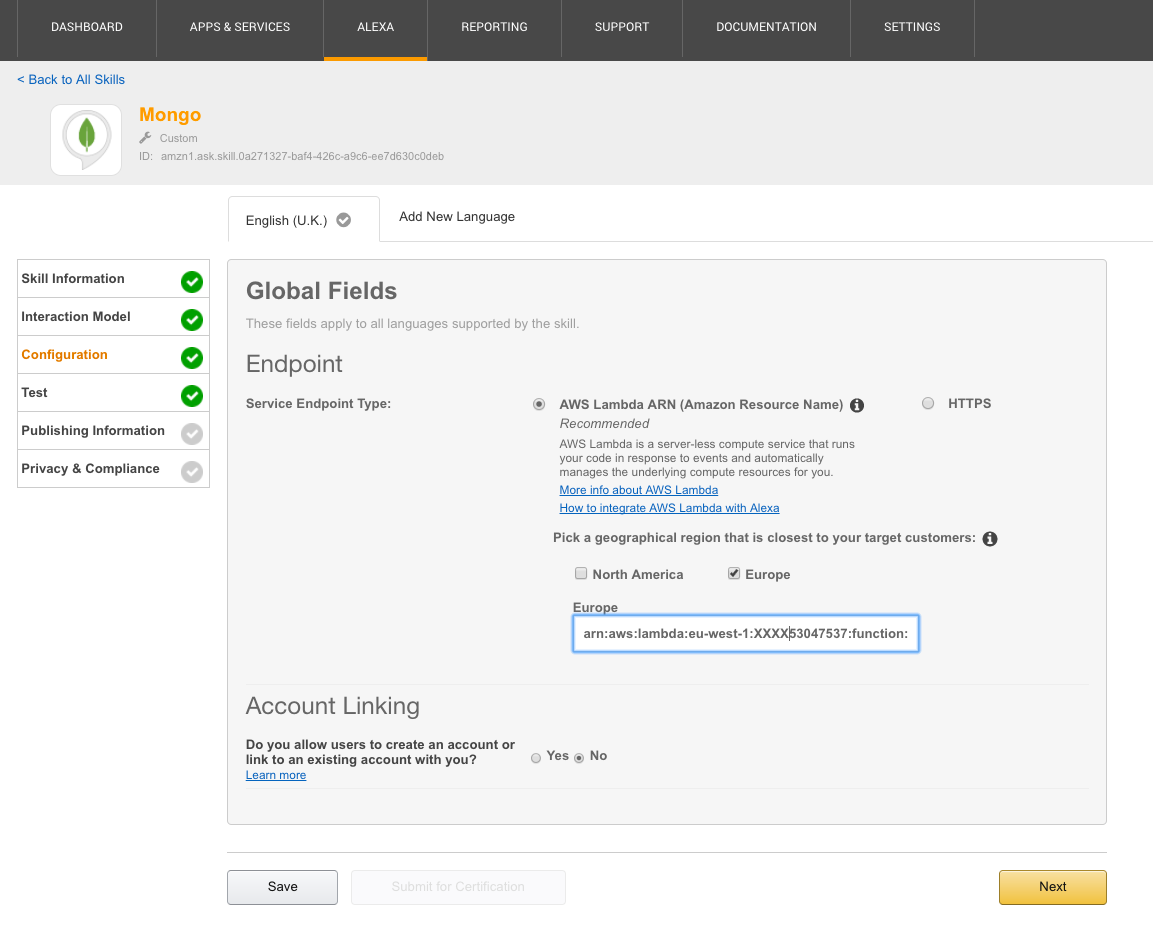
In the next screen, you indicate where the the skill’s business logic runs; in this case, I provide the Amazon Resource Name (ARN) of my Lambda function:
As explained earlier, the aim of this post is to cover a broad set of technologies rather than going too deeply into any one but explaining a few concepts may help you understand what this code is doing:
A handler is implemented for each of the intents; that handler is invoked when the user speaks one of the utterances associated with that intent
The handlers for the CountIntent and WhereIntent makes calls to the Mongopop REST API using the request function
The emit method is how the handlers can send results or errors back to the user (via Alexa)
The card, referred to by tellWithCard, is visual content (text and images) that are displayed in the Alexa app
Note that this is a simple skill which receives a request and sends a single response. It is also possible to implement an interactive state machine where there’s a conversation between the user and Alexa – in those skills, the logic uses both the latest intent and the past context in deciding how to respond. Note that the Lambda function is always stateless and so all data should be stored in a database such as MongoDB.
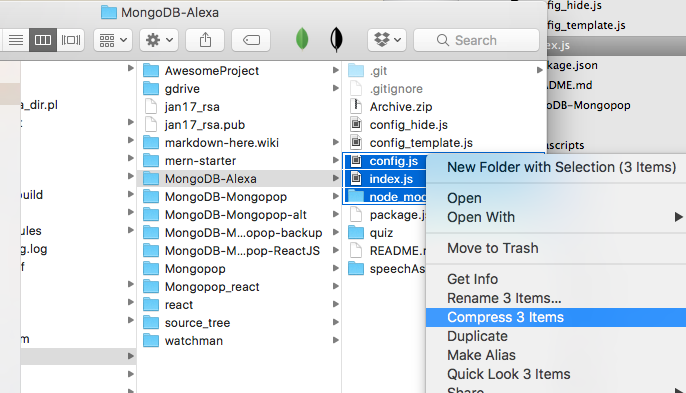
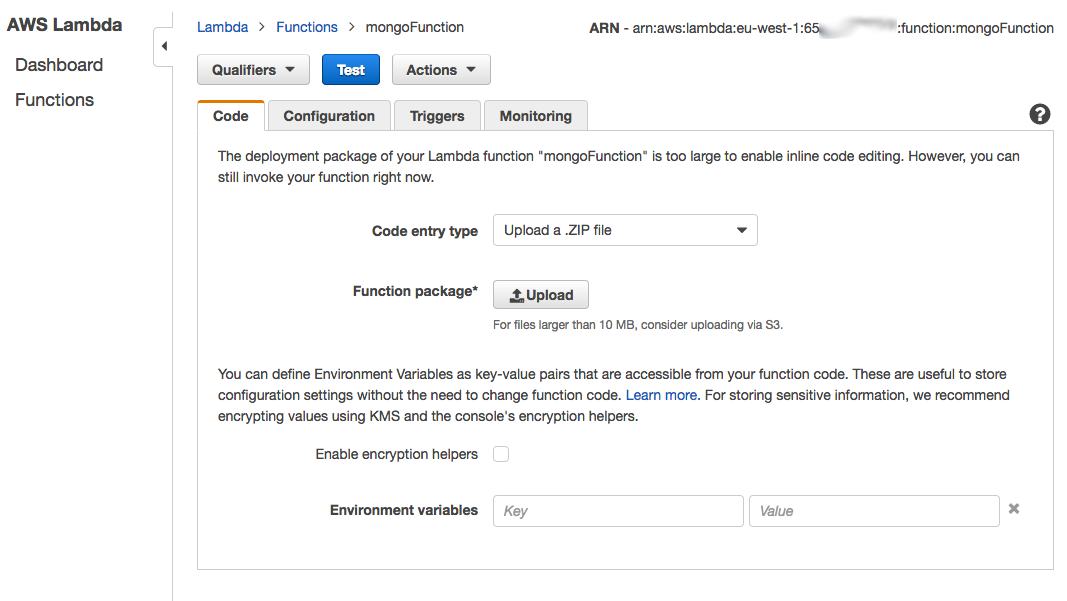
The skill is deployed to AWS Lambda through the AWS Management Console. The index.js, config.js and node_modules directory (created by running npm install) should be archived into a single Zip file which is then uploaded to AWS:
Create zip file for Alexa skill to upload to AWS Lambda
Upload zip file for Alexa skill to AWS Lambda
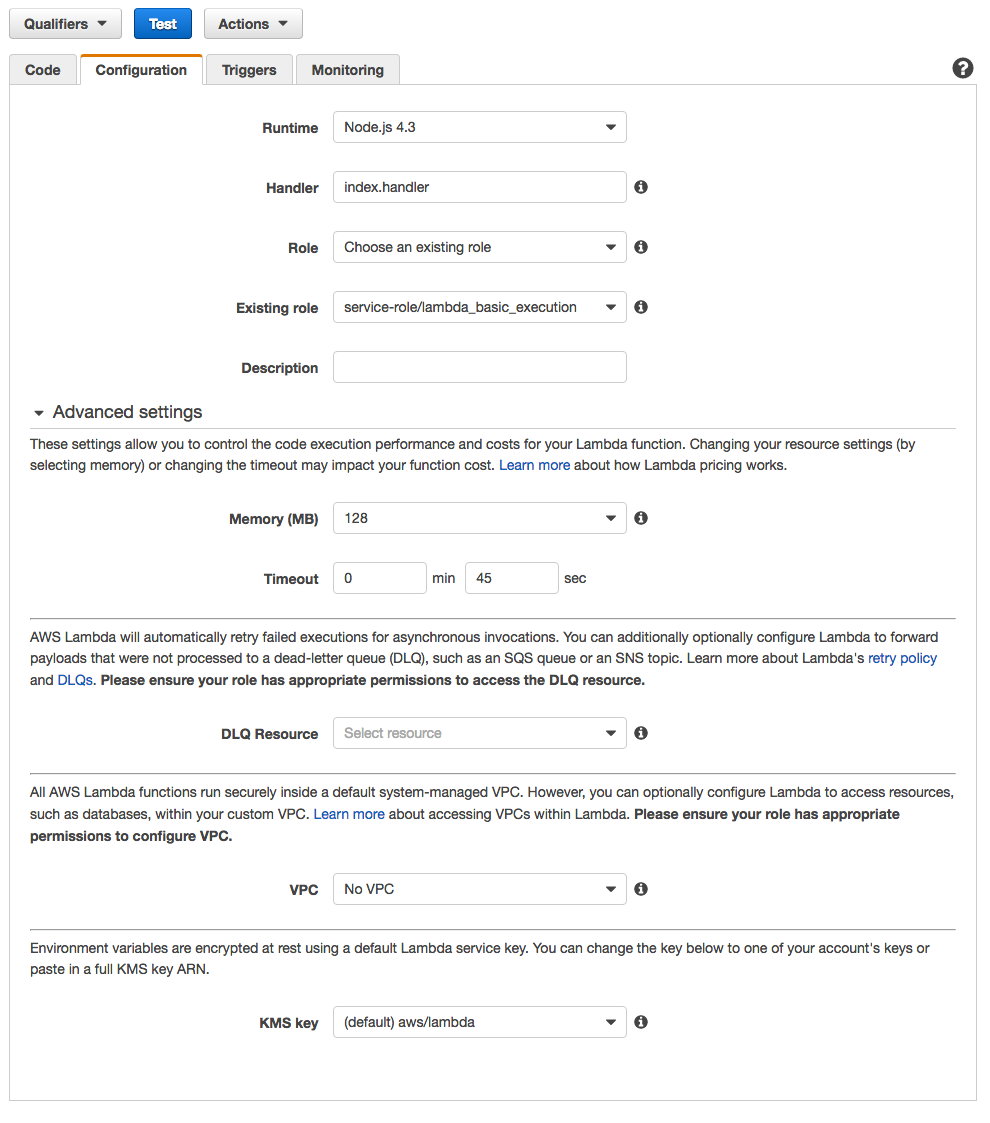
There are a number of extra configuration options – such as the runtime environment to use (Node.js), the user role, the amount of memory to be made available to the function, and how long each invocation of the function should be allowed to run (the function is making external HTTP requests and so it may need a few seconds):
Configure AWS Lambda function for Amazon Alexa skill
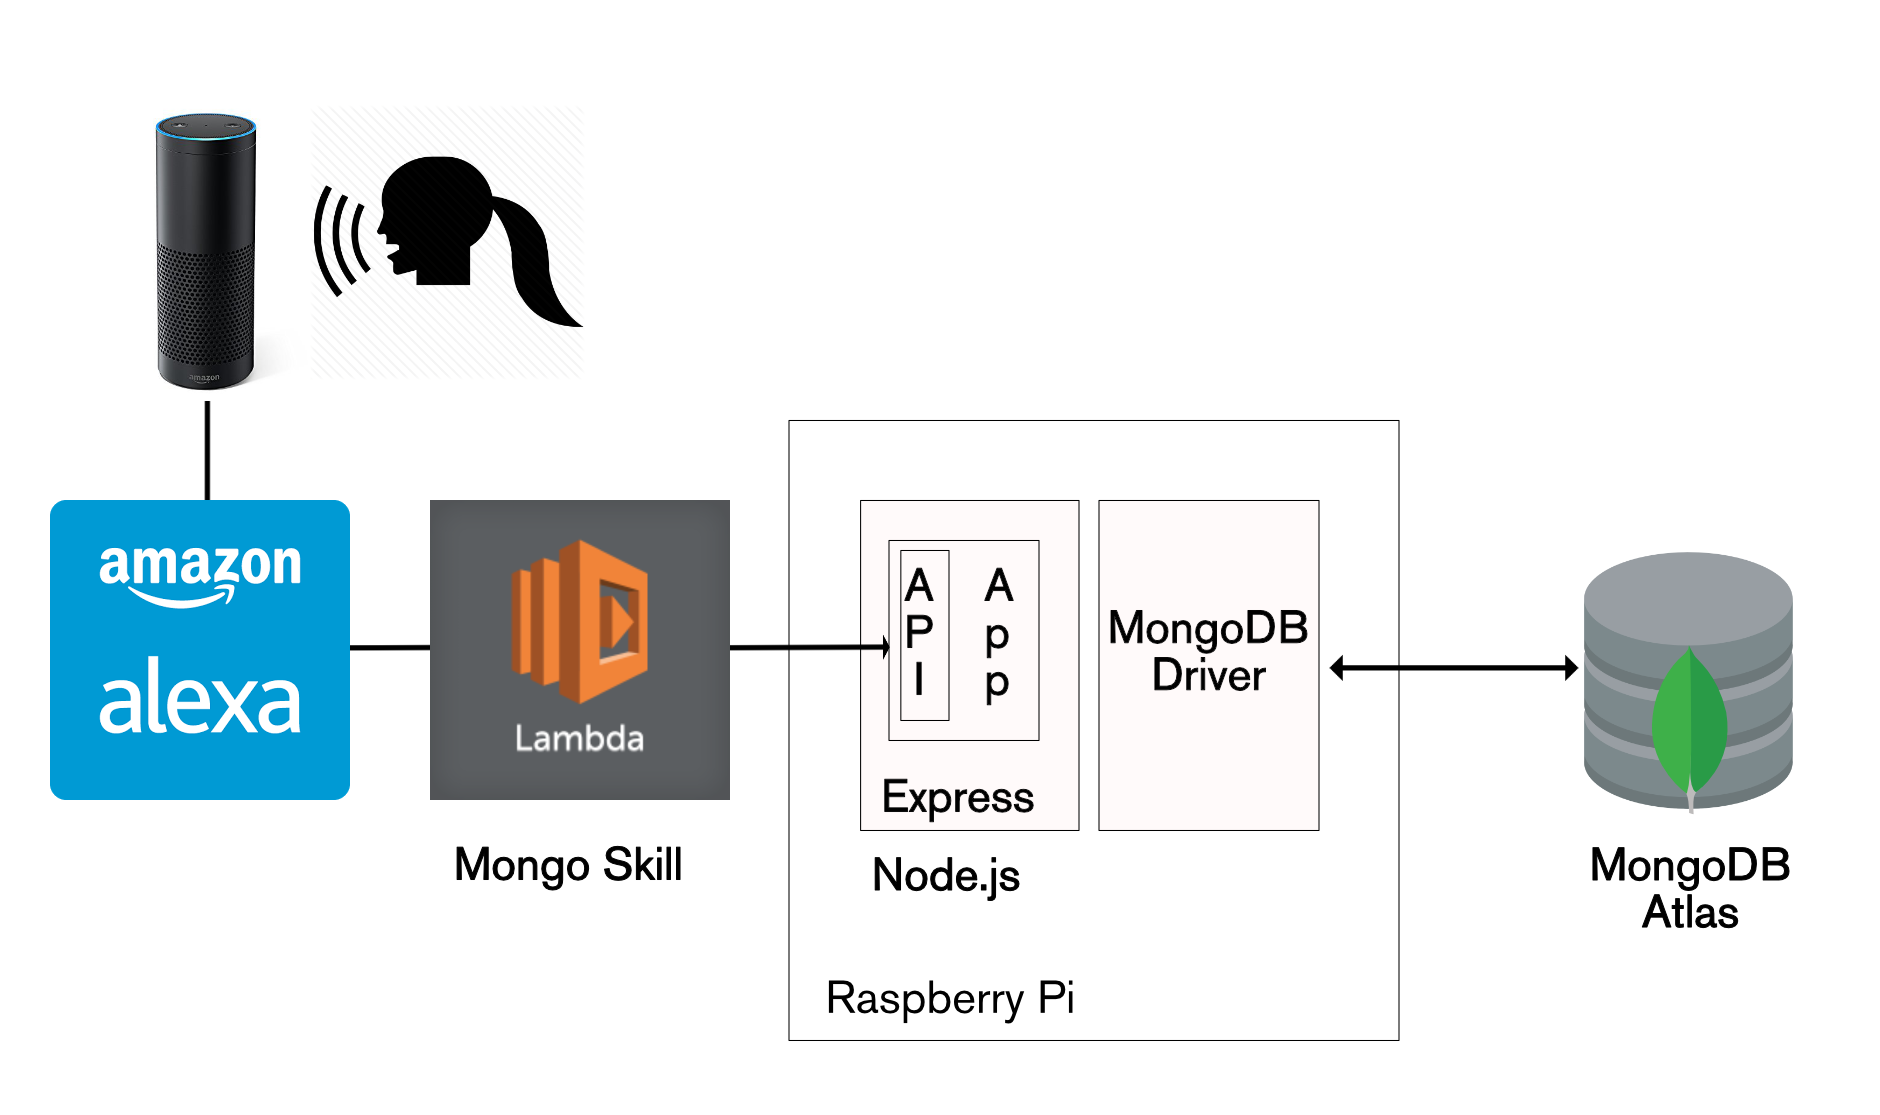
As a reminder, the user speaks to the Amazon Echo device, then the Alexa application invokes an AWS Lambda function, which implements the business logic for the Mongo skill, which then interacts with the MongoDB database via the Mongopop REST API:
Stack to have Alexa make REST API calls to Mongopop
To start, test the simplest intent – asking the Mongo skill for help:
Note that the visual card can contain more information than Alexa’s spoken response. For example, if there is an error in the Mongopop back-end, the returned error message is displayed on the card.
Next, we can ask Alexa how many times I’ve checked in and where my last check-in was. Note that I could have used any of the utterances associated with these intents (and Alexa will automatically convert similar phrases):
Summary
Previous posts stepped through building the Mongopop application back-end and then the creation of web client applications using Angular 2 and ReactJS.
This post explored some alternative ways to build client applications; in particular, it showed how to combine existing cloud services with a bit of new logic to create something brand new. We looked at a number of technologies to help build applications quickly and efficiently:
IFTTT: Make events in one cloud service trigger actions in another
Workflow: Automate complex tasks involving multiple services on an iOS device
Amazon Alexa: Implement your own voice-controlled skills
AWS Lambda: Host and scale your business logic in the cloud while only paying for the transactions you process
Increasingly, applications leverage multiple services (if only to allow the user to share their efforts on different social media networks). The key to all of these integrations is the REST APIs provided by each service. If you’ve jumped straight to this post then consider reading parts 1 through 3 to learn how to build your own REST API:
A simpler way to build your app – MongoDB Stitch, Backend as a Service
MongoDB Stitch is a backend as a service (BaaS), giving developers a REST-like API to MongoDB, and composability with other services, backed by a robust system for configuring fine-grained data access controls. Stitch provides native SDKs for JavaScript, iOS, and Android.
Built-in integrations give your application frontend access to your favorite third party services: Twilio, AWS S3, Slack, Mailgun, PubNub, Google, and more. For ultimate flexibility, you can add custom integrations using MongoDB Stitch’s HTTP service.
MongoDB Stitch allows you to compose multi-stage pipelines that orchestrate data across multiple services; where each stage acts on the data before passing its results on to the next.
Unlike other BaaS offerings, MongoDB Stitch works with your existing as well as new MongoDB clusters, giving you access to the full power and scalability of the database. By defining appropriate data access rules, you can selectively expose your existing MongoDB data to other applications through MongoDB Stitch’s API.
KeystoneJS is an open source framework for building web applications and Content Management Systems. It’s built on top of MongoDB, Express, and Node.js – key components of the ubiquitous MEAN stack.
This post explains why MongoDB Atlas is an ideal choice for KeystoneJS and then goes on to show how to configure KeystoneJS to use it.
Why are KeystoneJS and MongoDB Atlas a Good Match
The MEAN stack is extremely popular and well supported and it’s the go to platform when developing modern applications. For its part, MongoDB brings flexible schemas, rich queries, an idiomatic Node.js driver, and simple to use high availability and scaling.
MongoDB Atlas provides all of the features of MongoDB, without the operational heavy lifting required for any new application. MongoDB Atlas is available on demand through a pay-as-you-go model and billed on an hourly basis, letting you focus on what you do best.
It’s easy to get started – use a simple GUI to select the instance size, region, and features you need. MongoDB Atlas provides:
Security features to protect access to your data
Built in replication for always-on availability, tolerating complete data center failure
Backups and point in time recovery to protect against data corruption
Fine-grained monitoring to let you know when to scale. Additional instances can be provisioned with the push of a button
Automated patching and one-click upgrades for new major versions of the database, enabling you to take advantage of the latest and greatest MongoDB features
A choice of cloud providers, regions, and billing options
Like KeystoneJS, MongoDB Atlas is a natural fit for users looking to simplify their development and operations work, letting them focus on what makes their application unique rather than commodity (albeit essential) plumbing.
Installing KeystoneJS and Configuring it to Use MongoDB Atlas
Before starting with KeystoneJS, you should launch your MongoDB cluster using MongoDB Atlas and then (optionally) create a user with read and write privileges for just the database that will be used for this project, as shown in Figure 1. You must also add the IP address of your application server to the IP Whitelist in the MongoDB Atlas security tab.
Figure 1: Creating KeystoneJS user in MongoDB Atlas
If it isn’t already installed on your system, download and install Node.js:
You should then add the bin sub-folder to your .bash_profile file and then install KeystoneJS:
Before starting KeystoneJS you need to configure it with details on how to connect to your specific MongoDB Atlas cluster. This is done by updating the MONGO_URI value within the .env file:
The URI contains these components:
keystonejs_user is the name of the user you created in the MongoDB Atlas UI
my_password is the password you chose when creating the user in MongoDB Atlas
cluster0-shard-00-00-qfovx.mongodb.net, cluster0-shard-00-01-qfovx.mongodb.net, & cluster0-shard-00-02-qfovx.mongodb.net are the hostnames of the instances in your MongoDB Atlas replica set (click on the “CONNECT” button in the MongoDB Atlas UI if you don’t have these)
27017 is the standard MongoDB port number
clusterdb is the name of the database (schema) that KeystoneJS will use (note that this must match the project name used when installing KeystoneJS as well as the database you granted the user access to)
To enforce security, MongoDB Atlas mandates that the ssl option is used
admin is the database that’s being used to store the credentials for keystonejs_user
Clients connect to KeystoneJS through port 3000 and so you must open that port in your firewall.
You can then start KeystoneJS:
$ node keystone
Testing the Configuration
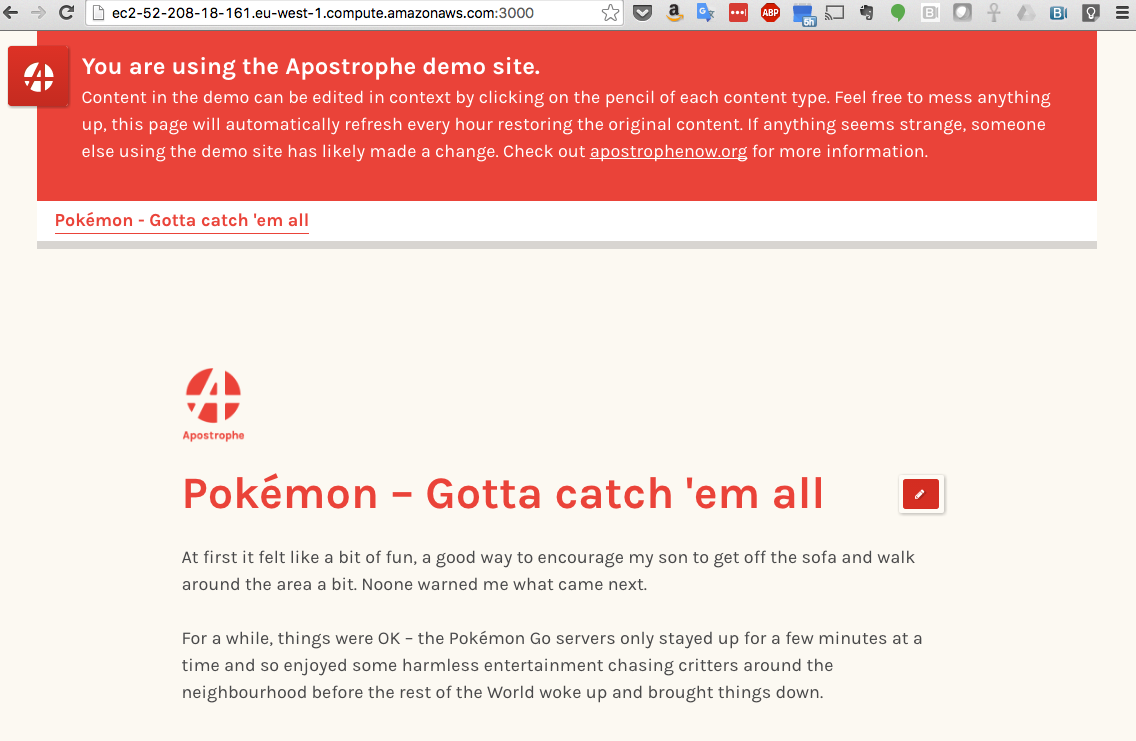
Browse to the application at http://address-of-app-server:3000 as shown in Figure 2.
Figure 2: KeystoneJS Running on MongoDB Atlas
Sign in using the credentials shown and then confirm that you can upload some images to a gallery and create a new page as shown in Figure 3.
Figure 3: Create a Page in KeystoneJS with Data Stored in MongoDB Atlas
After saving the page, confirm that you can browse to the newly created post (Figure 4).
Figure 4: View KeystoneJS Post with Data Read from MongoDB Atlas
Optionally, confirm that, MongoDB Atlas really is being used by KeystoneJS, you can connect using the MongoDB shell:
To visually navigate through the schema and data created by KeystoneJS, download and install MongoDB Compass. The same credentials can be used to connect Compass to your MongoDB database – Figure 5.
Figure 5: Connect MongoDB Compass to MongoDB Atlas Database
Navigate through the structure of the data in the clusterdb database (Figure 6) and view the JSON documents (Figure 7).
Figure 6: Explore KeystoneJS Schema Using MongoDB Compass
Figure 7: View Documents Stored by KeystoneJS Using MongoDB Atlas
Next Steps
While MongoDB Atlas radically simplifies the operation of MongoDB there are still some decisions to take to ensure the best performance and reliability for your application. The MongoDB Atlas Best Practices white paper provides guidance on best practices for deploying, managing, and optimizing the performance of your database with MongoDB Atlas.
The guide outlines considerations for achieving performance at scale with MongoDB Atlas across a number of key dimensions, including instance size selection, application patterns, schema design and indexing, and disk I/O. While this guide is broad in scope, it is not exhaustive. Following the recommendations in the guide will provide a solid foundation for ensuring optimal application performance.
PencilBlue is a Node.js based, open source blogging and Content Management System, targeted at enterprise grade websites.
This post explains why MongoDB Atlas is an ideal choice for PencilBlue and then goes on to show how to configure PencilBlue to use it.
Why MongoDB Atlas is the Ideal Database for PencilBlue
MongoDB delivers flexible schemas, rich queries, an idiomatic Node.js driver, and simple to use high availability and scaling. This makes it the go-to database for anyone looking to build applications on Node.js.
MongoDB Atlas provides all of the features of MongoDB, without the operational heavy lifting required for any new application. MongoDB Atlas is available on demand through a pay-as-you-go model and billed on an hourly basis, letting you focus on what you do best.
It’s easy to get started – use a simple GUI to select the instance size, region, and features you need. MongoDB Atlas provides:
Security features to protect access to your data
Built in replication for always-on availability, tolerating complete data center failure
Backups and point in time recovery to protect against data corruption
Fine-grained monitoring to let you know when to scale. Additional instances can be provisioned with the push of a button
Automated patching and one-click upgrades for new major versions of the database, enabling you to take advantage of the latest and greatest MongoDB features
A choice of cloud providers, regions, and billing options
Like PencilBlue, MongoDB Atlas is a natural fit for users looking to simplify their development and operations work, letting them focus on what makes their application unique rather than commodity (albeit essential) plumbing.
Installing PencilBlue and Connecting it to MongoDB Atlas
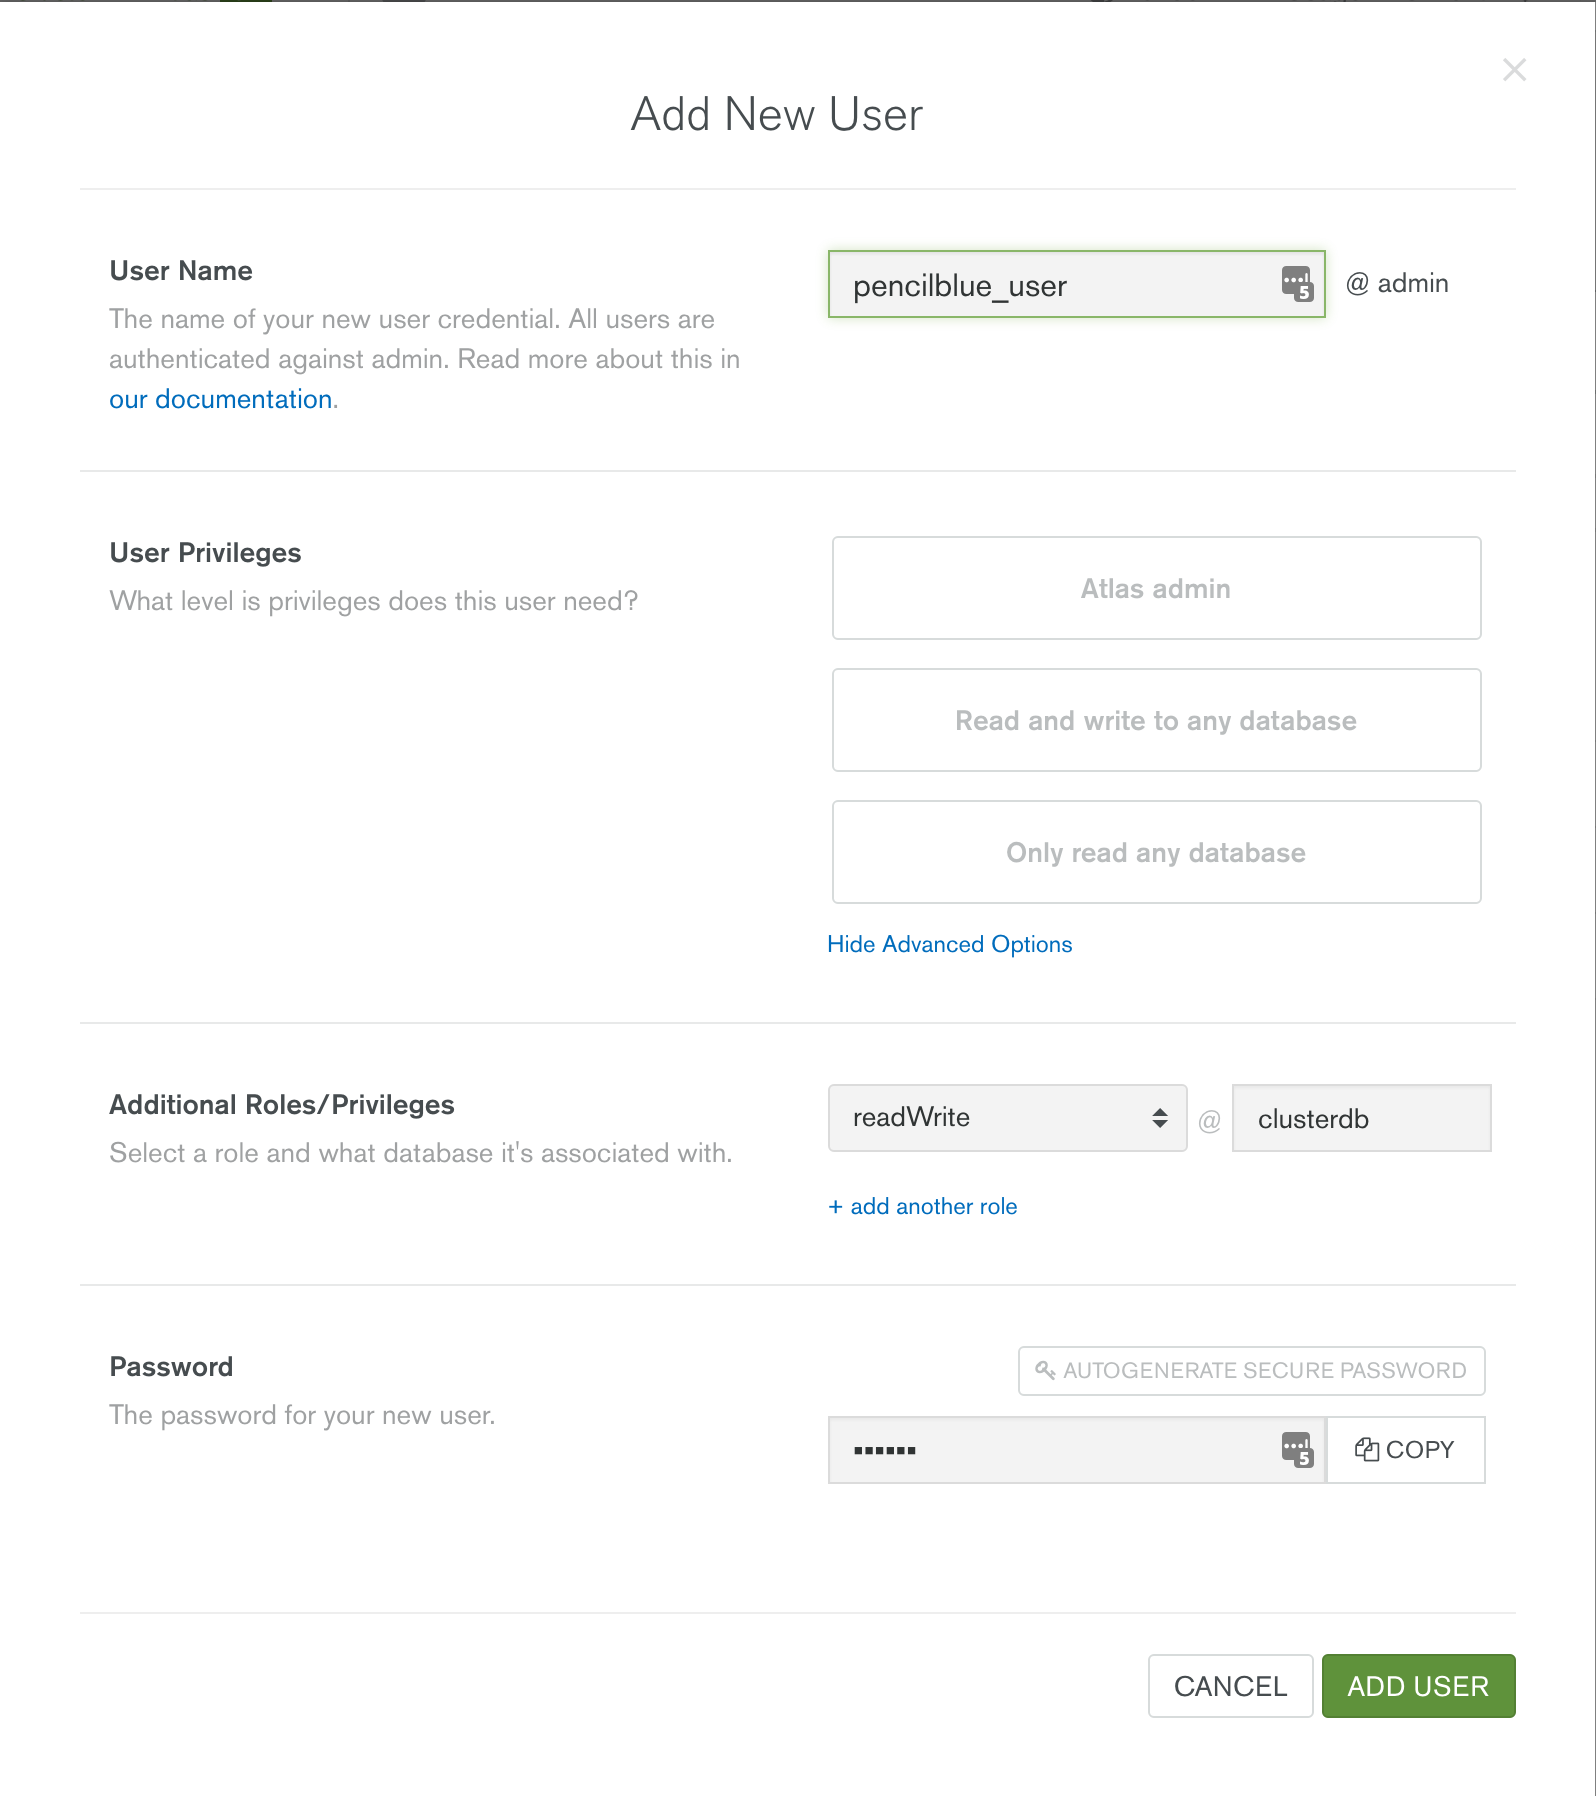
Before starting with PencilBlue, you should launch your MongoDB cluster using MongoDB Atlas and then (optionally) create a user with read and write privileges for just the database that will be used for this project, as shown in Figure 1.
Figure 1: Adding a PencilBlue User to MongoDB Atlas
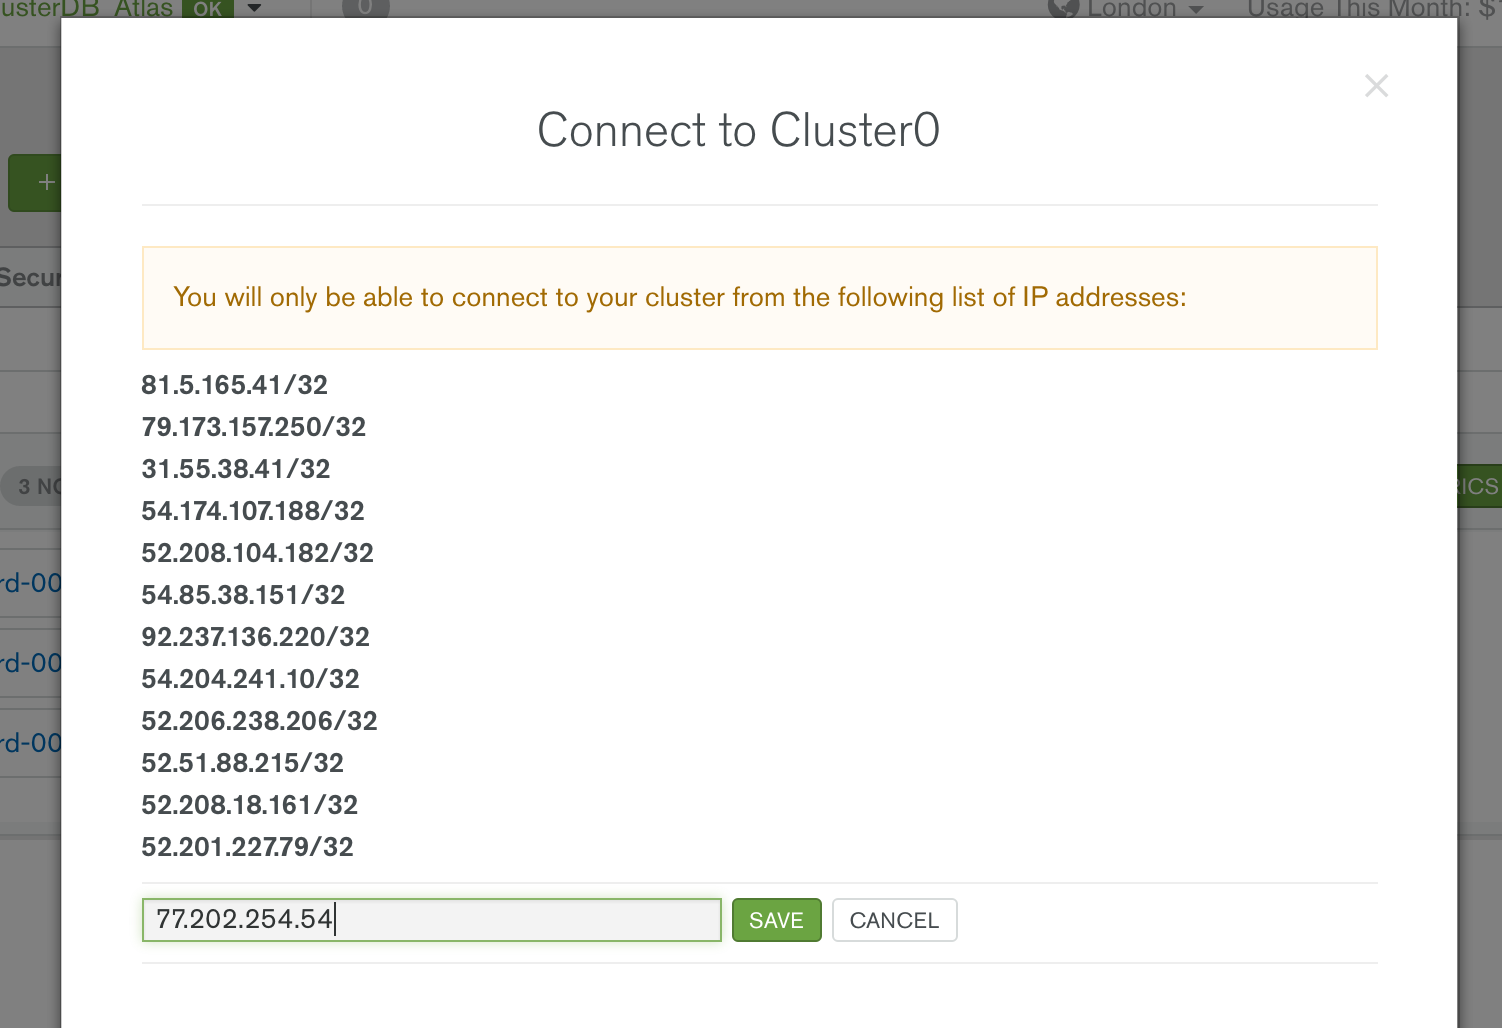
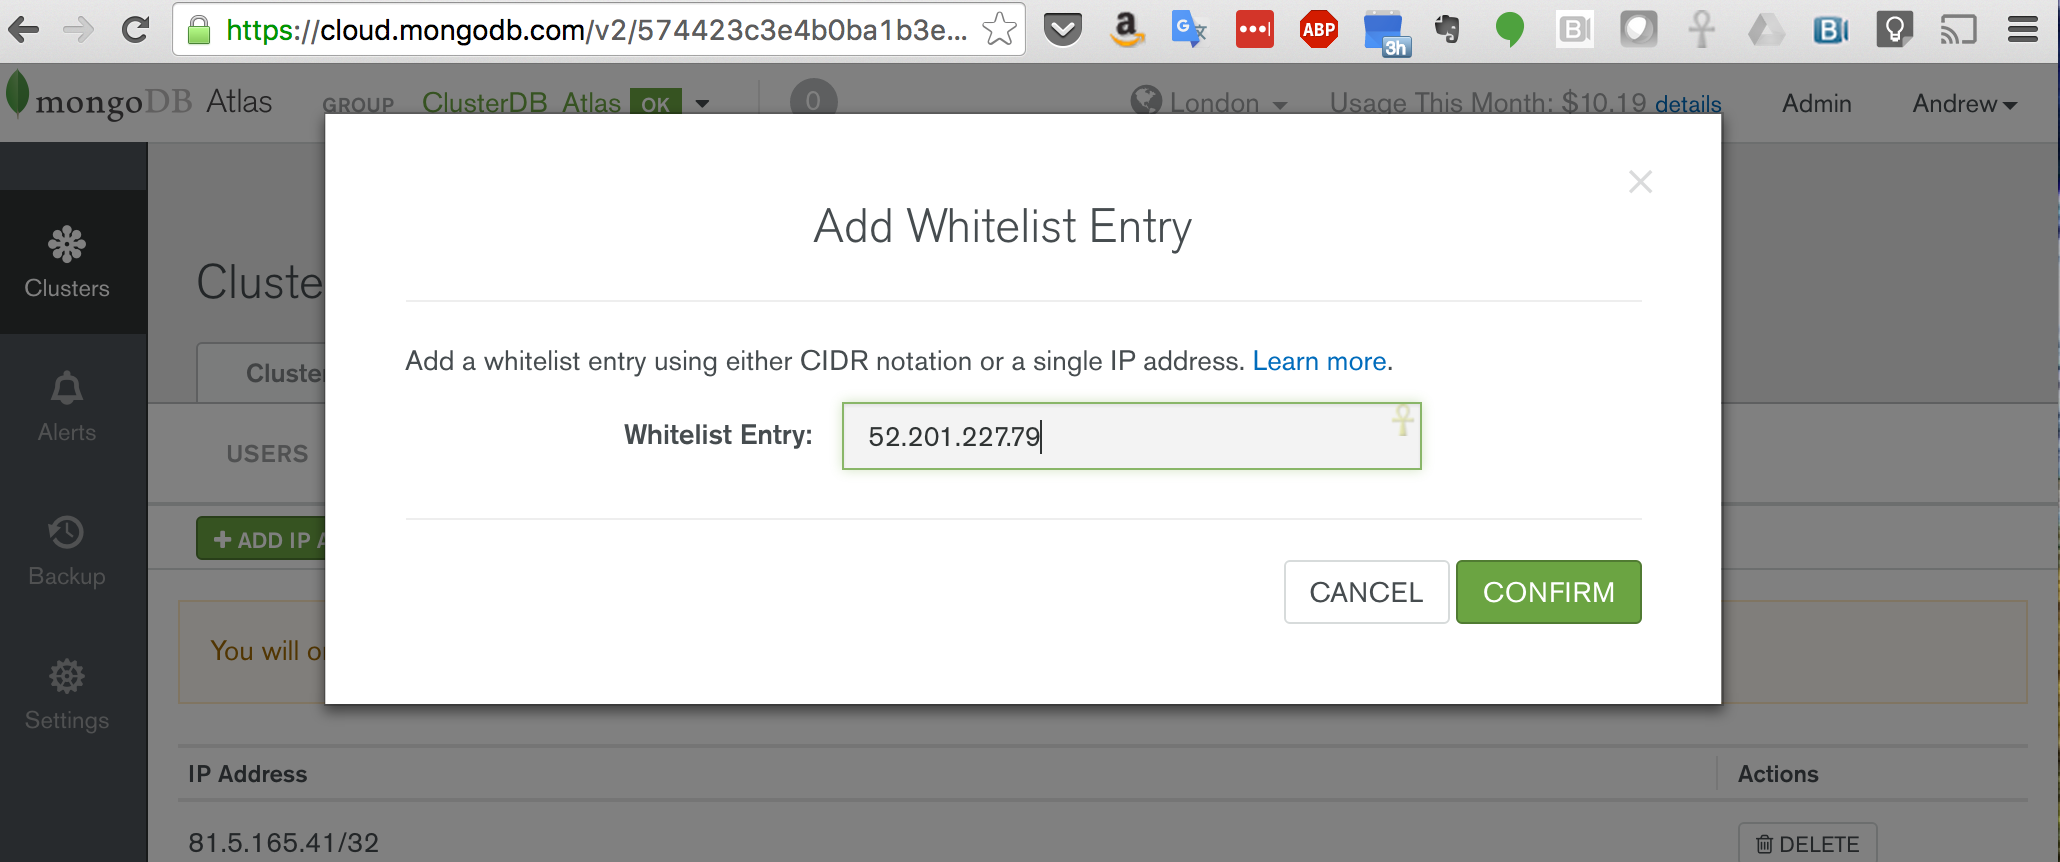
You must also add your IP address to the IP Whitelist in the MongoDB Atlas security tab (Figure 2).
Figure 2: Add IP Address to MongoDB Atlas Whitelist
If it isn’t already installed on your system, download and install Node.js:
$ curl https://nodejs.org/dist/v4.4.7/node-v4.4.7-linux-x64.tar.xz -o node.tar.xz
$ tar xf node.tar.xz
You should then add the bin sub-folder to your .bash_profile before installing the PencilBlue command line interface (CLI):
The CLI can then be used to install and configure PencilBlue itself:
$ pbctrl install PencilBlue
Site Name: (My PencilBlue Site) PokeSite
Site Root: (http://localhost:8080)
Address to bind to: (0.0.0.0)
Site Port: (8080)
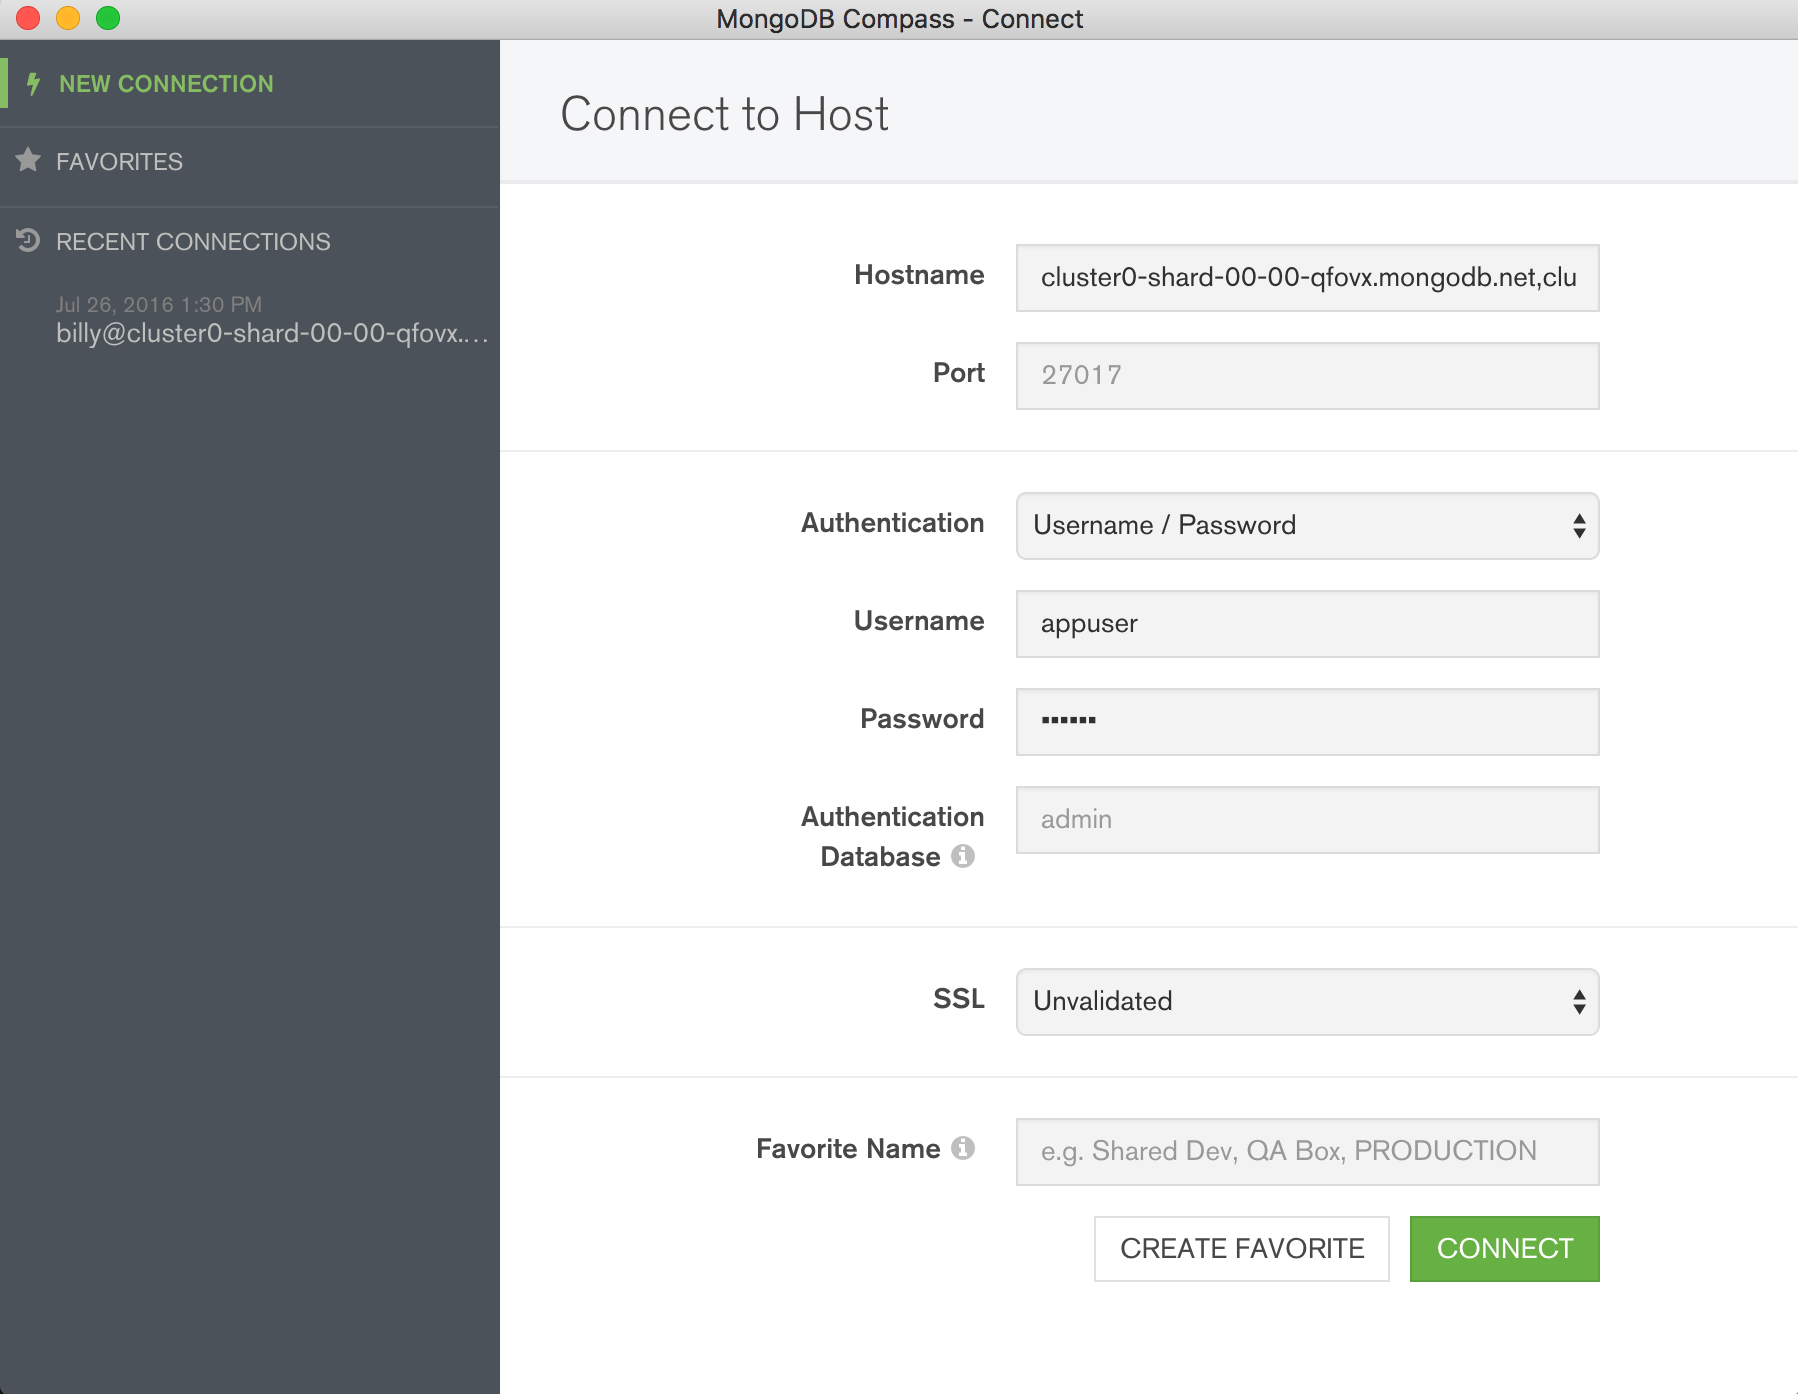
MongoDB URL: (mongodb://127.0.0.1:27017/) mongodb://pencilblue_user:my_password@cluster0-shard-00-00-qfovx.mongodb.net:27017,cluster0-shard-00-01-qfovx.mongodb.net:27017,cluster0-shard-00-02-qfovx.mongodb.net:27017/?ssl=true&authSource=admin
Database Name: (pencilblue) clusterdb
Do you want to install Bower components?: (y/N)
Cloning PencilBlue from github...
Cloning into 'PencilBlue'...
Installing npm modules...
...
Creating config.js...
Installation completed.
Note that if you need to change the configuration (e.g., to specify a new URL to connect to MongoDB) then edit the config.js file that was created during this step.
The MongoDB URL you provided contains these components:
pencilblue_user is the name of the user you created in the MongoDB Atlas UI
my_password is the password you chose when creating the user in MongoDB Atlas
cluster0-shard-00-00-qfovx.mongodb.net, cluster0-shard-00-01-qfovx.mongodb.net, & cluster0-shard-00-02-qfovx.mongodb.net are the hostnames of the instances in your MongoDB Atlas replica set (click on the “CONNECT” button in the MongoDB Atlas UI if you don’t have these – Figure 3)
27017 is the standard MongoDB port number
To enforce security, MongoDB Atlas mandates that the ssl option is used
admin is the database that’s being used to store the credentials for pencilblue_user
Figure 3: Find the Hostnames From the MongoDB Atlas UI
clusterdb is the name of the database (schema) that PencilBlue will use (note that unlike some frameworks, the database name is specified separately rather than being embedded in the MongoDB URL).
The PencilBlue process can now be started:
$ cd PencilBlue/
$ pbctrl start
Confirm that MongoDB Atlas is Being Used
At this point, it is possible to connect to MongoDB Atlas using the MongoDB shell (we’ll look at an easier way to navigate the data later) to confirm that the schema has been created:
$ mongo mongodb://cluster0-shard-00-00-qfovx.mongodb.net:27017,cluster0-shard-00-01-qfovx.mongodb.net:27017,cluster0-shard-00-02-qfovx.mongodb.net:27017/admin?replicaSet=Cluster0-shard-0 --ssl --username billy --password my_password

Cluster0-shard-0:PRIMARY> show dbs
admin      0.000GB
clusterdb  0.008GB
local      0.007GB

Cluster0-shard-0:PRIMARY> use clusterdb
switched to db clusterdb

Cluster0-shard-0:PRIMARY> show collections
article
auth_token
comment
custom_object
custom_object_type
fs.chunks
fs.files
job_log
lock
media
page
password_reset
plugin
plugin_settings
section
server_registry
session
setting
theme_settings
topic
unverified_user
user
Create Your First Page in PencilBlue
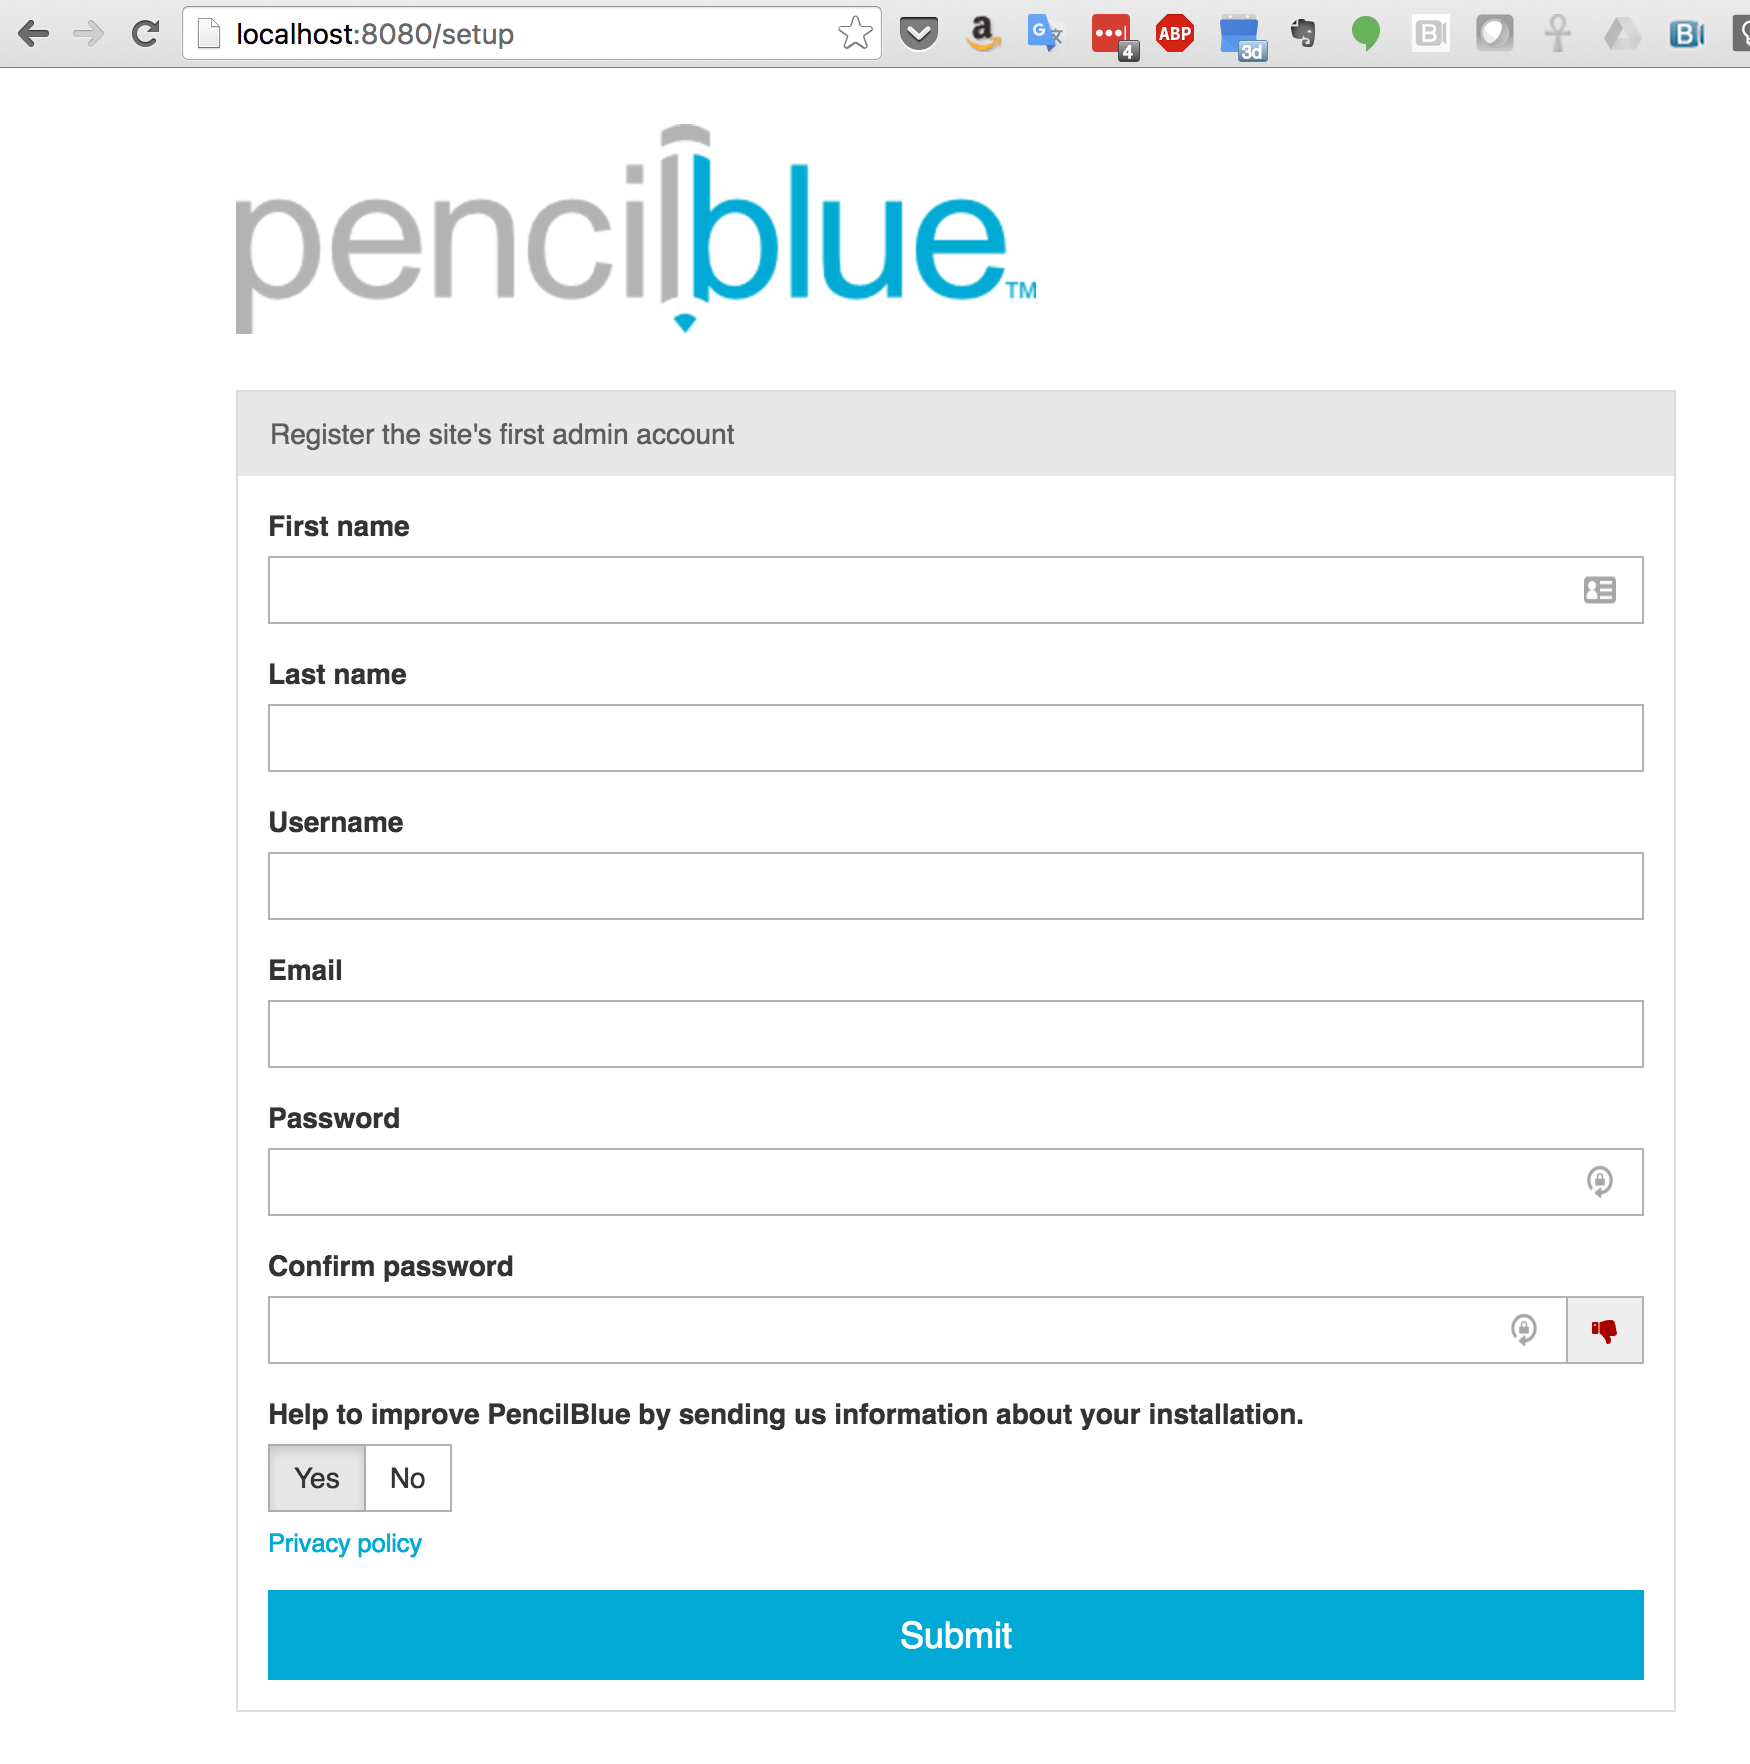
Browse to the application at http://localhost:8080 as shown in Figure 4 and create a user account.
Figure 4: Register User in PencilBlue
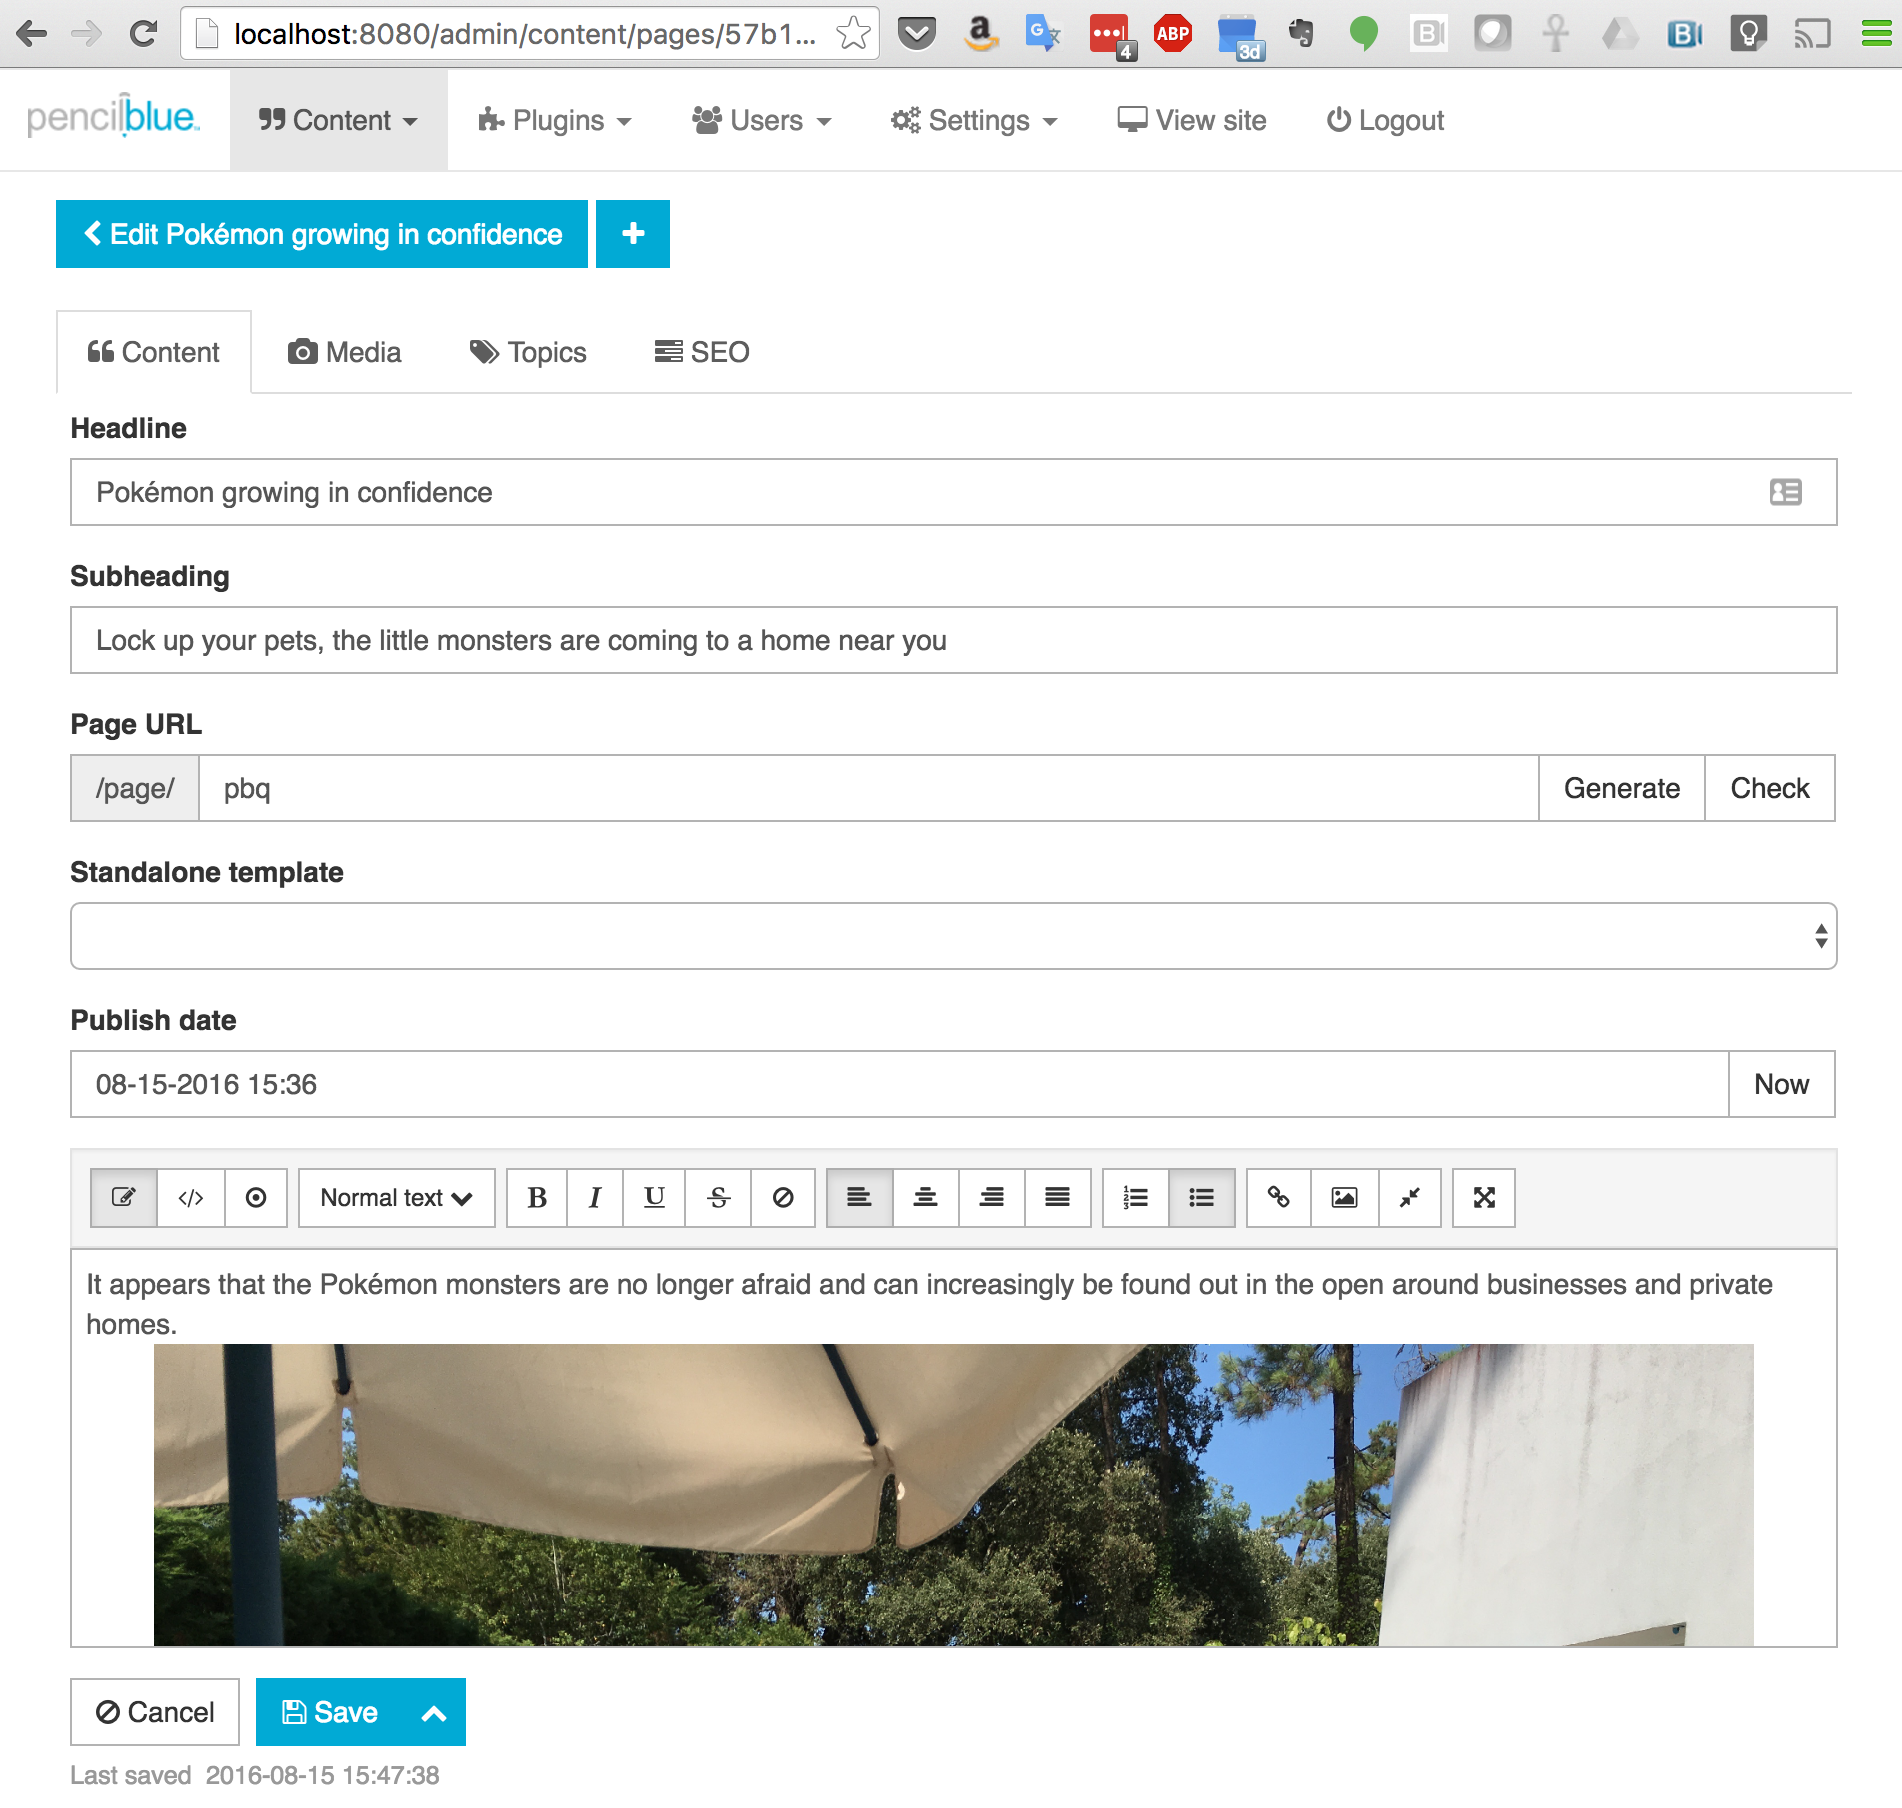
You’re then able to login and create your first page (Figure 5).
Figure 5: Create a New Page Using PencilBlue
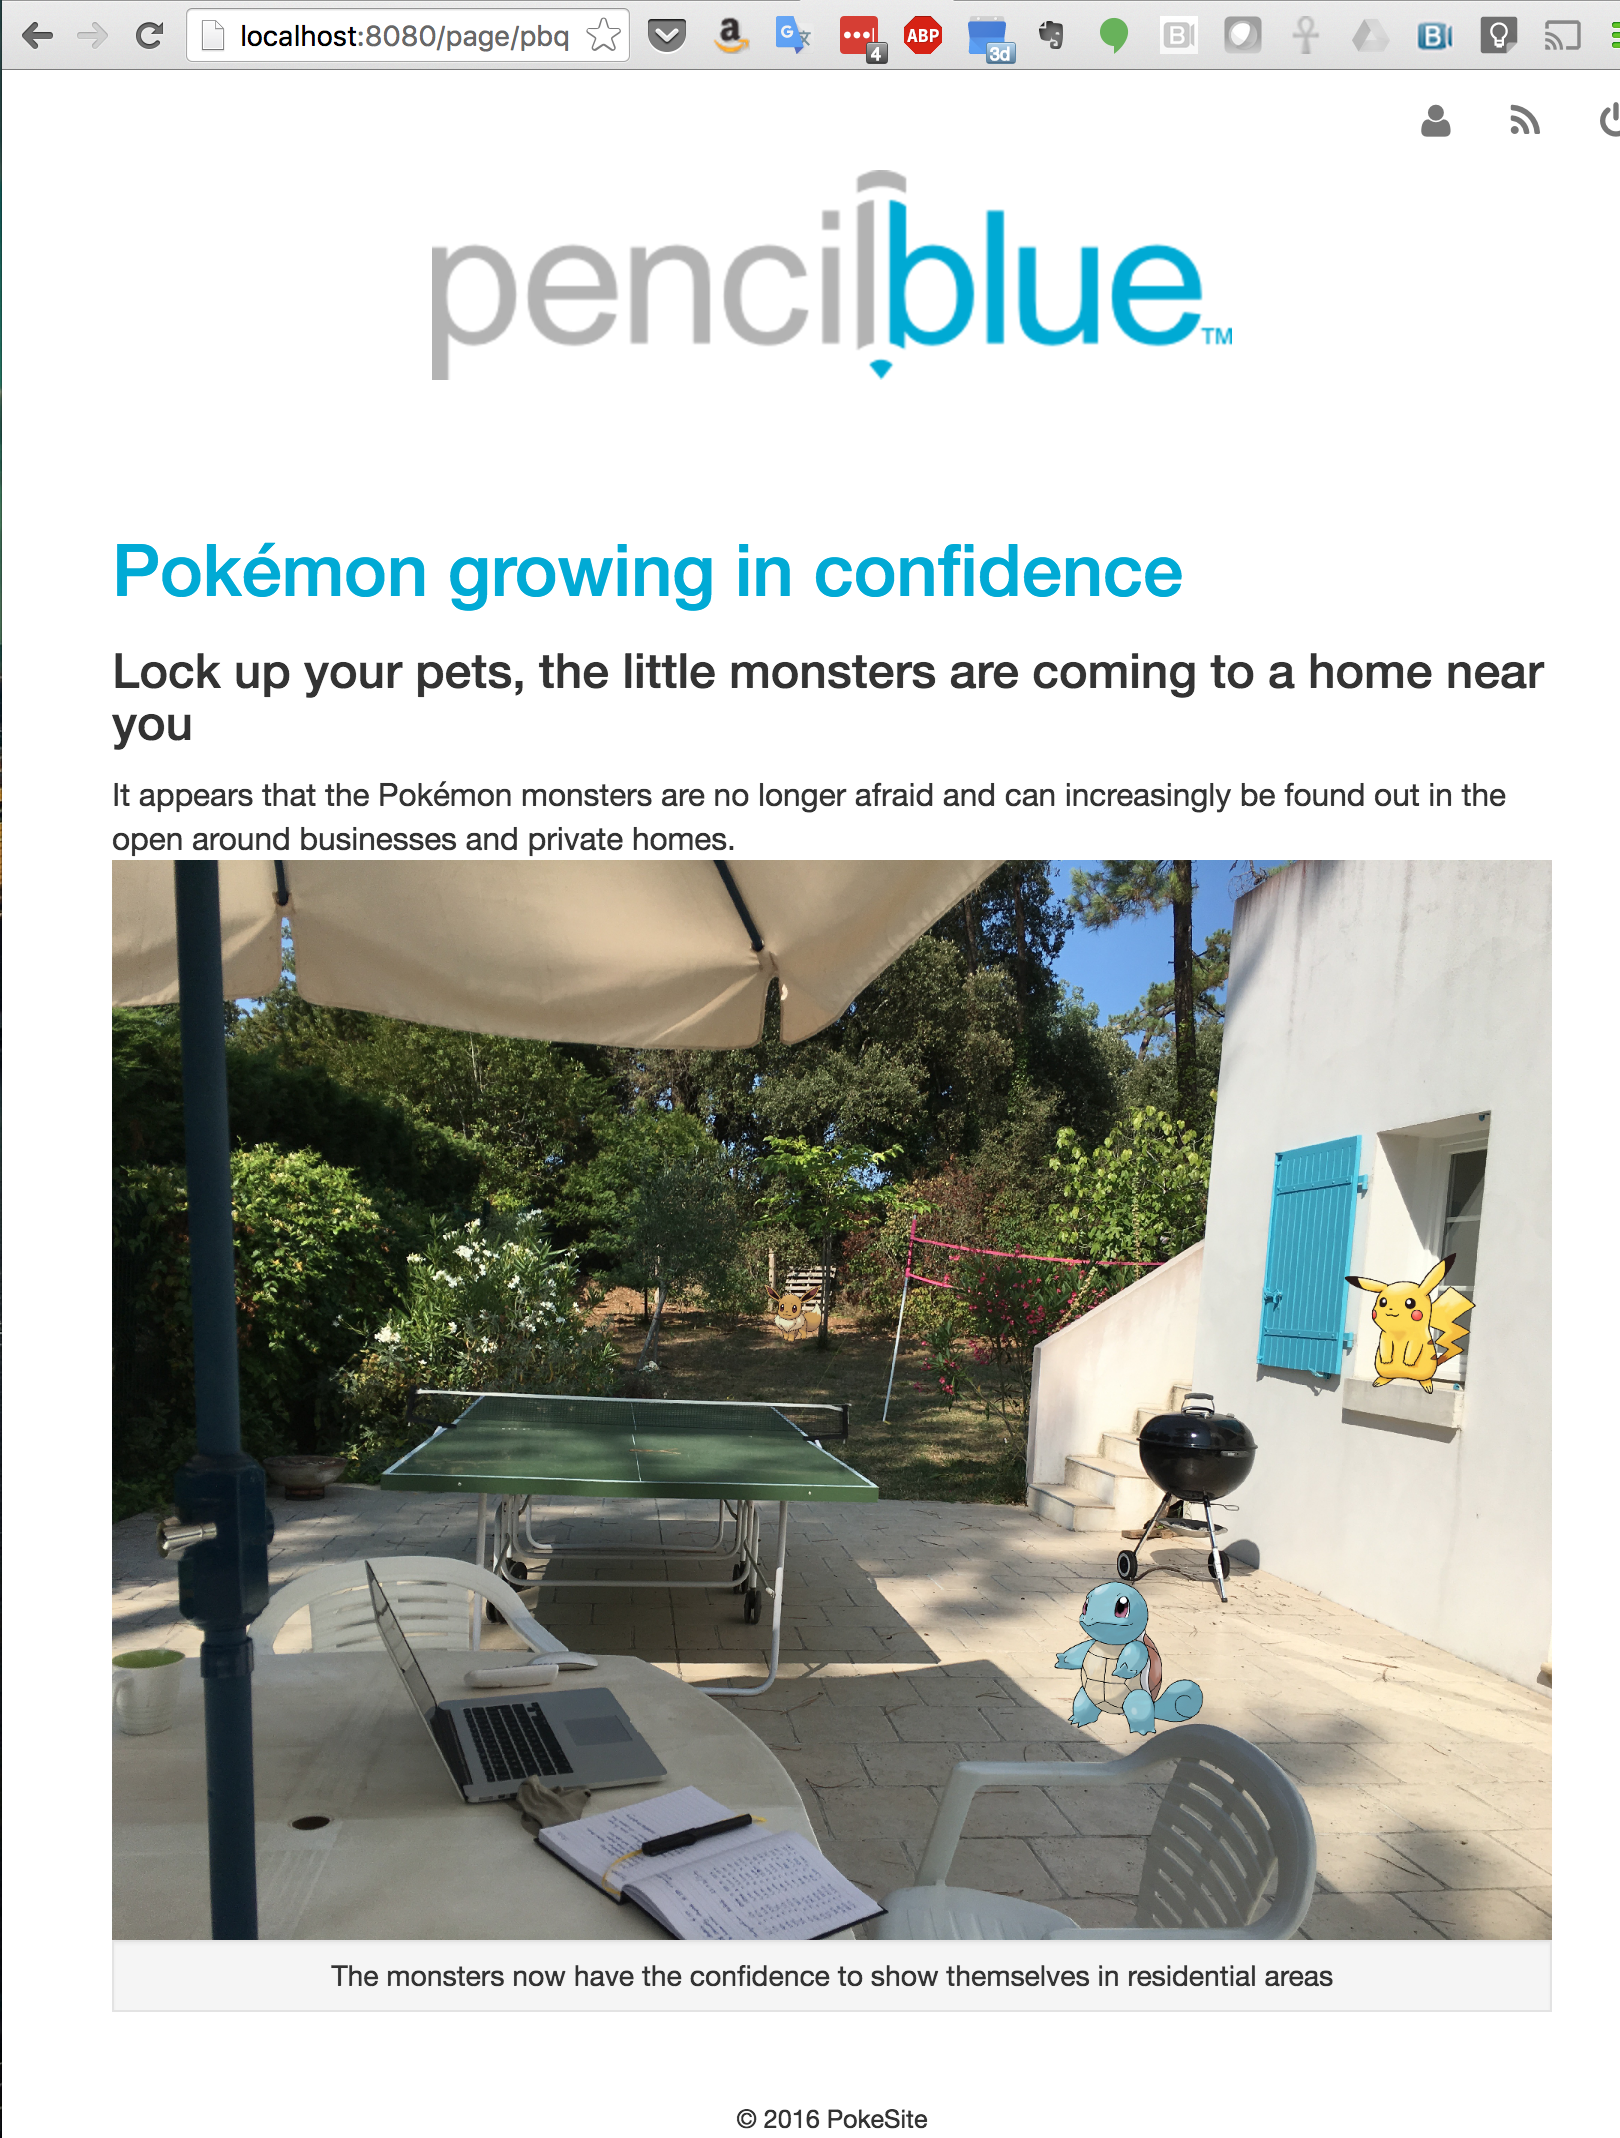
After saving, the new page can be viewed (Figure 6).
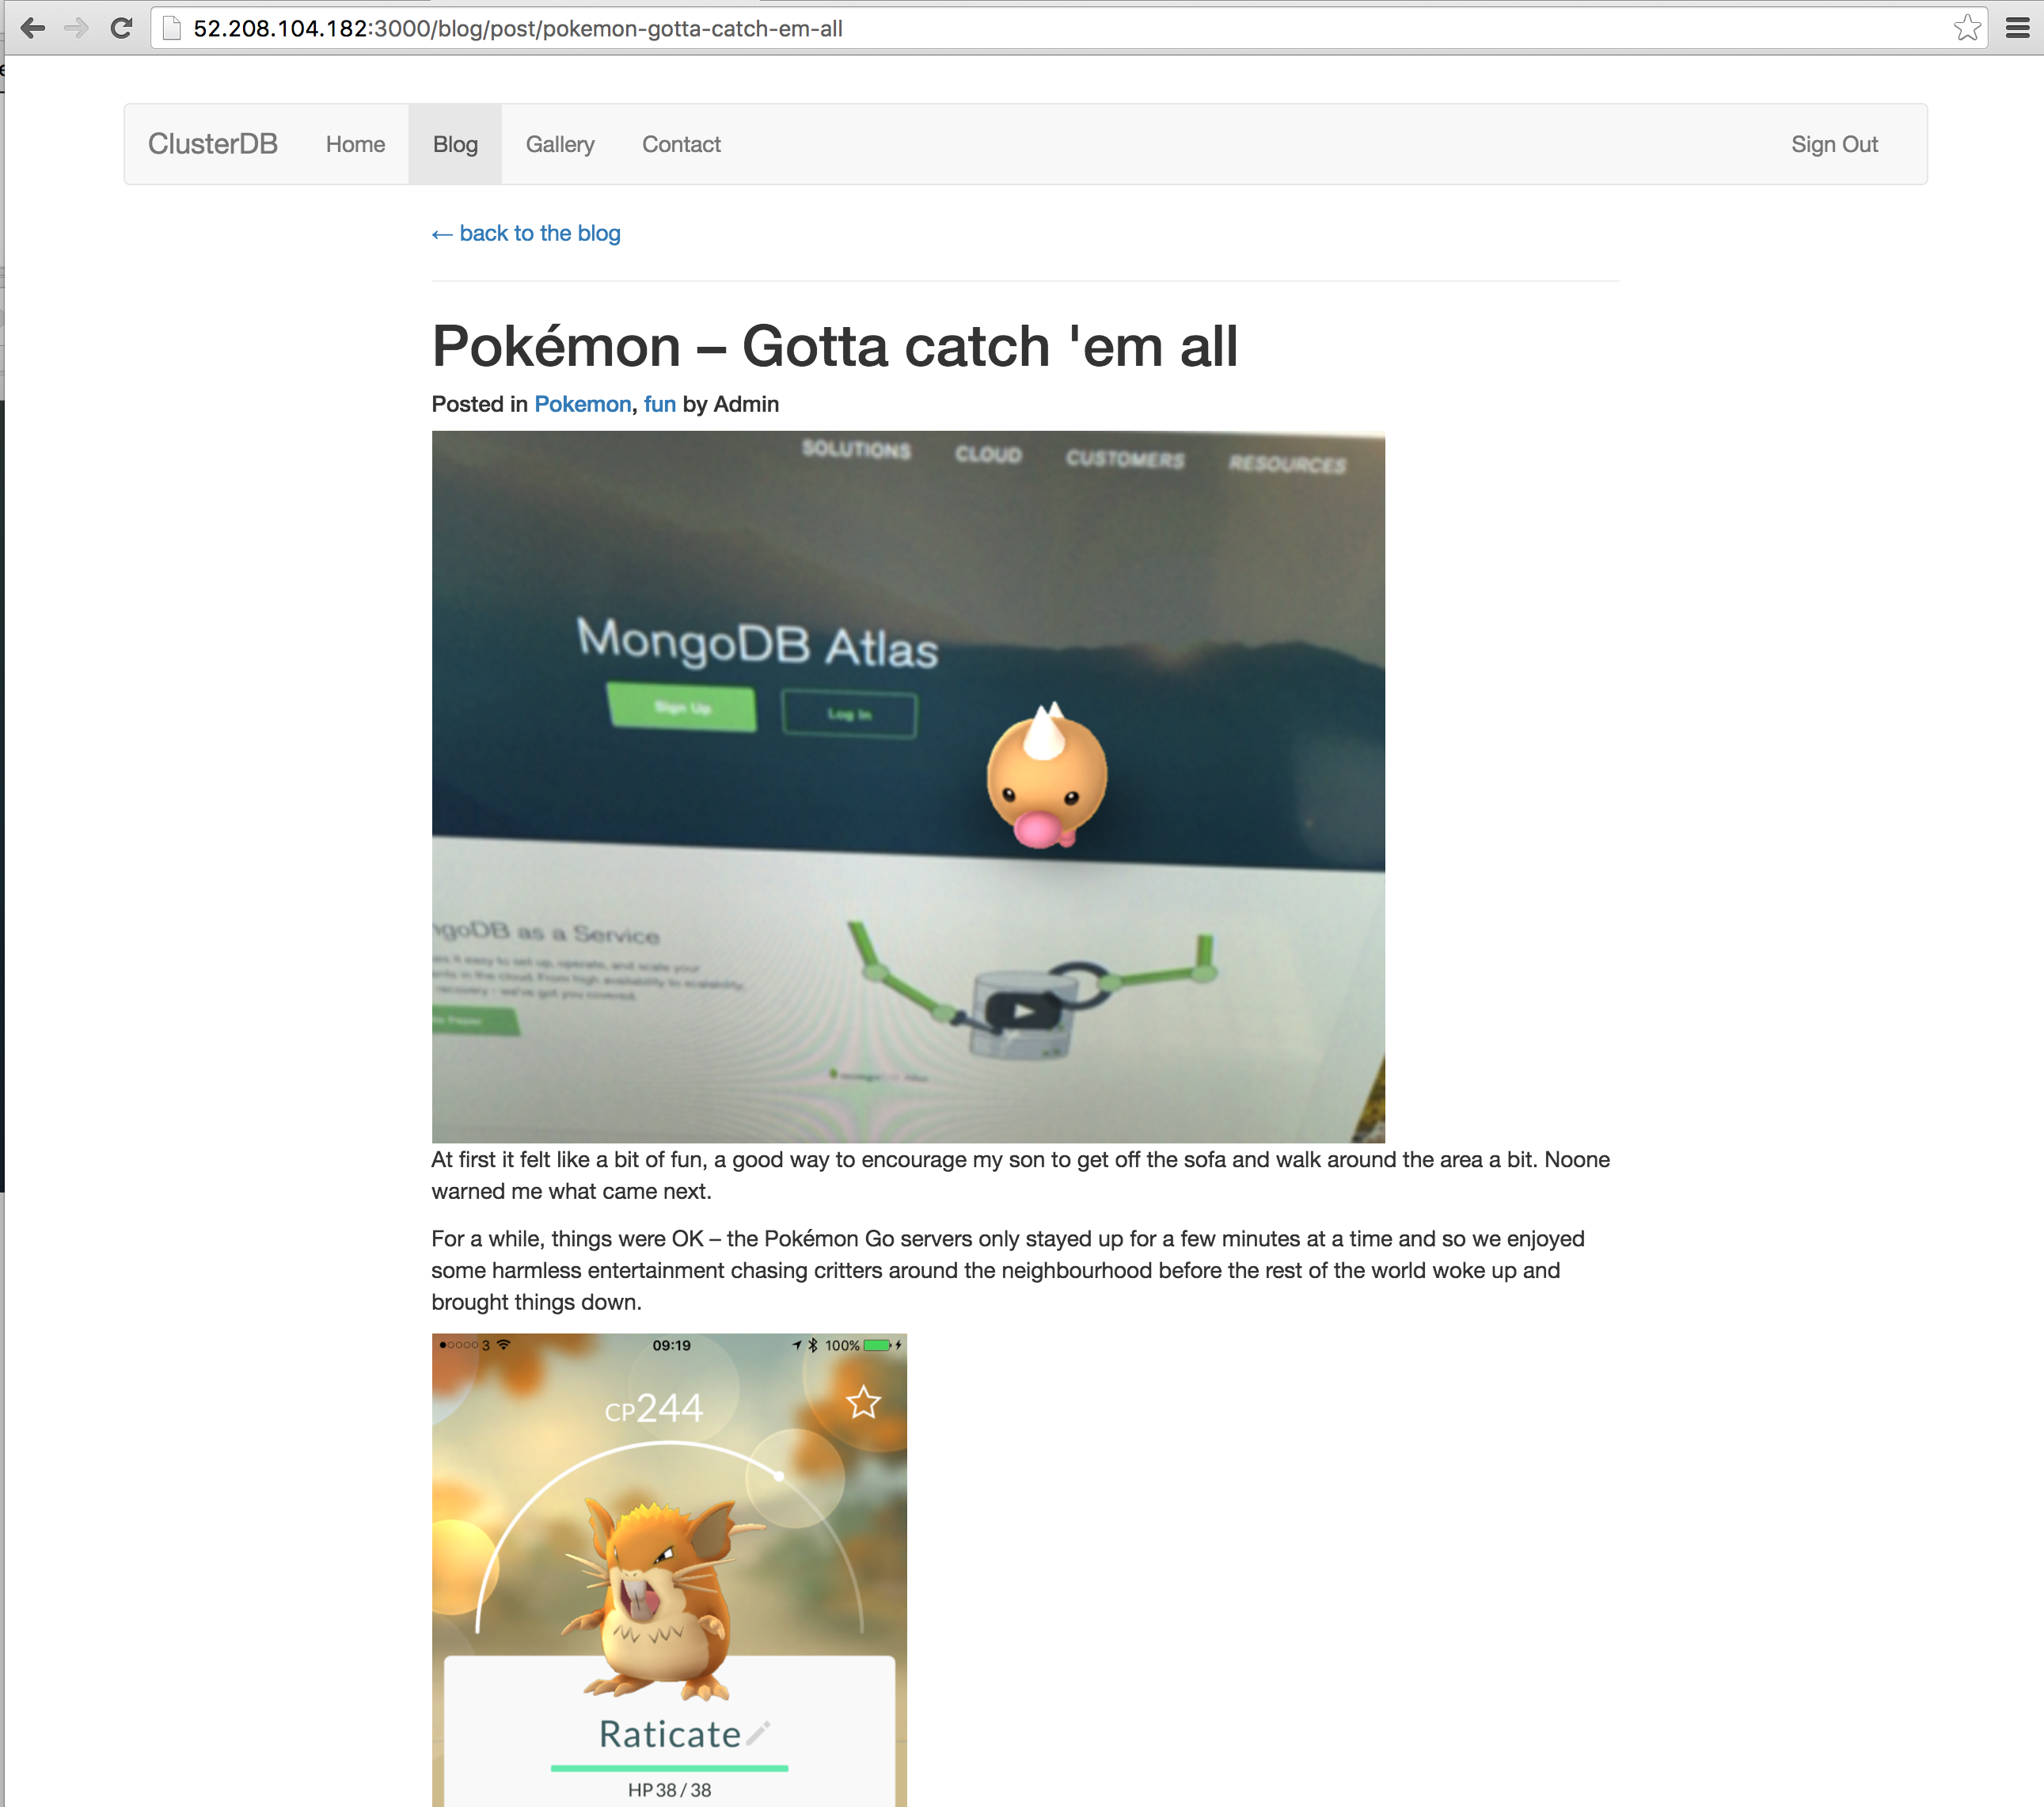
Figure 6: View Pokémon Page in PencilBlue
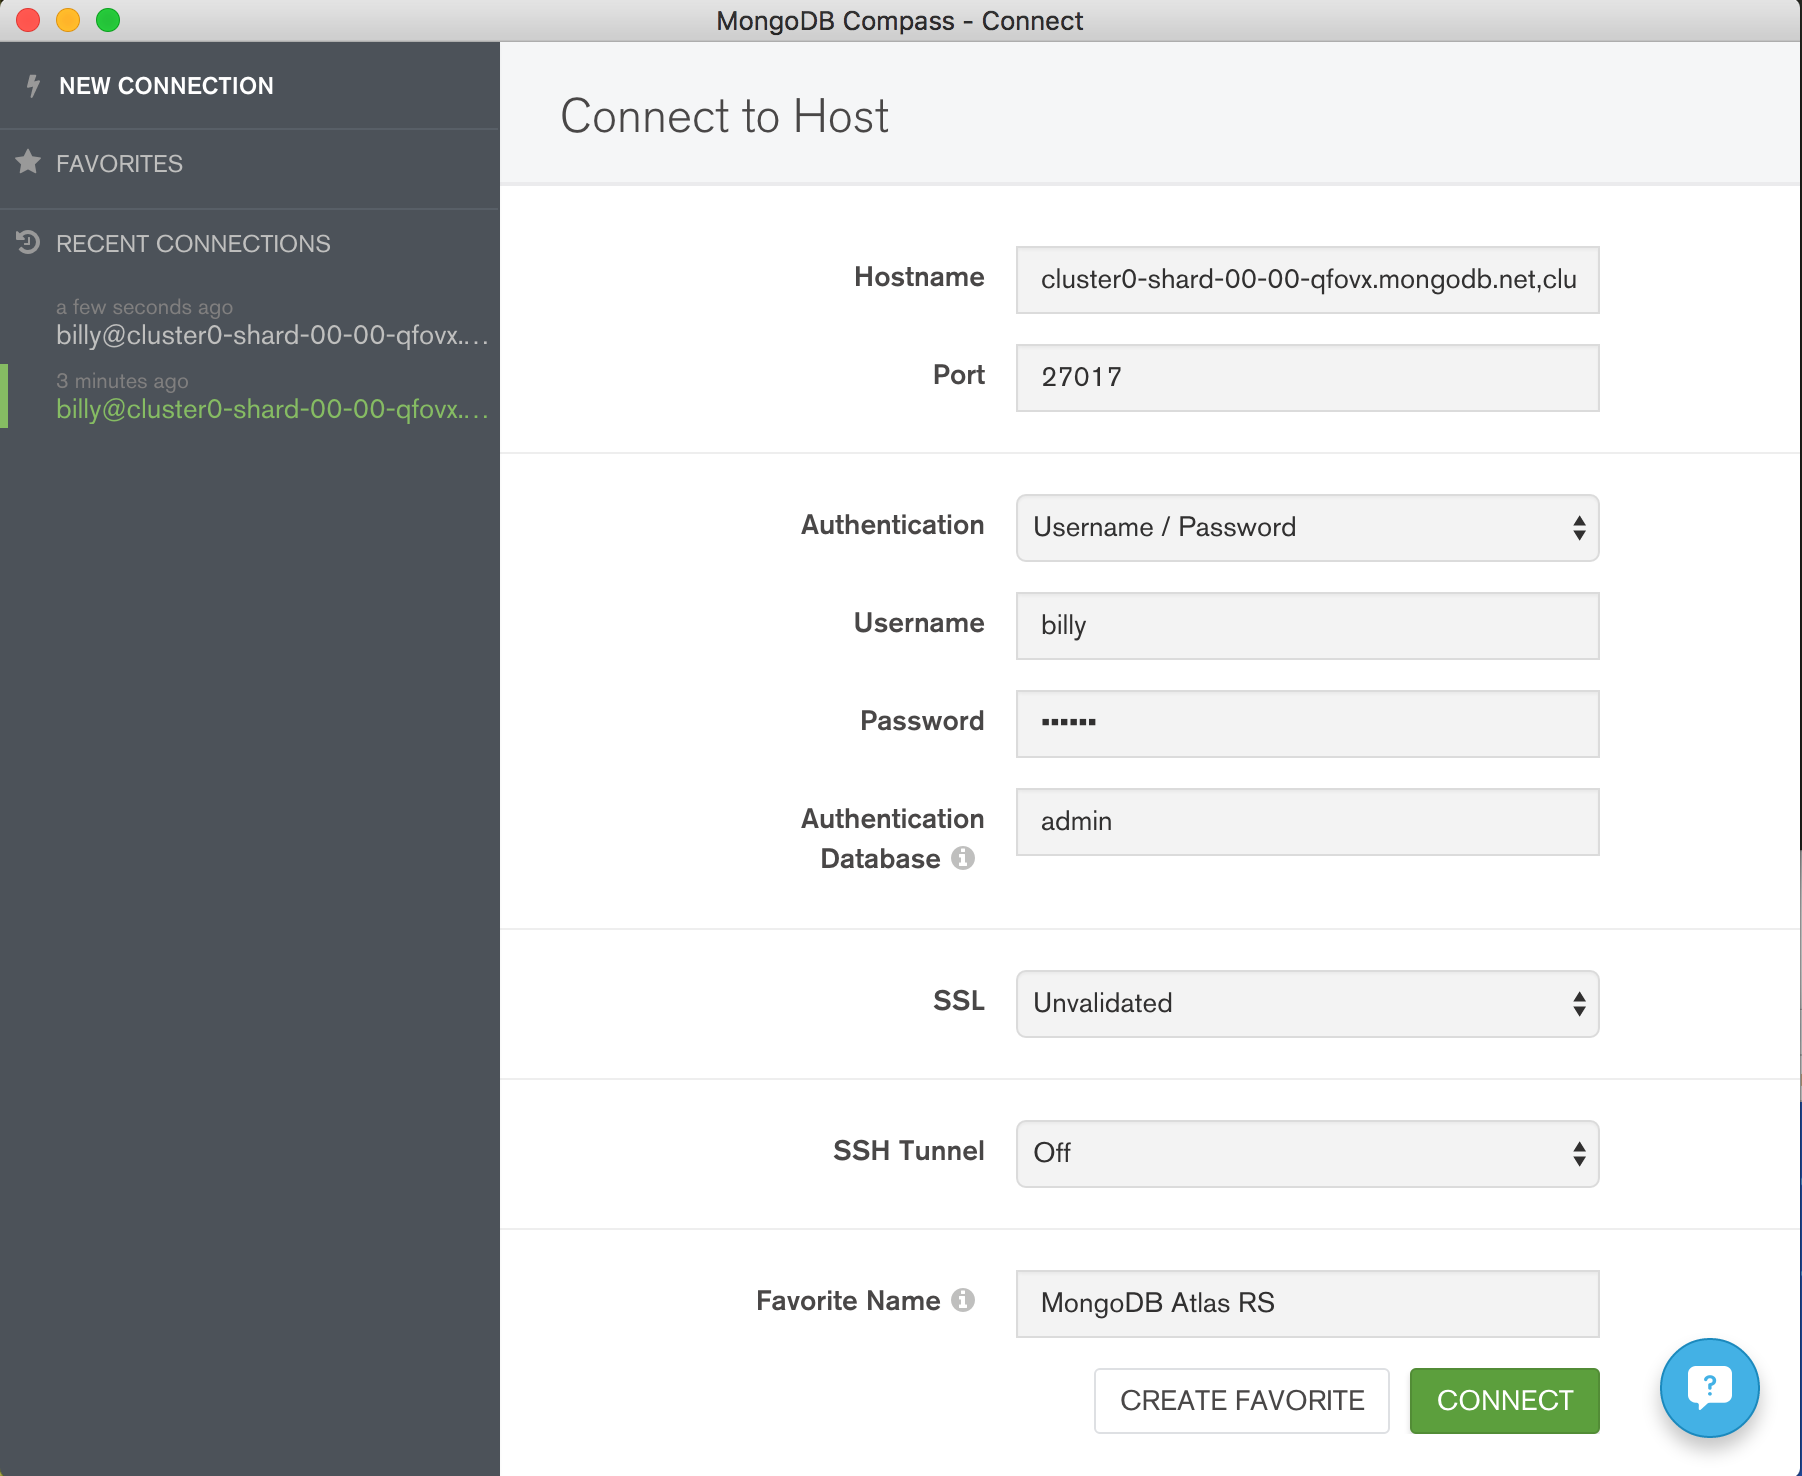
To visually navigate through the PencilBlue schema and data, download and install MongoDB Compass. Use your MongoDB Atlas credentials to connect Compass to your MongoDB database – Figure 7.
Figure 7: Connect MongoDB Compass to MongoDB Atlas
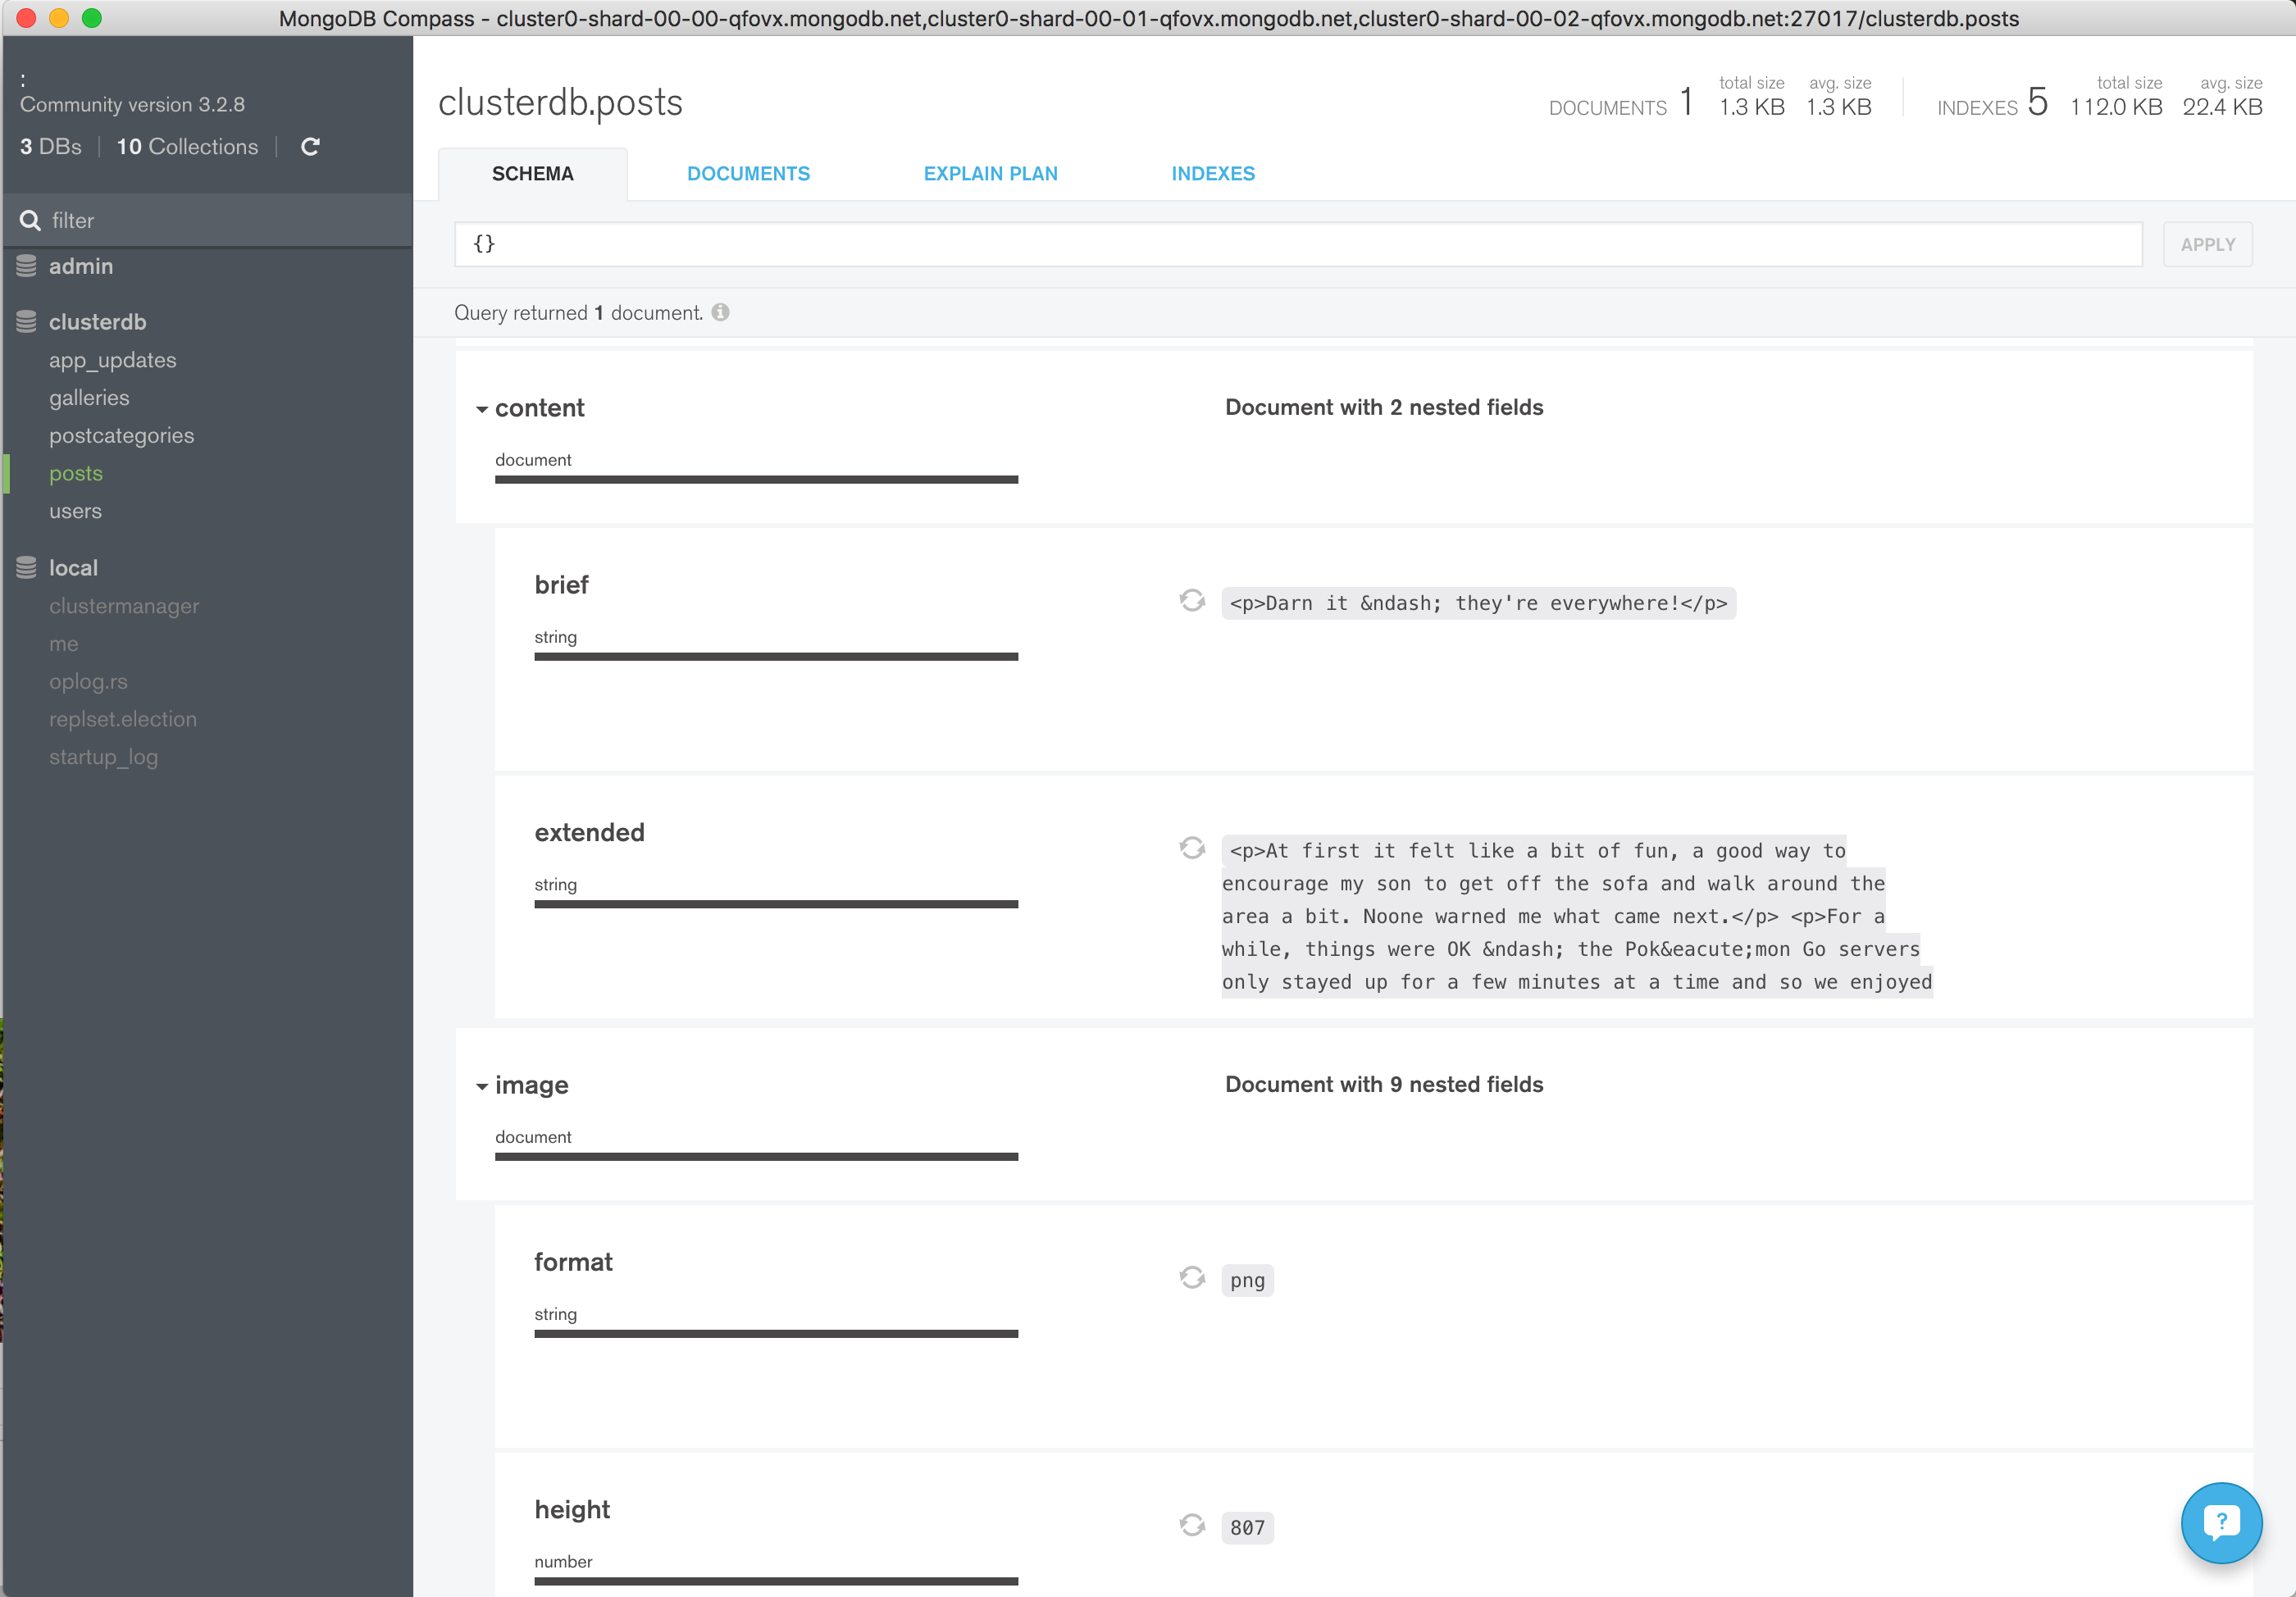
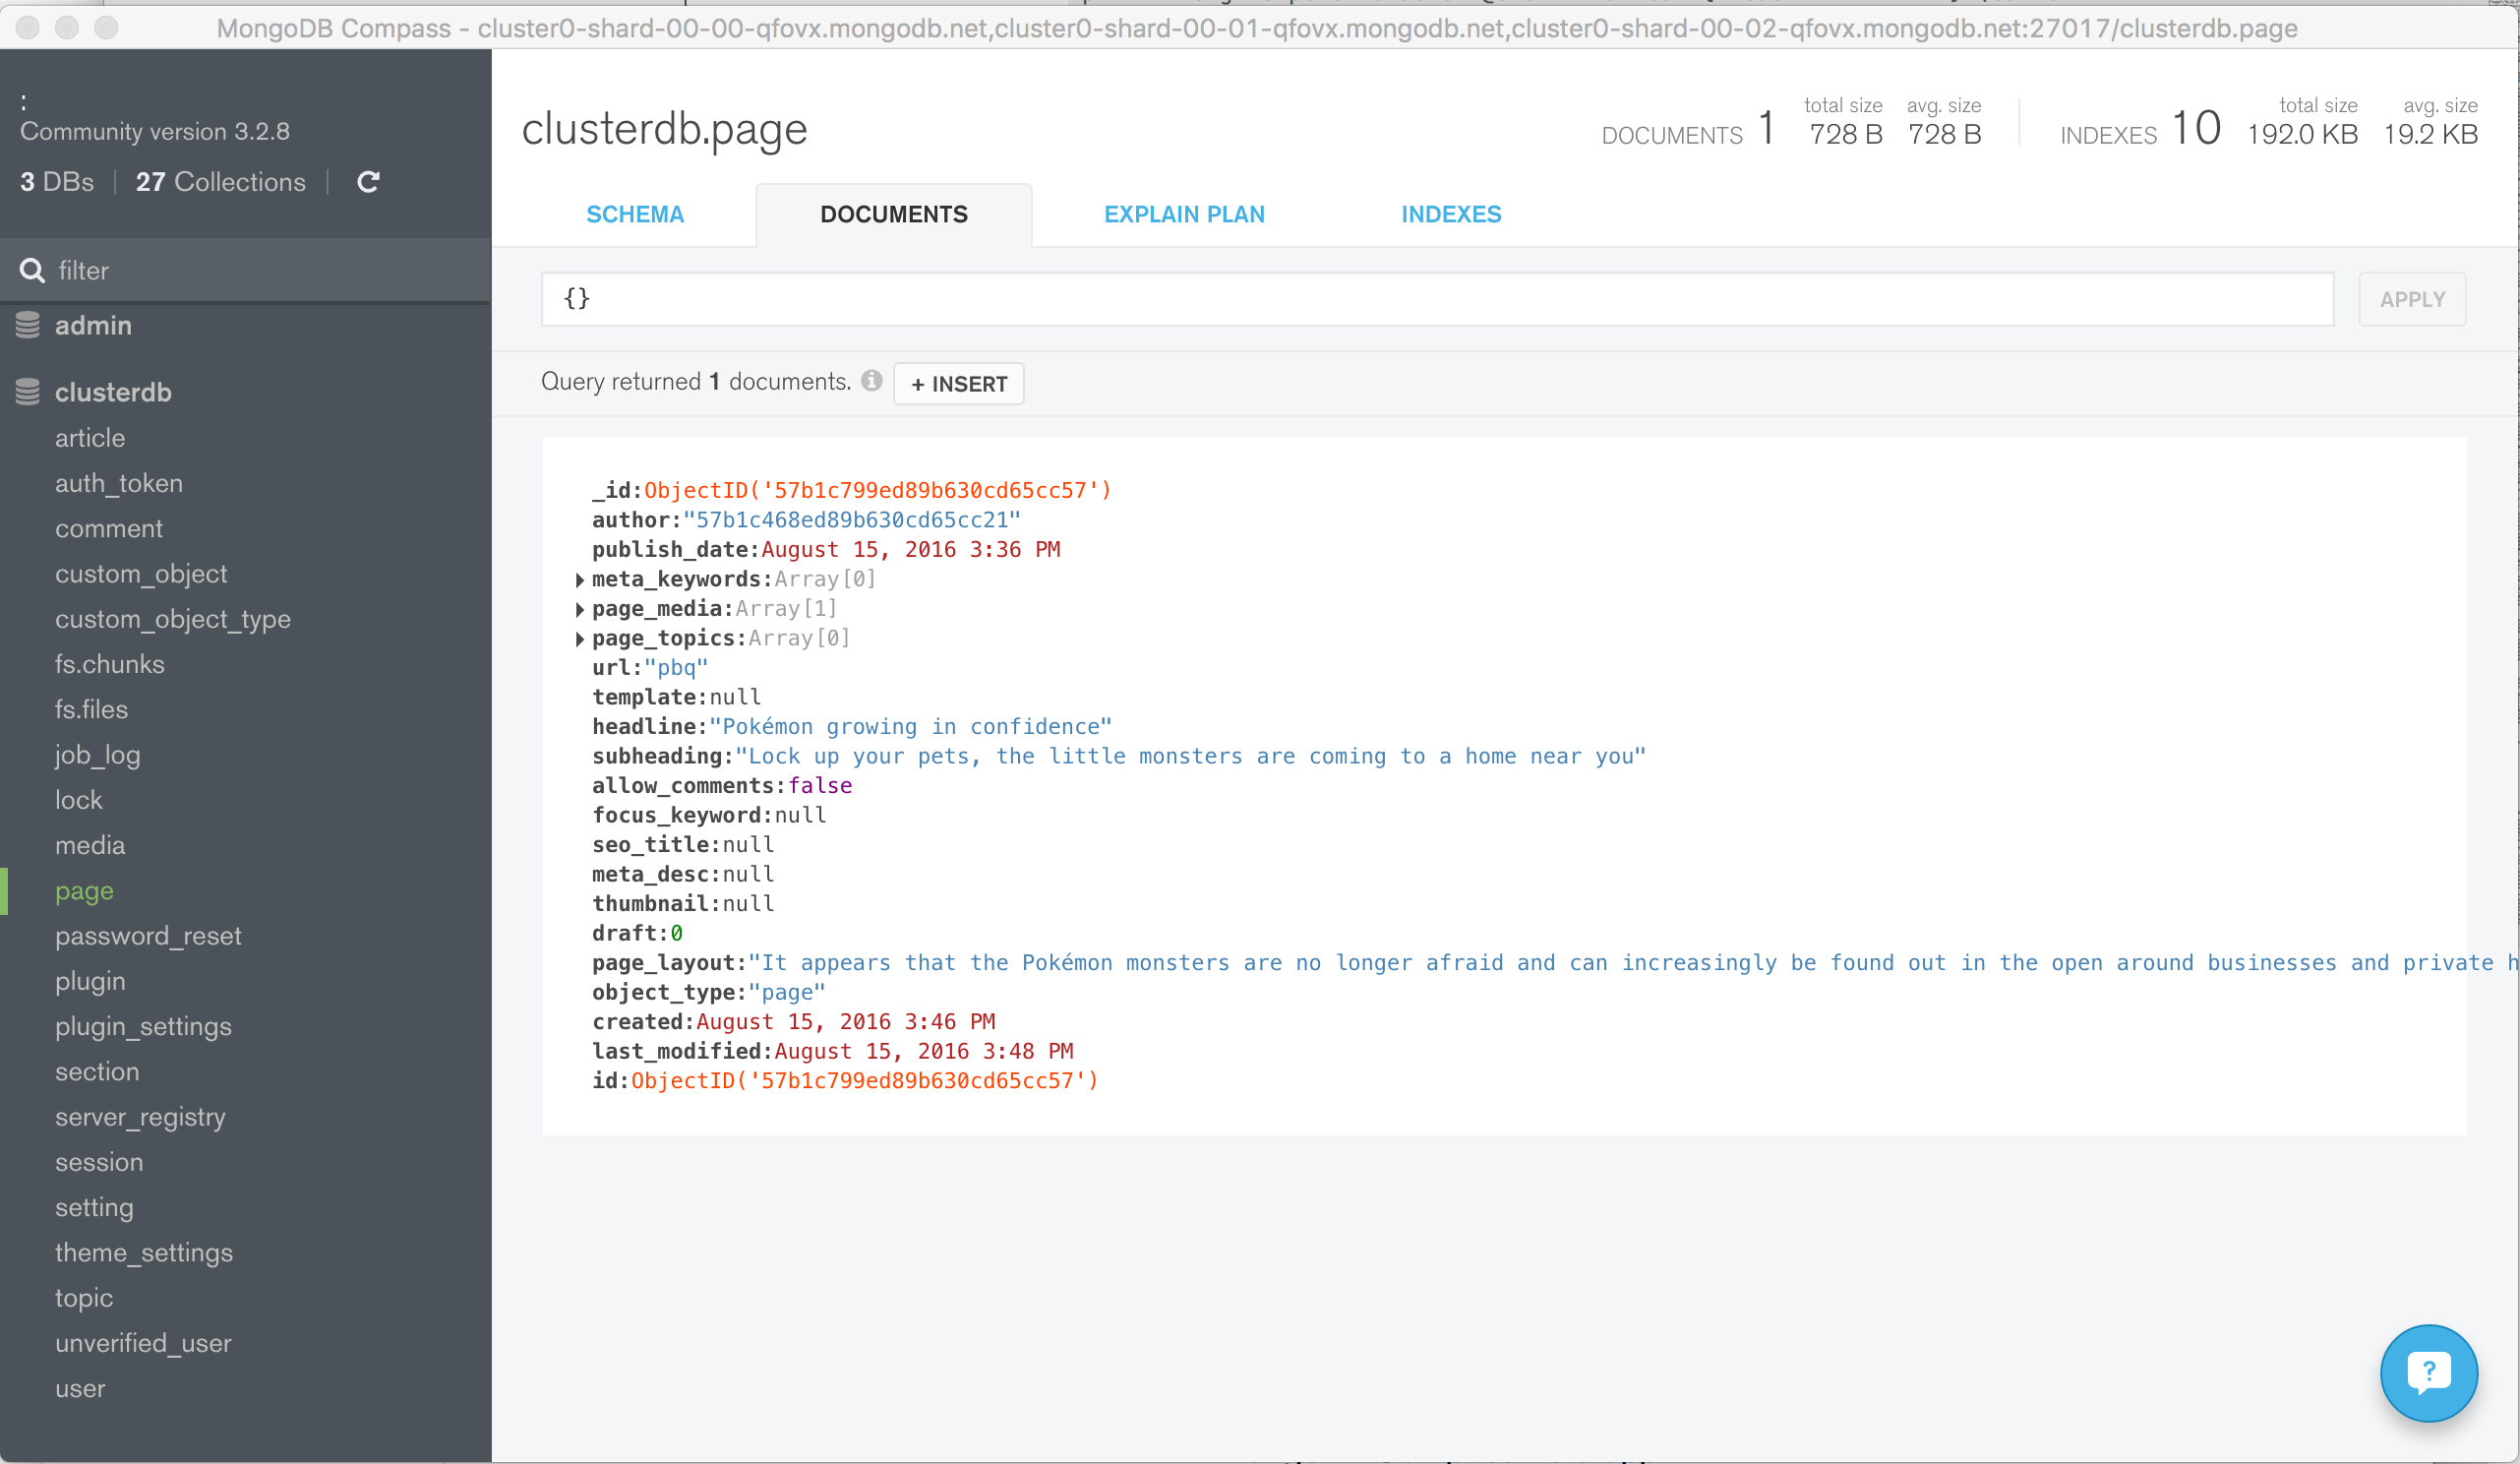
Navigate through the structure of the data in the clusterdb database (Figure 8); view the JSON documents (Figure 9) and check the indexes (Figure 10).
Figure 8: Explore PencilBlue Schema Using MongoDB Compass
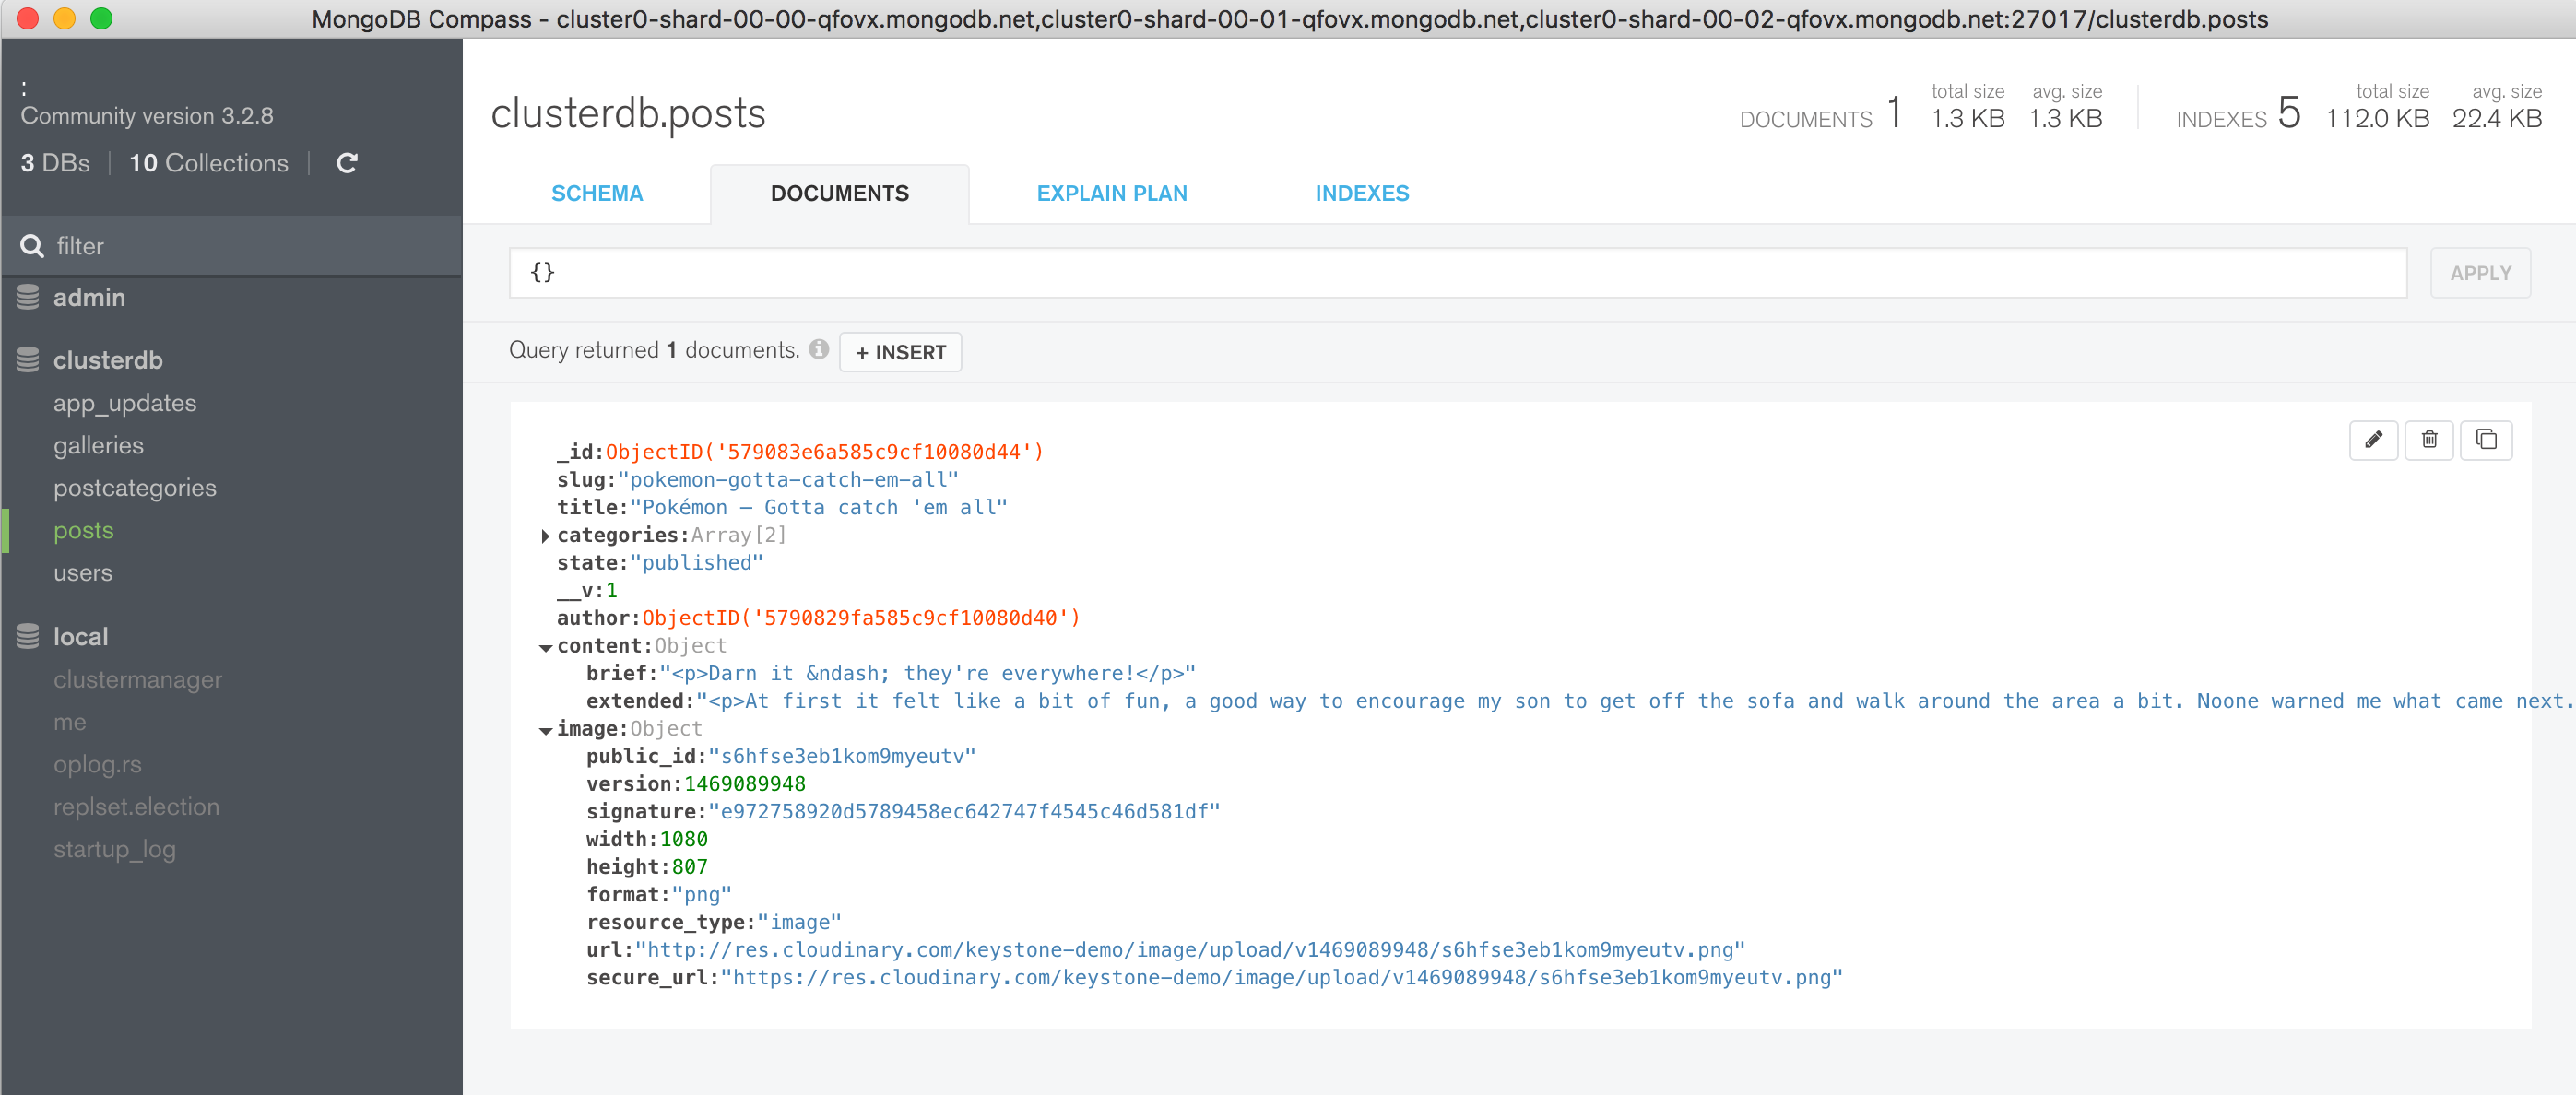
Figure 9: View PencilBlue Documents in MongoDB Compass
Figure 10: View PencilBlue Indexes Using MongoDB Compass
Next Steps
While MongoDB Atlas radically simplifies the operation of MongoDB there are still some decisions to take to ensure the best performance and reliability for your application. The MongoDB Atlas Best Practices white paper provides guidance on best practices for deploying, managing, and optimizing the performance of your database with MongoDB Atlas.
The guide outlines considerations for achieving performance at scale with MongoDB Atlas across a number of key dimensions, including instance size selection, application patterns, schema design and indexing, and disk I/O. While this guide is broad in scope, it is not exhaustive. Following the recommendations in the guide will provide a solid foundation for ensuring optimal application performance.
This blog post demonstrates how to build and deploy an application on AWS Elastic Beanstalk, and have that application connect to MongoDB Atlas as its back-end database service:
Introducing the example MongoPop application
Connecting applications to your MongoDB Atlas cluster; including IP address whitelisting
Downloading and testing MongoPop locally and on AWS Elastic Beanstalk
Populating your database with thousands of realistic documents
Explaining key parts of the application code
Adapting and redeploying applications
Graphically exploring your schema and data with MongoDB Compass
AWS Elastic Beanstalk is a service offered by Amazon to make it simple for developers to deploy and manage their cloud-based applications. After you’ve uploaded your application, Elastic Beanstalk automatically takes care of:
Capacity provisioning, adding more instances as needed
Load balancing
Health monitoring
MongoDB Atlas provides all of the features of the MongoDB database, without the operational heavy lifting. MongoDB Atlas is available on demand through a pay-as-you-go model and billed on an hourly basis, letting you focus on your application code.
It’s easy to get started – use a simple GUI to select the instance size, region, and features you need. MongoDB Atlas provides:
Security features to protect access to your data
Built in replication for always-on availability, tolerating complete data center failure
Backups and point in time recovery to protect against data corruption
Fine-grained monitoring to let you know when to scale. Additional instances can be provisioned with the push of a button
Automated patching and one-click upgrades for new major versions of the database, enabling you to take advantage of the latest and greatest MongoDB features
A choice of cloud providers, regions, and billing options
There is clearly a lot of synergy between these technologies – both of them handling the enabling infrastructure, letting the developer spend their precious time on writing great applications. To continue in the spirit of developer productivity, the application used in this post is developed using Node.js, the Express web application framework, and the Pug (formerly Jade) template engine.
The Application – MongoPop
Let’s start by taking a look at what the new Mongopop application provides.
Getting your MongoDB Atlas cluster up and running is a breeze but what do you do with it next? Wouldn’t it be great to populate it with some realistic data so that you can start experimenting? This is what MongoPop does – even letting you tailor the format and contents of the data using the Mockaroo service.
Mockaroo is a flexible service, allowing you to define a rich schema and then generate realistic sample data sets. Supported types include:
Email address
City
European first name
JSON array
Branded drug names
Custom types defined by you, based on regular expressions
Data files can be downloaded from Mockaroo in multiple formats, including: JSON, CSV, and SQL.
MongoPop pulls data from Mockaroo and then automatically writes the data to your database. It defaults to our example Mockaroo schema but you can replace that with a URL for any schema that you’ve defined in Mockaroo (or any other service providing arrays of JSON documents). Mockaroo takes care of connecting to MongoDB Atlas and runs multithreaded, speeding up the process of loading large datasets into MongoDB.
Using MongoPop
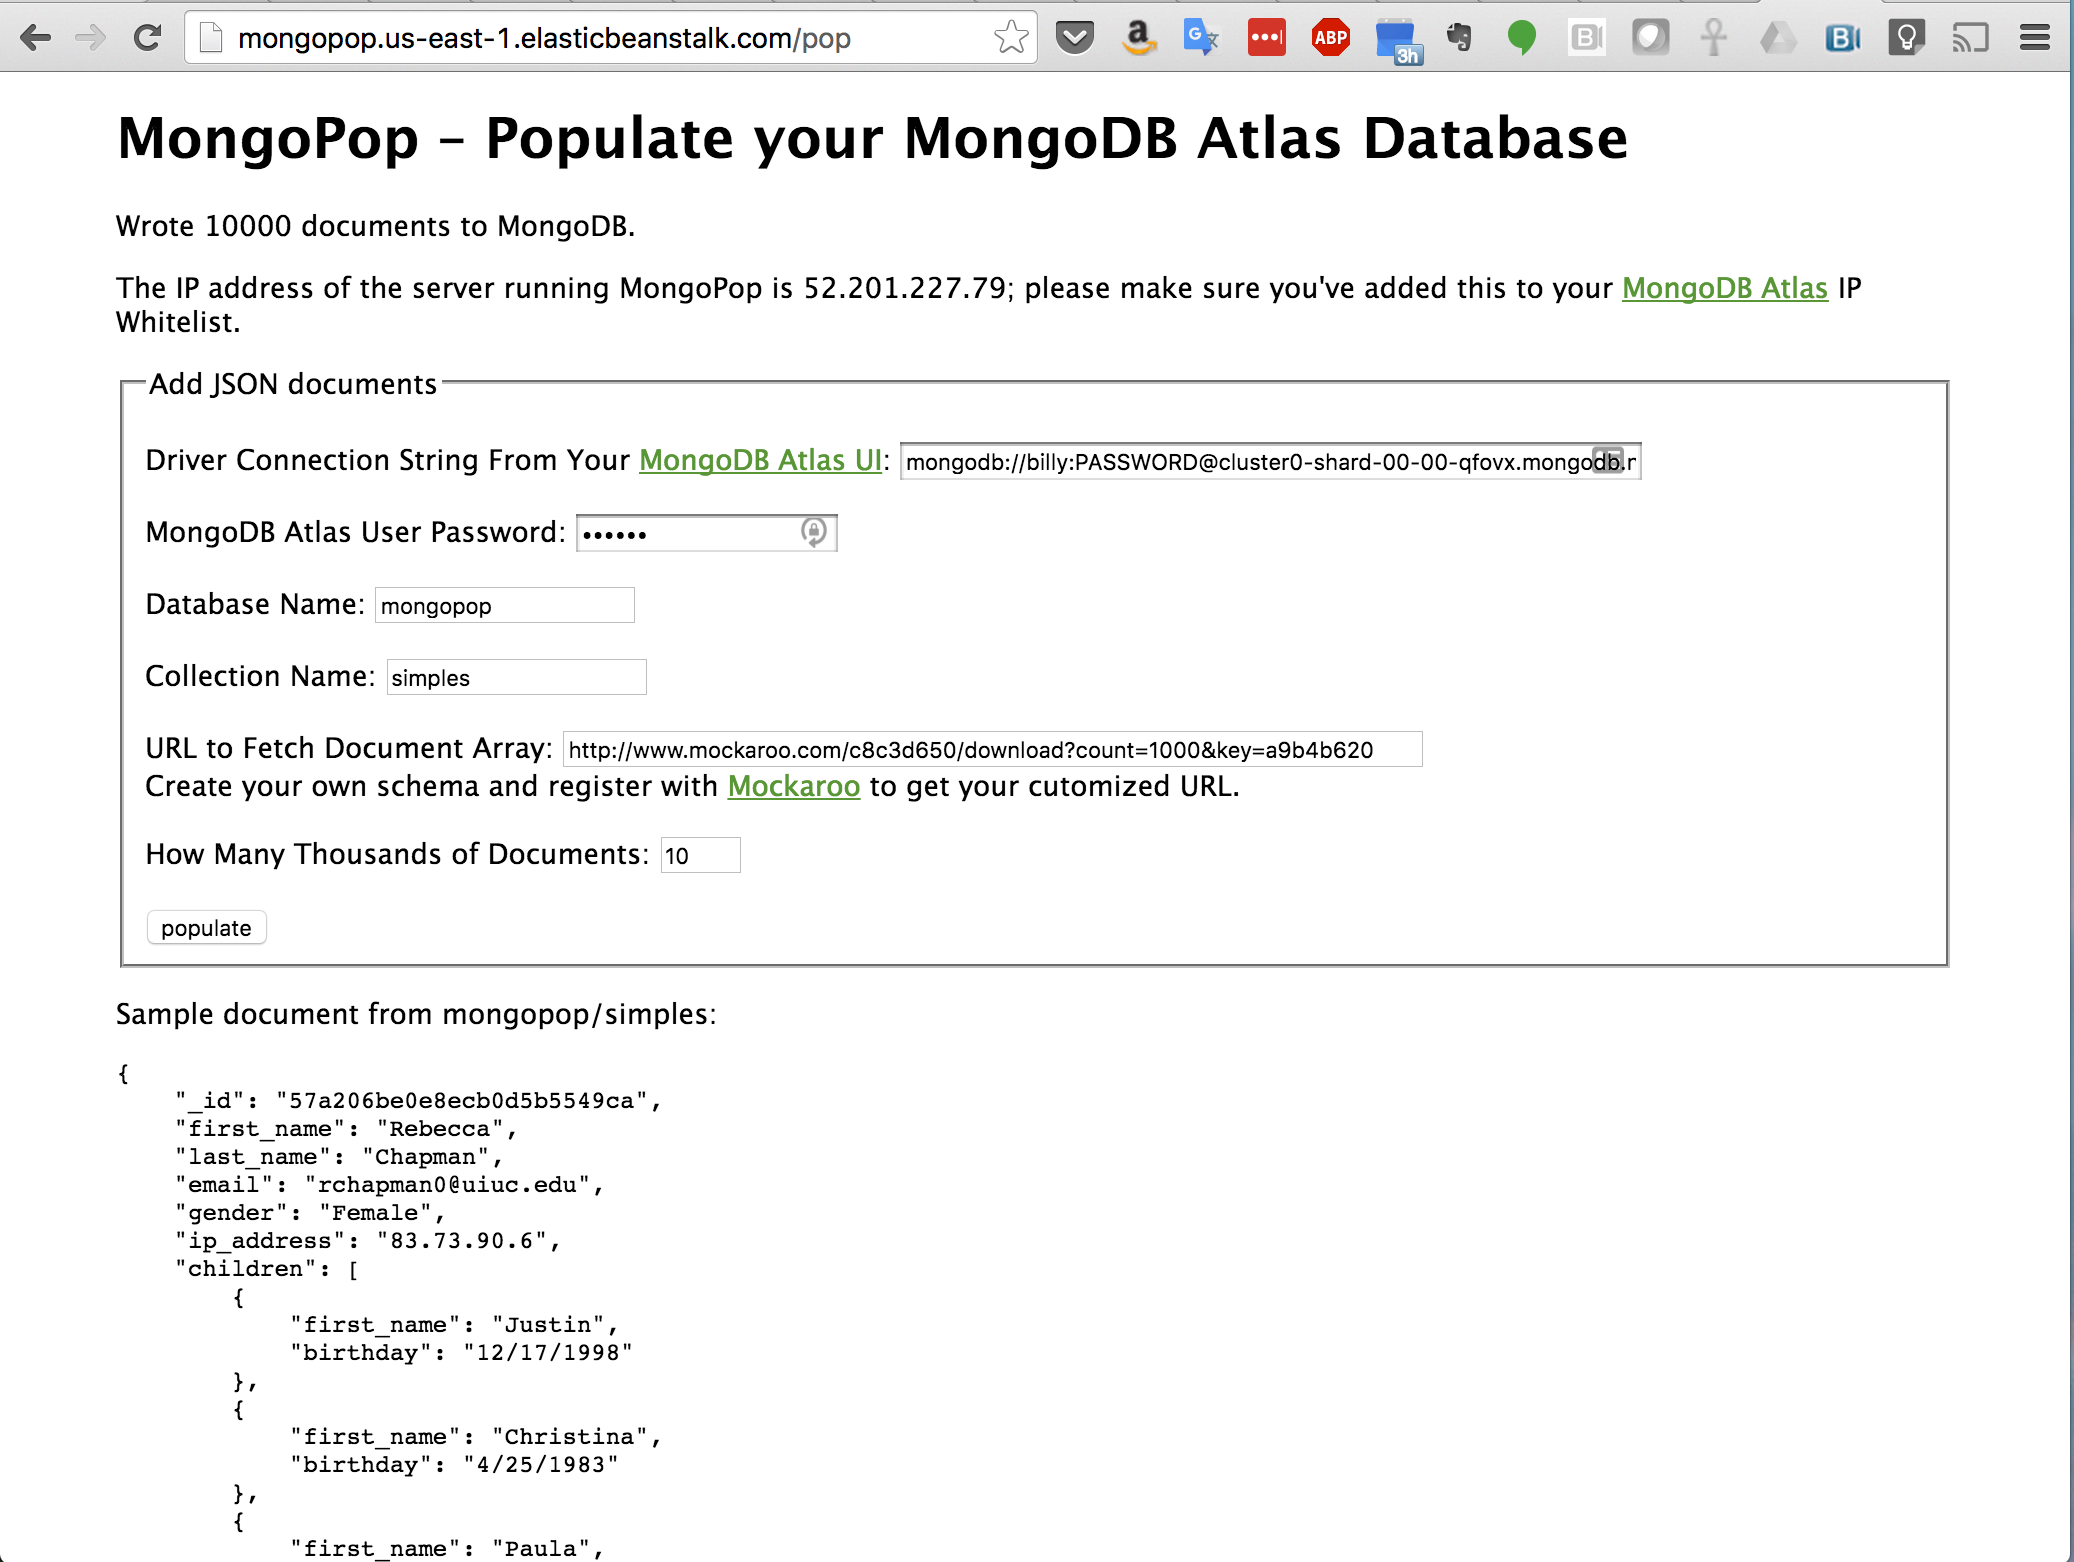
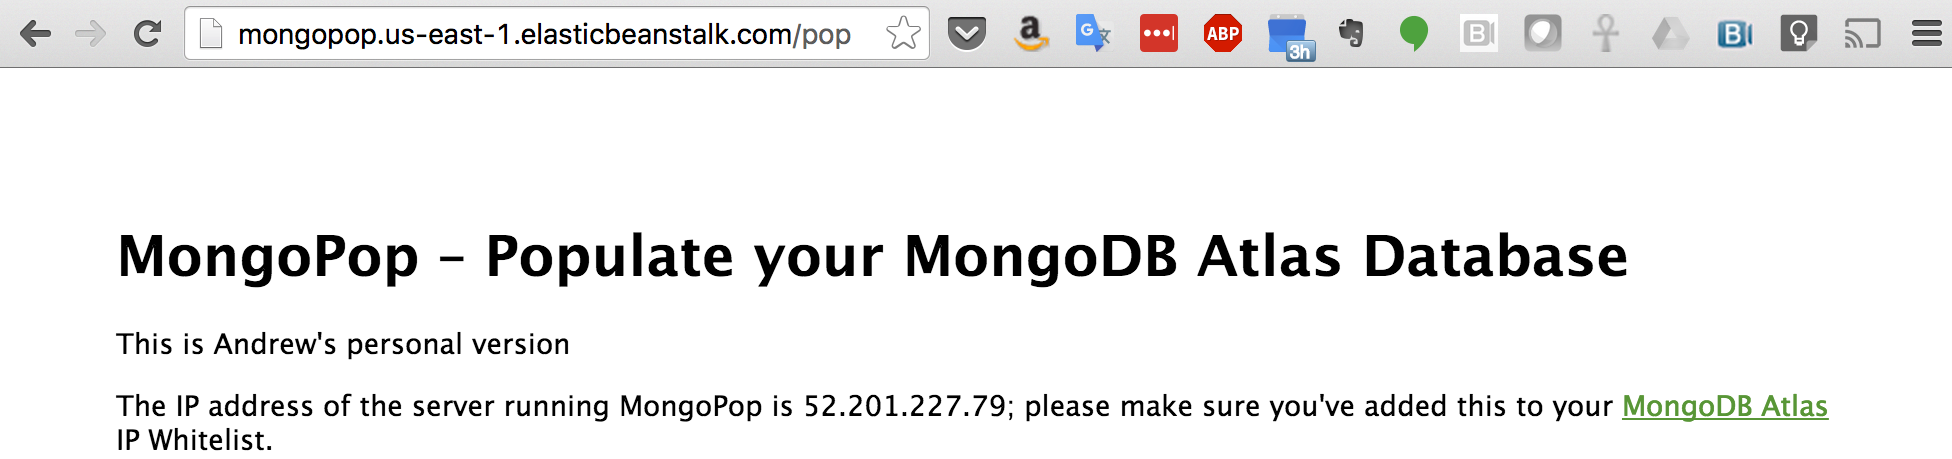
Figure 1: Identify IP Address of MongoPop Server for MongoDB Atlas IP Whitelisting
When you first access MongoPop (Figure 1), you’re presented with a form to provide details on how to connect to your MongoDB Atlas instance, and what you’d like the data to look like. Before completing the form, take a note of the IP address that’s displayed. This IP address needs to be added to the whitelist for your group, which is done through the security tab of the MongoDB Atlas UI (Figure 2).
Figure 2: Add MongoPop IP Address to MongoDB Atlas Group Whitelist
In a production Elastic Beanstalk environment, the IP whitelisting can be a little more involved – that will be covered later in this post.
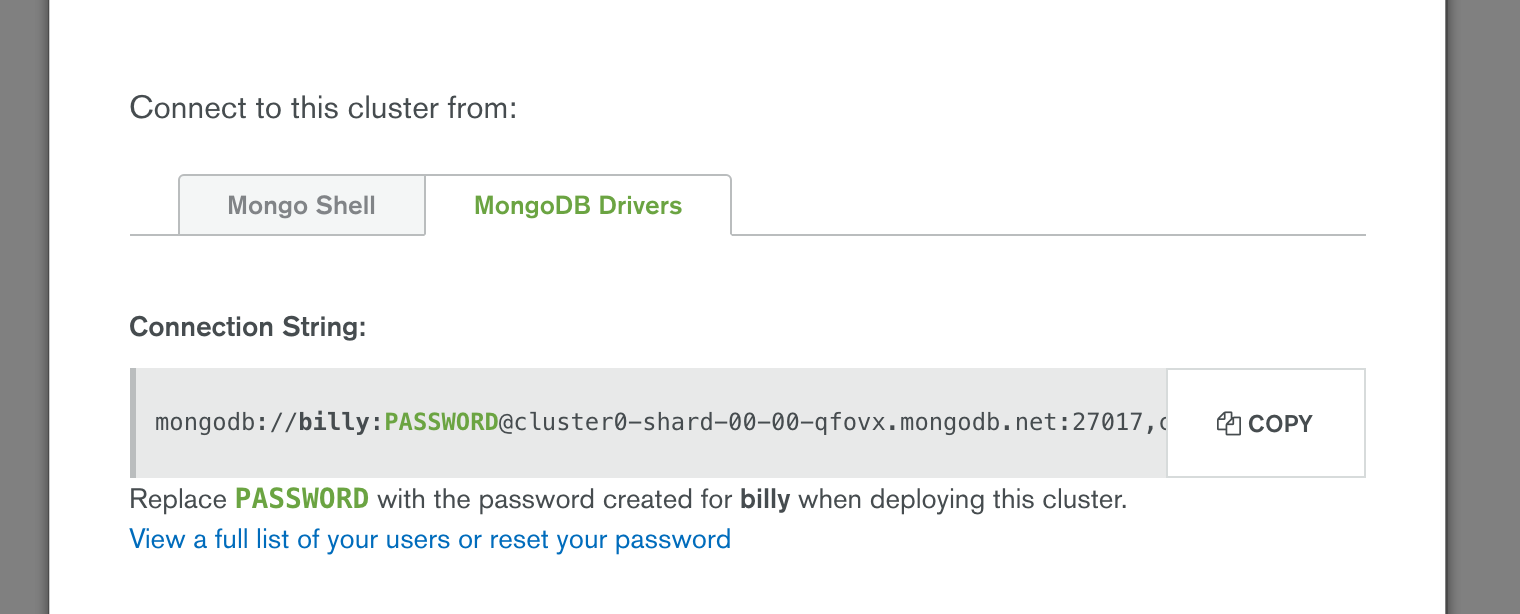
Figure 3: Find the Node.js Driver Connect String in MongoDB Atlas
While in the MongoDB Atlas UI, click the “CONNECT” button, select the “MongoDB Drivers” tab and then the “COPY” button (Figure 3). Paste the copied URI directly into MongoPop. You should also enter the password and the database you want to use.
Note that the URI needs editing before it’s actually used but MongoPop handles that using the password and database name you provide; the final URI will take this form: mongodb://mongodb_user:my_password@cluster0-shard-00-00-qfovx.mongodb.net:27017,cluster0-shard-00-01-qfovx.mongodb.net:27017,cluster0-shard-00-02-qfovx.mongodb.net:27017/mongopop?ssl=true&authSource=admin.
This URI contains these components:
mongodb_user is the name of the user you gave when creating the group in the MongoDB Atlas UI. Alternatively, create a new user in the MongoDB Atlas UI with more restricted privileges.
my_password is the password you chose when creating the user in MongoDB Atlas.
cluster0-shard-00-00-qfovx.mongodb.net, cluster0-shard-00-01-qfovx.mongodb.net, & cluster0-shard-00-02-qfovx.mongodb.net are the hostnames of the instances in your MongoDB Atlas replica set.
27017 is the default MongoDB port number.
mongopop is the name of the database (schema) that MongoPop will use.
To enforce over-the-wire encryption, MongoDB Atlas mandates that the ssl option is used.
admin is the database that’s being used to store the credentials for mongodb_user.
The remaining fields define the collection to store the documents, the source of the document schema, and the number of documents (in thousands) to be added. The source URL defaults to a document format already defined but you can create your own by registering at the Mockaroo site, defining the document structure and then using the URL provided.
After clicking the “populate” button, MongoPop fetches the data set(s) from Mockaroo and then adds the documents to your MongoDB Atlas collection. Once the data has been added, the page refreshes and you’re shown a sample of the documents now stored in your collection (Figure 4).
Figure 4: Sample of Data Added to MongoDB Atlas Collection
MongoDB Compass
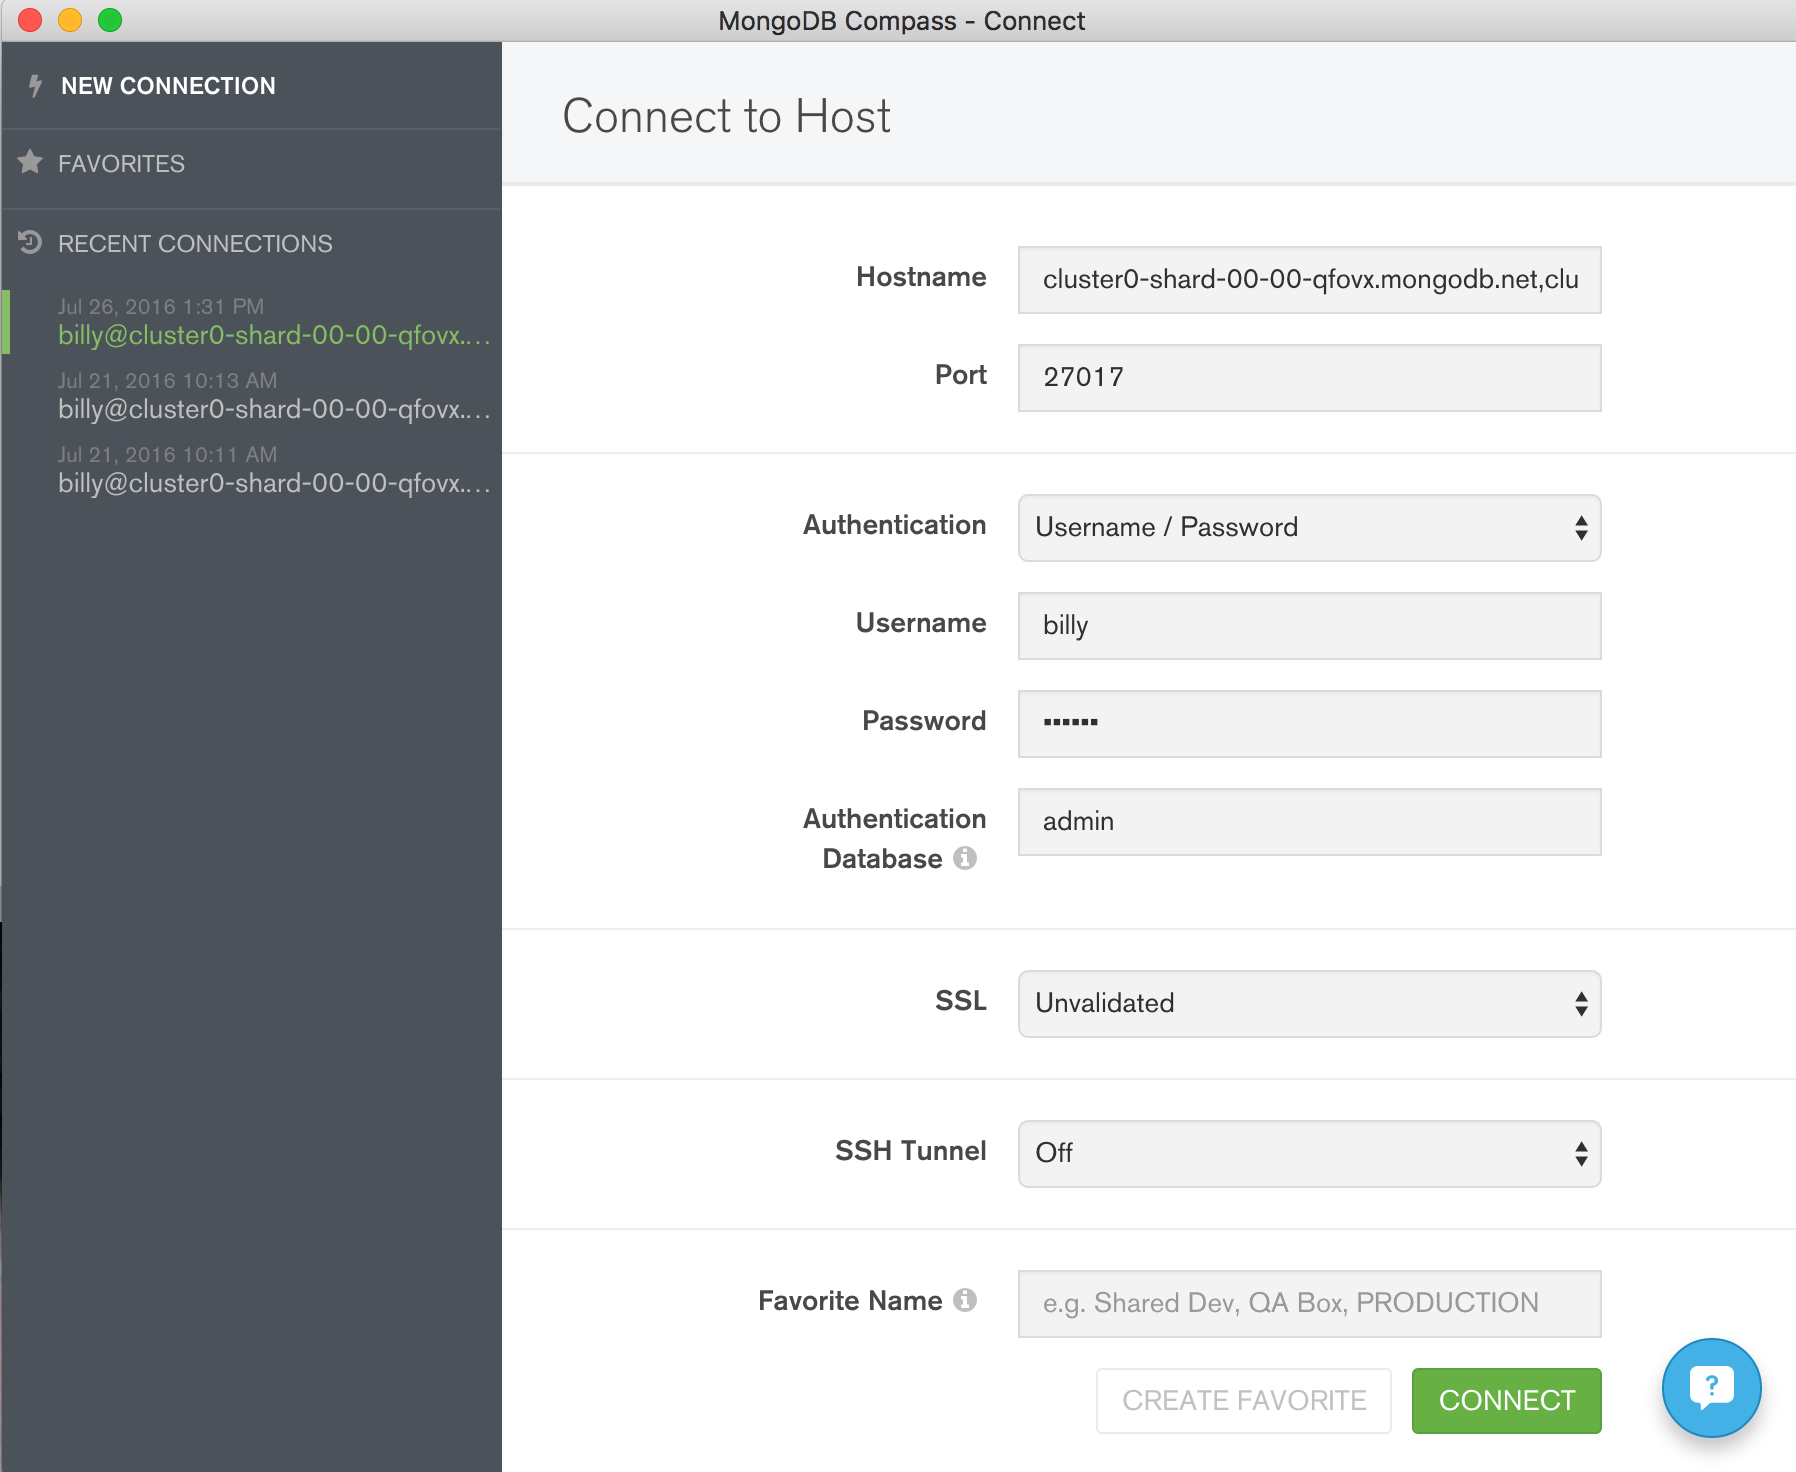
Congratulations, you now have some data in your database! An optional step is to start exploring that data using MongoDB Compass. The same credentials can be used to connect Compass to your MongoDB database (Figure 5).
Figure 5: Connect MongoDB Compass to MongoDB Atlas
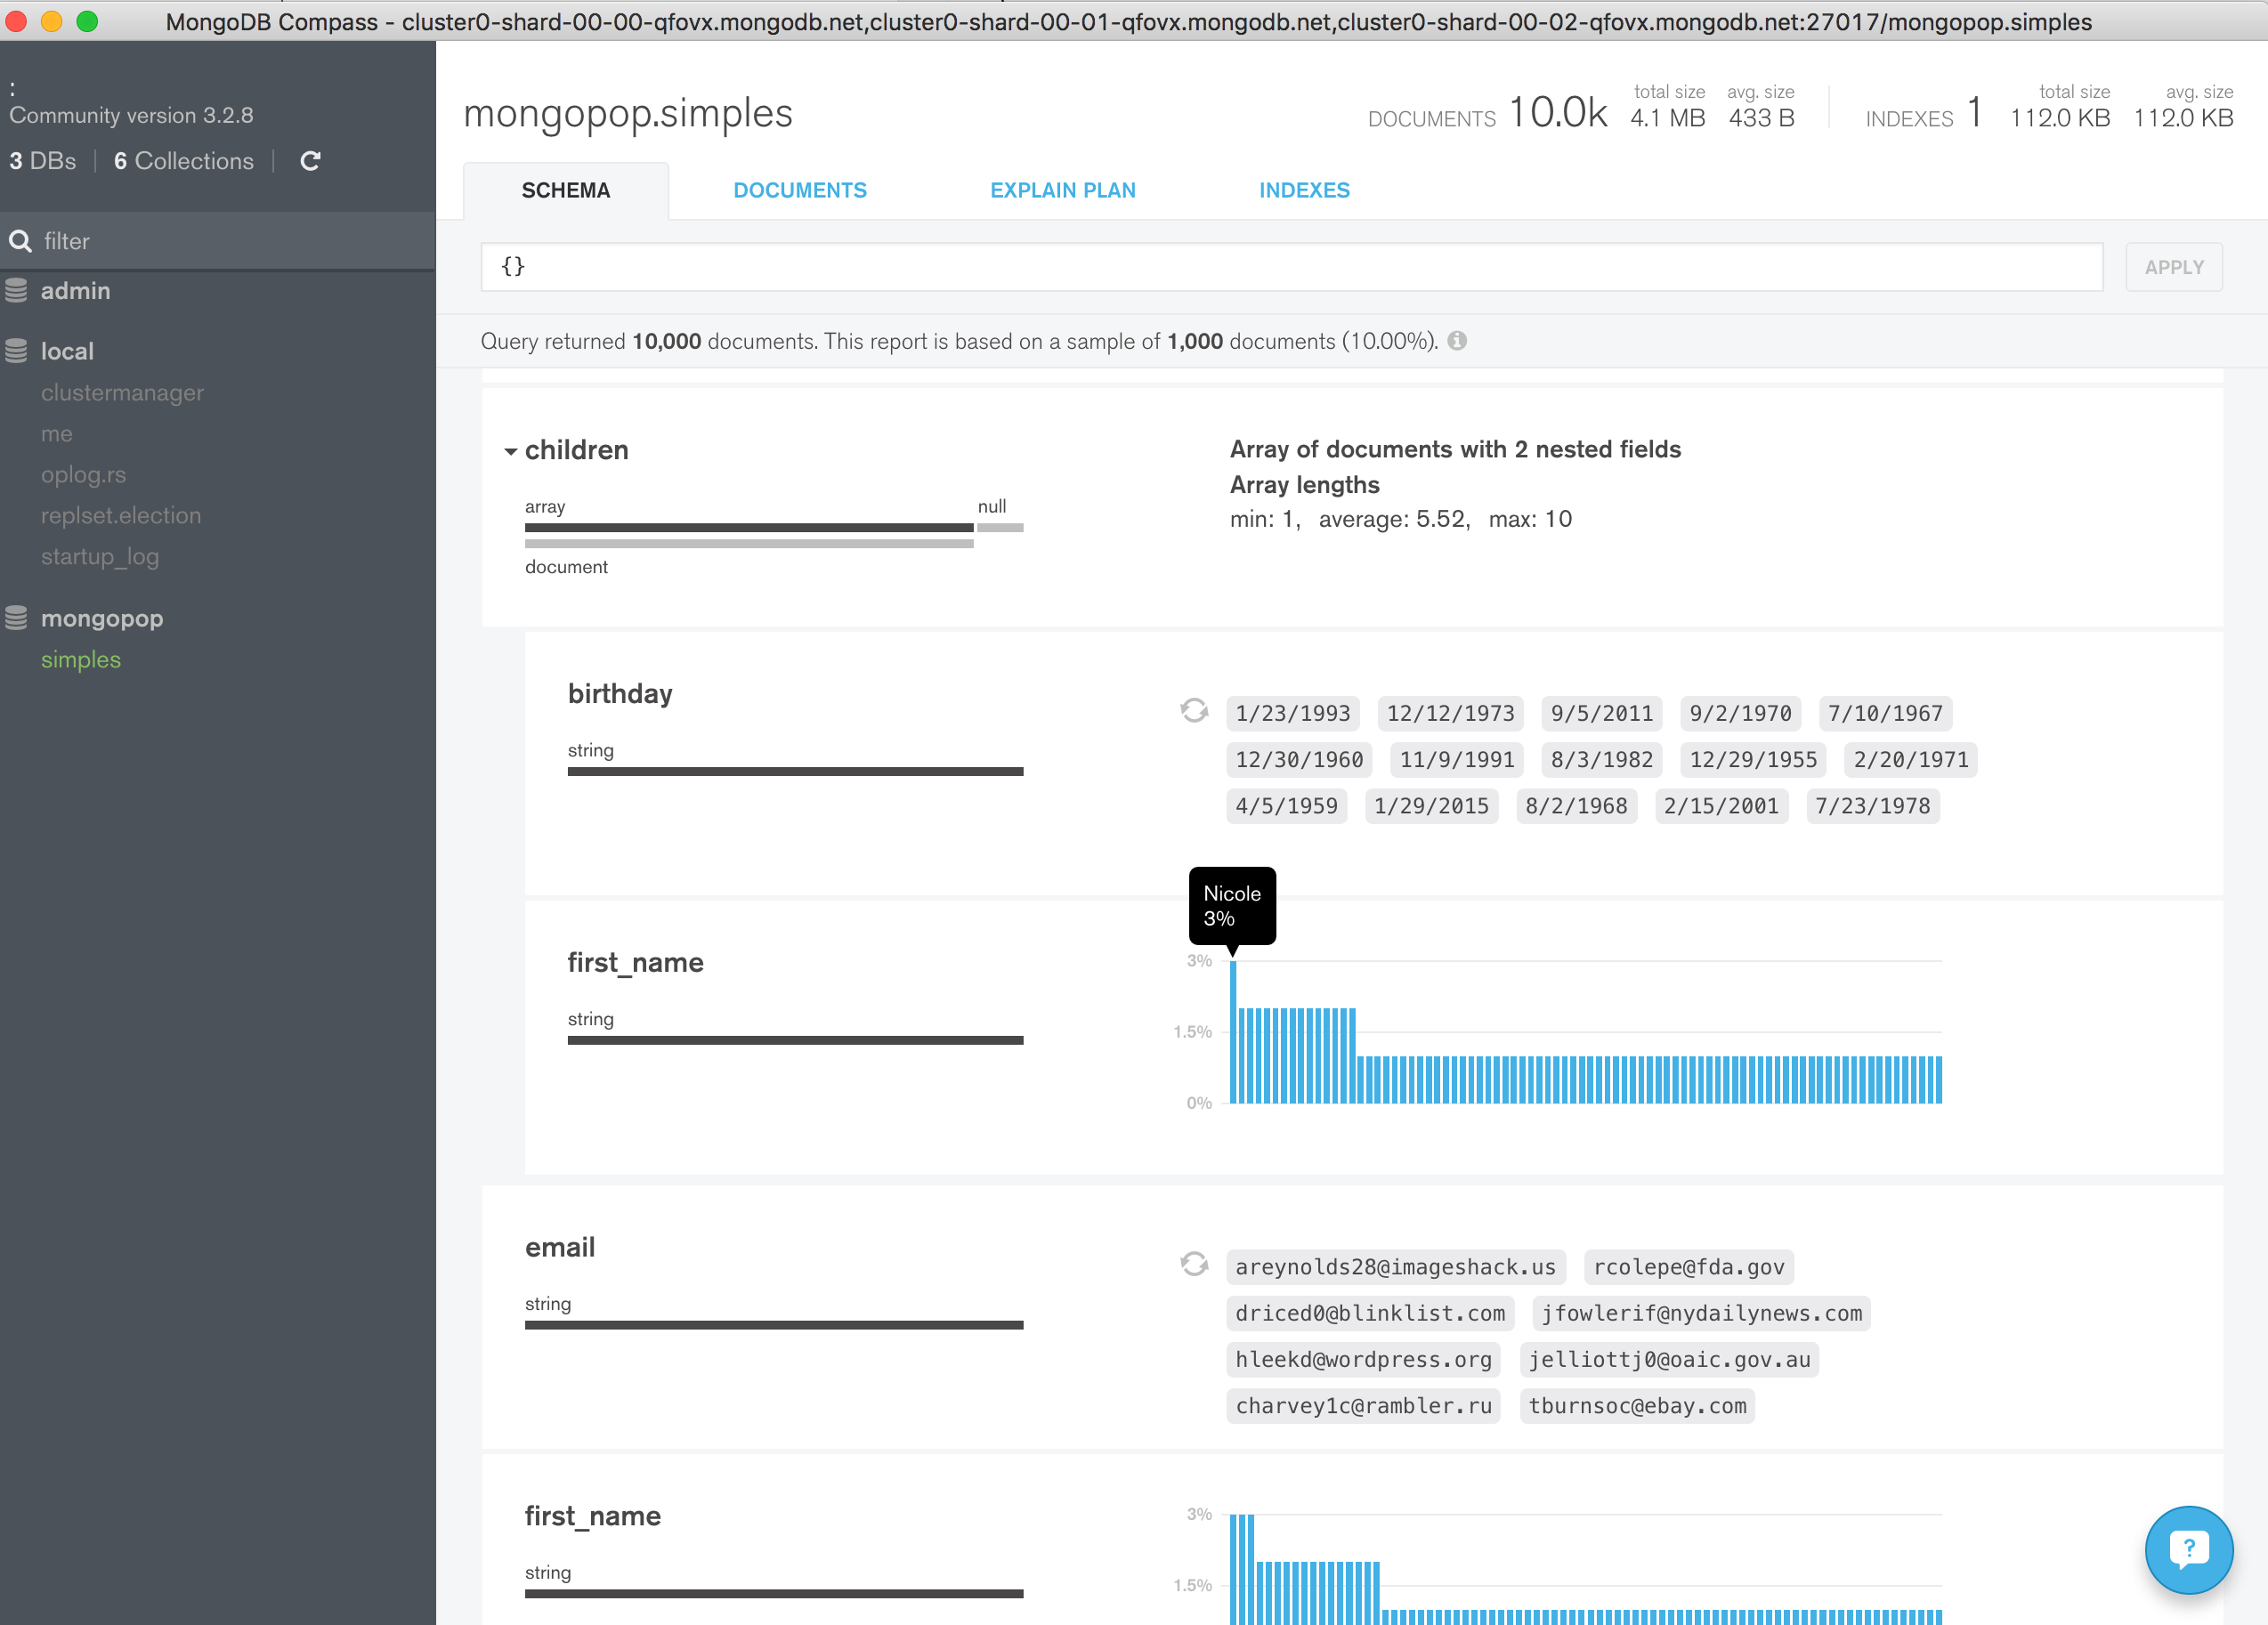
Once connected, explore the data added to the collection (Figure 6).
Figure 6: Explore MongoDB Atlas Data Using MongoDB Compass
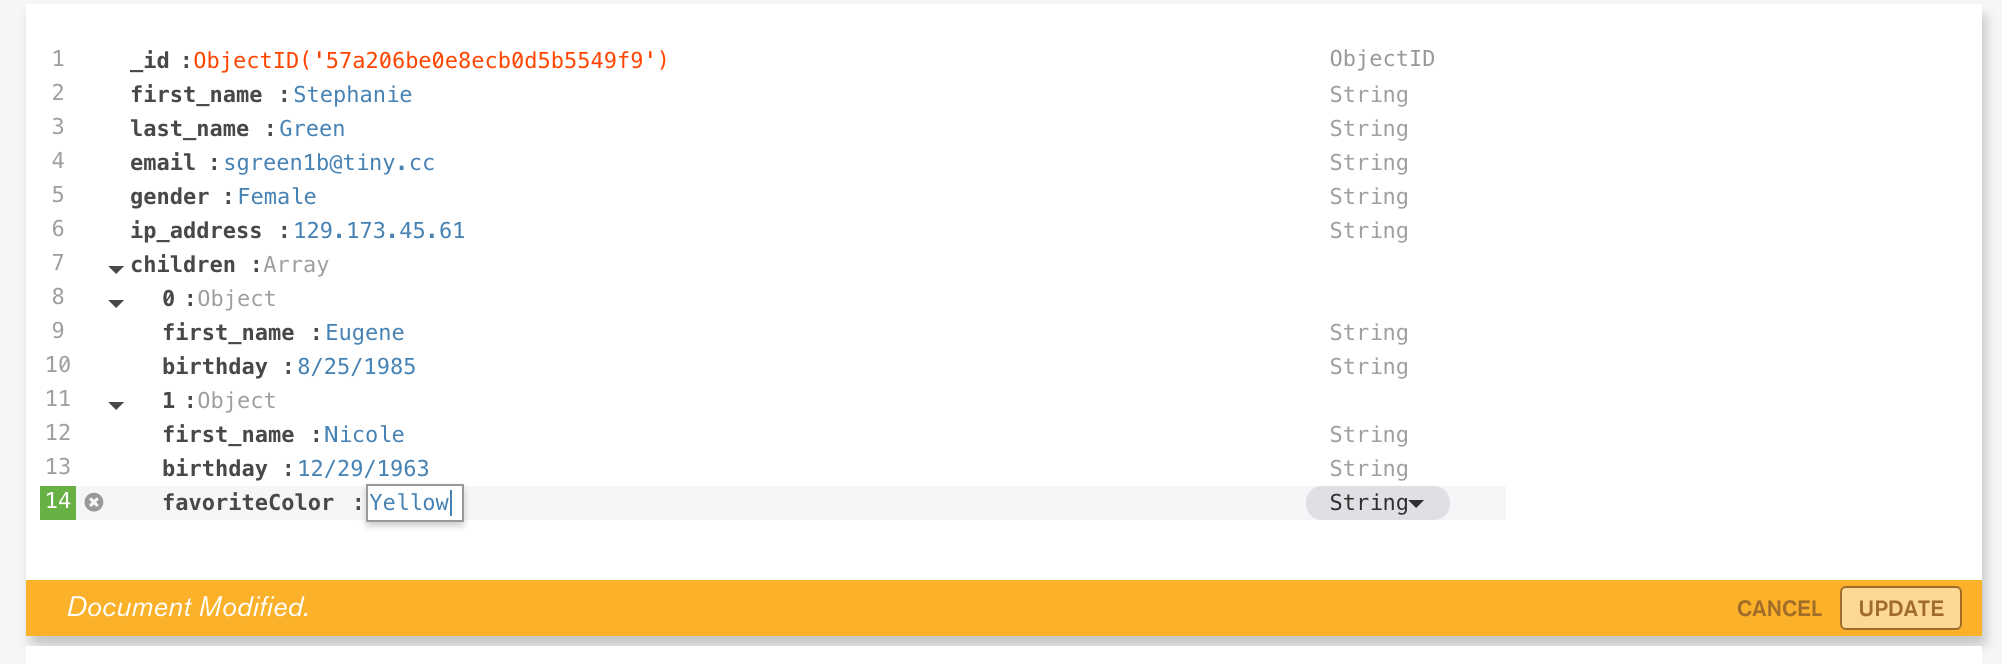
In this version (1.3) of MongoDB Compass (currently in beta), it is also possible to add, delete, and modify documents (Figure 7).
Figure 7: Modify a Document in MongoDB Compass
You can verify that the document has really been updated from the MongoDB shell:
Downloading the Application
The tools for deploying your application to AWS Elastic Beanstalk integrate with git, which makes it the best way to get the code. Assuming that git is already installed, downloading the code is simple:
If you then want to refresh your local repository with the latest version:
Deploying to Elastic Beanstalk is straightforward but there is a delay each time you update and redeploy your application. For that reason, it’s still useful to be able to test and debug locally.
After downloading the application, installing its dependencies and then running it is trivial (this assumes that you already have Node.js installed):
npm_install installs all of the required dependencies (which are described in package.json). npm start starts the application – once it it running browse to http://localhost:3000/pop to try it out.
Deploying to AWS Elastic Beanstalk
You can create your Elastic Beanstalk environment and deploy and monitor your application from the AWS console. If you don’t already have an account then that’s where you would create it. If you already have an account, and a copy of your Access Key ID and Secret Access Key, then using the EB CLI provides a more efficient workflow.
The method for installing the EB CLI varies by platform but if you already have Homebrew installed on OS X then it’s as simple as:
eb init sets default values for Elastic Beanstalk applications created with the EB CLI by prompting you with a series of questions:
eb create creates a new environment and deploys the current application to that environment:
Finally, eb open connects to the MongoPop app from your browser.
If you want to make changes to the application then the EB CLI makes it simple to redeploy the new version. As an example, edit the views/pop.jade file to add an extra paragraph after the title:
The EB CLI integrates with git and so update git with the change and then redeploy:
Figure 8: Personalized Version of MongoPop Deployed to AWS EBS
When you’re finished with the application, the environment can be deleted with a single command:
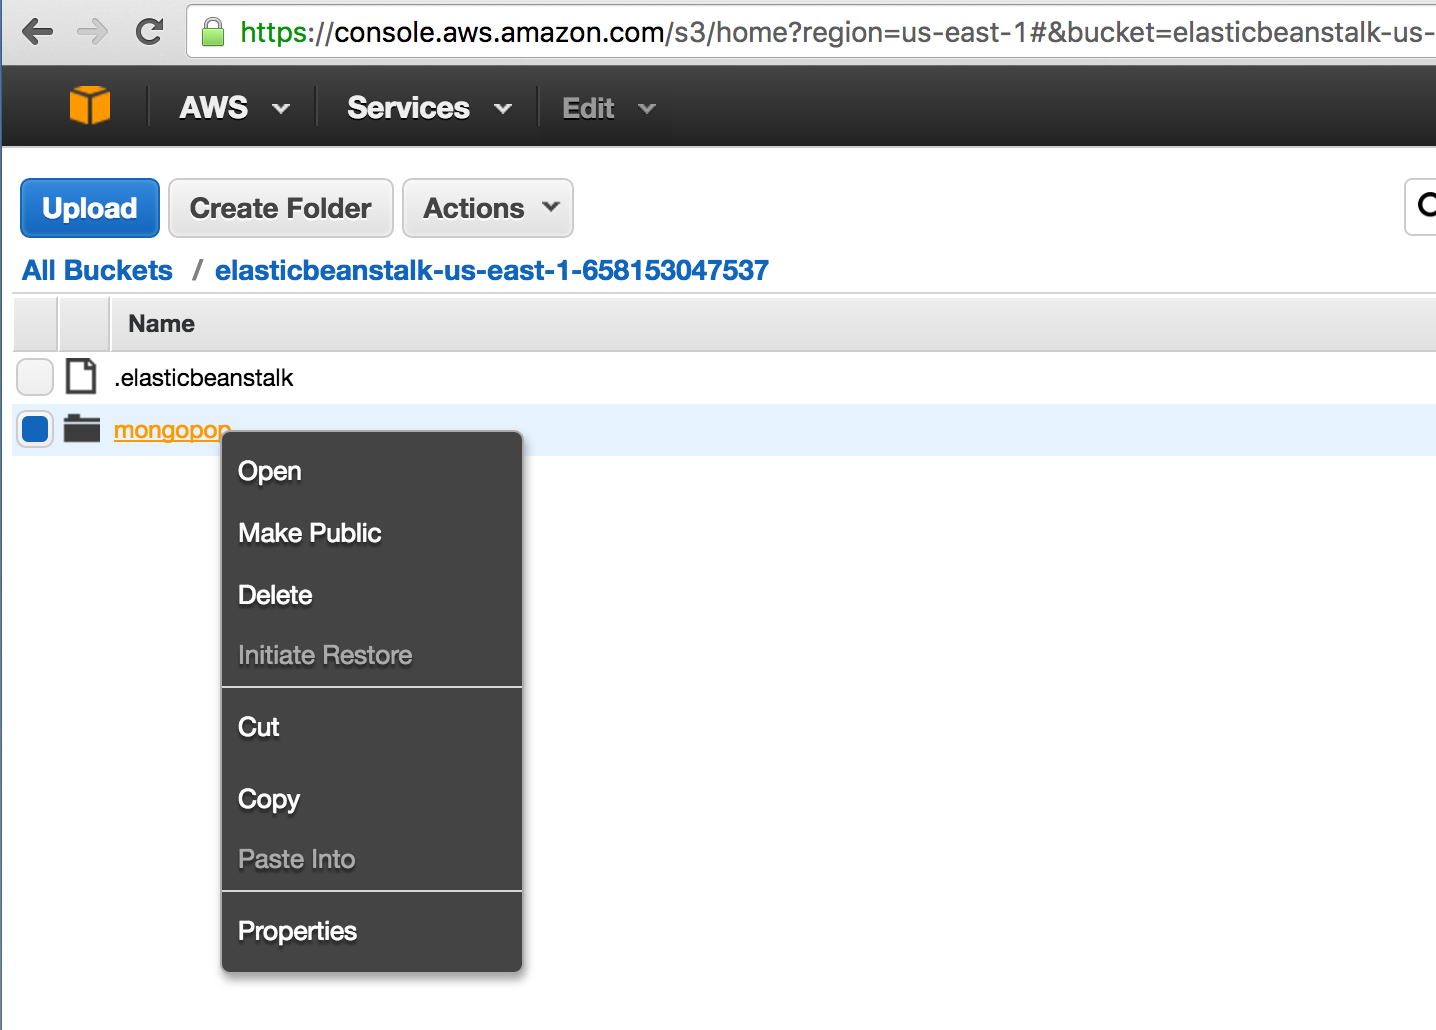
Note that this doesn’t remove the application deployment files that Elastic Beanstalk keeps in AWS S3 storage. To avoid continuing charges, delete those files through the AWS console (Figure 9).
Figure 9: Remove Deployment Files From AWS S3 Storage
Code Highlights
The full code for MongoPop can be found in GitHub but this section presents some snippets that are specific to MongoDB and MongoDB Atlas.
Firstly, constructing the final URI to access the database (from views/pop.js):
Connecting to the database and working with the collection (javascripts/db.js):
All of the dependencies (including the MongoDB Node.js driver) are defined in package.json:
The IP Address Whitelisting Challenge
IP address whitelisting is a key MongoDB Atlas security feature, adding an extra layer to prevent 3rd parties from accessing your data. Clients are prevented from accessing the database unless their IP address has been added to the IP whitelist for your MongoDB Atlas group.
VPC Peering for MongoDB Atlas is under development and will be available soon, offering a simple, robust solution. It will allow the whitelisting of an entire AWS Security Group within the VPC containing your application servers.
If you need to deploy a robust, scalable application before VPC peering becomes available, some extra steps may be required.
In our example application, the public IP address of the AWS EC2 instance running MongoPop was added to the MongoDB Atlas whitelist for the group.
That works fine but what happens if that EC2 instance fails and is rescheduled – its IP Address changes and so it would not be able to connect to MongoDB Atlas until it was whitelisted. That scenario can be remedied by assigning an Elastic IP address (which survives rescheduling) to the EC2 instance using the AWS Console.
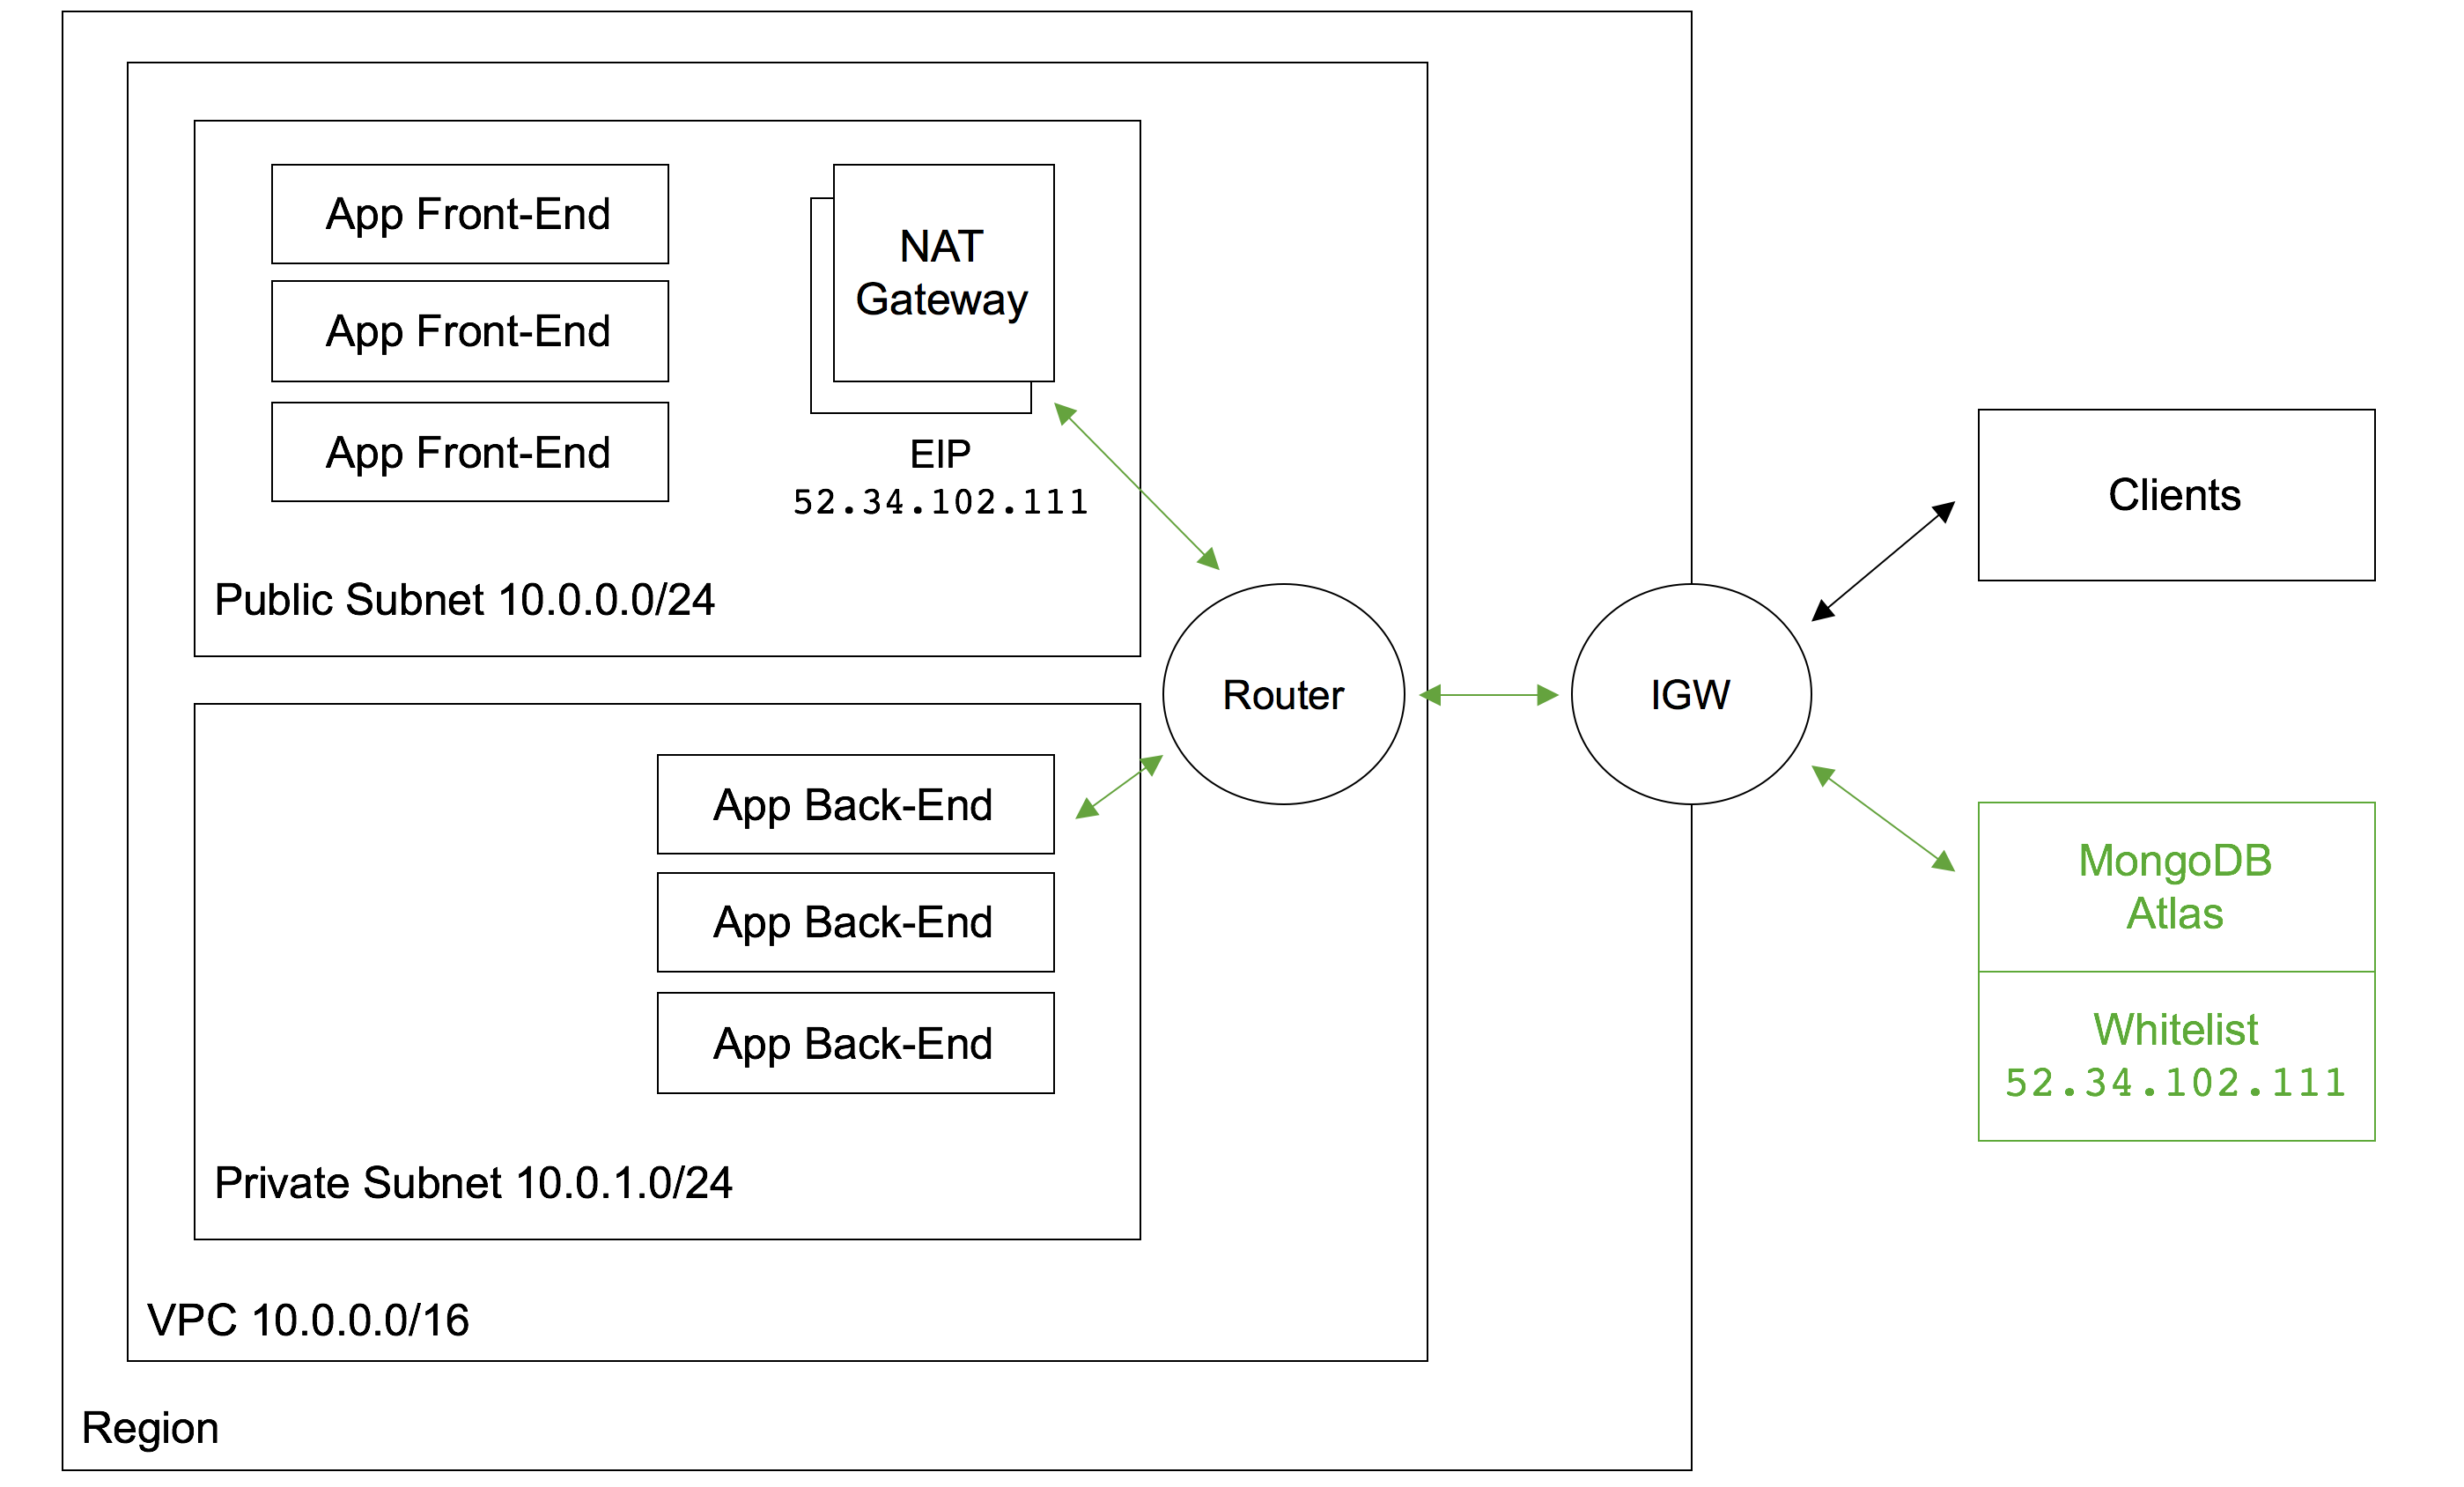
What if demand for your application grows and Elastic Beanstalk determines that it needs to add an extra EC2 instance? Again, that instance will have an IP Address that hasn’t yet been added to the MongoDB Atlas whitelist. To cover that scenario (as well as rescheduling), the AWS NAT Gateway service can be used. Figure 10 illustrates a configuration using a NAT Gateway.
Figure 10: Presenting a Single IP Address Using an AWS NAT Gateway
Two subnets are created within the AWS Virtual Private Cloud (VPC):
The public subnet contains the front-end servers which external clients access via an Elastic IP Address attached to the Internet Gateway (IGW). It also contains the NAT Gateway service.
The private subnet contains the back-end servers which will access MongoDB Atlas.
Routing tables must be created to route all messages from the private subnet destined for public IP addresses through the NAT Gateway. The NAT Gateway has its own Elastic IP Address which all of the outgoing messages that pass through it appear to originate from – this IP Address must be added to the MongoDB Atlas whitelist.
Messages between the front-end and back-end servers use local IP Addresses and so are routed directly, without passing through the NAT Gateway. Messages from external clients are routed from the IGW to the front-end servers.
Clearly this configuration adds cost and complexity (e.g., the application needs breaking into front and back-end components).
An alternative is to add extra logic to your application so that it automatically adds its IP address to the whitelist using the MongoDB Atlas Public API. If taking that approach, then also consider how to remove redundant IP addresses as the whitelist is limited to 20 entries.
What Next?
While MongoDB Atlas radically simplifies the operation of MongoDB there are still some decisions to take to ensure the best performance and reliability for your application. The MongoDB Atlas Best Practices white paper provides guidance on best practices for deploying, managing, and optimizing the performance of your database with MongoDB Atlas.
The guide outlines considerations for achieving performance at scale with MongoDB Atlas across a number of key dimensions, including instance size selection, application patterns, schema design and indexing, and disk I/O. While this guide is broad in scope, it is not exhaustive. Following the recommendations in the guide will provide a solid foundation for ensuring optimal application performance.
Learn more about the capabilities of MongoDB Atlas and try it out for yourself here.
Apostrophe is a Content Management Systems that’s designed to build content-driven web sites. Because of their ease of use, Apostrophe is built upon MongoDB and Node.js.
This post explains why MongoDB Atlas is an ideal choice for Apostrophe and then goes on to show how to configure Apostrophe to use it.
Why MongoDB Atlas is the Ideal Database for Apostrophe
MongoDB delivers flexible schemas, rich queries, an idiomatic Node.js driver, and simple to use high availability and scaling. This makes it the go-to database for anyone looking to build applications on Node.js.
MongoDB Atlas provides all of the features of MongoDB, without the operational heavy lifting required for any new application. MongoDB Atlas is available on demand through a pay-as-you-go model and billed on an hourly basis, letting you focus on what you do best.
It’s easy to get started – use a simple GUI to select the instance size, region, and features you need. MongoDB Atlas provides:
Security features to protect access to your data
Built in replication for always-on availability, tolerating complete data center failure
Backups and point in time recovery to protect against data corruption
Fine-grained monitoring to let you know when to scale. Additional instances can be provisioned with the push of a button
Automated patching and one-click upgrades for new major versions of the database, enabling you to take advantage of the latest and greatest MongoDB features
A choice of cloud providers, regions, and billing options
Like Apostrophe, MongoDB Atlas is a natural fit for users looking to simplify their development and operations work, letting them focus on what makes their application unique rather than commodity (albeit essential) plumbing.
Installing Apostrophe and Setting it up to Use MongoDB Atlas
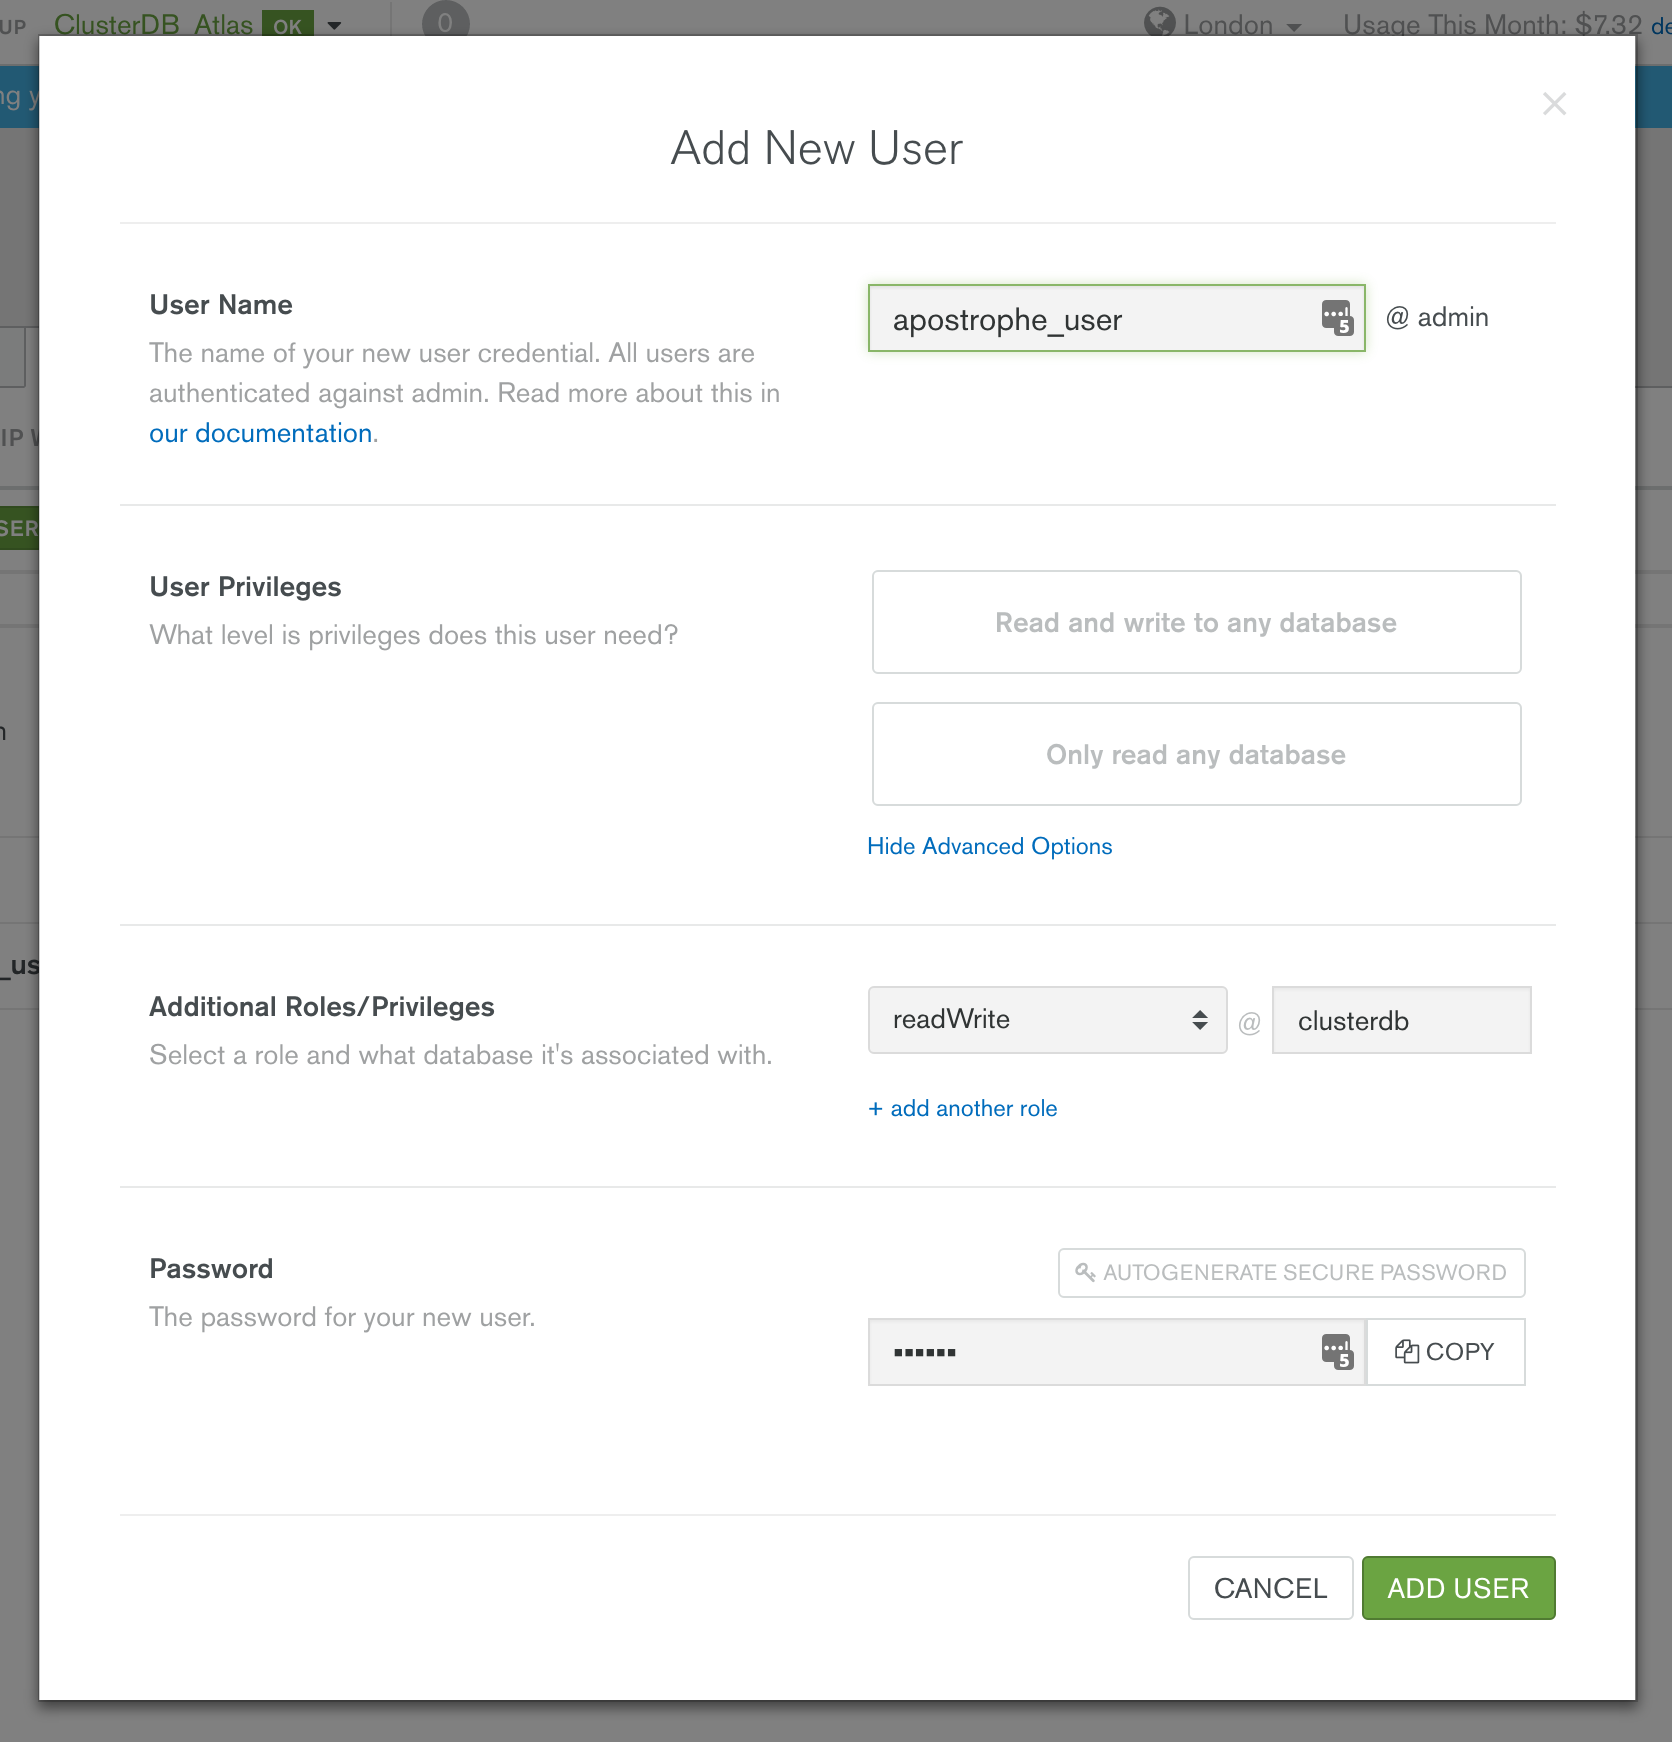
Before starting with Apostrophe, you should launch your MongoDB cluster using MongoDB Atlas and then (optionally) create a user with read and write privileges for just the database that will be used for this project, as shown in Figure 1. You must also add the IP address of your application server to the IP Whitelist in the MongoDB Atlas security tab.
Figure 1:Creating an Apostrophe user in MongoDB Atlas
If it isn’t already installed on your system, download and install Node.js:
You should then add the bin sub-folder to your .bash_profile file and then install ImageMagick (used by Apostrophe to handle image files); clone the Apostrophe Sandbox project; and then install its dependencies:
Before starting Apostrophe you need to configure it with details on how to connect to your specific MongoDB Atlas cluster. This is done by cloning the configuration file to data/local.js:
You should then edit the data/local.js file and set the uri parameter using the specific connection information provided for your MongoDB Atlas group:
The URI contains these components:
apostrophe_user is the name of the user you created in the MongoDB Atlas UI
my_password is the password you chose when creating the user in MongoDB Atlas
cluster0-shard-00-00-qfovx.mongodb.net, cluster0-shard-00-01-qfovx.mongodb.net, & cluster0-shard-00-02-qfovx.mongodb.net are the hostnames of the instances in your MongoDB Atlas replica set (click on the “CONNECT” button in the MongoDB Atlas UI if you don’t have these)
27017 is the standard MongoDB port number
clusterdb is the name of the database (schema) that Apostrophe will use (note that this must match the project name used when installing Apostrophe as well as the database you granted the user access to
To enforce security, MongoDB Atlas mandates that the ssl option is used
admin is the database that’s being used to store the credentials for apostrophe_user
Clients connect to Apostrophe through port 3000 and so you must open that port in your firewall.
You can then create the database and start Apostrophe:
Testing the Application
Browse to the application at http://address-of-app-server:3000 as shown in Figure 2 and then login using the username admin and the password demo.
Figure 2: Apostrophe Running on MongoDB Atlas
Now, go ahead and add some content (Figure 3).
Figure 3: Edit Apostrophe Home Page with Data Stored in MongoDB Atlas
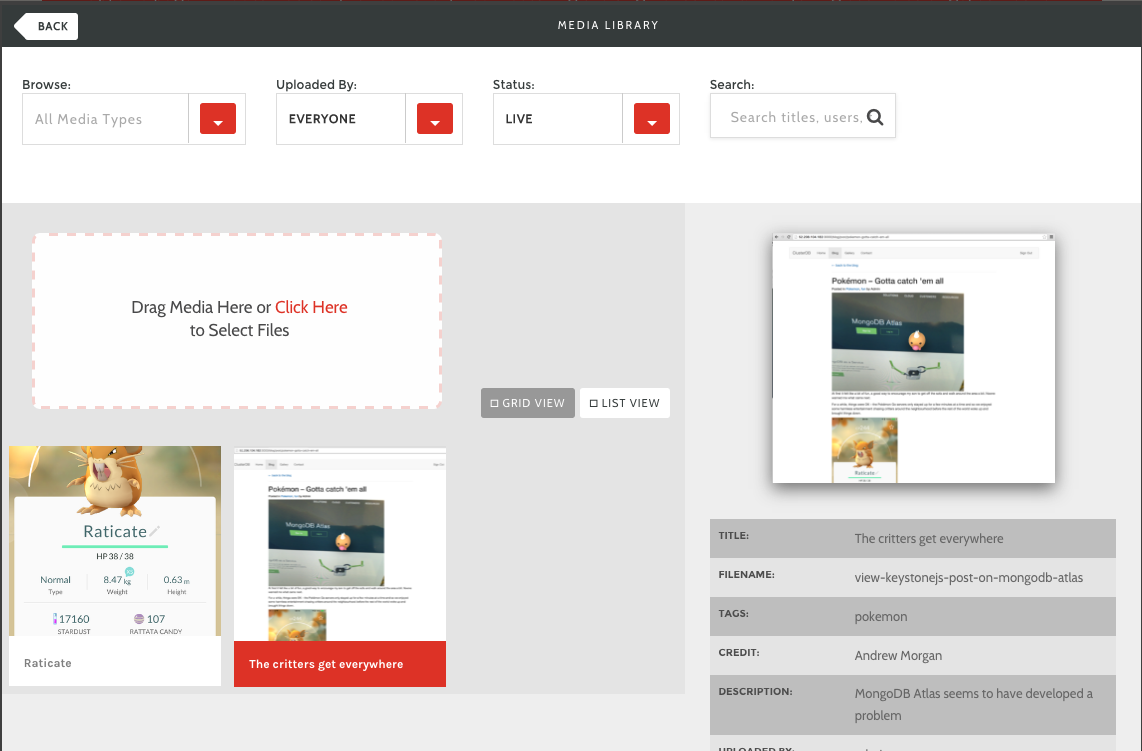
Upload some images as shown in Figure 4.
Figure 4: Upload Images to Apostrophe on MongoDB Atlas
Optionally, to confirm that, MongoDB Atlas really is being used by Apostrophe, you can connect using the MongoDB shell:
To visually navigate through the schema and data created by Apostrophe, download and install MongoDB Compass. Use your MongoDB Atlas credentials to connect Compass to your MongoDB database – Figure 5.
Figure 5: Connect MongoDB Compass to MongoDB Atlas
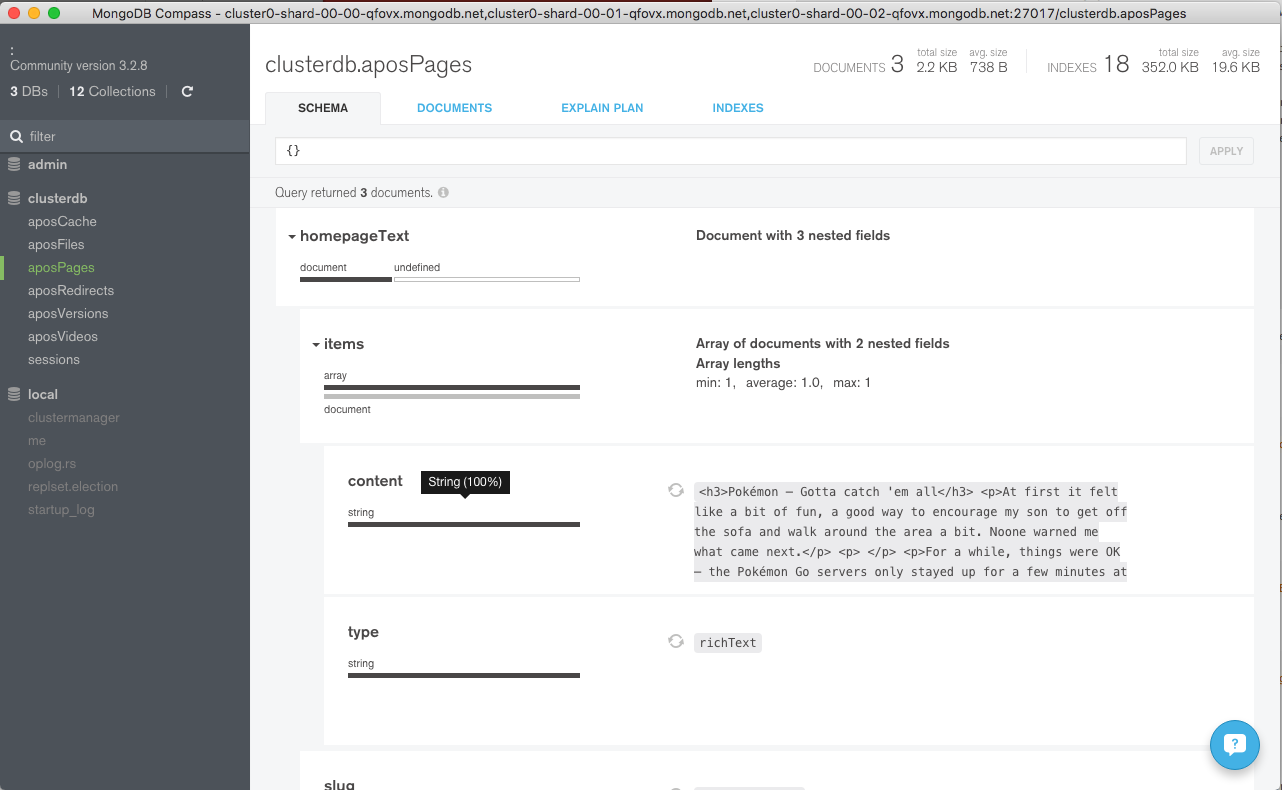
Navigate through the structure of the data in the clusterdb database (Figure 6) and view the JSON documents (Figure 7).
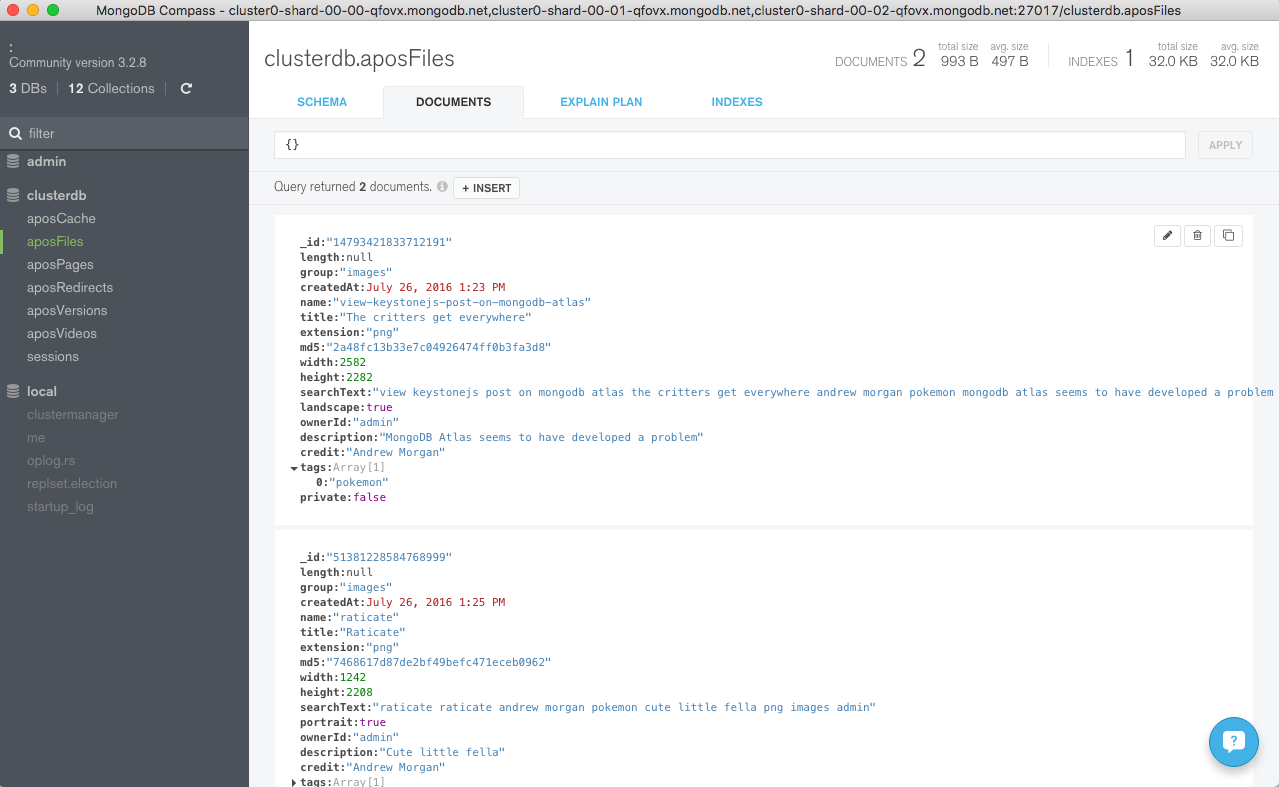
Figure 6: Explore Apostrophe Schema Using MongoDB Compass
Figure 7: View Apostrophe Documents in MongoDB Compass
What Next?
While MongoDB Atlas radically simplifies the operation of MongoDB there are still some decisions to take to ensure the best performance and reliability for your application. The MongoDB Atlas Best Practices white paper provides guidance on best practices for deploying, managing, and optimizing the performance of your database with MongoDB Atlas.
The guide outlines considerations for achieving performance at scale with MongoDB Atlas across a number of key dimensions, including instance size selection, application patterns, schema design and indexing, and disk I/O. While this guide is broad in scope, it is not exhaustive. Following the recommendations in the guide will provide a solid foundation for ensuring optimal application performance.
There’s a lot of excitement about NoSQL data stores, with the promise of simple access patterns, flexible schemas, scalability, and high availability. The downside comes in the form of losing ACID transactions, consistency, flexible queries, and data integrity checks. What if you could have the best of both worlds? This session shows how MySQL Cluster provides simultaneous SQL and native NoSQL access to your data—whether it’s in a simple key-value API (memcached) or REST, JavaScript, Java, or C++. You will hear how the MySQL Cluster architecture delivers in-memory real-time performance; 99.999 percent availability; online maintenance; and linear, horizontal scalability through transparent autosharding.
MySQL Cluster does more than scale beyond a billion transactions per minute. It’s also the in-memory database at the heart of mobile phone networks and online games. Scaling for the masses. A touch of your mobile phone’s green button likely has already gotten you in contact with MySQL Cluster. Driven by these extreme use cases, this session covers how to build business-critical scalable solutions with MySQL Cluster.
On Thursday 12th September I co-presented a webinar on how MySQL Cluster delivers the key benefits of NoSQL Data Stores without having to give up the features that people rely on from relational databases (consistency, SQL etc.). There was a particular focus on how to use the new node.js JavaScript API which was recently released as part of MySQL Cluster 7.3. If you weren’t able to attend the live event then the webinar replay is available here. If you scroll down to the bottom of this post you’ll see a summary of the Questions and Answers from the session.
The new MySQL JavaScript Connector for Node.js is designed to deliver simplicity and high performance for JavaScript users.
Enables end-to-end JavaScript development, from the browser to the server and now to the world’s most popular open source database.
Provides native NoSQL access to the MySQL Cluster storage engine without first going through SQL transformations and parsing
This session gives you everything you need in order to get started on building highly scalable, event-driven Web, mobile, and social applications.
It discusses:
Implementation of the connector
Database connection and metadata management
Creating and executing queries
Use with InnoDB (via an internal SQL conversion) and MySQL Cluster (direct)
WHO:
Andrew Morgan, Principal Product Manager
John Duncan, Senior Software Developer
Craig Russell, Principal Software Developer
Q & A
What is the benefit of using an asynchrous run-time model? The async everywhere idea in Node.JS means the one execution thread is always doing work for a user. Never waiting on I/O. It allows you to minimize the cost of waiting on the network for i/o, and that’s a big part of how it can handle so many simultaneous requests.
Can you please ellaborate more about multi-threading in node.js? Node.js has a just one thread that runs JavaScript. Then there is also a small thread pool that handles some background i/o tasks.
Why can’t you use a synchrous model? Would there be any drawbacks? The async programming style can be hard to get used to … but in JavaScript, async is really “how things are done”. Just like browser-side JavaScript responding to a mouse event, this is server-side JS responding to a database event or a network event.
Is there also a synchronous Session function? There is a synchronous version of connect(). There are some “immediate” calls on session (which don’t have to do any waiting), but there are no synchronous calls on session that wait for anything
Most applications run as responses to requests and so most of the logic needs to be executed sequentially. How are asynchronous calls handled? Is there any mechanism to wait and join multiple asynch call for a particular section of logic? If you have multiple database operations to execute, you can use the batch feature which will wait for all operations to complete and then call back. If you have other operations you need to have your own synchronization mechanism.
It was mentioned that you can use this APi to access the MySQL Cluster data nodes directly or MyISAM/InnoDB data via SQL and a MySQL server – how do I configure that? In the connection properties for your database connection, you use adapter=ndb for a native NDB connection, or adapter=mysql for a MySQL connection.
Are results mapped into objects? Yes. When the inner layer reads a row from the database, it creates a JavaScript object (according to the mapping) and it calls your Constructor with no arguments and with this set to the newly created object.
So there is seperate mapping for tables and for results? No, a single mapping.
Does the object mapping support the entity relationships like in JPA implementations? Can it be referenced with JSON ojects with one-to-one, one-to-many, etc relationships? The current release does not support relationships/JOINs.
JavaScript is weakly typed. How are different data types handled with the same reffrence? Dynamic typing means that values (objects, exspanssions) have types (i.e. a set of available operations and properties) but not variables, so a variable can, over time, refer to values of different types.
Are there sql like transaction through the Node.js NoSQL API? Yes, the API looks something like this: session.currentTransaction().begin() … define operations … session.currentTransaction.commit()
So, we can use session to track any transaction? Right, a session owns its single transaction. If you don’t call begin() on the transaction, then your operation will run “auto-commit”.
Is this library similar to what mongoose is to mongodb? I’m not very familiar with mongoose — but it is broadly similar to many object-to-database mapping layers.
So, just for clarification, the chief advantage of this is it’s moving the heavy lifting from the server side (like with PHP) to the client side? Not quite, node.js is server-side javascript. The main advantage is an asynchronous processing of requests that never block. In contrast, a large number of server-threads need to be provided with requests that can block.
Node.js runs on V8 which developed by google, its run fast any browser or only in Chrome? Node.js actually runs in the app server rather than in your browser and so it will play nicely when accessed via any browser (or other client)
On Thursday 12th September I’ll be co-presenting a free webinar on how MySQL Cluster delivers the key benefits of NoSQL Data Stores without having to give up the features that people rely on from relational databases (consistency, SQL etc.). There will be particular focus on how to use the new node.js JavaScript API which was recently released as part of MySQL Cluster 7.3. As usual the webinar is free but you should register in advance here.
The new MySQL JavaScript Connector for Node.js is designed to deliver simplicity and high performance for JavaScript users.
Enables end-to-end JavaScript development, from the browser to the server and now to the world’s most popular open source database.
Provides native NoSQL access to the MySQL Cluster storage engine without first going through SQL transformations and parsing
This session gives you everything you need in order to get started on building highly scalable, event-driven Web, mobile, and social applications.
It discusses:
Implementation of the connector
Database connection and metadata management
Creating and executing queries
Use with InnoDB (via an internal SQL conversion) and MySQL Cluster (direct)
WHO:
Andrew Morgan, Principal Product Manager
John Duncan, Senior Software Developer
Craig Russell, Principal Software Developer
WHEN:
Thu, Sep 12: 09:00 Pacific time (America)
Thu, Sep 12: 10:00 Mountain time (America)
Thu, Sep 12: 11:00 Central time (America)
Thu, Sep 12: 12:00 Eastern time (America)
Thu, Sep 12: 16:00 UTC
Thu, Sep 12: 17:00 Western European time
Thu, Sep 12: 18:00 Central European time
Thu, Sep 12: 19:00 Eastern European time
Thu, Sep 12: 21:30 India, Sri Lanka
Fri, Sep 13: 00:00 Singapore/Malaysia/Philippines time
We’re very pleased to announce that MySQL Cluster 7.3 has gone GA; for a full run-down of the new features and enhancements, take a look at the "MySQL Cluster 7.3 New Features for Internet-Scale Performance with Carrier-Grade Availability" white paper but this post will focus on just one of the features – the MySQL Cluster JavaScript Driver for Node.js. The post will step you through setting everything up so that you can get your first Node.js code reading and writing from MySQL Cluster.
Background
MySQL Cluster is a distributed, shared nothing database that provides linear scalability, 99.999% availability and high read/write throughput with low latency. SQL is just one way of accessing data stored in MySQL Cluster – there are also a number of native NoSQL APIs that go straight to the data without any interim conversion to SQL. These APIs include C++, Memcached, Java, JPA and REST – in MySQL Cluster 7.3 JavaScript/Node.js is added to the list.
Node.js (typically referred to simply as "Node") is a platform for running fast, scalable applications using JavaScript. For maximum performance, Node.js is built around a non-blocking, event-driven architecture – just like MySQL Cluster and so they fit together very well.
The MySQL Cluster JavaScript Driver for Node.js is just what it sounds like it is – it’s a connector that can be called directly from your JavaScript code to read and write your data. As it accesses the data nodes directly, there is no extra latency from passing through a MySQL Server and need to convert from JavaScript code//objects into SQL operations. If for some reason, you’d prefer it to pass through a MySQL Server (for example if you’re storing tables in InnoDB) then that can be configured.
As with all of the other APIs that we offer, you’re able to mix & match access methods; while you access the database using JavaScript objects, these will be mapped to rows in database tables and this same data can simultaneously be accessed by other NoSQL API or through SQL.
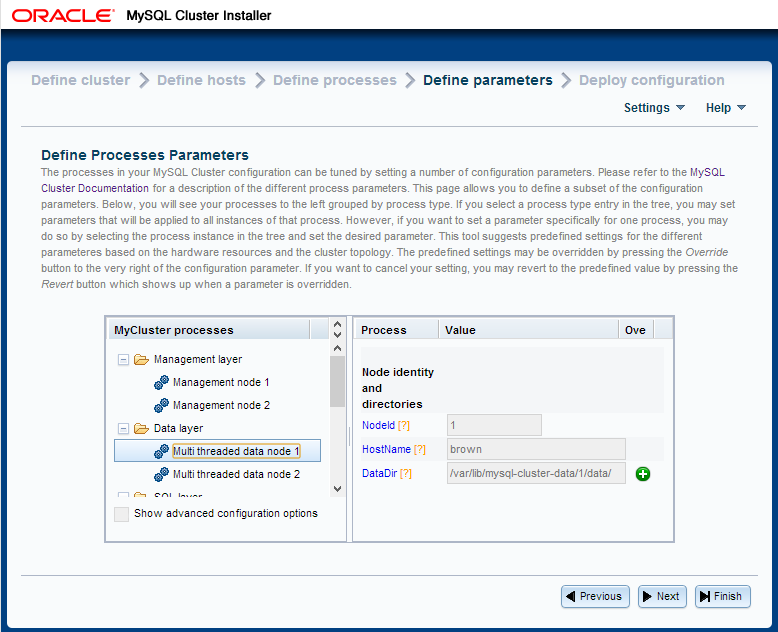
MySQL Cluster Auto-Installer
Installing MySQL Cluster
Obviously, to try out our JavaScript code we’ll need a database to access. The simplest way to do this is to use the new auto-installer that’s part of MySQL Cluster 7.3; this provides a browser-based GUI that configures and runs a MySQL Cluster database that’s been configured for your application and environment. Using this installer is described in the "MySQL Cluster Auto-Installer" post.
Setting up the Database
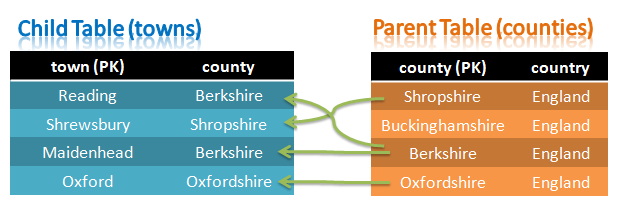
Tables with Foreign Key constraint
A simple database schema is being used – a single table would really be enough but we’ll actually create two in order to demonstrate that Foreign Key constraints (Foreign Keys are another new feature in MySQL Cluster 7,3) are still enforced when using the NoSQL APIs.
These two tables are set up as follows:
[billy@bob]$ mysql --protocol=tcp -u root
Welcome to the MySQL monitor.  Commands end with ; or g.
Your MySQL connection id is 2
Server version: 5.6.10-ndb-7.3.1-cluster-gpl MySQL Cluster Community Server (GPL)

Copyright (c) 2000, 2013, Oracle and/or its affiliates. All rights reserved.

Oracle is a registered trademark of Oracle Corporation and/or its
affiliates. Other names may be trademarks of their respective
owners.

Type 'help;' or 'h' for help. Type 'c' to clear the current input statement.

mysql> CREATE TABLE test.counties (county VARCHAR(30) NOT NULL PRIMARY KEY,
country VARCHAR(30)) ENGINE=ndb;
Query OK, 0 rows affected (1.17 sec)

mysql> CREATE TABLE test.towns (town VARCHAR(30) NOT NULL PRIMARY KEY, county VARCHAR(30),
INDEX county_county_index (county), CONSTRAINT county_town FOREIGN KEY (county) REFERENCES counties(county)
ON DELETE RESTRICT ON UPDATE RESTRICT) ENGINE=ndb;
Query OK, 0 rows affected (1.00 sec)
If you’re using Windows then the MSI will guide you through the process – though when you’ve finished you’ll need to manually run the following from the cmd prompt:
npm install -g node-gyp
On Linux, you’ll need to manually build and install Node.js after you’ve downloaded it:
[root@bob node-v0.10.7]# ./configure
[root@bob node-v0.10.7]# make
[root@bob node-v0.10.7]# make install
Building mysql-js (the JavaScript driver for MySQL Cluster)
Regardless of what operating system is being used, the driver must be built before it can be used. Furthermore, to build the driver you need to have a local MySQL Cluster package (so that it can access the NDB API client library).
Depending on the exact Linux distro and version being used, some dependencies may need to be installed first:
Once that has been done, the driver can be built – the following should be run from within the share/nodejs directory within the MySQL Cluster package:
To begin with, the complete code is provided and then each component is explained.
var nosql = require('..');

var Town = function(name, county) {
    if (name) this.town = name;
    if (county) this.county = county;
};

// create basic object<->table mapping
var annotations = new nosql.TableMapping('towns').applyToClass(Town);

//check results of find
var onFind = function(err, result) {
    console.log('onFind.');
    if (err) {
        console.log(err);
    } else {
        console.log('Found: ' + JSON.stringify(result));
    }
    process.exit(0);
};

//check results of insert
var onInsert = function(err, object, session) {
    console.log('onInsert.');
    if (err) {
        console.log(err);
    } else {
        console.log('Inserted: ' + JSON.stringify(object));

        // Now read the data back out from the database
        session.find(Town, 'Maidenhead', onFind);
    }
};

// insert an object
var onSession = function(err, session) {
    console.log('onSession.');
    if (err) {
    console.log('Error onSession.');
        console.log(err);
        process.exit(0);
    } else {
        var data = new Town('Maidenhead', 'Berkshire');
        session.persist(data, onInsert, data, session);
    }
};

var dbProperties = nosql.ConnectionProperties('ndb');

console.log('Openning session');

// connect to the database
nosql.openSession(dbProperties, Town, onSession);

console.log('Openned session');
Step 1 Import API software
The first step is for your JavaScript application to specify that it will use the new API (mysql-js); this will work if this file is stored in a directory under cluster-install/share/nodejs:
var nosql = require('mysql-js');
Step 2 Define JavaScript class
A class should be defined that will be used by the application and will also be mapped to the towns table that has already been created. The class is defined through the specification of its constructor:
var Town = function(name, county) {
    if (name) this.town = name;
    if (county) this.county = county;
};
Step 3 Define schema mappings
MySQL Cluster is a relational database while JavaScript works with objects. To get the best of both worlds, mappings can be set up between MySQL tables (or individual columns) and JavaScript objects – in this case it’s kept very simple and the Town class is mapped to the towns table:
var annotations = new nosql.TableMapping('towns').applyToClass(Town);
In this step, the application connects to the database to indicate that it wants to access the data nodes directly rather than via the MySQL Server (and hidden conversion to SQL), the ConnectionProperties is set to ndb (rather than mysql). Additionally, a callback function (onSession) is passed as an argument. Recall that this is an event-driven, non-blocking, asynchronous API and so after calling openSession, control will be immediately returned to the application – without waiting for the session to actually be established – the application can then go away and perform other useful work. Once the session has been created, the callback function (onSession) will be invoked, allowing the application to take the next steps.
var dbProperties = nosql.ConnectionProperties('ndb');
nosql.openSession(dbProperties, annotations, onSession);
Step 5 Store some data
Note that the code in this step is the implementation of the call back function (onSession) that we passed in as a parameter to openSession in the previous step. This function simply instantiates a Town JavaScript object and then writes it to MySQL Cluster through the persist method. Once more, a callback function is passed in (onInsert) which will be invoked once the data has been stored in the database. Note that any objects specified after the callback function in the parameter list (in this case, the Town object data) will be provided as parameters to the callback function when it’s executed – note that the session parameter is also included and the framework will pass that as a parameter to the onInsert callback function.
var onSession = function(err, session) {
    if (err) {...} else {
        var data = new Town('Maidenhead', 'Berkshire');
        session.persist(data, onInsert, data, session);
    }
};
Step 6 Verify insert succeeded & initiate reading of data from the database
Next, our callback function (onInsert) is called and the object parameter contains the Town that had been passed into the persist method in the previous step, together with the session variable. This function simply checks that there wasn’t an error and then displays the Town that has been stored in the database. Again, a callback function is provided – onFind – that will be called once the data has been found.
Step 7 Process the data read back from the database
Finally, onFind is called-back and it handles the processing of the results (whether it is an error or the Town object in the form of the result parameter).
The example code should be stored in a file called my-test.js in a directory under cluster-install/share/nodejs/my_samples. To run the application, just run the following (spoiler – there will be a database error!):
This error is seen because the code is attempting to add an object/row to the towns table where the county doesn’t already have an entry in the counties table – this breaks the Foreign Key constraint that was included when the tables were created.
To get around this, the required row should be added to the counties table:
[billy@bob my_samples]$ mysql --protocol=tcp -u root
Welcome to the MySQL monitor.  Commands end with ; or g.
Your MySQL connection id is 3
Server version: 5.6.10-ndb-7.3.1-cluster-gpl MySQL Cluster Community Server (GPL)

Copyright (c) 2000, 2013, Oracle and/or its affiliates. All rights reserved.

Oracle is a registered trademark of Oracle Corporation and/or its
affiliates. Other names may be trademarks of their respective
owners.

Type 'help;' or 'h' for help. Type 'c' to clear the current input statement.

mysql> REPLACE INTO test.counties VALUES ('Berkshire', 'England');
Query OK, 1 row affected (0.25 sec)
The code can then be executed again – this time successfully:
Please give this a try – especially with your own code – and let us know how you get on. We’re especially interested in what features you’d like to see added – embedded objects, lists, joins….