On 17th October I’ll be running a hands-on workshop on the various technologies available to provide High Availability using MySQL. The workshop is being held on 17th October (the day before the All Your Base conference) in Oxford (UK). The cost is £250 + VAT and you can register here.
This workshop provides an introduction to what High Availability (HA) is; what technology options are available to achieve it with MySQL and how to actually implement your own HA solutions. The session will be a mixture of presentations, demonstrations and (most importantly) hands-on tutorials.
We’ll start with an overview of High Availability – in general and in the context of MySQL and then a survey of the technologies to choose from:
MySQL Replication
MySQL Cluster
DRBD
Shared storage clustering options
Windows Server Failover Clustering
Solaris Clusters
Oracle Virtual Machine
There will be deep-dives on MySQL Replication and MySQL Cluster and this is where the hands-on parts of the workshop will focus:
What these technologies achieve and how
Get your own database clusters up and running (hands-on)
“What happens when I do this…?” (hands-on)
Monitoring (mix of hands-on and demos)
The plan is to get everyone up and running with multiple VMs on their laptops so that they can experiment and test with MySQL Cluster and MySQL Replication over multiple (virtual) hosts. As a stretch, we’ll try creating a Cluster running over everyone’s machine at the same time – though that might be stretching the logisitics! I’ve got a supply of 30 USB sticks and hope to have 2-3 unique virtual appliances on each – what could go wrong?
With the General Availability of the standalone MySQL Utilities it now makes sense to use these to simplify (and optionally automate) your MySQL Replication and High Availability solutions. In light of that, 4 of our MySQL white papers have been updated to reflect the new opportunities:
MySQL Guide to High Availability Solutions. Data is the currency of today’s web, mobile, social, enterprise and cloud applications. Ensuring data is always available is a top priority for any organization – minutes of downtime will result in significant loss of revenue and reputation.
This Guide is designed to assist Developers, Architects and DBAs in navigating the complex waters of HA. It presents:
A methodology for selecting the right HA solution to meet Service Level Agreements
A tour of the leading certified HA solutions for MySQL
Operational best practices to implement and support HA
Global Transaction Identifiers (GTIDs) are one of the core new features of MySQL 5.6 replication, providing a foundation to building self-healing, highly available data clusters.
By reading this whitepaper, you will be able to:
Illustrate use-cases and implementation of MySQL replication
Learn how High Availability (HA) with MySQL replication is achieved using GTIDs
Gain an overview of MySQL replication utilities
Discover resources for achieving HA with MySQL replication
The paper concludes with an overview of operational best practices.
MySQL Replication: An Introduction. Download the whitepaper to learn how MySQL replication enables the largest web, cloud, mobile and social applications to scale-out on commodity hardware, while reducing the risks of downtime.
The whitepaper discusses:
Replication concepts
Replication enhancements in MySQL 5.6
Replication use-cases
Replication topologies
Replication monitoring and management
The paper concludes with resources to get started with MySQL replication in building next generation services.
With the release of MySQL Utilities 1.3.4, the standalone (not bundled with the MySQL WorkBench GUI) package is now Generally Available and fully supported. This post will focus on a very important change (the ability to run as a daemon rather than in a terminal) to the mysqlfailover utility which allows you to build a light-weight HA database solution using MySQL Replication.
When we first released the mysqlfailover utility, the reaction was very positive but the feedback also told us that to really use this to provide High Availability in a production system two enhancements were critical:
The ability to not have the database password visible when someone queries the status of the process (for example, using the ps command). This was addressed by allowing the connection string to be specified using a login-path (referring to an entry in .mylogin.cnf – see https://dev.mysql.com/doc/refman/5.6/en/mysql-config-editor.html) in place of <user>[:<passwd>]@<host>. This is a vital security enhancement added in MySQL Utilities 1.3.1.
Allowing mysqlfailover to be run as a daemon rather than being tied to the terminal from where it had to be manually launched. This option is key to enabling the user to build a reslient HA system that doesn’t rely on mysqlfailover being launched from a terminal and that terminal then never going away.
The rest of this post focuses on how to run mysqlfailover as a daemon.
By default, mysqlfailover runs as an interactive program within the terminal it was run from; it constantly refreshes, providing a summary of the status of the replication topology as shown below.
mysql@mini servers]$ mysqlfailover --master=root@192.168.1.101:5001
  --discover-slaves-login=root --rediscover

MySQL Replication Failover Utility
Failover Mode = auto     Next Interval = Thu Aug  1 23:34:56 2013

Master Information
------------------
Binary Log File   Position  Binlog_Do_DB  Binlog_Ignore_DB
mini1-bin.000001  581

GTID Executed Set
1aca3d80-faf9-11e2-a214-0800272b8804:1-2

WARNING: Errant transaction(s) found on slave(s).
Replication Health Status
+----------------+-------+---------+--------+------------+---------+
| host           | port  | role    | state  | gtid_mode  | health  |
+----------------+-------+---------+--------+------------+---------+
| 192.168.1.101  | 5001  | MASTER  | UP     | ON         | OK      |
| 192.168.1.101  | 5002  | SLAVE   | UP     | ON         | OK      |
| 192.168.1.101  | 5003  | SLAVE   | UP     | ON         | OK      |
| 192.168.1.101  | 5004  | SLAVE   | UP     | ON         | OK      |
+----------------+-------+---------+--------+------------+---------+

Q-quit R-refresh H-health G-GTID Lists U-UUIDs
To run mysqlfailover as a daemon, the first new command-line option you must provide is –daemon=start; as you’d expect this runs the process as a daemon. In this mode, you won’t get to see the output from mysqlfailover at your terminal and so you should make sure that you know what log file is being used – so it’s best to specify it with –log=<path-to-log-file>. You can also control what information is periodically written to the log file using –report-values=<list-of-attributes from health,gtid,uuid>. As you’ll likely to want to be able to manage the daemon without having to be in the same directory (and also likely to manage it from scripts that are automatically run when the server starts and stops) it makes sense to specify where the process ID file should be stored using –pid=<path-to-pid-file>.
The final incantation might look something like the following:
and the resulting log file could then contain information such as this:
2013-08-02 01:10:34 AM INFO Getting health for master: 192.168.1.101:5001.
2013-08-02 01:10:35 AM INFO Health Status:
2013-08-02 01:10:35 AM INFO host: 192.168.1.101, port: 5001, role: MASTER, state: UP, gtid_mode: ON, health: OK
2013-08-02 01:10:35 AM INFO host: 192.168.1.101, port: 5002, role: SLAVE, state: UP, gtid_mode: ON, health: OK
2013-08-02 01:10:35 AM INFO host: 192.168.1.101, port: 5003, role: SLAVE, state: UP, gtid_mode: ON, health: OK
2013-08-02 01:10:35 AM INFO host: 192.168.1.101, port: 5004, role: SLAVE, state: UP, gtid_mode: ON, health: OK
2013-08-02 01:10:35 AM INFO GTID Status - Transactions executed on the servers:
2013-08-02 01:10:35 AM INFO host: 192.168.1.101, port: 5001, role: MASTER, gtid: 1aca3d80-faf9-11e2-a214-0800272b8804:1-2
2013-08-02 01:10:35 AM INFO host: 192.168.1.101, port: 5002, role: SLAVE, gtid: 1aca3d80-faf9-11e2-a214-0800272b8804:1-2
2013-08-02 01:10:35 AM INFO host: 192.168.1.101, port: 5002, role: SLAVE, gtid: 1db19050-faf9-11e2-a214-0800272b8804:1
2013-08-02 01:10:35 AM INFO host: 192.168.1.101, port: 5003, role: SLAVE, gtid: 1aca3d80-faf9-11e2-a214-0800272b8804:1-2
2013-08-02 01:10:35 AM INFO host: 192.168.1.101, port: 5003, role: SLAVE, gtid: 200f8139-faf9-11e2-a214-0800272b8804:1
2013-08-02 01:10:35 AM INFO host: 192.168.1.101, port: 5004, role: SLAVE, gtid: 1aca3d80-faf9-11e2-a214-0800272b8804:1-2
2013-08-02 01:10:35 AM INFO host: 192.168.1.101, port: 5004, role: SLAVE, gtid: 22842441-faf9-11e2-a214-0800272b8804:1
2013-08-02 01:10:35 AM INFO UUID Status:
2013-08-02 01:10:35 AM INFO host: 192.168.1.101, port: 5001, role: MASTER, uuid: 1aca3d80-faf9-11e2-a214-0800272b8804
2013-08-02 01:10:35 AM INFO host: 192.168.1.101, port: 5002, role: SLAVE, uuid: 1db19050-faf9-11e2-a214-0800272b8804
2013-08-02 01:10:35 AM INFO host: 192.168.1.101, port: 5003, role: SLAVE, uuid: 200f8139-faf9-11e2-a214-0800272b8804
2013-08-02 01:10:35 AM INFO host: 192.168.1.101, port: 5004, role: SLAVE, uuid: 22842441-faf9-11e2-a214-0800272b8804
The final option for daemon= is daemon=nodetach which is like start but the terminal that it’s run from will continue to view the output from the daemon.
One thing to note is that when the server is restarted, mysqlfailover needs to be started again and this is not something that is automatically configured when you run it as a daemon – rather, it’s your responsibility to ensure that it’s restarted (for example, including it in an init script.
Please try it out and (as always) let us know how you get on – the addition of these extra options is a direct result of the user feedback received for the earlier versions.
On Thursday, Dr Charles Bell and I will be presenting a webinar on MySQL Utilities; there will be a heavy focus on what you can acheive with them and how you should use them. As well as listening to the presentation, this is a great chance to get your questions answered by the experts (Israel Gomez from the engineering team will also be on-line to help with the questions). As always, the webinar is free but you should register in advance here. If the time isn’t convenient, register anyway and you’ll be sent a link to the replay when it’s available.
Abstract:
MySQL Utilities provide a collection of command-line utilities that are used for maintaining and administering MySQL databases, including:
General Utilities (Disk Usage, Redundant Indexes, Search Meta Data)
Andrew Morgan and Chuck Bell will guide you through these utilities, and many more, explaining what you can gain from these tools and how to use them (for example how a single command repeatedly checks your master server and in the event it fails, automatically promotes one of the slaves to be the new master). This is your opportunity to listen to the development lead describe what he and his team have created, and to get your questions answered by the experts.
WHO:
Andrew Morgan, Principal Product Manager
Chuck Bell, Software Development Manager
WHEN:
Thu, Jul 18: 09:00 Pacific time (America)
Thu, Jul 18: 10:00 Mountain time (America)
Thu, Jul 18: 11:00 Central time (America)
Thu, Jul 18: 12:00 Eastern time (America)
Thu, Jul 18: 16:00 UTC
Thu, Jul 18: 17:00 Western European time
Thu, Jul 18: 18:00 Central European time
Thu, Jul 18: 19:00 Eastern European time
Thu, Jul 18: 21:30 India, Sri Lanka
Fri, Jul 19: 00:00 Singapore/Malaysia/Philippines time
Fri, Jul 19: 00:00 China time
Fri, Jul 19: 01:00 日本
Fri, Jul 19: 02:00 NSW, ACT, Victoria, Tasmania (Australia)
The presentation will be approximately 60 minutes long followed by Q&A.
This Wednesday (27th March) Mat Keep and I will be presenting a free, live webinar on MySQL 5.6 Replication. You need to register here ahead of the webinar – worth doing even if you can’t attend as you’ll then be sent a link to the replay when it’s available. We’ll also have some of the key MySQL replication developers on-line to answer your questions and so it’s also a great chance to get some free consultancy 😉
Details….
Join this session to learn how the new replication features in MySQL 5.6 enable developers and DBAs to build and scale next generation services using the world’s most popular open source database. MySQL 5.6 delivers new replication capabilities which we will discuss and demonstrate in the webinar:
High performance with Binary Log Group Commit, Multi-Threaded Slaves and Optimized Row Based Replication
High availability with Global Transaction Identifiers, Failover Utilities and Crash Safe Slaves & Binlog
Data integrity with Replication Event Checksums
Dev/Ops agility with new Replication Utilities, Time Delayed Replication and more
The session will wrap up with resources to get started with MySQL 5.6.
WHEN:
Wed, Mar 27: 07:00 Pacific time (America)
Wed, Mar 27: 08:00 Mountain time (America)
Wed, Mar 27: 09:00 Central time (America)
Wed, Mar 27: 10:00 Eastern time (America)
Wed, Mar 27: 14:00 UTC
Wed, Mar 27: 14:00 Western European time
Wed, Mar 27: 15:00 Central European time
Wed, Mar 27: 16:00 Eastern European time
Wed, Mar 27: 19:30 India, Sri Lanka
Wed, Mar 27: 22:00 Singapore/Malaysia/Philippines time
Wed, Mar 27: 22:00 China time
Wed, Mar 27: 23:00 日本
Thu, Mar 28: 01:00 NSW, ACT, Victoria, Tasmania (Australia)
The presentation will be approximately 60 minutes long.
MySQL 5.6 has now been declared Generally Available (i.e. suitable for production use). This is a very exciting release from a MySQL replication perspective with some big new features. These include:
Global Transaction Identifiers (GTIDs) – a unique identifier that is used accross your replication topology to identify a transaction. Makes setting up and managing your cluster (including the promotion of a new master) far simpler and more reliable.
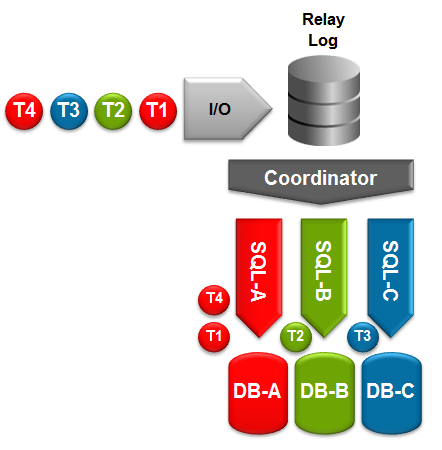
Multi-threaded slaves (MTS) – Increases the performance of replication on the slave; different threads will handle applying events to different databases.
Binary Log Group Commit – Improves replication performance on the master.
Optimized Row Based Replication – reduces the amount of data that needs to be replicated; reducing network usage and potentially speeding up replication.
Crash-Safe Replication – makes replication transactional. The data and replication positioning information are both updated as part of the same transaction.
Replication Event Checksums – checks to ensure that the data being replicated hasn’t become corrupted, avoids writing corrupted data to the slave.
Time-Delayed Replication – configure one or more of your slaves to only apply replicated events after a configured time. This can be useful to protect against DBA mistakes.
Informational Logs – includes the original statement in the binary log when using row-based-replication to aid in debugging.
If you’re already familiar with using MySQL Replication, here are a few pointers on what to do differently for the new MySQL 5.6 features but you should refer to the full tutorial to see these changes in context.
First of all, here are some extra configuration parameters to include…
When initiating (or restarting) replication on the slave, it is no longer necessary to include the binary log positioning information as the master and slave will automatically negotiate what outstanding events need to be replicated based on any GTIDs previously received by the slave…
slave> CHANGE MASTER TO MASTER_HOST='black',
                        MASTER_USER='repl_user',
                        MASTER_PASSWORD='billy',
                        MASTER_AUTO_POSITION=1;
Please try out these new features and let us know what you think.
If you’re a user of MySQL Workbench then you may have noticed a pocket knife icon appear in the top right hand corner – click on that and a terminal opens which gives you access to the MySQL utilities. In this post I’m focussing on the replication utilities but you can also refer to the full MySQL Utilities documentation.
What I’ll step through is how to uses these utilities to:
Set up replication from a single master to multiple slaves
Automatically detect the failure of the master and promote one of the slaves to be the new master
Introduce the old master back into the topology as a new slave and then promote it to be the master again
Tutorial Video
Before going through the steps in detail here’s a demonstration of the replication utilities in action…
For many people, the instinctive reaction is to deploy a fully automated system that detects when the master database fails and then fails over (promotes a slave to be the new master) without human intervention. For many applications this may be the correct approach.
There are inherent risks to this though – What if the failover implementation has a flaw and fails (after all, we probably don’t test this out in the production system very often)? What if the slave isn’t able to cope with the workload and makes things worse? Is it just a transitory glitch and would the best approach have been just to wait it out?
Following a recent, high profile outage there has been a great deal of debate on the topic between those that recommend auto-failover and those that believe it should only ever be entrusted to a knowledgeable (of the application and the database architecture) and well informed (of the state of the database nodes, application load etc.) human. Of course, if the triggering of the failover is to be left to a human then you want that person to have access to the information they need and an extremely simple procedure (ideally a single command) to execute the failover. Probably the truth is that it all depends on your specific circumstances.
The MySQL replication utilities aim to support you whichever camp you belong to:
In the fully automated mode, the utilities will continually monitor the state of the master and in the event of its failure identify the best slave to promote – by default it will select the one that is most up-to-date and then apply any changes that are available on other slaves but not on this one before promoting it to be the new master. The user can override this behaviour (for example by limiting which of the slaves are eligible for promotion). The user is also able to bind in their own programs to be run before and after the failover (for example, to inform the application).
In the monitoring mode, the utility still continually checks the availability of the master, and informs the user if it should fail. The user then executes a single command to fail over to their preferred slave.
Step 1. Make sure MySQL Servers are configured correctly
For some of the utilities, it’s important that you’re using Global Transaction IDs; binary logging needs to be enabled; may as well use the new crash-safe slave functionality… It’s beyond the scope of this post to go through all of those and so instead I’ll just give example configuration files for the 5 MySQL Servers that will be used:
my1.cnf
[mysqld]
binlog-format=ROW
log-slave-updates=true
gtid-mode=on
disable-gtid-unsafe-statements=true # Use enforce-gtid-consistency from 5.6.9+
master-info-repository=TABLE
relay-log-info-repository=TABLE
sync-master-info=1
datadir=/home/billy/mysql/data1
server-id=1
log-bin=util11-bin.log
report-host=utils1
report-port=3306
socket=/home/billy/mysql/sock1
port=3306
my2.cnf
[mysqld]
binlog-format=ROW
log-slave-updates=true
gtid-mode=on
disable-gtid-unsafe-statements=true # Use enforce-gtid-consistency from 5.6.9+
master-info-repository=TABLE
relay-log-info-repository=TABLE
sync-master-info=1
datadir=/home/billy/mysql/data2
server-id=2
log-bin=util12-bin.log
report-host=utils1
report-port=3307
socket=/home/billy/mysql/sock2
port=3307
my3.cnf
[mysqld]
binlog-format=ROW
log-slave-updates=true
gtid-mode=on
disable-gtid-unsafe-statements=true # Use enforce-gtid-consistency from 5.6.9+
master-info-repository=TABLE
relay-log-info-repository=TABLE
sync-master-info=1
datadir=/home/billy/mysql/data3
server-id=3
log-bin=util2-bin.log
report-host=utils2
report-port=3306
socket=/home/billy/mysql/sock3
port=3306
my4.cnf
[mysqld]
binlog-format=ROW
log-slave-updates=true
gtid-mode=on
disable-gtid-unsafe-statements=true # Use enforce-gtid-consistency from 5.6.9+
master-info-repository=TABLE
relay-log-info-repository=TABLE
master-info-file=/home/billy/mysql/master4.info
datadir=/home/billy/mysql/data4
server-id=4
log-bin=util4-bin.log
report-host=utils2
report-port=3307
socket=/home/billy/mysql/sock4
port=3307
The utilities are actually going to be run from a remote host and so it will be necessary for that host to access each of the MySQL Servers and so a user has to be granted remote access (note that the utilities will automatically create the replication user):
[billy@utils1 ~]$ mysql -h 127.0.0.1 -P3306 -u root -e "grant all on *.* to root@'%' with grant option;"
[billy@utils1 ~]$ mysql -h 127.0.0.1 -P3307 -u root -e "grant all on *.* to root@'%' with grant option;"
[billy@utils2 ~]$ mysql -h 127.0.0.1 -P3306 -u root -e "grant all on *.* to root@'%' with grant option;"
[billy@utils2 ~]$ mysql -h 127.0.0.1 -P3307 -u root -e "grant all on *.* to root@'%' with grant option;"
[billy@utils2 ~]$ mysql -h 127.0.0.1 -P3308 -u root -e "grant all on *.* to root@'%' with grant option;"
OK – that’s the most painful part of the whole process out of the way!
Set up replication
While there are extra options (such as specifying what username/password to use for the replication user or providing a password for the root user) I’m going to keep things simple and use the defaults as much as possible. The following commands are run from the MySQL Utilities terminal – just click on the pocket-knife icon in MySQL Workbench.
mysqlreplicate --master=root@utils1:3306 --slave=root@utils1:3307
# master on utils1: ... connected.
# slave on utils1: ... connected.
# Checking for binary logging on master...
# Setting up replication...
# ...done.

mysqlreplicate --master=root@utils1:3306 --slave=root@utils2:3306
# master on utils1: ... connected.
# slave on utils2: ... connected.
# Checking for binary logging on master...
# Setting up replication...
# ...done.

mysqlreplicate --master=root@utils1:3306 --slave=root@utils2:3307
# master on utils1: ... connected.
# slave on utils2: ... connected.
# Checking for binary logging on master...
# Setting up replication...
# ...done.

mysqlreplicate --master=root@utils1:3306 --slave=root@utils2:3308
# master on utils1: ... connected.
# slave on utils2: ... connected.
# Checking for binary logging on master...
# Setting up replication...
# ...done.
That’s it, replication has now been set up from one master to four slaves.
You can now check that the replication topology matches what you intended:
Additionally, you can also check that any of the replication relationships is correctly configure:
mysqlrplcheck --master=root@utils1 --slave=root@utils2
# master on utils1: ... connected.
# slave on utils2: ... connected.
Test Description                                                     Status
---------------------------------------------------------------------------
Checking for binary logging on master                                [pass]
Are there binlog exceptions?                                         [pass]
Replication user exists?                                             [pass]
Checking server_id values                                            [pass]
Is slave connected to master?                                        [pass]
Check master information file                                        [pass]
Checking InnoDB compatibility                                        [pass]
Checking storage engines compatibility                               [pass]
Checking lower_case_table_names settings                             [pass]
Checking slave delay (seconds behind master)                         [pass]
# ...done.
Including the -s option would have included the output that you’d expect to see from SHOW SLAVE STATUSG on the slave.
Automated monitoring and failover
The previous section showed how you can save some serious time (and opportunity for user-error) when setting up MySQL replication. We now look at using the utilities to automatically monitor the state of the master and then automatically promote a new master from the pool of slaves. For simplicity I’ll stick with default values wherever possible but note that there are a number of extra options available to you such as:
Constraining which slaves are eligible for promotion to master; the default is to take the most up-to-date slave
Binding in your own scripts to be run before or after the failover (e.g. inform your application to switch master?)
Have the utility monitor the state of the servers but don’t automatically initiate failover
Here is how to set it up:
mysqlfailover --master=root@utils1:3306 --discover-slaves-login=root --rediscover

MySQL Replication Failover Utility
Failover Mode = auto     Next Interval = Wed Aug 15 13:19:30 2012

Master Information
------------------
Binary Log File    Position  Binlog_Do_DB  Binlog_Ignore_DB
util11-bin.000001  2586

Replication Health Status
+---------+-------+---------+--------+------------+---------+
| host    | port  | role    | state  | gtid_mode  | health  |
+---------+-------+---------+--------+------------+---------+
| utils1  | 3306  | MASTER  | UP     | ON         | OK      |
| utils1  | 3307  | SLAVE   | UP     | ON         | OK      |
| utils2  | 3306  | SLAVE   | UP     | ON         | OK      |
| utils2  | 3307  | SLAVE   | UP     | ON         | OK      |
| utils2  | 3308  | SLAVE   | UP     | ON         | OK      |
+---------+-------+---------+--------+------------+---------+

Q-quit R-refresh H-health G-GTID Lists U-UUIDs
mysqlfailover will then continue to run, refreshing the state – just waiting for something to go wrong.
Rather than waiting, I kill the master MySQL Server:
mysqladmin -h utils1 -P3306 -u root shutdown
Checking with the still-running mysqlfailover we can see that it has promoted utils1:3307.
MySQL Replication Failover Utility
Failover Mode = auto     Next Interval = Wed Aug 15 13:21:13 2012

Master Information
------------------
Binary Log File    Position  Binlog_Do_DB  Binlog_Ignore_DB
util12-bin.000001  7131

Replication Health Status
+---------+-------+---------+--------+------------+---------+
| host    | port  | role    | state  | gtid_mode  | health  |
+---------+-------+---------+--------+------------+---------+
| utils1  | 3307  | MASTER  | UP     | ON         | OK      |
| utils2  | 3306  | SLAVE   | UP     | ON         | OK      |
| utils2  | 3307  | SLAVE   | UP     | ON         | OK      |
| utils2  | 3308  | SLAVE   | UP     | ON         | OK      |
+---------+-------+---------+--------+------------+---------+

Q-quit R-refresh H-health G-GTID Lists U-UUIDs
Add the recovered MySQL Server back into the topology
After restarting the failed MySQL Server, it can be added back into the mix as a slave to the new master:
mysqlreplicate --master=root@utils1:3307 --slave=root@utils1:3306
# master on utils1: ... connected.
# slave on utils1: ... connected.
# Checking for binary logging on master...
# Setting up replication...
# ...done.
The output from mysqlfailover (still running) confirms the addition:
MySQL Replication Failover Utility
Failover Mode = auto     Next Interval = Wed Aug 15 13:24:38 2012

Master Information
------------------
Binary Log File    Position  Binlog_Do_DB  Binlog_Ignore_DB
util12-bin.000001  7131

Replication Health Status
+---------+-------+---------+--------+------------+---------+
| host    | port  | role    | state  | gtid_mode  | health  |
+---------+-------+---------+--------+------------+---------+
| utils1  | 3307  | MASTER  | UP     | ON         | OK      |
| utils1  | 3306  | SLAVE   | UP     | ON         | OK      |
| utils2  | 3306  | SLAVE   | UP     | ON         | OK      |
| utils2  | 3307  | SLAVE   | UP     | ON         | OK      |
| utils2  | 3308  | SLAVE   | UP     | ON         | OK      |
+---------+-------+---------+--------+------------+---------+

Q-quit R-refresh H-health G-GTID Lists U-UUIDs
If it were important that the recovered MySQL Server be restored as the master then it is simple to manually trigger the promotion (after quitting out of mysqlfailover):
mysqlrpladmin --master=root@utils1:3307 --new-master=root@utils1:3306 --demote-master
  --discover-slaves-login=root switchover

# Discovering slaves for master at utils1:3307
# Checking privileges.
# Performing switchover from master at utils1:3307 to slave at utils1:3306.
# Checking candidate slave prerequisites.
# Waiting for slaves to catch up to old master.
# Stopping slaves.
# Performing STOP on all slaves.
# Demoting old master to be a slave to the new master.
# Switching slaves to new master.
# Starting all slaves.
# Performing START on all slaves.
# Checking slaves for errors.
# Switchover complete.
#
# Replication Topology Health:
+---------+-------+---------+--------+------------+---------+
| host    | port  | role    | state  | gtid_mode  | health  |
+---------+-------+---------+--------+------------+---------+
| utils1  | 3306  | MASTER  | UP     | ON         | OK      |
| utils1  | 3307  | SLAVE   | UP     | ON         | OK      |
| utils2  | 3306  | SLAVE   | UP     | ON         | OK      |
| utils2  | 3307  | SLAVE   | UP     | ON         | OK      |
| utils2  | 3308  | SLAVE   | UP     | ON         | OK      |
+---------+-------+---------+--------+------------+---------+
# ...done.
As always, we’d really appreciate people trying this out and giving us feedback!
On Wednesday (16th May 2012), Mat Keep and I presented on the new replication features that are previewed as part of the latest MySQL 5.6 Development Release.
In addition, there were a huge number of great questions raised and we had a couple of key engineers answering them on-line – view the Q&A transcript here.
A reminder of the topics covered in the webinar…
MySQL 5.6 delivers new replication capabilities which we will discuss in the webinar:
High performance with Multi-Threaded Slaves and Optimized Row Based Replication
High availability with Global Transaction Identifiers, Failover Utilities and Crash Safe Slaves & Binlog
Data integrity with Replication Event Checksums
Dev/Ops agility with new Replication Utilities, Time Delayed Replication and more
There are a couple of conferences coming up where you can expect to learn about the latest developments in MySQL Cluster and MySQL Replication (as well as what else is happening in MySQL 5.6).
The first is the Oracle MySQL Innovation Day which is being held in Oracle HQ at Redwood Shores. This is an all-day event on 5th June – unfortunately I won’t be able to attend this one but there will be lots of great Cluster and replication sessions. If you can’t make it out to California then there will be a live Webcast. You can register here to attend in person or join the webcast.
The second is MySQL Connect – this runs the weekend before Oracle OpenWorld in San Francisco; it’s not until 29th September but it’s worth registering now to get the early bird pricing and save $500 (end 13th July). There are lots of great sessions lined up both from the MySQL experts within Oracle and users and community members.
On Wednesday (16th May 2012), Mat Keep and I will be presenting the new replication features that are previewed as part of the latest MySQL 5.6 Development Release. If you’d like to attend then register here.
MySQL 5.6 delivers new replication capabilities which we will discuss in the webinar:
High performance with Multi-Threaded Slaves and Optimized Row Based Replication
High availability with Global Transaction Identifiers, Failover Utilities and Crash Safe Slaves & Binlog
Data integrity with Replication Event Checksums
Dev/Ops agility with new Replication Utilities, Time Delayed Replication and more
The session will wrap up with resources to get started with MySQL 5.6 and an opportunity to ask questions.
The webinar will last 45-60 minutes and will start on Wednesday, May 16, 2012 at 09:00 Pacific time (America); start times in other time zones:
Wed, May 16: 06:00 Hawaii time
Wed, May 16: 10:00 Mountain time (America)
Wed, May 16: 11:00 Central time (America)
Wed, May 16: 12:00 Eastern time (America)
Wed, May 16: 16:00 UTC
Wed, May 16: 17:00 Western European time
Wed, May 16: 18:00 Central European time
Wed, May 16: 19:00 Eastern European time
As always, it’s worth registering even if you can’t make the live webcast as you’ll be emailed a link to the replay as soon as it’s available.