MongoDB Stitch – the latest, and best way to build your app
In a recent 6 part blog series on the MEAN & MERN stacks, I stepped through how you can build modern applications on a stack of MongoDB, Node.js, Express, and Angular or React. What if there was a service that took care of everything apart from the from application frontend (Angular, React, or other technology)? [MongoDB Stitch](http://www.clusterdb.com/mongodb/modern-application-stack-part-1-introducing-the-mean-stack “Backend as a Service for MongoDB”) is that service, it’s a new backend as a service (BaaS) for applications usinf MongoDB.
The purpose of this post is to introduce what MongoDB Stitch is and, most importantly, demonstrate exactly how you use it – both configuring your app through the Stitch backend UI, and invoking that app backend from your frontend code or other services. Note that MongoDB Stitch is currently in beta and so you should expect the UI to evolve over the coming weeks and months. The tutorials in the Stitch documentation provide always up-to-date examples for creating Stitch applications.
What is MongoDB Stitch?
MongoDB Stitch is a BaaS, giving developers a REST-like API (plus SDKs for JavaScript, iOS, and Android) to MongoDB, and composability with other services, backed by a robust permissioning system for configuring fine-grained data access controls.
Stitch allows developers to focus on building applications rather than on managing data manipulation code or service integration. As application and display logic continues to move into the frontend web and mobile tiers, the remaining backend is often dominated by code to handle storing and retrieving data from a database, enforcing security and data privacy, and integrating various services. MongoDB Stitch provides that same functionality declaratively, rather than using procedural boilerplate backend code.
The data access rules in MongoDB stitch are entirely declarative and designed to be expressive enough to handle any application, including sensitive data such as payment details. For a given collection, you can restrict what operations are permitted and what fields can be accessed – according to user id, role, or custom criteria. Access can even be limited to specific aggregations – allowing analysts to work with the data without exposing any individual’s private information.
If you already have data in MongoDB Atlas, you can start by safely exposing it to new applications via Stitch’s API – perhaps allowing read access to specific fields. You can authenticate users through built-in integrations with auth providers.
In my previous blog series, I detailed how to work with the technologies that are typically used to make up a modern application backend: MongoDB for the database, Node.js to run the backend logic, and a framework such as Express to provide a REST API:
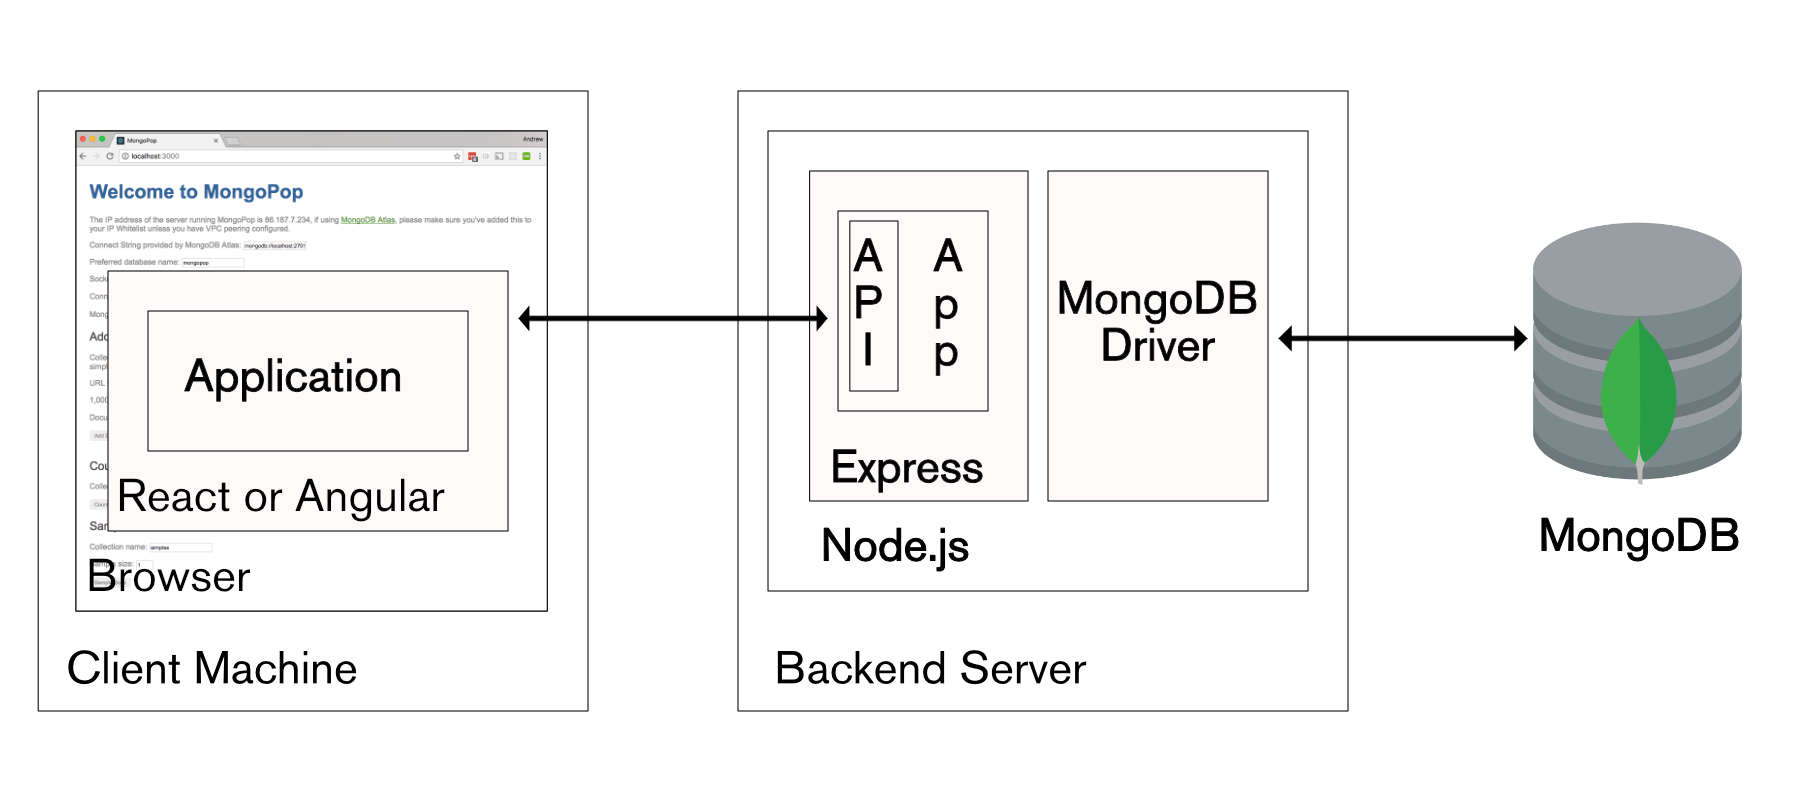
MEAN Stack and MERN Stack
Stitch, greatly simplifies your development and ops efforts for new applications by providing the entire backend as managed service. Even your frontend application code is simplified, as Stitch provides idiomatic SDKs for JavaScript, iOS, and Android – so you don’t need to code HTTP requests directly. Further, the SDK/API isn’t limited to just accessing MongoDB data, you can also use it for any other service registered with your Stitch application backend.
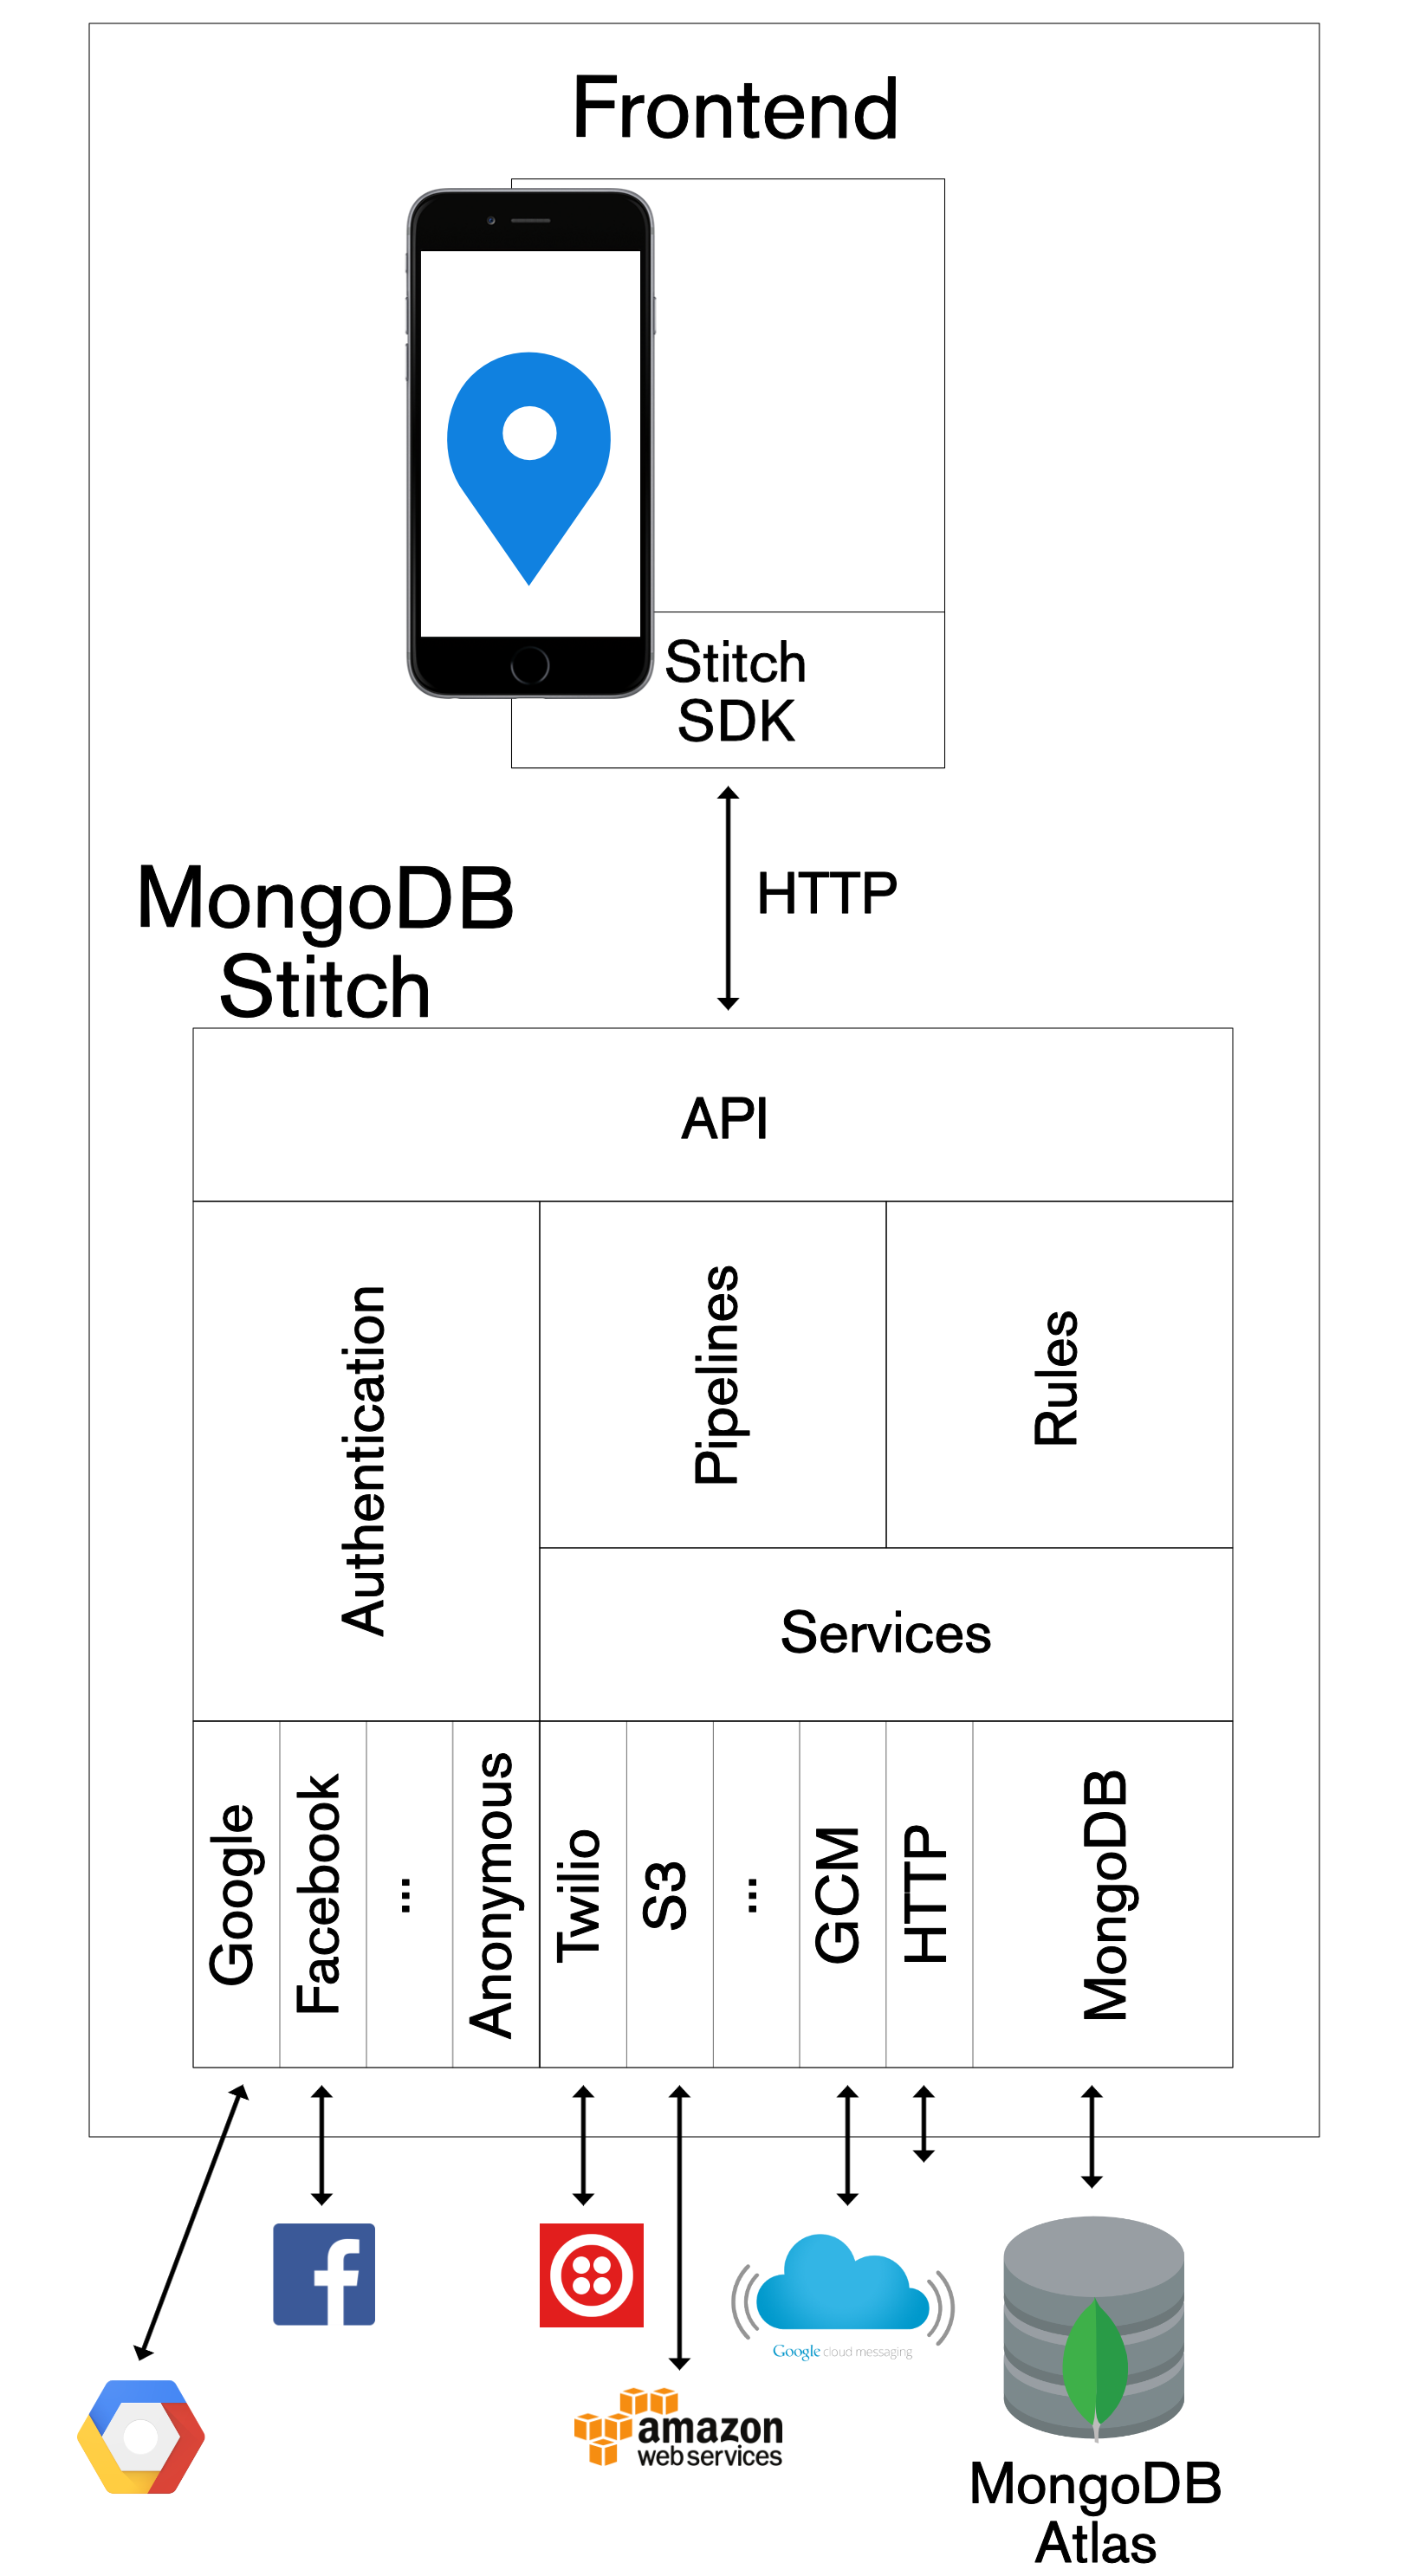
MongoDB Stitch BaaS architecture
Building an application with MongoDB Stitch
You can get started with MongoDB Stitch for free – use it with your free MongoDB Atlas cluster. If you already registered for MongoDB Atlas then you can create your MongoDB Stitch apps with your existing Atlas group.
Creating your application in MongoDB Stitch
The app that we’re building will record user check-ins (from FourSquare or an iOS app or an iOS Workflow applet) in MongoDB Atlas, and then make them visible to the user and their friends through a React/JavaScript web app.
As we work through the tutorial, no previous knowledge is assumed, but at points, you may need to refer back to the earlier blog series (e.g. for details on creating a React application frontend).
If you haven’t done so already, create a new MongoDB Atlas cluster, selecting the M0 instance type for the free tier (if you already have an Atlas cluster, feel free to use that):

Creating a MongoDB Atlas cluster
After the cluster has spun up, click on Stitch Apps and then Create New Application:
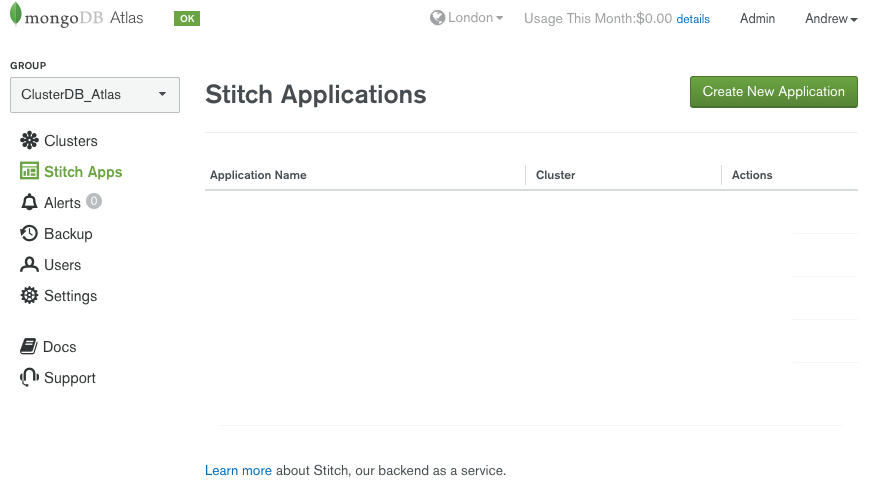
Create new MongoDB Stitch application
Give the application a name and ensure that the correct Atlas cluster is selected:
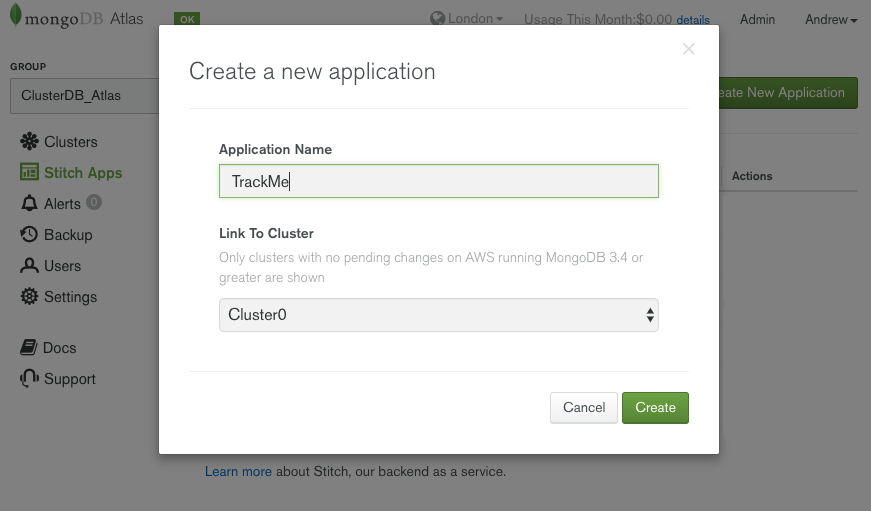
Name your MongoDB Stitch BaaS appName your MongoDB Stitch BaaS app
Once you’ve created the application, take a note of its App ID (in this example trackme-pkjif) as this will be needed by your application’s frontend:

MongoDB Stitch BaaS application details
Backend database and rules
Select the mongodb-atlas service, followed by the Rules tab – this is where you define who can access what data from the MongoDB database:
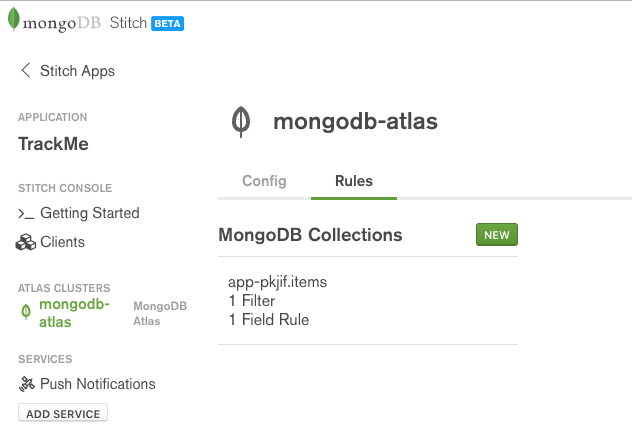
MongoDB Stitch BaaS data rules
Set the database name to trackme and the collection to checkins:
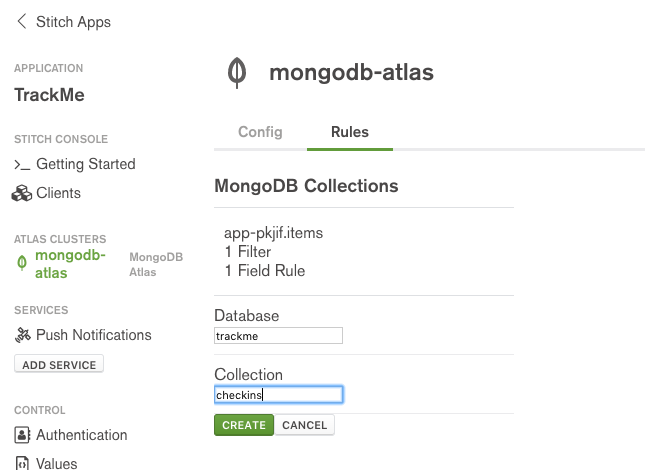
MongoDB Stitch – naming a collection
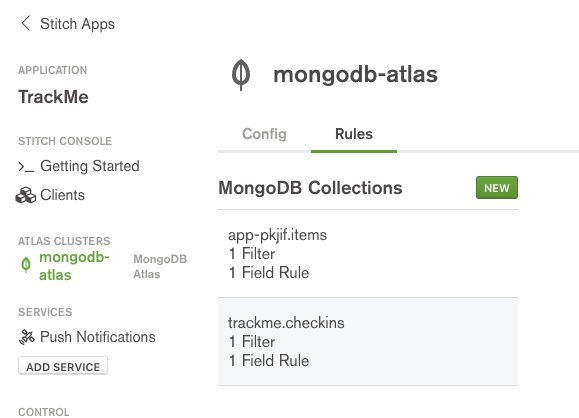
MongoDB Stitch – select collection
A typical record from the track.checkins collection will look like this:
db.checkins.find().sort({_id: -1}).skip(2).limit(1).pretty()
{
    "_id" : ObjectId("597f14fe4fdd1f5eb78e142f"),
    "owner_id" : "596ce3304fdd1f3e885999cb",
    "email" : "me@gmail.com",
    "venueName" : "Starbucks",
    "date" : "July 31, 2017 at 12:27PM",
    "url" : "http://4sq.com/LuzfAn",
    "locationImg" : "http://maps.google.com/maps/api/staticmap?center=51.522058,-0.722497&zoom=16&size=710x440&maptype=roadmap&sensor=false&markers=color:red%7C51.522058,-0.722497&key=AIzaSyC2e-2nWNBM0VZMERf2I6m_PLZE4R2qAoM"
}
Select the Field Rules tab and note the default read and write rules for the Top-Level document:

Defining a MongoDB Stitch write rule
The default read rule is:
{
  "owner_id": "%%user.id"
}
With this configuration, a document can only be read from this collection if its owner_id field matches the id of the application user making the request (i.e. a user can only read their own data). %%user is an expansion which gives the rule access to information about the application end-user making the request – here we’re interested in their unique identifier (id). Whenever a user adds a document to a collection, Stitch will set the owner_id to the ID of that user.
Overwrite the write rule with the following, then press SAVE:
{
  "%or": [
    {
      "%%prevRoot.owner_id": "%%user.id"
    },
    {
      "%%prevRoot": {
        "%exists": 0
      }
    }
  ]
}
%%prevRoot is another expansion, representing the state of the document before the operation. You can read the above logic as: “Allow the write to succeed if either the the same user previously added the document or the document didn’t exist (i.e. it’s an insert)”.
In addition to general rules for the document, read/write rules can be added for individual fields. Select the owner_id field and ensure that the validation rule is set to:
{
  "%or": [
    {
      "%%prev": "%%user.id"
    },
    {
      "%%prev": {
        "%exists": false
      }
    }
  ]
}
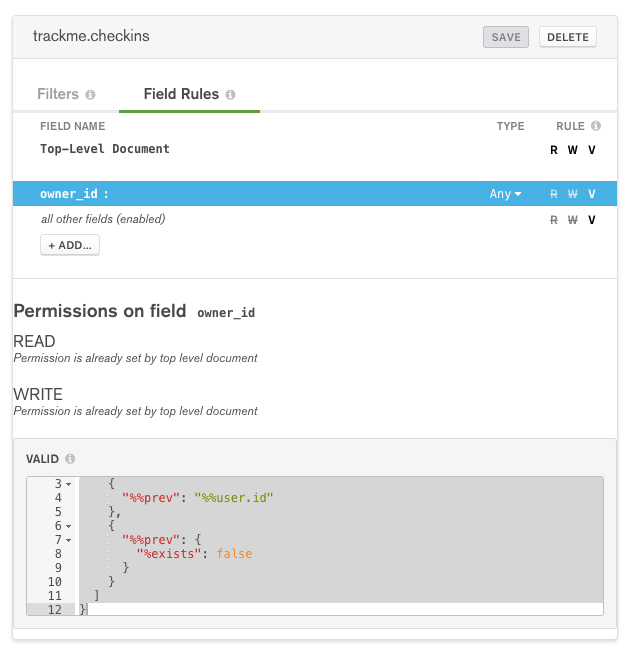
MongoDB Stitch field validation rule
Filters control which documents a user sees when viewing a collection:
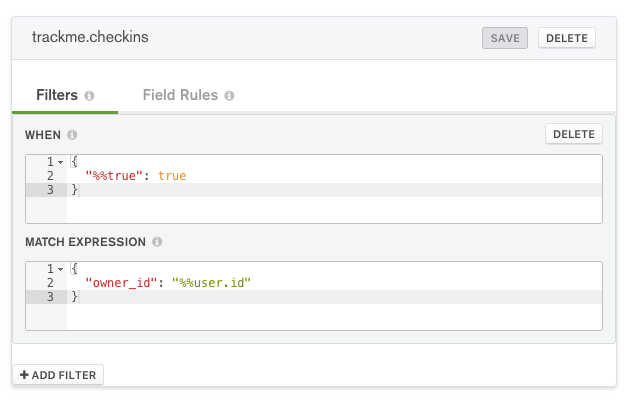
MongoDB Stitch collection filter
Ensure that When == {"%%true": true} and Match Expression == {"owner_id": "%%user.id"}. This means that the filter is always applied and that a user will only see their own documents.
You should also add rules for the trackme.users collection, where a typical document will look like:
> db.users.findOne()
{
    "_id" : ObjectId("596e354f46224c3c723d968a"),
    "owner_id" : "596ce47c4fdd1f3e88599ac4",
    "userData" : {
        "email" : "andrew.morgan@mongodb.com",
        "name" : "Andrew Morgan",
        "picture" : "https://lh4.googleusercontent.com/-lCBSTZFxhw0/AAAAAAAAAAI/AAAAAAAAAB4/vX9Sg4dO8xE/photo.jpg"
    },
    "friends" : [
        "billy@gmail.com",
        "granny@hotmail.com"
    ]
}
Setup trackme.users with the same rules and filters as trackme.checkins.
Values/constants
Stitch provides a simple and secure way to store values associated with your application – a perfect example is your keys for public cloud services. Set up the following values:

Define MongoDB Stitch BaaS values
By default, your WebHooks, named pipelines, and frontend application code can read the values. By setting the value to be private, you prevent access from your frontend code (or any other users of the Stitch API). The example React frontend code refers to the twilioNumber value (%%values.twilioNumber) when building a pipeline (if you wanted to keep the value more secure then you could implement a named pipeline to send the Twilio message and make twilioNumber private):
this.props.stitchClient.executePipeline([
  {
    service: "myTwilio",
    action: "send",
    args: {
      to: this.state.textNumber,
      from:
        "%%values.twilioNumber",  // Relies on twilioNumber not being private
      body: name + " last checked into " + venue
    }
  }
])
Authentication providers
A key feature of Stitch is authenticating your app’s end users – after which you can configure precisely what data and services they’re entitled to access (e.g., to view documents that they created through their actions in the app). The following types of authentication are all supported:
- Anonymous (the user doesn’t need to register or log in, but they’re still assigned an ID which is used to control what they see)
- Email/Password
- Custom (using JSON web tokens)
From the Authentication section of the Stitch UI, turn on Google authentication, providing the Client ID and Client Secret generated by Google. If you are running your app on your local machine then add http://localhost:3000/ as a Redirect URI; if hosting externally, add the DNS hostname. Enable Name, Picture, and Email so that your app has access to those user credentials from Google. Click Save.
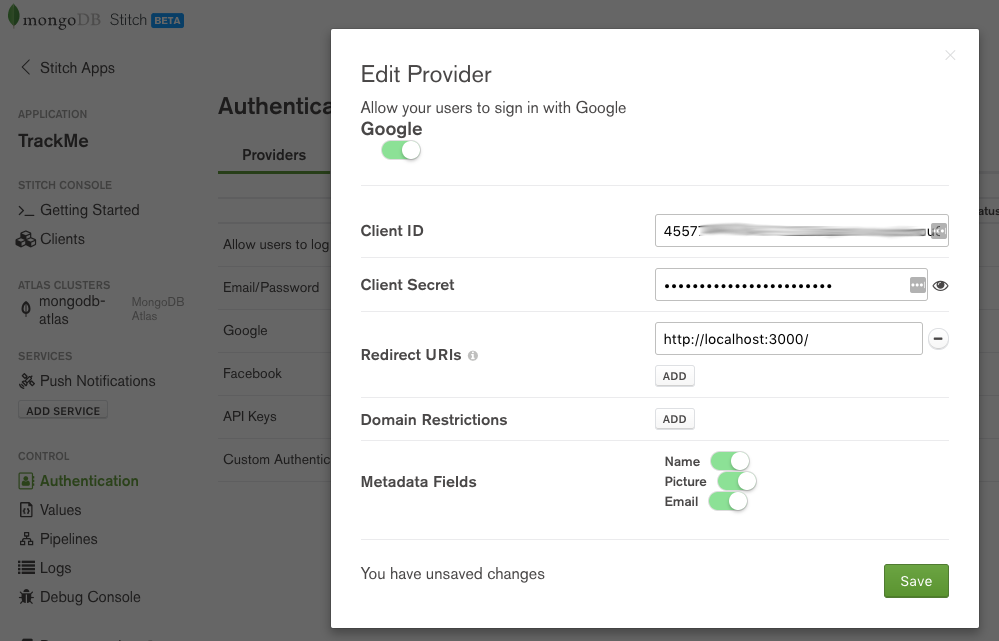
MongoDB Stitch BaaS – adding Google authentication
Turn on Facebook authentication, providing the Client ID and Client Secret generated by Facebook. If you are running your app on your local machine then add http://localhost:3000/ as a Redirect URI; if hosting externally, add the DNS hostname. Enable Name, Picture, and Email so that your app has access to those user credentials from Facebook. Click Save.
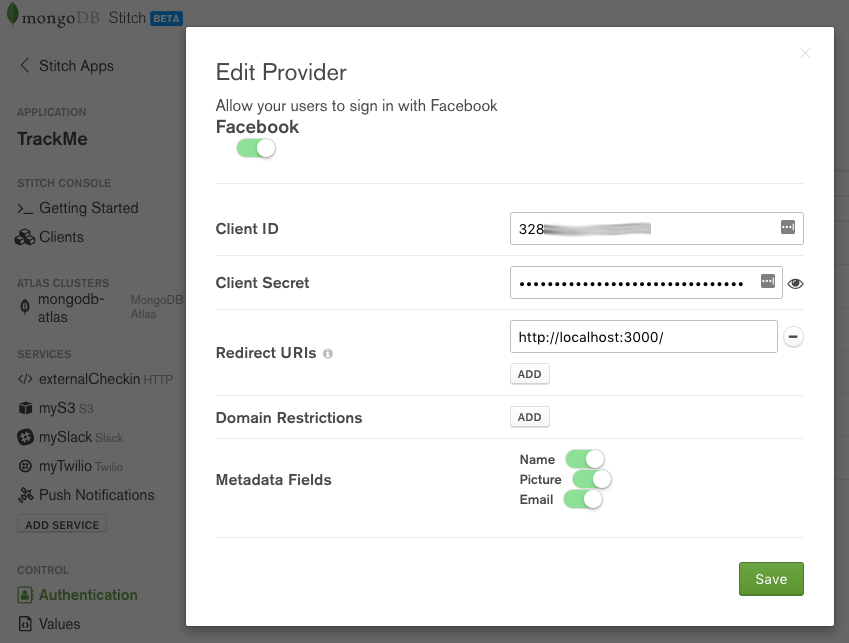
MongoDB Stitch BaaS – adding Facebook authentication
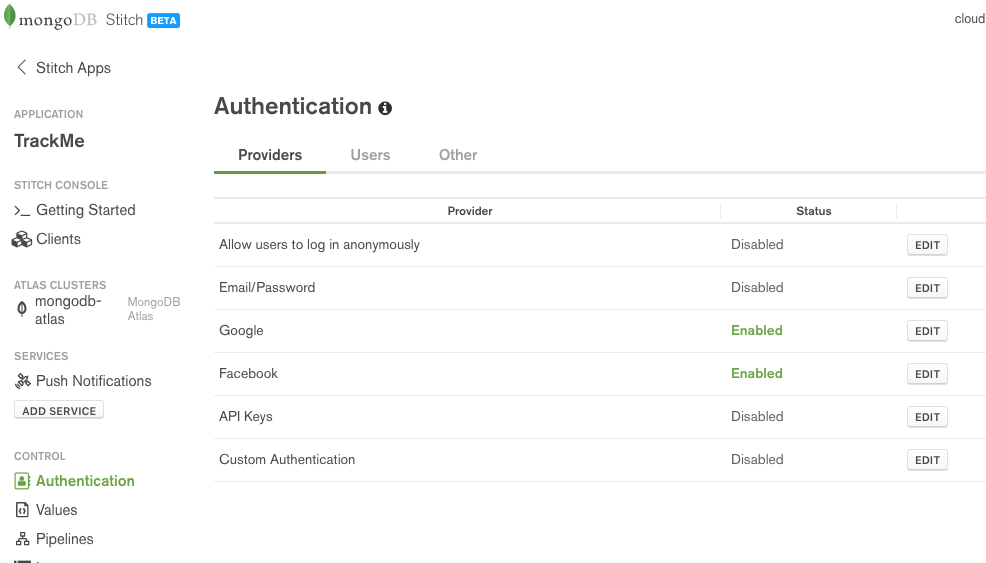
MongoDB Stitch BaaS authentication providers
Adding other services (Slack & Twilio)
Stitch has some services pre-integrated, for others, you can use the HTTP Service.
When a user checks in, a notification will be sent to a Slack channel using Stitch’s [Slack Service](https://docs.mongodb.com/stitch/services/slack/ “MongoDB Stitch Slack service). Click on Add Service and then select Slack, name the service mySlack (your pipelines and WebHooks can refer to the service using that name), and then click Add service.
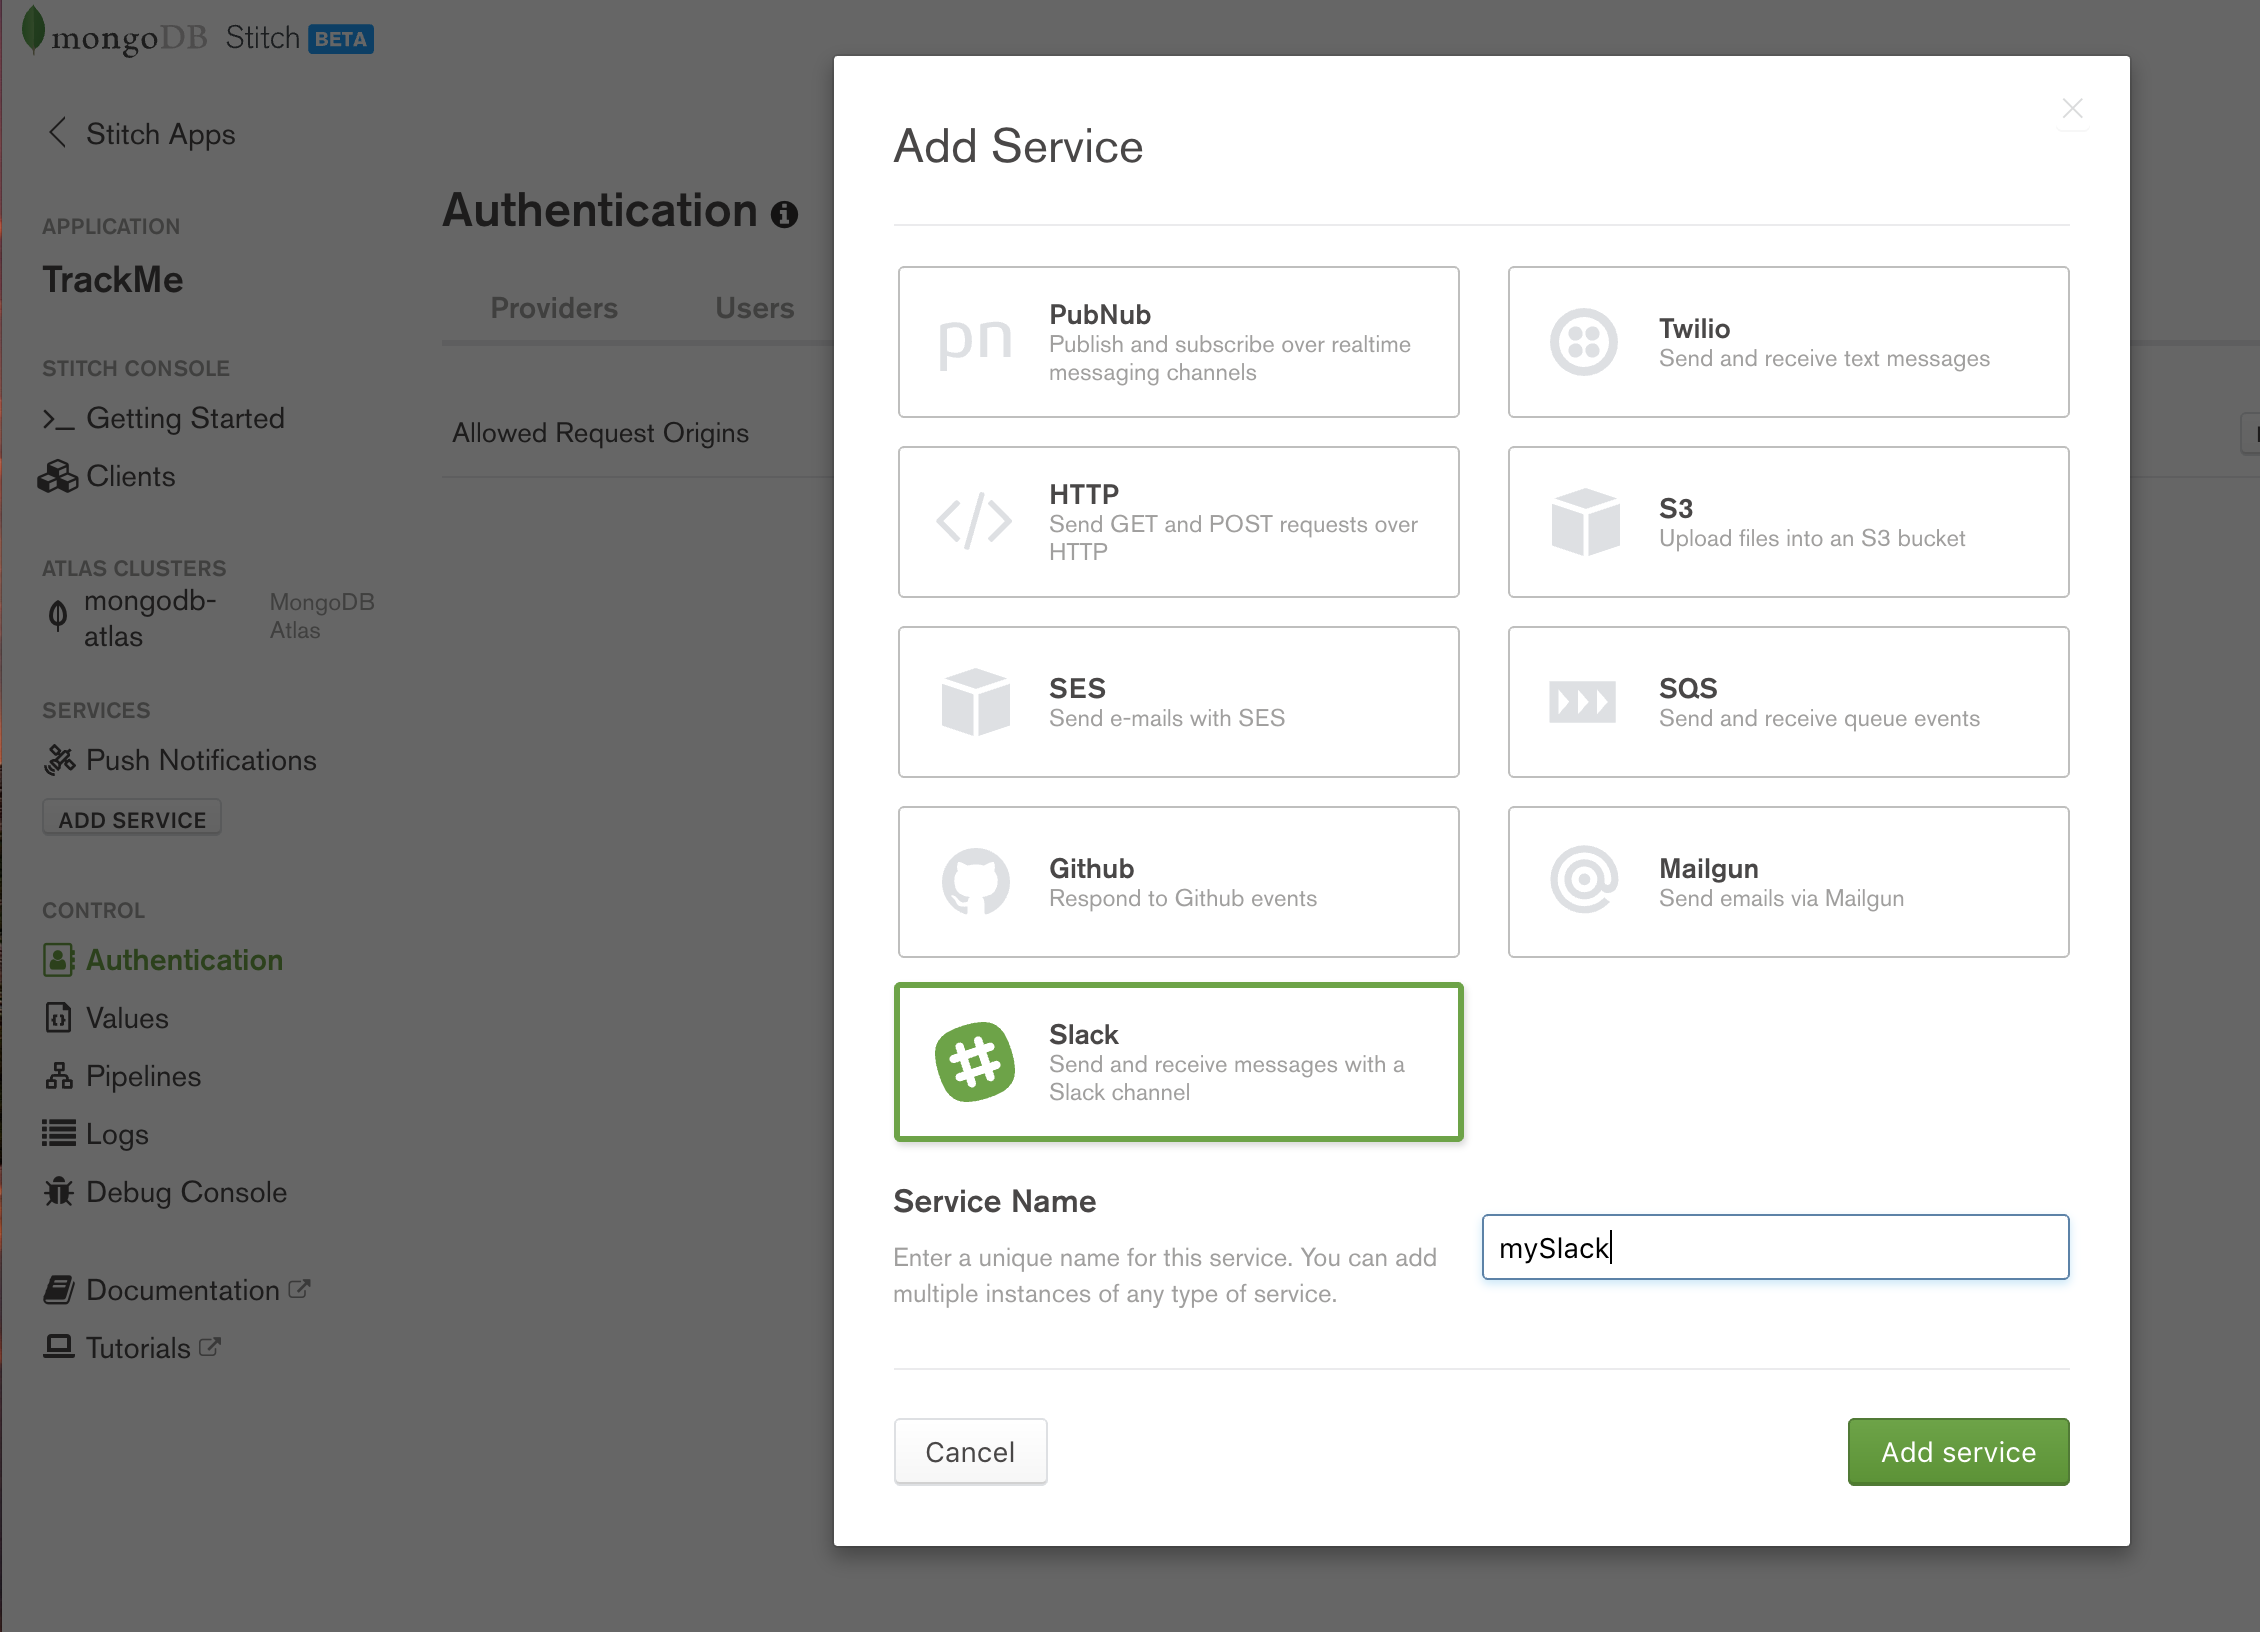
MongoDB Stitch, adding Slack service
In the Config tab, enter the Team ID and Incoming WebhookURL provided by Slack:

MongoDB Stitch configuring Slack service
There is no need to add any WebHooks (the app will send out Slack messages but will not receive any). On the Rules tab, enable Post (as the Stitch app must use the HTTP POST method to send messages to Stitch’s API), and then Save:

MongoDB Stitch adding Slack rules
From the React web app, a logged-in user has the option to send an SMS text message, containing their latest check-in, to a phone number of their choice. To enable that service, you must configure the Twilio Service through the Slack UI:
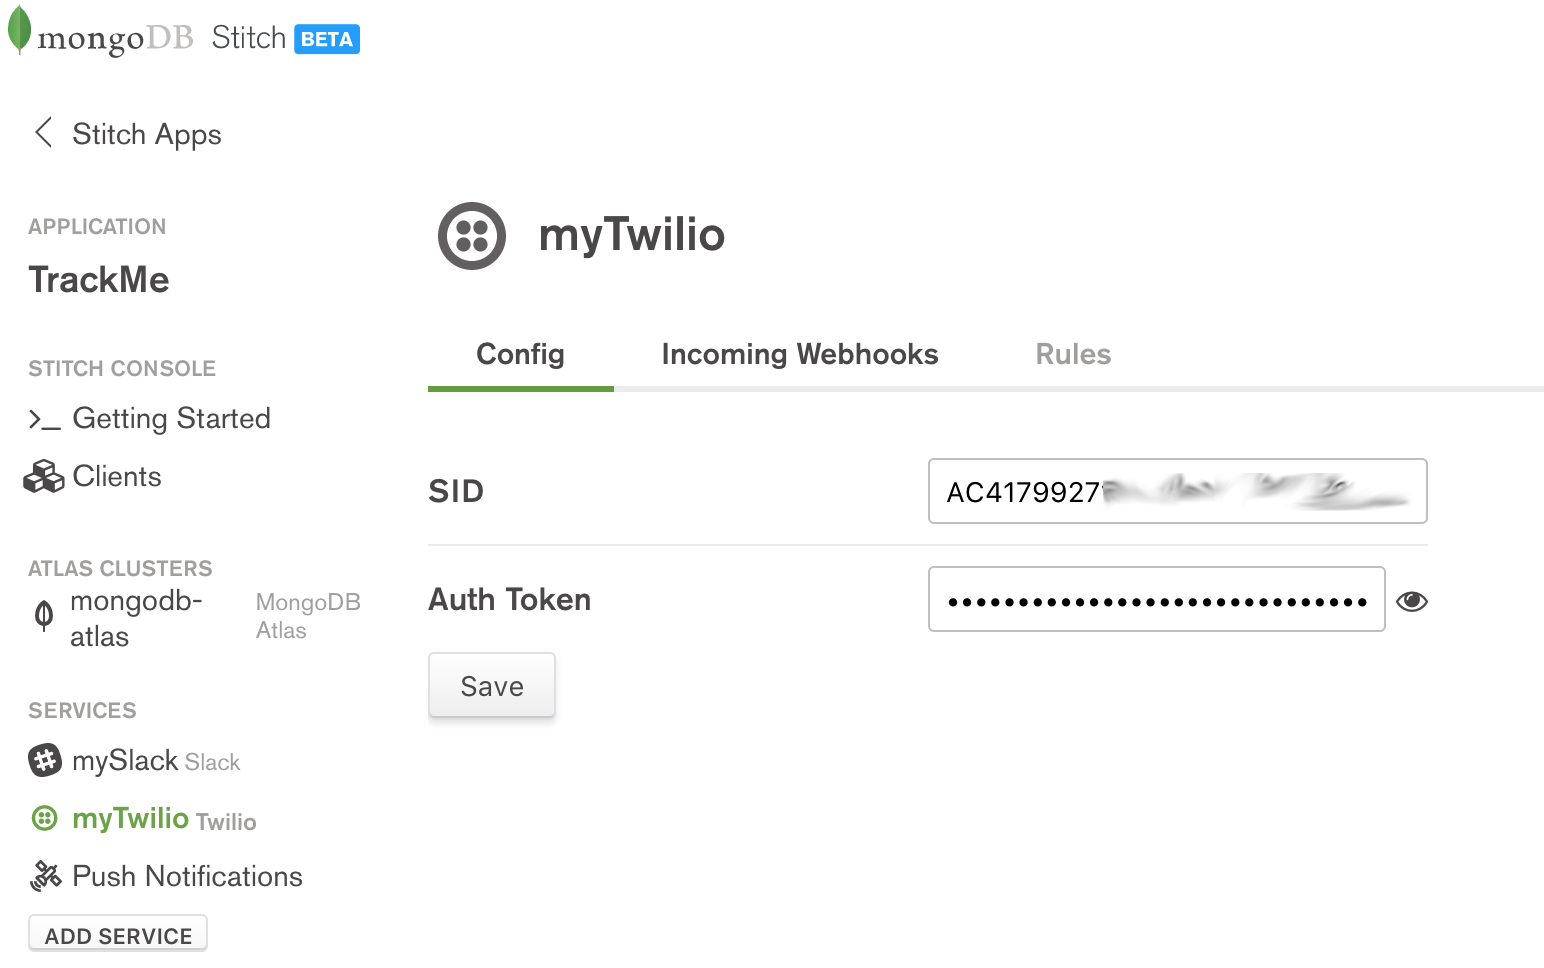
MongoDB Stitch, configuring Twilio service
The values to use for the SSID and the Auth Token can be retrieved after registering with Twilio. As with Slack, the app will not accept incoming messages from Twilio, and so there is no need to define any incoming WebHooks. In the Rules tab, enable the Send action and click Save:
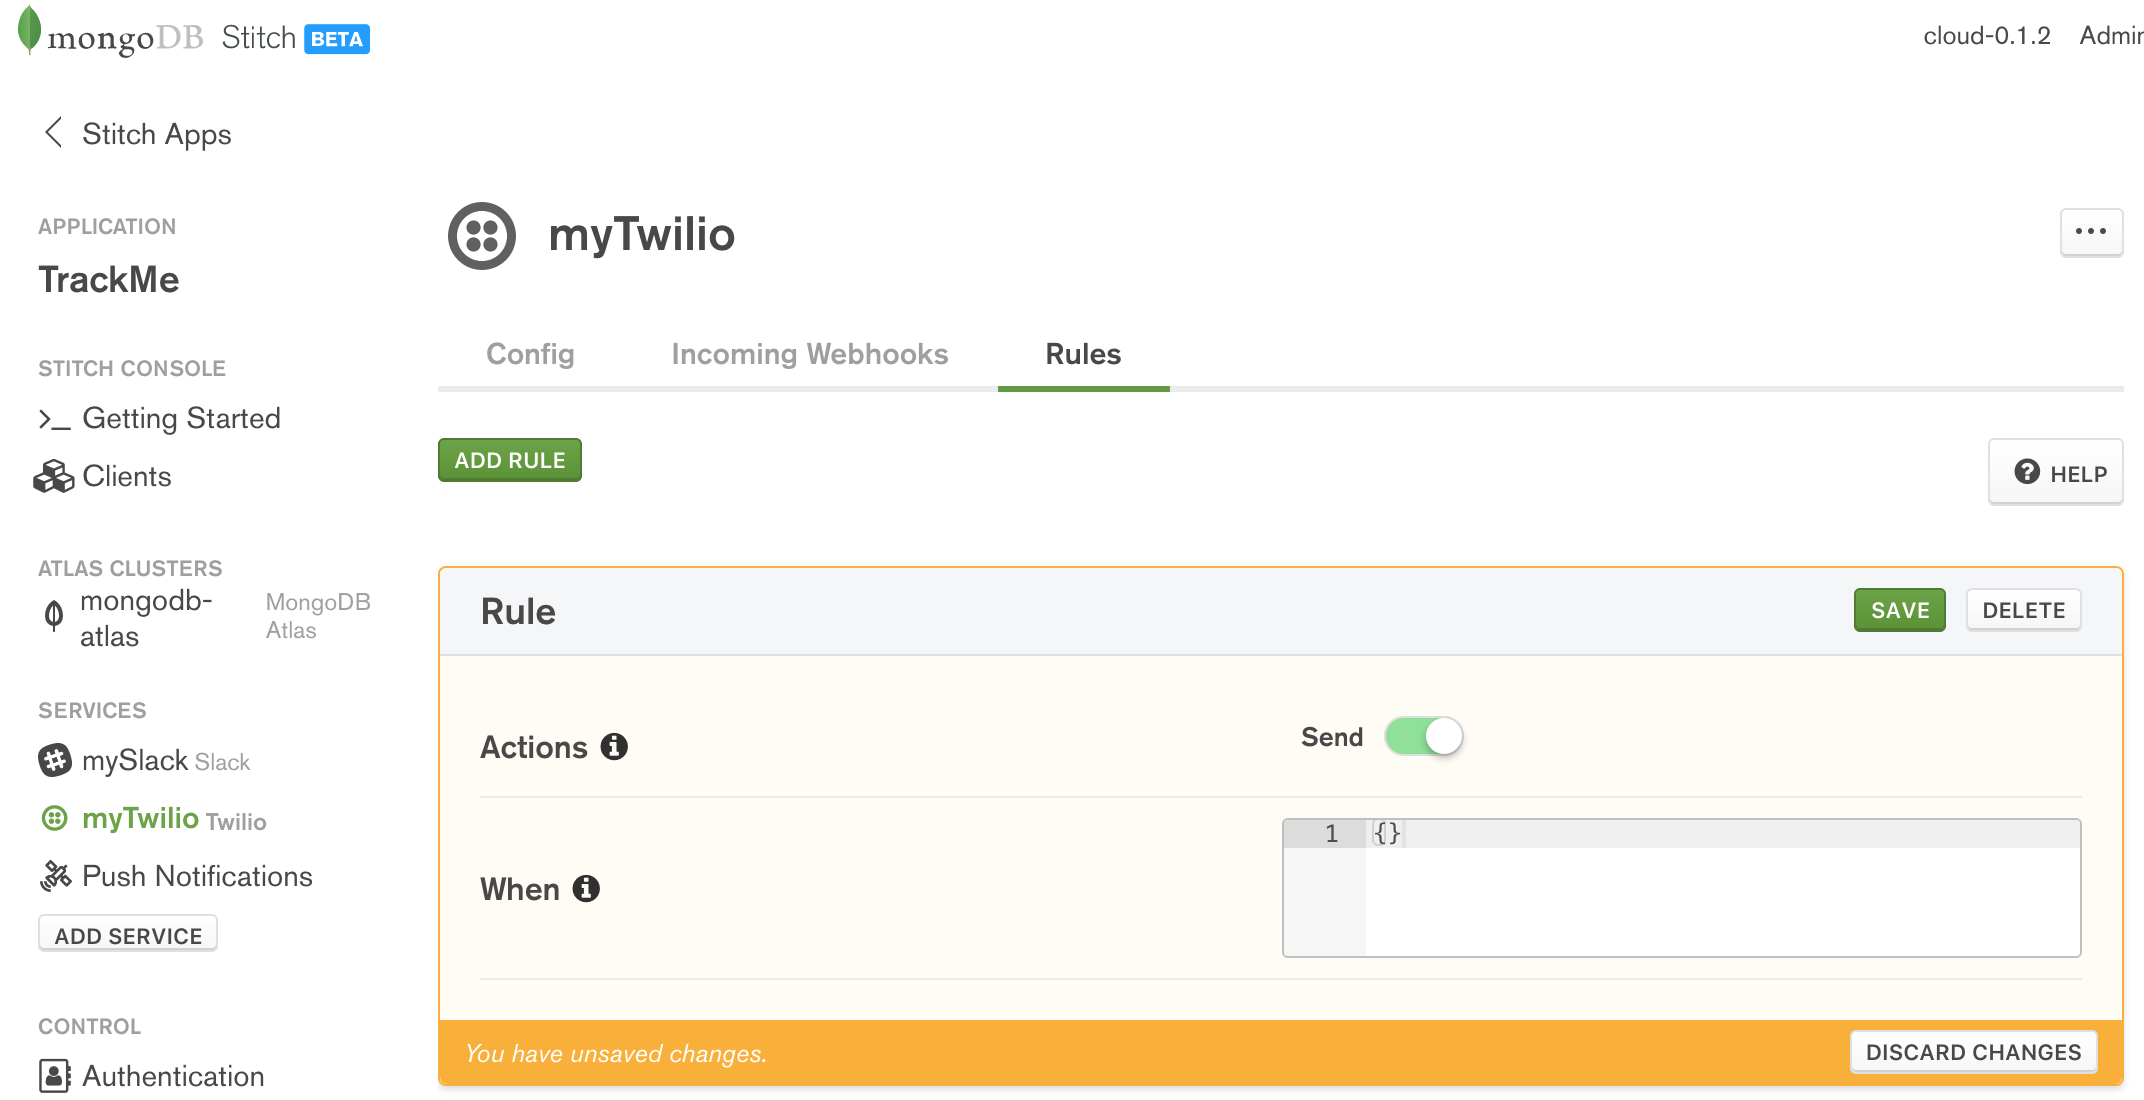
Configure Twilio rules in MongoDB Stitch
Named service pipelines
Service pipelines are used to execute a sequence of actions. As with the Stitch features you’ve already seen, pipelines are defined using JSON documents. You can create pipelines on the fly in your application code, or you can preconfigure Named Pipelines. The advantages of named pipelines are:
- Code reuse: you can create the named pipeline once in the Stich backend, and then invoke it from multiple frontend locations (e.g., from multiple places in a web app, as well as from iOS and Android apps).
- Simpler code: keep the frontend application code clean by hiding the pipeline’s details in the Stitch backend.
- Enhanced security: access to secret resources, such as API keys, can be encapsulated within the Stitch backend. The alternative is to code them in the device-side code, where a user may attempt to reverse-engineer them.
When creating a named pipeline, there is a set of information you must always provide:
- The name of the pipeline. The name is how your frontend application code, WebHooks, or other named pipelines can execute this pipeline.
- Whether the pipeline is private. If set to
true, you can only invoke the pipeline from within the Stitch backend (from another named pipeline or a WebHook). If set tofalsethen you can also invoke it directly from your application’s frontend code (or from Stitch’s Debug Console). - If a service accessed by your pipeline would otherwise be blocked by that resource’s rules (e.g. a MongoDB document only being readable by the user that created it), enabling Skip Rules overrides those rules.
- You can control under what scenarios a pipeline is allowed to run by providing a JSON document – if it evaluates to
truethen the pipeline can run. - You can define a set of Parameters that you can provide when invoking the pipeline. You can also tag as Required, those parameters which you must always provide.
- The Output Type indicates whether the pipeline will return a Single Document, Boolean, or Array.
- The rest of the pipeline definition consists of one or more stages, where each stage passes its results as input to the next. For each stage, you define:
- Which Service to use (e.g. MongoDB, Twilio, Slack, or built-in (such as expressions, or literals))
- The Action associated with that service (e.g. for a MongoDB service, you might pick
findorinsert) - The body of the action
- Bind Data to %%Vars lets you create variables based on other values. When defining the value of one of these variables, you can use expansions such as:
%%args.parameter-nameto access parameters passed to the pipeline%%item.field-nameto access the results of the previous stage%%values.value-nameto access pre-defined values/constants
- You can access the variable values from the Action document using
%%vars.variable-name.
The first pipeline to create is recentCheckins which returns an array of the user’s most recent check-ins. When invoking the pipeline, the caller must provide a single parameter (number) which specifies how many check-ins it should return:
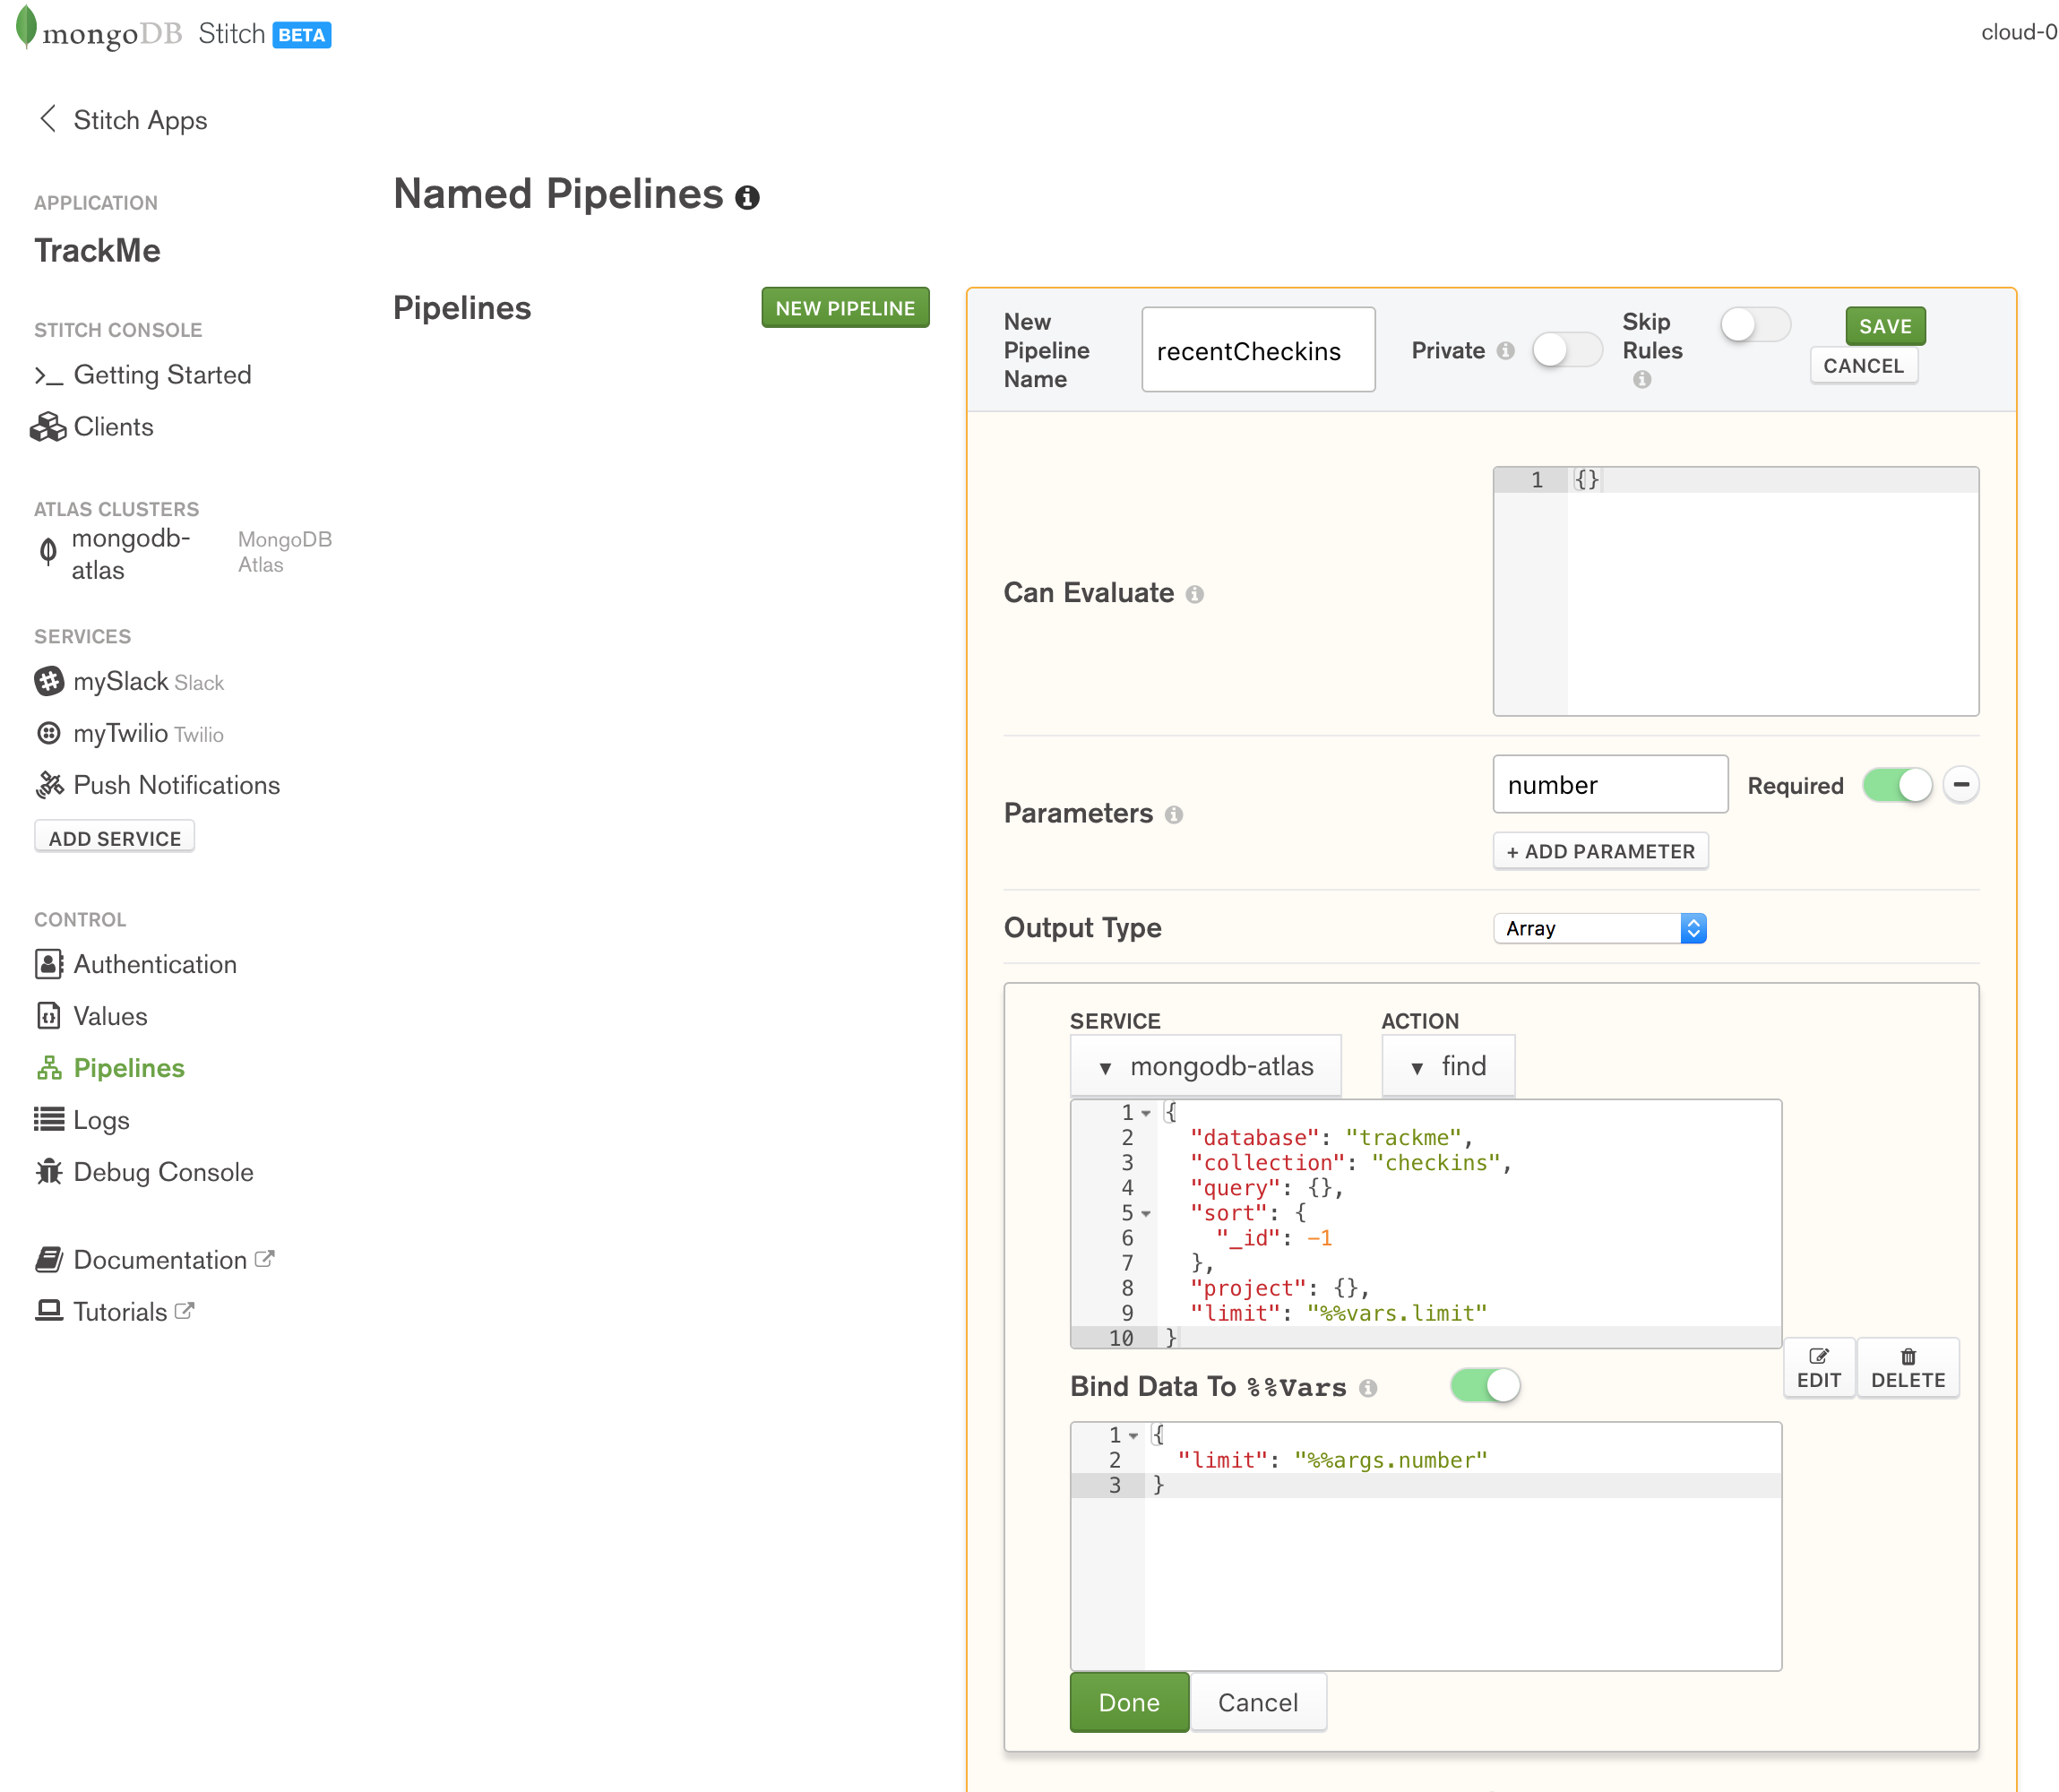
Creating MongoDB Stitch named pipeline
Note that the trackme.checkins collection already includes filters and rules to ensure that a user only sees their own check-ins and so the query subdocument can be empty.
Create the pipeline by pasting in the Action and Bind Data To %%Vars documents:
Action:
{
  "database": "trackme",
  "collection": "checkins",
  "query": {},
  "sort": {
    "_id": -1
  },
  "project": {},
  "limit": "%%vars.limit"
}
If you’re not familiar with the MongoDB Query Language, this searches the trackme.checkins collection, reverse sorts on the _id (most recently inserted documents have the highest value), and then discards all but the first %%vars.limit documents.
Bind Data To %%Vars:
{
  "limit": "%%args.number"
}
This creates a LET statement where %%vars.limit is bound to the number parameter which the caller passes to the pipeline.
The second named pipeline to define is friendsCheckins to retrieve the most recent check-ins of users who have befriended the current user. Again, the caller must provide a parameter indicating the total number of check-ins it should return:
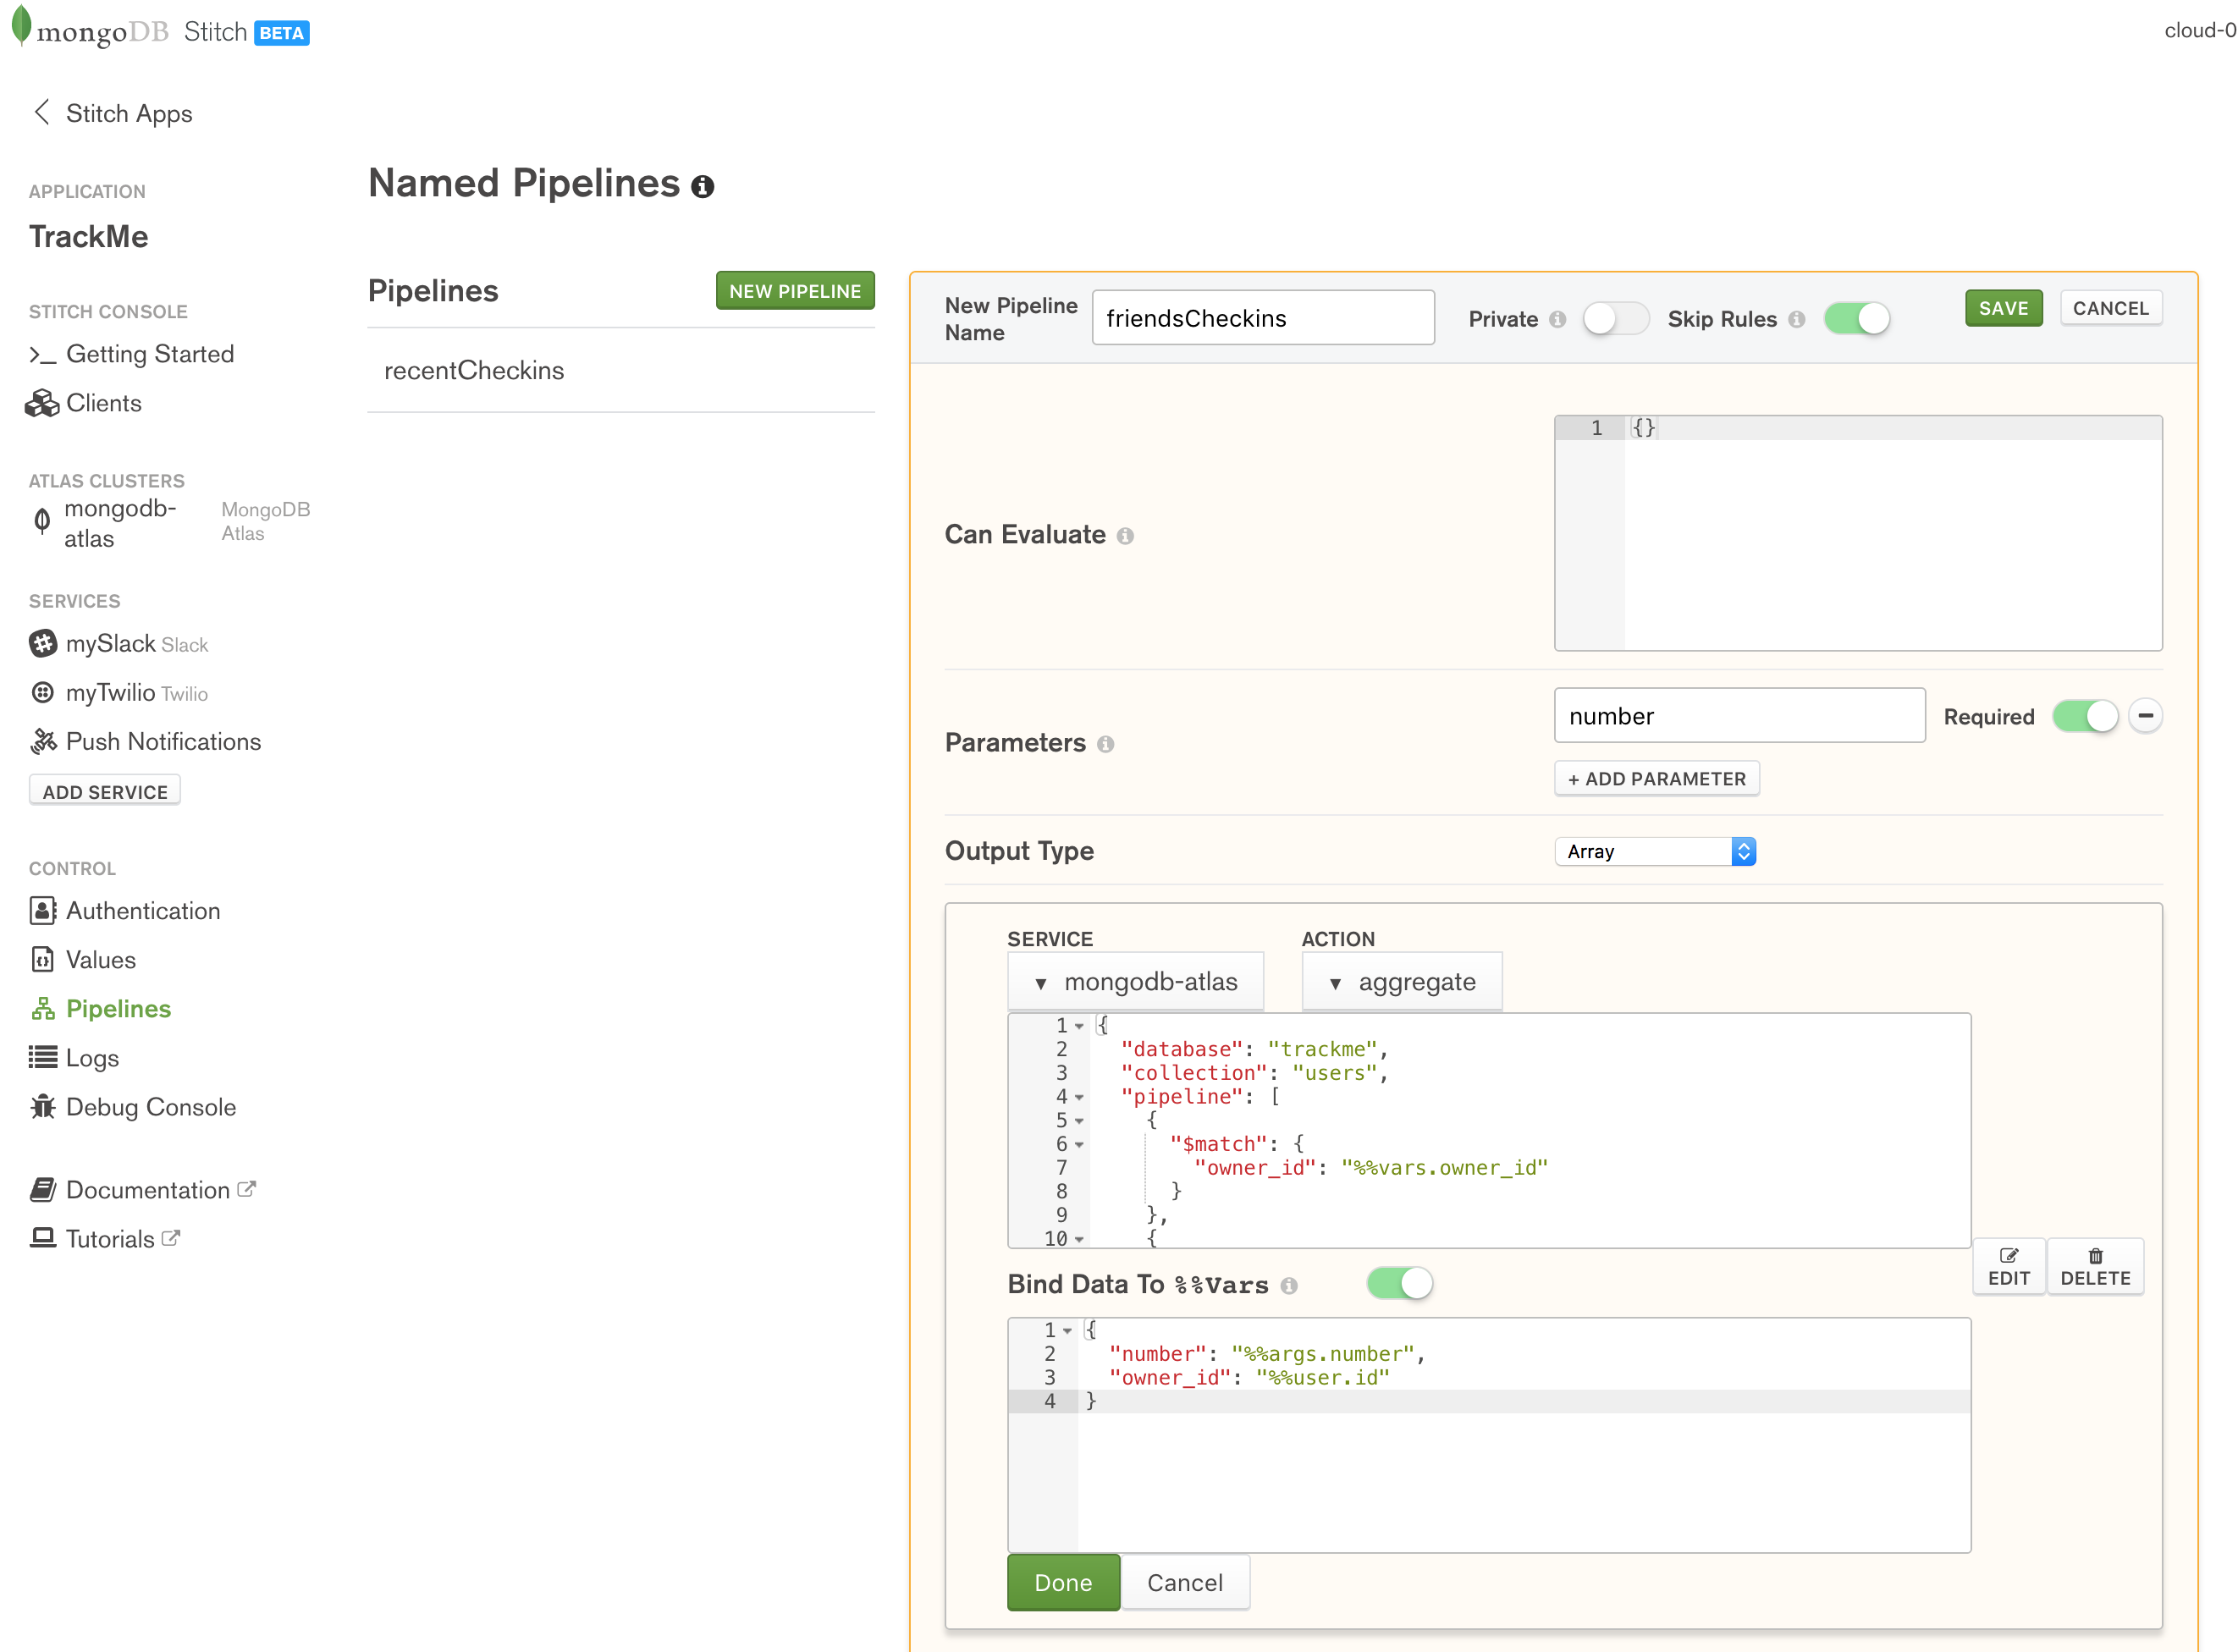
Define friendsCheckin named pipeline in MongoDB Stitch
Create the pipeline by pasting in the Action and Bind Data To %%Vars documents:
Action:
{
  "database": "trackme",
  "collection": "users",
  "pipeline": [
    {
      "$match": {
        "owner_id": "%%vars.owner_id"
      }
    },
    {
      "$project": {
        "userData.email": 1,
        "_id": 0
      }
    },
    {
      "$lookup": {
        "from": "users",
        "localField": "userData.email",
        "foreignField": "friends",
        "as": "friendedMe"
      }
    },
    {
      "$project": {
        "friendedMe.owner_id": 1
      }
    },
    {
      "$unwind": {
        "path": "$friendedMe"
      }
    },
    {
      "$lookup": {
        "from": "checkins",
        "localField": "friendedMe.owner_id",
        "foreignField": "owner_id",
        "as": "friendsCheckins"
      }
    },
    {
      "$project": {
        "friendsCheckins": 1
      }
    },
    {
      "$unwind": {
        "path": "$friendsCheckins"
      }
    },
    {
      "$sort": {
        "friendsCheckins._id": -1
      }
    },
    {
      "$limit": "%%vars.number"
    },
    {
      "$group": {
        "_id": "$friendsCheckins.email",
        "checkins": {
          "$push": {
            "venueName": "$friendsCheckins.venueName",
            "date": "$friendsCheckins.date",
            "url": "$friendsCheckins.url",
            "locationImg": "$friendsCheckins.locationImg"
          }
        }
      }
    }
  ]
}
If you’re not familiar with the format of this action, take a look at the MongoDB Aggregation Pipeline.
Bind Data To %%Vars:
{
  "number": "%%args.number",
  "owner_id": "%%user.id"
}
As before, this makes the values passed in as parameters accessible to the pipeline’s action section.
Before letting the user add a new email address to their array of friends, it’s useful if you check that they aren’t already friends:

Define the alreadyAFriend named pipeline in MongoDB Stitch
Action:
{
  "database": "trackme",
  "collection": "users",
  "query": {
    "friends": "%%vars.email"
  }
}
Because of the filter on the trackme.users collection, find operation will only look at this user, and so all the query needs to do is check if the provided email address already exists in the document’s array of friends.
Bind Data To %%Vars:
{
  "email": "%%args.friendsEmail"
}
Once your application has checked that the requested friend isn’t already listed, you can call the addFrriend pipeline to add their email address:
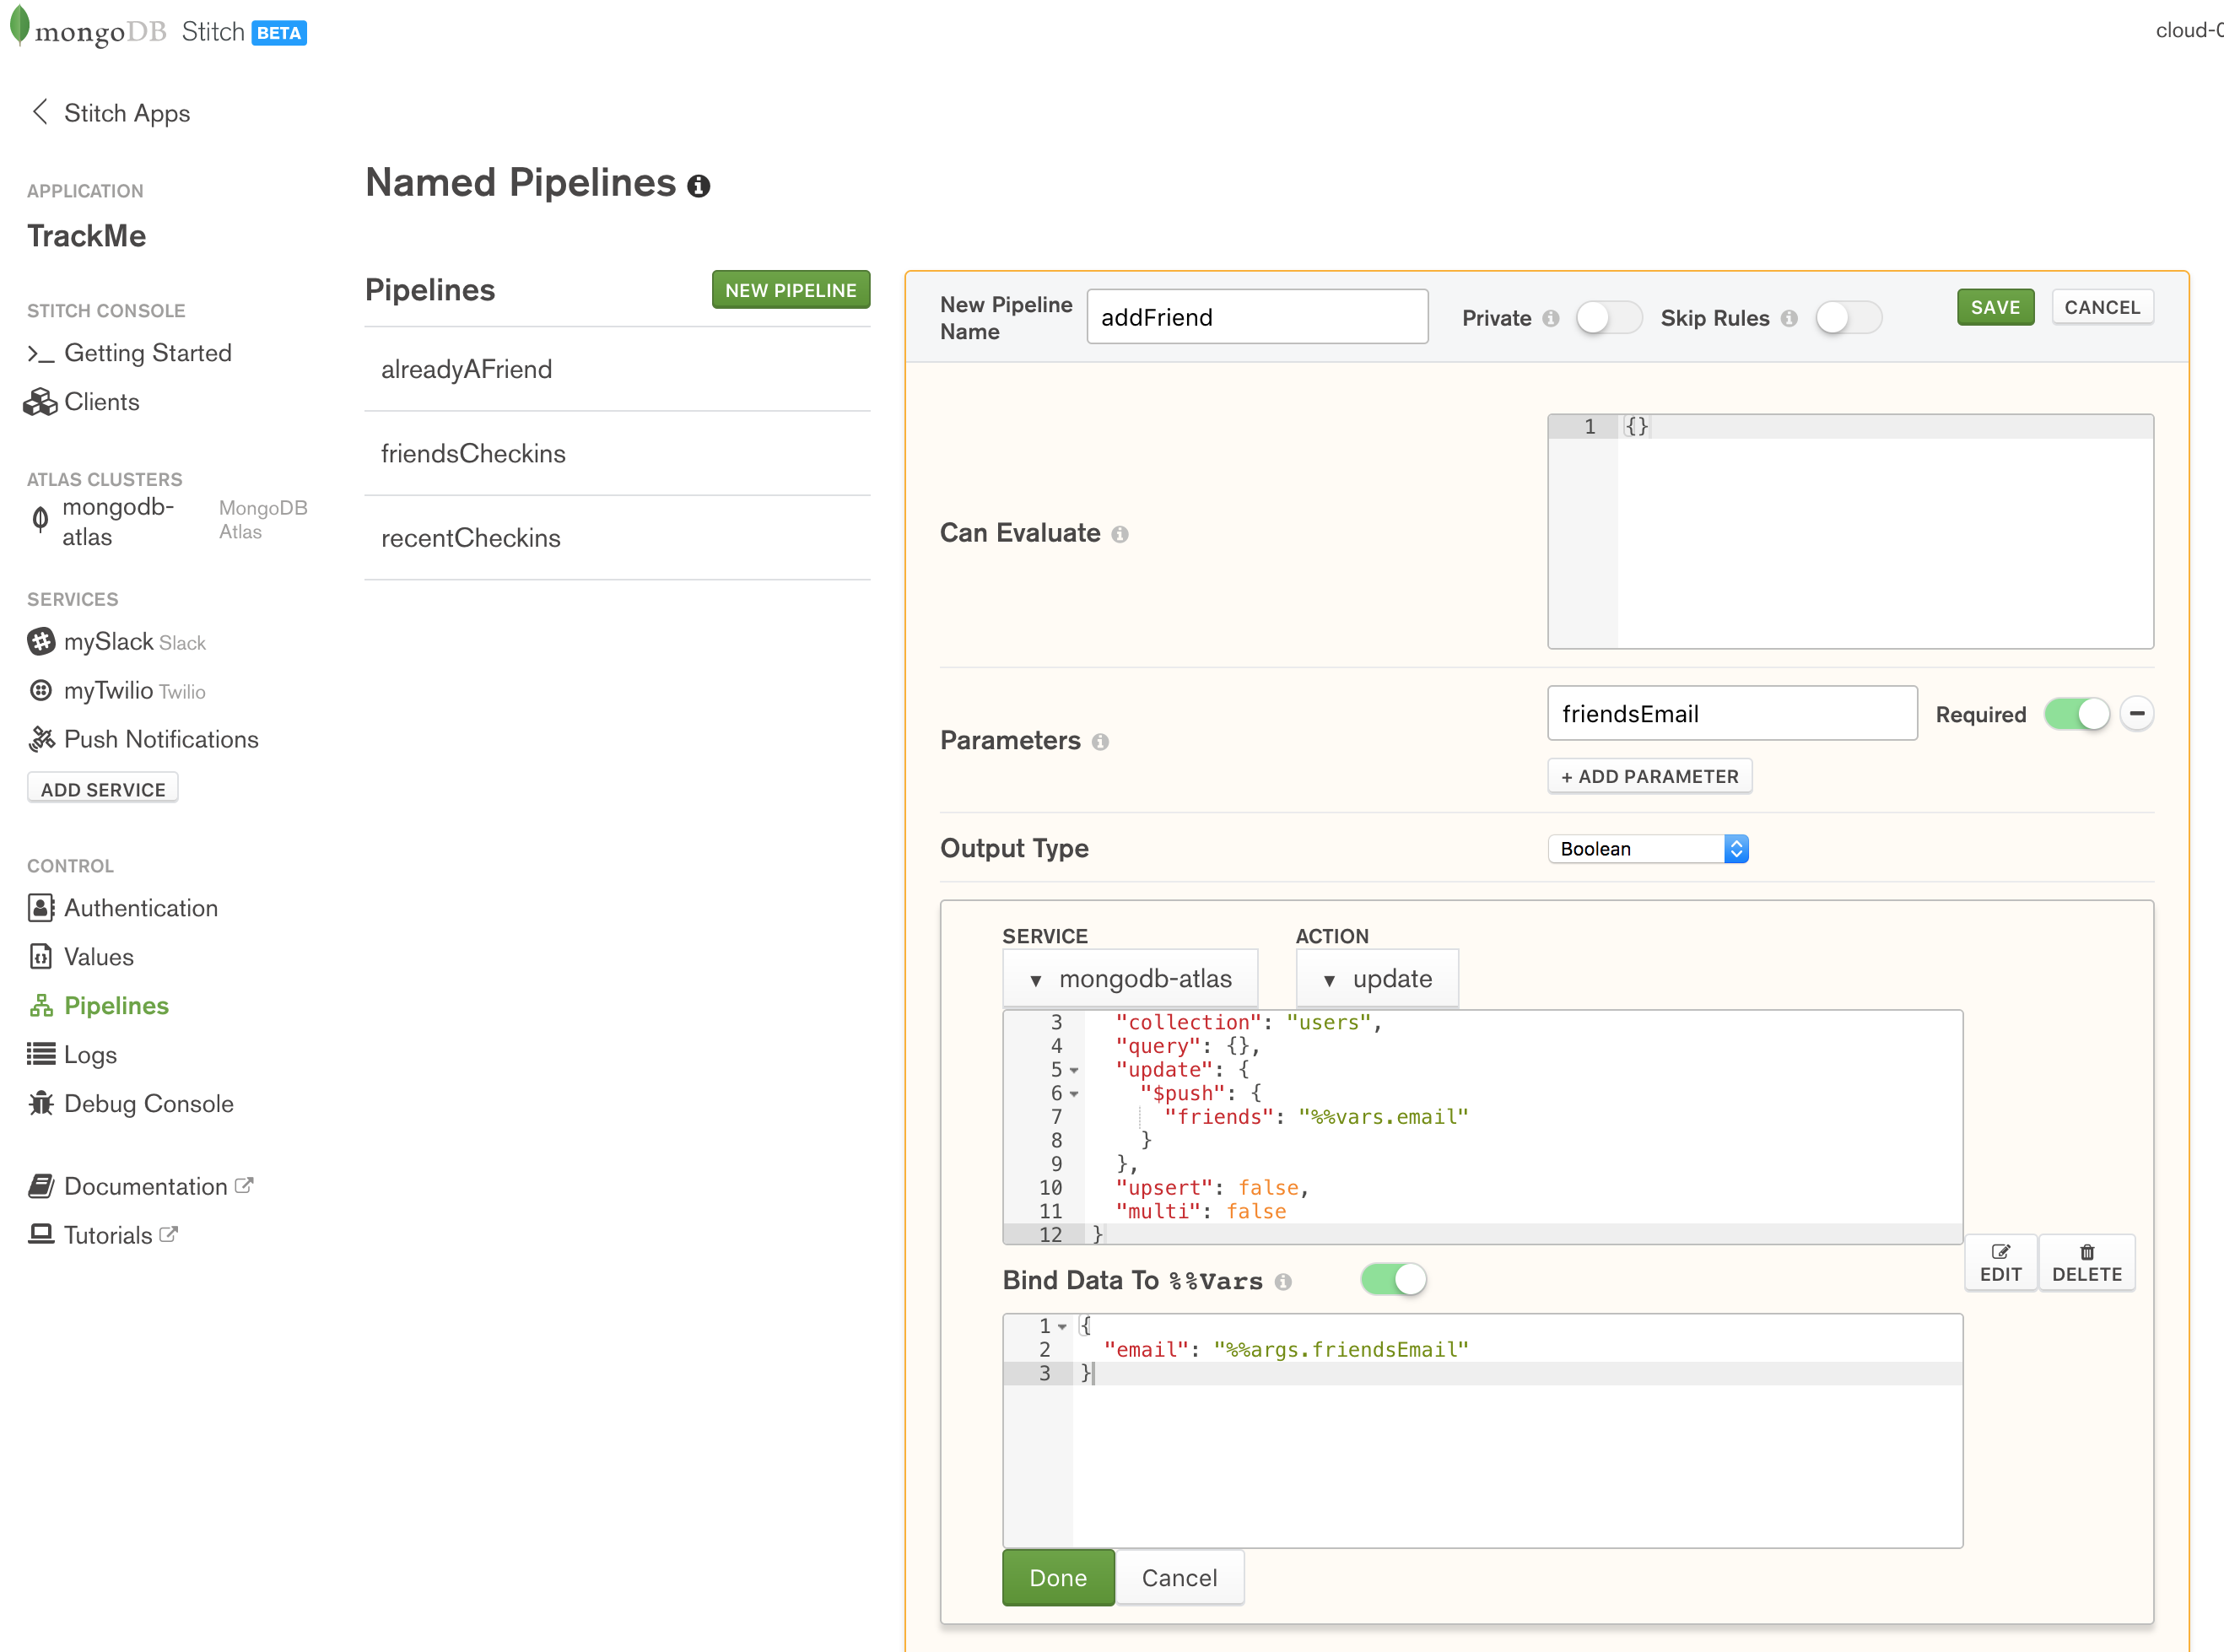
Define the addFriend named pipeline in MongoDB Stitch
Action:
{
  "database": "trackme",
  "collection": "users",
  "query": {},
  "update": {
    "$push": {
      "friends": "%%vars.email"
    }
  },
  "upsert": false,
  "multi": false
}
Bind Data To %%Vars:
{
  "email": "%%args.friendsEmail"
}
When a user checks in through FourSquare or our iOS Workflow app, we identify them by their email address rather than their owner_id; the ownerFromEmail pipeline retrieves the user’s owner_id using the email parameter:
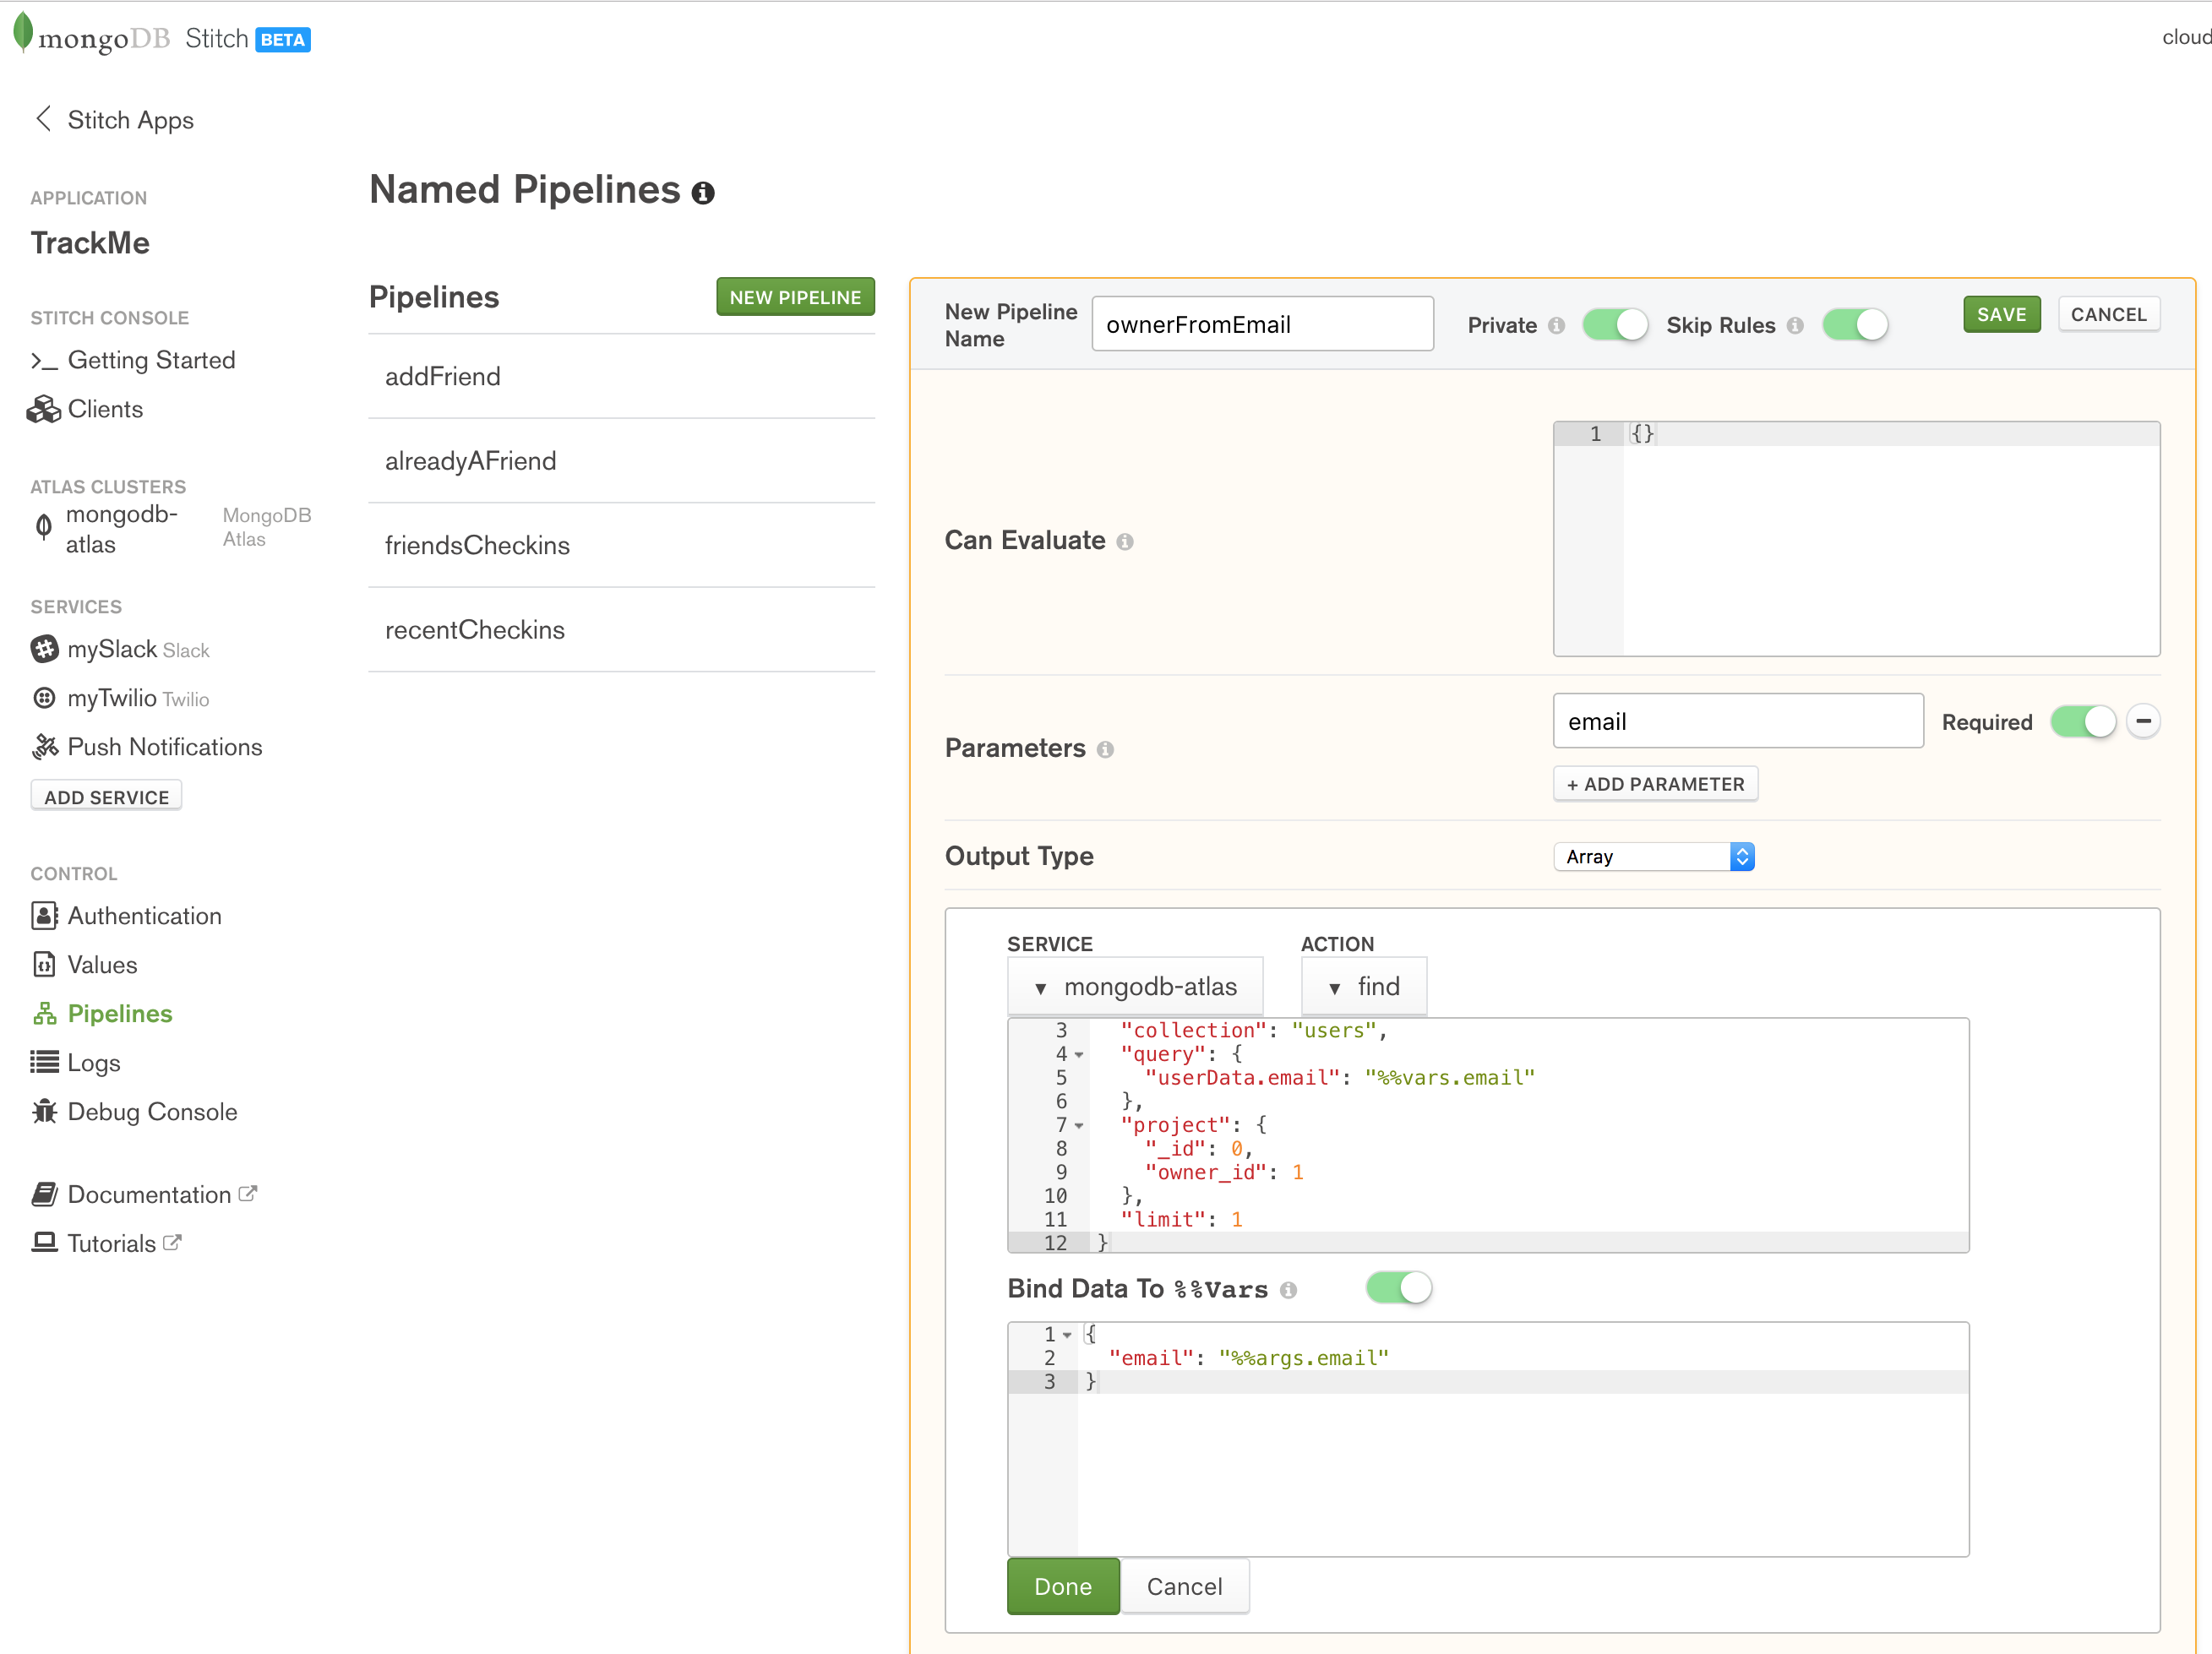
Define the ownerFromEmail named pipeline in MongoDB Stitch
Note that Skip Rules is enabled for the pipeline, so that it’s able to search all documents in the trackme.users collection. For extra security, we make it Private so that it can only be executed by other pipelines or WebHooks that we create.
Action:
{
  "database": "trackme",
  "collection": "users",
  "query": {
    "userData.email": "%%vars.email"
  },
  "project": {
    "_id": 0,
    "owner_id": 1
  },
  "limit": 1
}
Bind Data To %%Vars:
{
  "email": "%%args.email"
}
When a user checks in, we want to send a notification to our Slack channel – create the slackCheckin pipeline to do so:

Define the slackCheckin named pipeline in MongoDB Stitch
The pipeline uses the mySlack service that we created earlier. Again, set it to Private so that it can only be called from other WebHooks or named pipelines.
Action:
{
  "channel": "trackme",
  "username": "%%vars.name",
  "text": "%%vars.text",
  "iconUrl": "%%values.stitchLogo"
}
Bind Data To %%Vars:
{
  "name": "%%args.email",
  "text": {
    "%concat": [
      "I just checked into ",
      "%%args.venue",
      ". ",
      "%%args.location"
    ]
  }
}
Working with other services – the HTTP service and WebHooks
The HTTP service fulfills two roles:
- Makes outgoing HTTP calls to services (either public web services or your microservices)
- Accepts incoming HTTP requests (through Stitch WebHooks) – allowing external services to trigger actions within your Stitch application
The TrackMe application uses WebHooks to receive notifications whenever one of our users checks in through FourSquare or the iOS Workflow app.
Create a new HTTP service called externalCheckin:
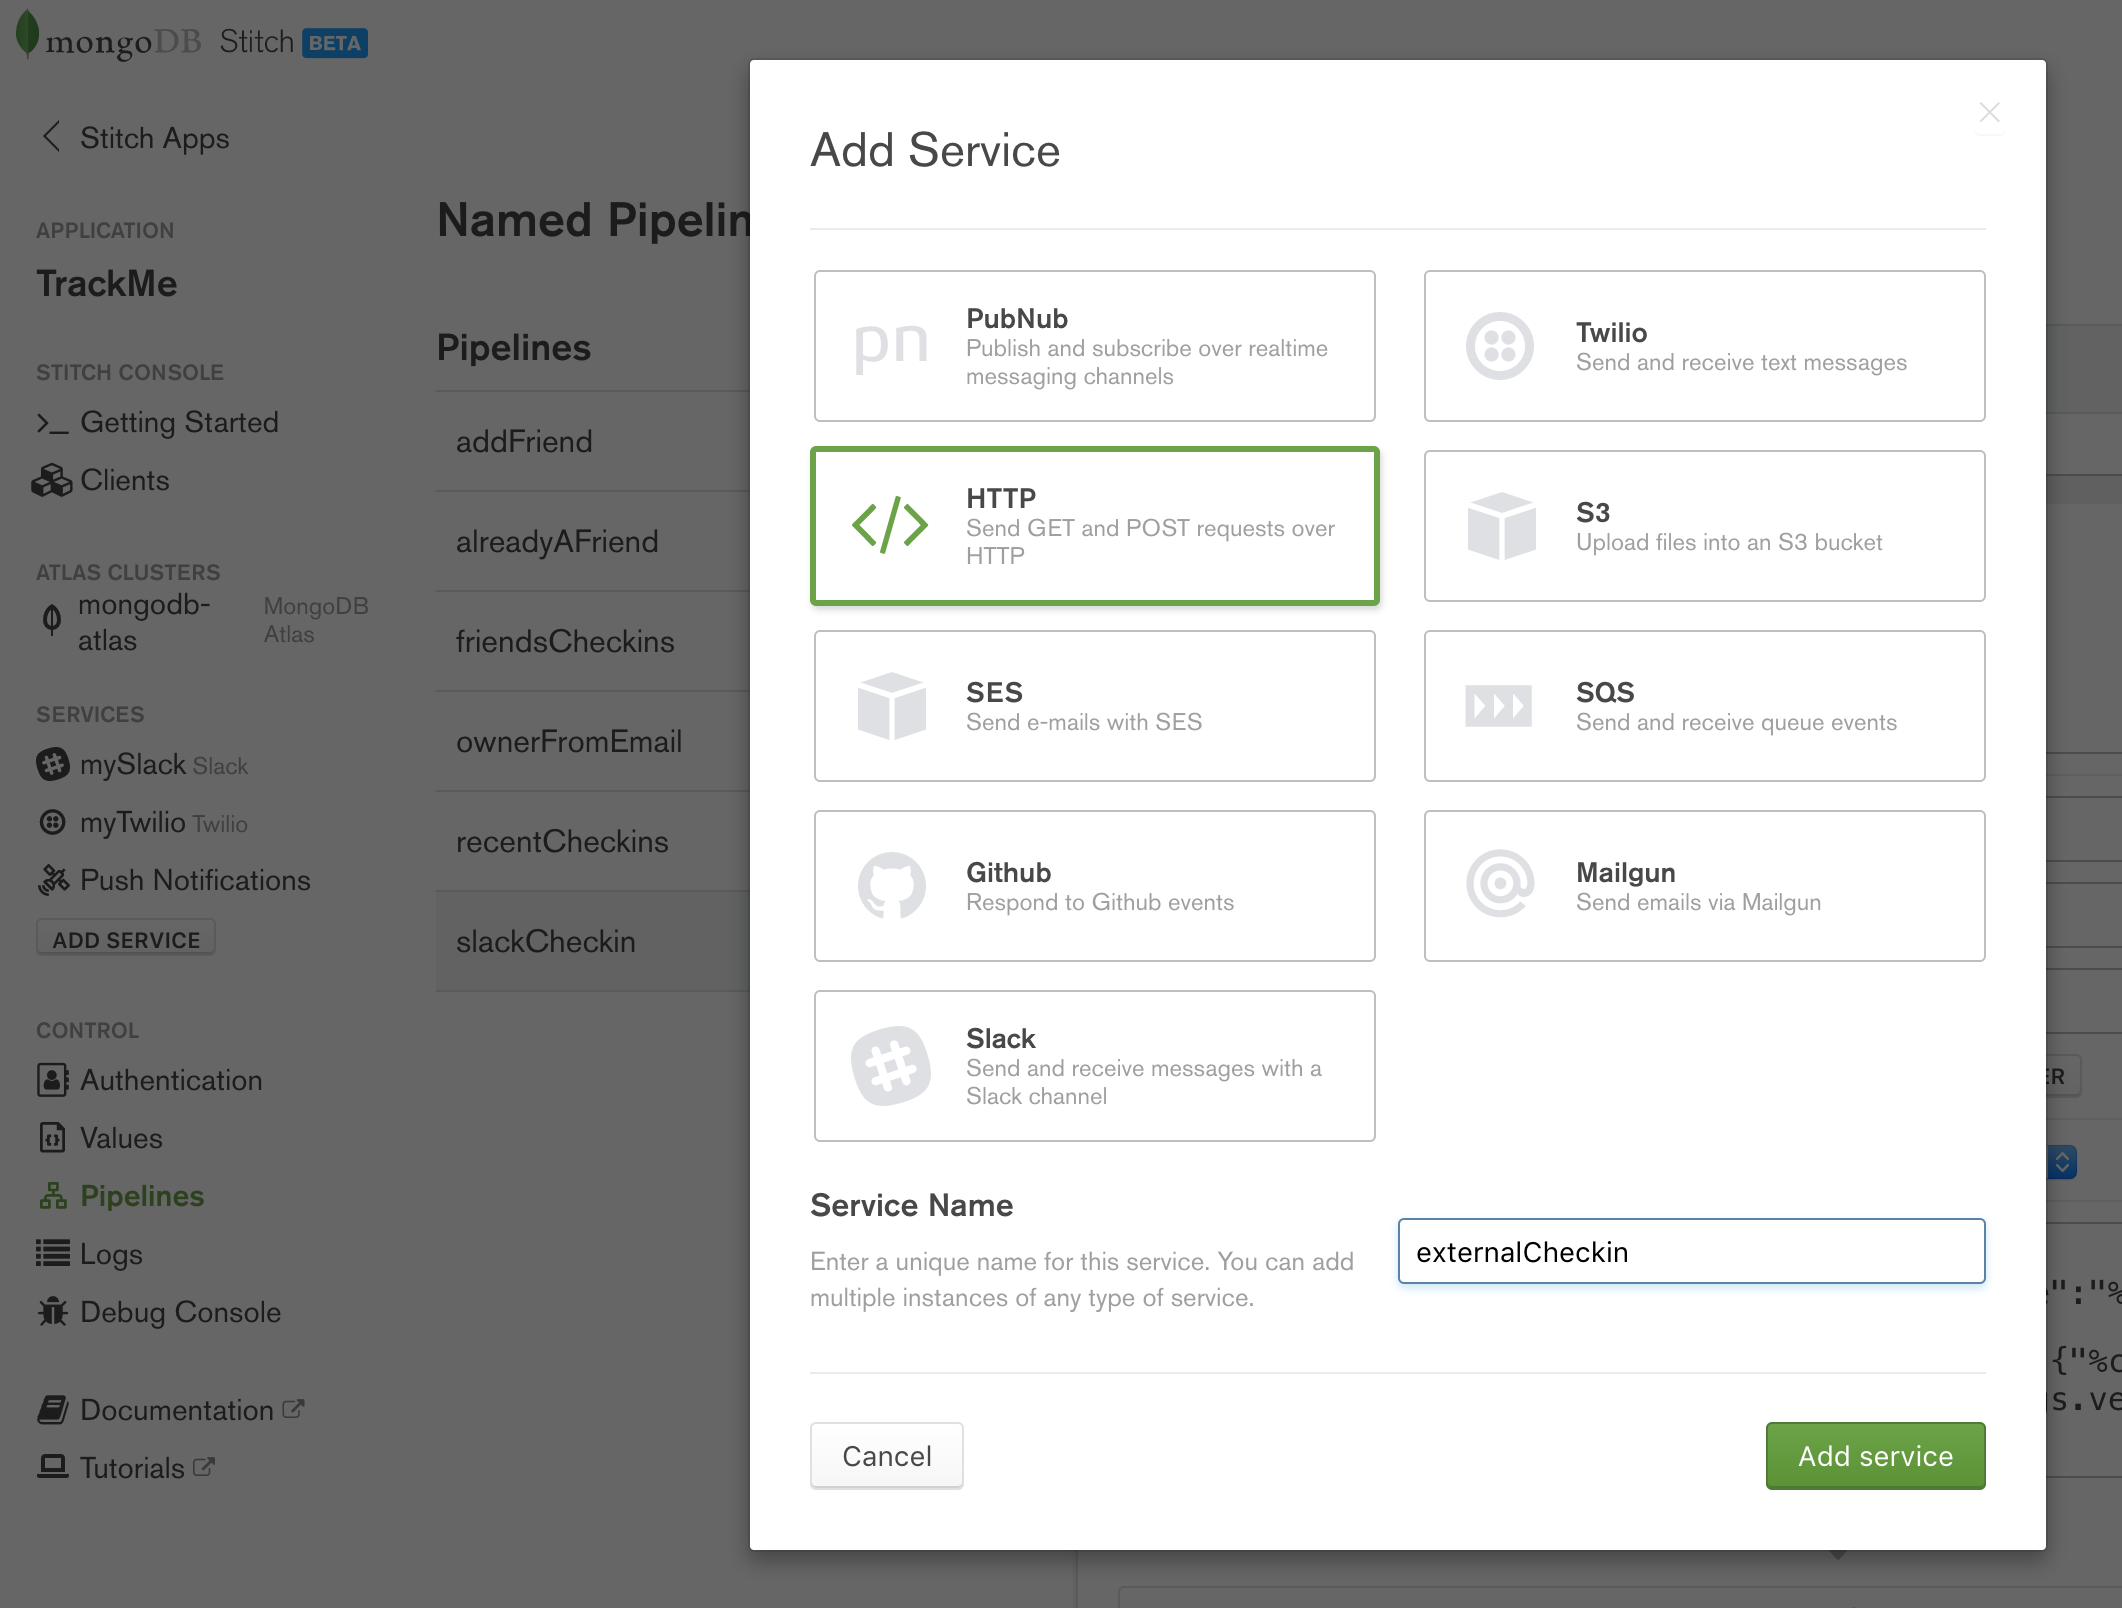
Create externalCheckin HTTP service in MongoDB Stitch
There’s no need to define any (outgoing) rules as our application doesn’t use this service to send out any requests.
Create the fourSquareCheckin WebHook:
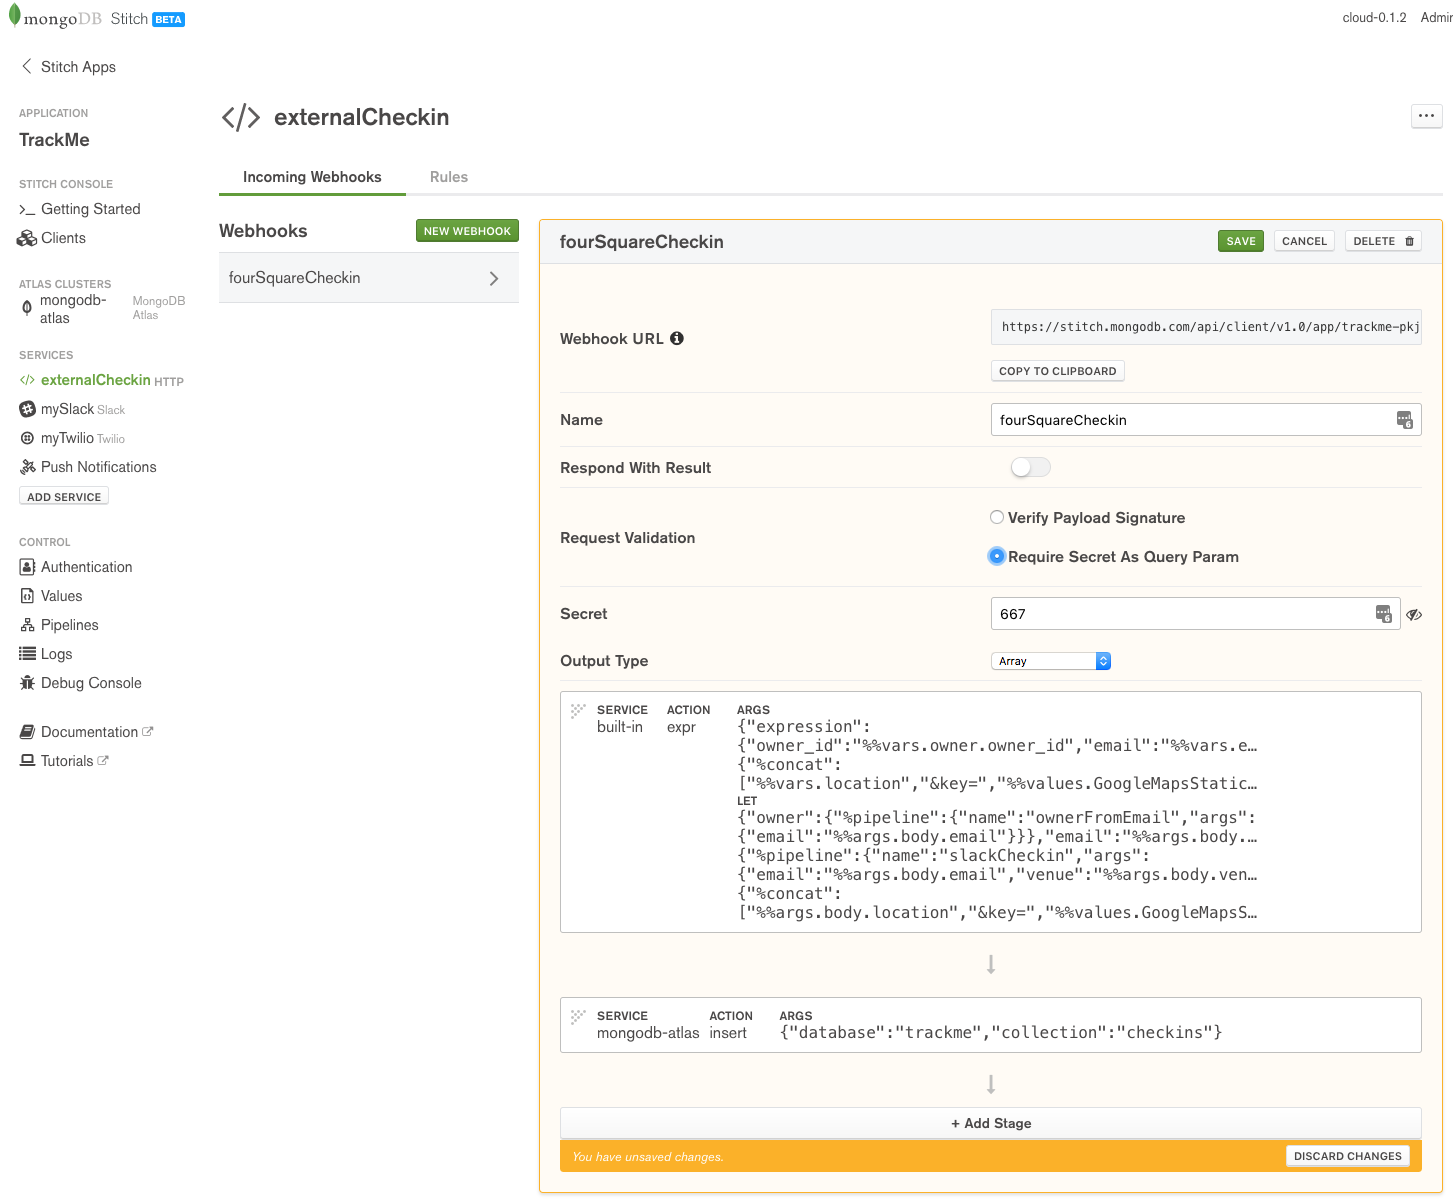
Define fourSquareCheckin WebHook in MongoDB Stitch
To prevent another application sending your application bogus check-ins, enable Require Secret As Query Param and provide a secret (I’ve used 667, but for a production app, you’d want a stronger secret).
The WebHook consists of two stages. The first stage (Stage 0) uses the built-in expression action to build a JSON document containing the check-in data. Note that we form the locationImg field by adding our GoogleMapsStaticKey value to the end of the received URL (so that the new URL can be used by the frontend application code to retrieve the map image from Google).
Action (first stage):
{
  "expression": {
    "owner_id": "%%vars.owner.owner_id",
    "email": "%%vars.email",
    "venueName": "%%vars.venue",
    "date": "%%vars.date",
    "url": "%%vars.url",
    "locationImg": {
      "%concat": [
        "%%vars.location",
        "&key=",
        "%%values.GoogleMapsStaticKey"
      ]
    }
  }
}
When creating the variables to construct the expression, %%vars.owner is formed by invoking our ownerFromEmail named pipeline – passing in the received email address from the received HTTP body.
Bind Data To %%Vars (first stage):
{
  "owner": {
    "%pipeline": {
      "name": "ownerFromEmail",
      "args": {
        "email": "%%args.body.email"
      }
    }
  },
  "email": "%%args.body.email",
  "venue": "%%args.body.venue",
  "date": "%%args.body.checkinDate",
  "url": "%%args.body.url",
  "location": "%%args.body.location",
  "slackDummy": {
    "%pipeline": {
      "name": "slackCheckin",
      "args": {
        "email": "%%args.body.email",
        "venue": "%%args.body.venue",
        "location": {
          "%concat": [
            "%%args.body.location",
            "&key=",
            "%%values.GoogleMapsStaticKey"
          ]
        }
     }
    }
  }
}
When defining the variables, we also create a dummy variable (slackDummy) so that we can invoke the slackCheckin pipeline as a side effect.
The second stage takes that document and stores it in the trackme.checkins collection.
Action (second stage):
{
  "database": "trackme",
  "collection": "checkins"
}
Take a note of the WebHook URL (https://stitch.mongodb.com/api/client/v1.0/app/trackme-pkjif/svc/externalCheckin/incomingWebhook/598081f44fdd1f5eb7900c16 in this example) as this is where other services must send requests.
The second WebHook (appCheckin) will be invoked from the iOS Workflow app; it’s very similar to fourSquareCheckin but there’s no need to add the Google Maps key as for these check-ins, locationImg is the Imgur URL of a photo taken by the user at the venue.
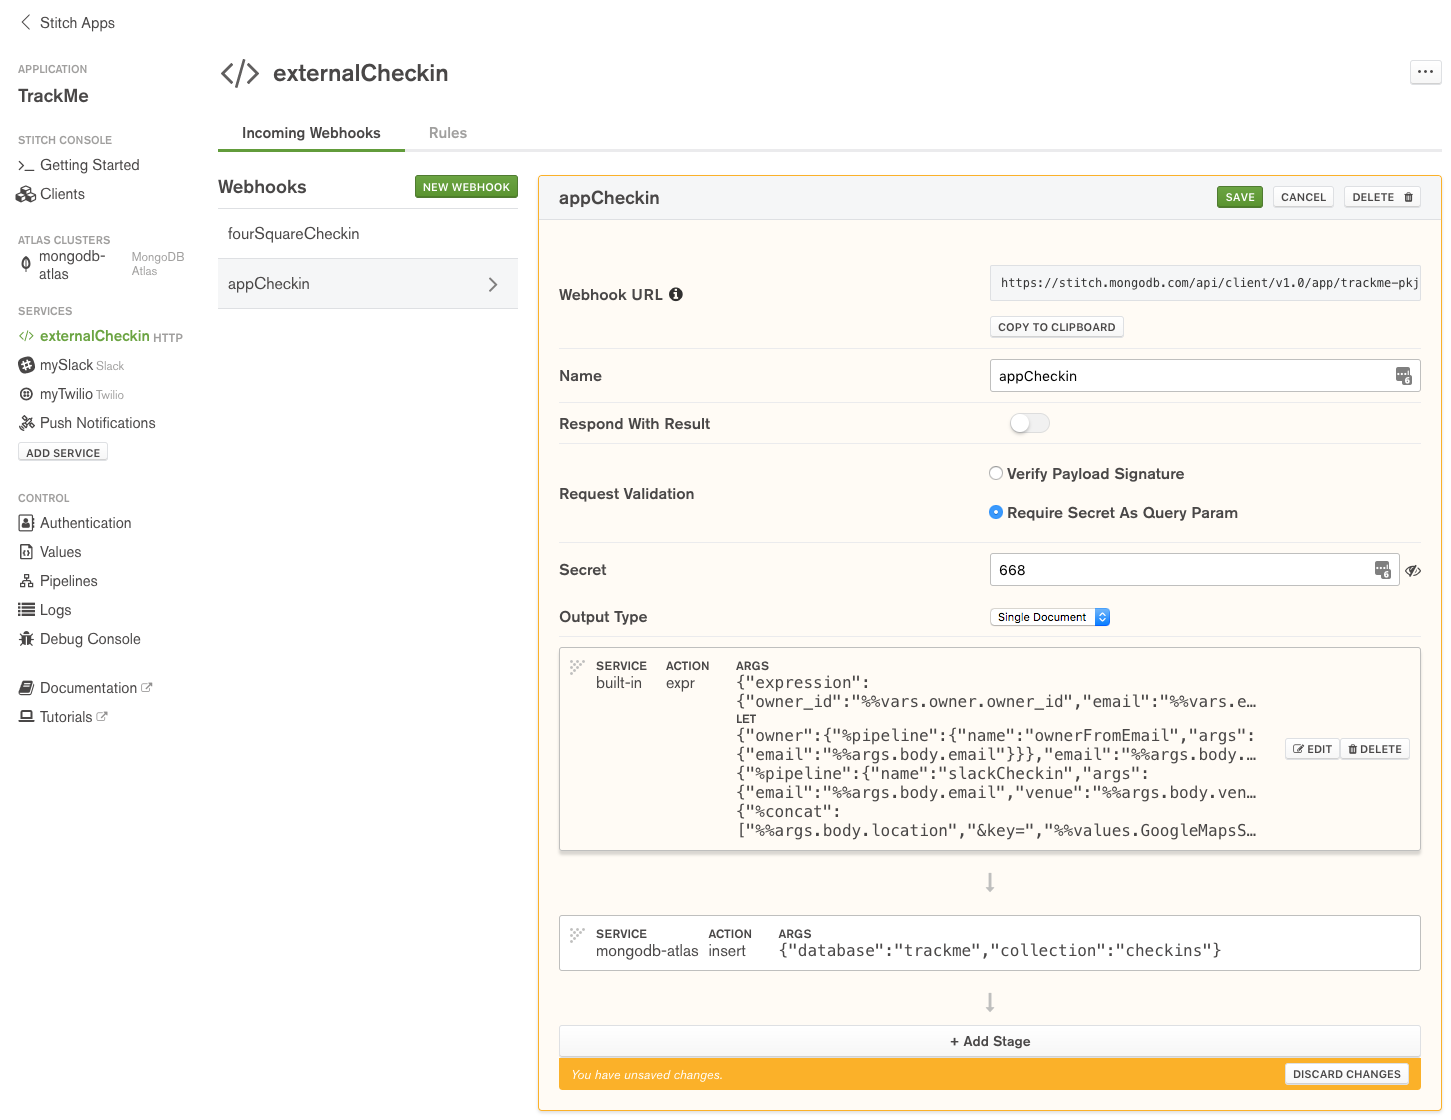
Define appCheckin WebHook in MongoDB Stitch
Action (first stage):
{
  "expression": {
    "owner_id": "%%vars.owner.owner_id",
    "email": "%%vars.email",
    "venueName": "%%vars.venue",
    "date": "%%vars.date",
    "url": "%%vars.url",
    "locationImg": "%%vars.location"
  }
}
Bind Data To %%Vars (first stage):
{
  "owner": {
    "%pipeline": {
      "name": "ownerFromEmail",
      "args": {
        "email": "%%args.body.email"
      }
    }
  },
  "email": "%%args.body.email",
  "venue": "%%args.body.venue",
  "date": "%%args.body.date",
  "url": "%%args.body.url",
  "location": "%%args.body.location",
  "slackDummy": {
    "%pipeline": {
      "name": "slackCheckin",
      "args": {
        "email": "%%args.body.email",
        "venue": "%%args.body.venue",
        "location": {
          "%concat": [
            "%%args.body.location",
            "&key=",
            "%%values.GoogleMapsStaticKey"
          ]
        }
      }
    }
  }
}
WebHook definition (second stage):
{
  "database": "trackme",
  "collection": "checkins"
}
Take a note for the Webhook URL.
Checking into the app using WebHooks
Capturing FourSquare check-ins (via IFTTT)
IFTTT (If This Then That) is a free cloud service which allows you to automate tasks by combining existing services (Google Docs, Facebook, Instagram, Hue lights, Nest thermostats, GitHub, Trello, Dropbox,…). The name of the service comes from the simple pattern used for each Applet (automation rule): “IF This event occurs in service x Then trigger That action in service y”.
IFTTT includes a Maker service which can handle web requests (triggers) or send web requests (actions). In this case, you can create an Applet to invoke our fourSquareCheckin WebHook whenever you check in using the Swarm (Foursquare) app:
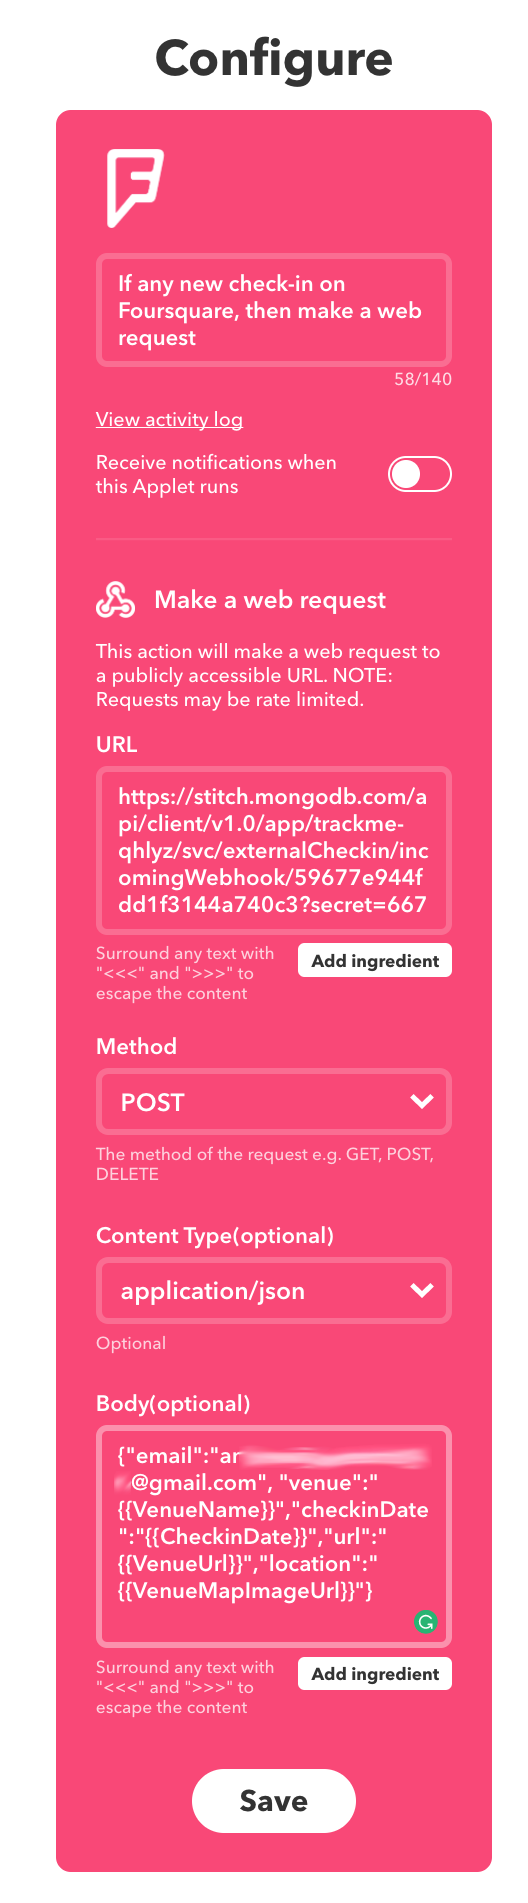
Define IFTTT applet for MongoDB Stitch app
Note that you form the URL: (https://stitch.mongodb.com/api/client/v1.0/app/trackme-pkjif/svc/externalCheckin/incomingWebhook/598081f44fdd1f5eb7900c16?secret=667) from the WebHook URL, with the addition of the secret parameter.
The HTTP method is set to POST and the body is a JSON document formed from several variables provided by the FourSquare service:
{
    "email":"me@gmail.com",
    "venue":"{{VenueName}}",
    "checkinDate":"{{CheckinDate}}",
    "url":"{{VenueUrl}}",
    "location":"{{VenueMapImageUrl}}"
}
In this example, the email is hard-coded, and so all check-ins will be registered by the same user. A production application would need a better solution.
Checking in from an iPhone (via the Workflow iOS app)
iOS Workflow has some similarities with IFTTT, but there are also some significant differences:
- Workflow runs on your iOS device rather than in the cloud.
- You trigger Workflows by performing actions on your iOS device (e.g. pressing a button); external events from cloud service trigger IFTTT actions.
- Workflow allows much more involved patterns than IFTTT; it can loop, invoke multiple services, perform calculations, access local resources (e.g. camera and location information) on your device, and much more.
Implementing a Workflow involves dragging actions into the work area and then adding attributes to those actions (such as the URL for the TrackMe appCheckin WebHook). The result of one action is automatically used as the input to the next in the workflow. Results can also be stored in variables for use by later actions.
The TrackMe workflow:
* Retrieve the current location from your device & fetch details venue details
* If the venue details isn’t a URL then fetch an Apple Maps URL
* Take a new photo and upload it to Imgur
* Create a URL to invoke Trackme (ending in ?secret=668)
* Perform an HTTP POST to this URL, including check-in details in the body
This is the Check In workflow:
Define IFTTT applet for MongoDB Stitch app
You can see the Workflow applet in action here:

Trackme MongoDB Stitch iOS Workflow in action
Checking the trackme Slack channel confirms that the checkin was received. Note that you also check the results of the request in the *Logs * section of the Stitch Admin UI.
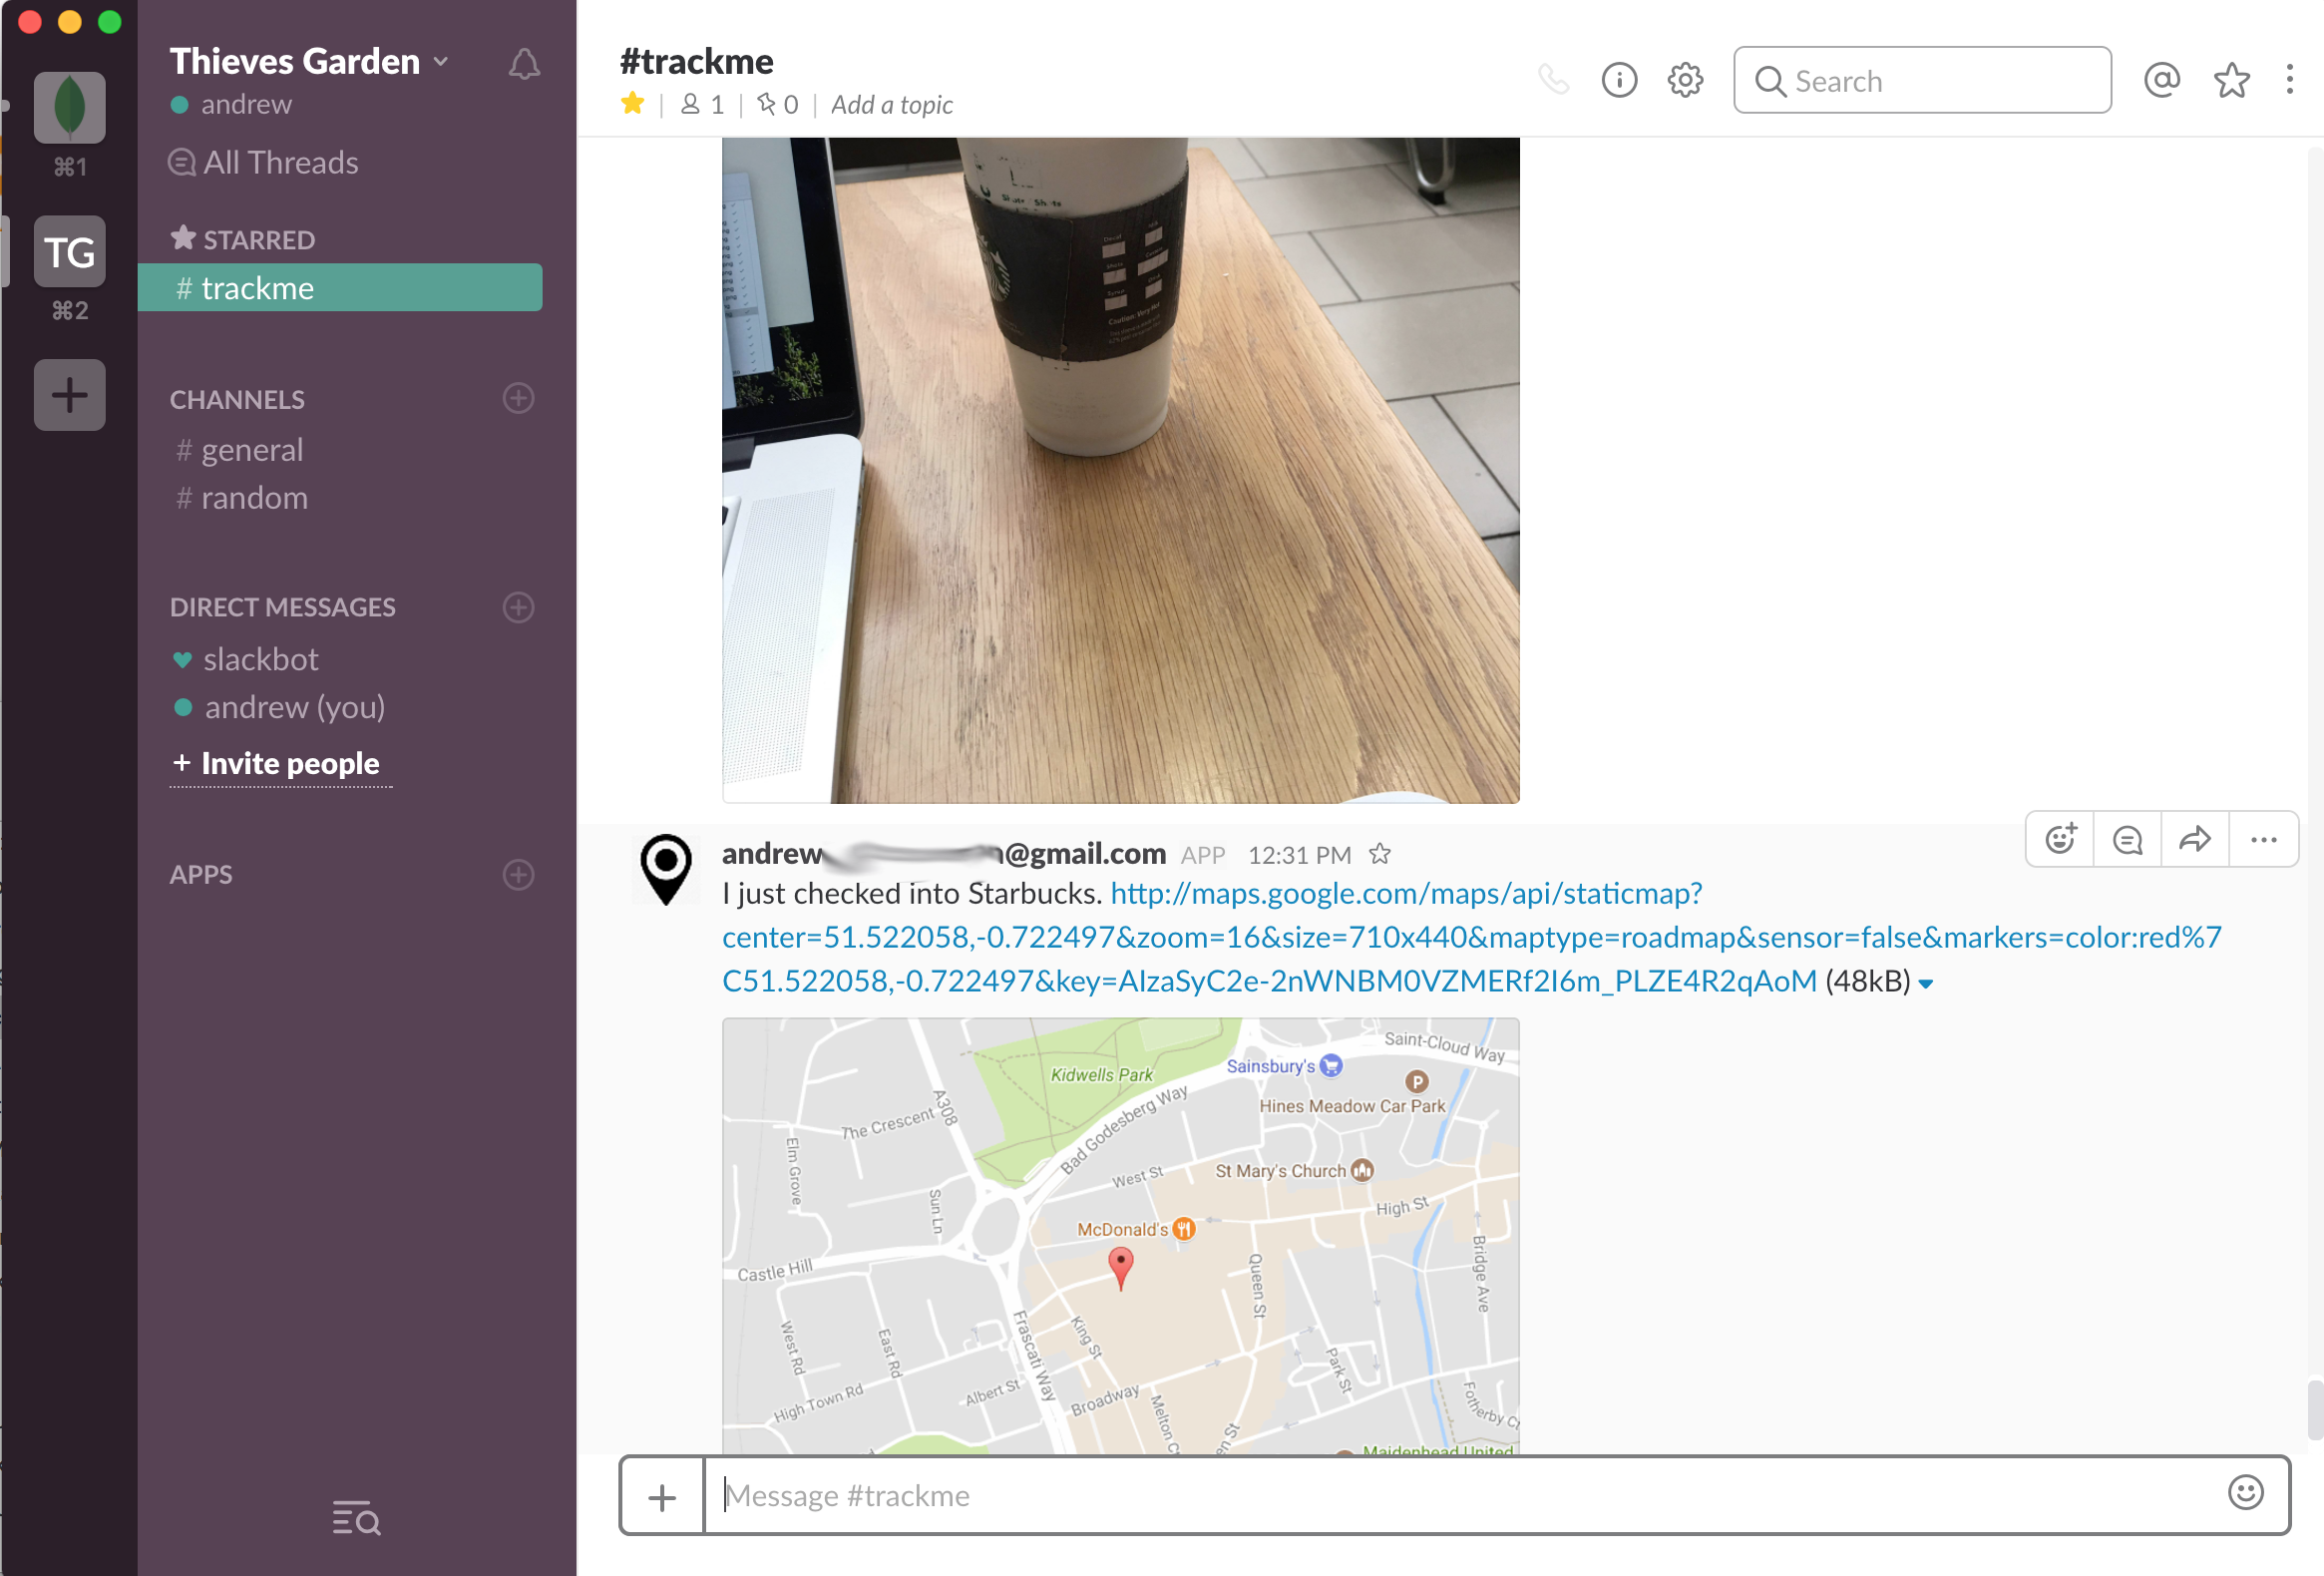
Check-in data shown in Slack
Building a frontend app using React
In The Modern Application Stack – Part 5: Using ReactJS, ES6 & JSX to Build a UI (the rise of MERN), I covered developing an application frontend using React. In this post, I don’t rehash the introduction to React, instead, I focus on how the React application interacts with its Stitch backend.
If you read my earlier post then you may recall that it included writing a data service to handle interactions with the backend (Mongopop) REST API; this isn’t required for the TrackMe frontend as the Stitch SDK provides access to the backend.
The TrackMe application frontend allows a user to:
- Log in using Google or Facebook authentication
- View their most recent check-ins
- View the most recent check-ins of users that have added them to their list of friends
- Add another user to their list of friends
- Use Twilio to send an SMS text to any number, containing the user’s latest check-in information
Download the full application can from the trackme_MongoDB_Stitch GitHub project.
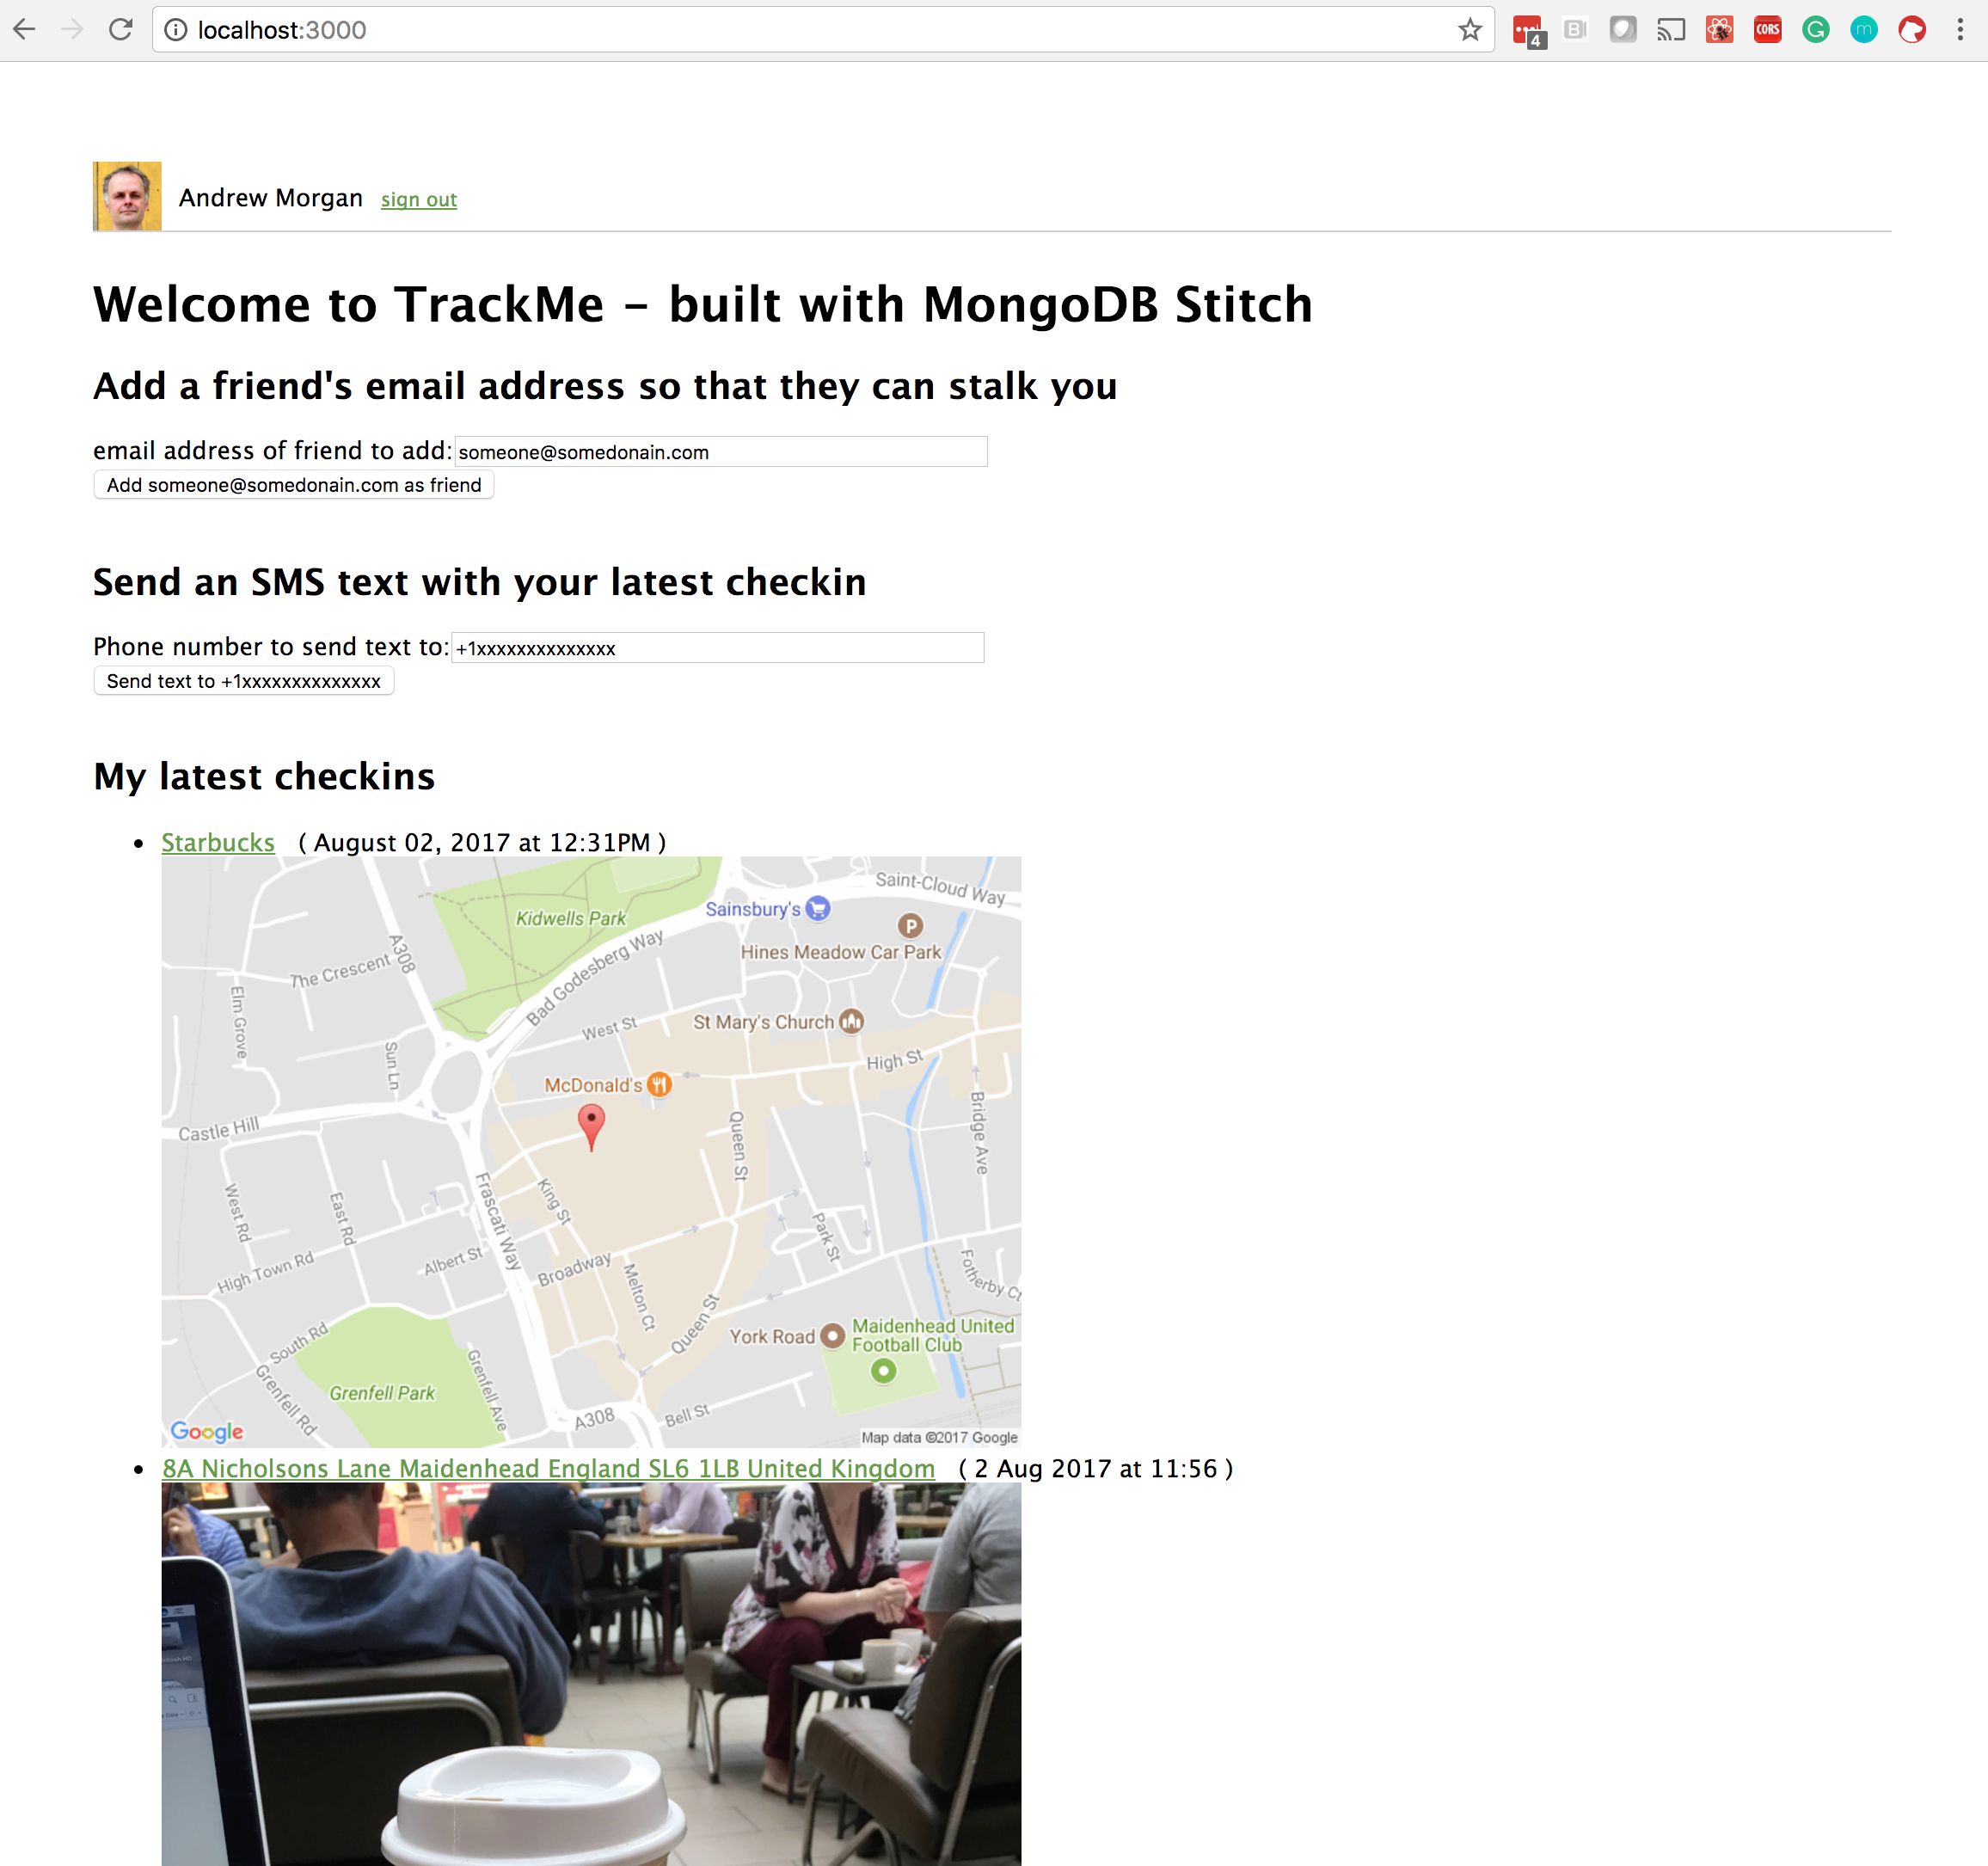
TrackMe ReactJS Web app frontend for MongoDB Stitch
To run the TrackMe frontend:
git clone https://github.com/am-MongoDB/trackme_MongoDB_Stitch.git
cd trackme_MongoDB_Stitch
npm install
Edit the value of appId in src/config.js; replacing trackme-xxxx with the value for your Stitch app (found in the Clients tab in the Stitch console after creating your MongoDB Stitch app).
npm start
ReactJS Javascript (ES6) Client Code
The application’s React frontend is made up of the Trackme component which embeds four sub-components:
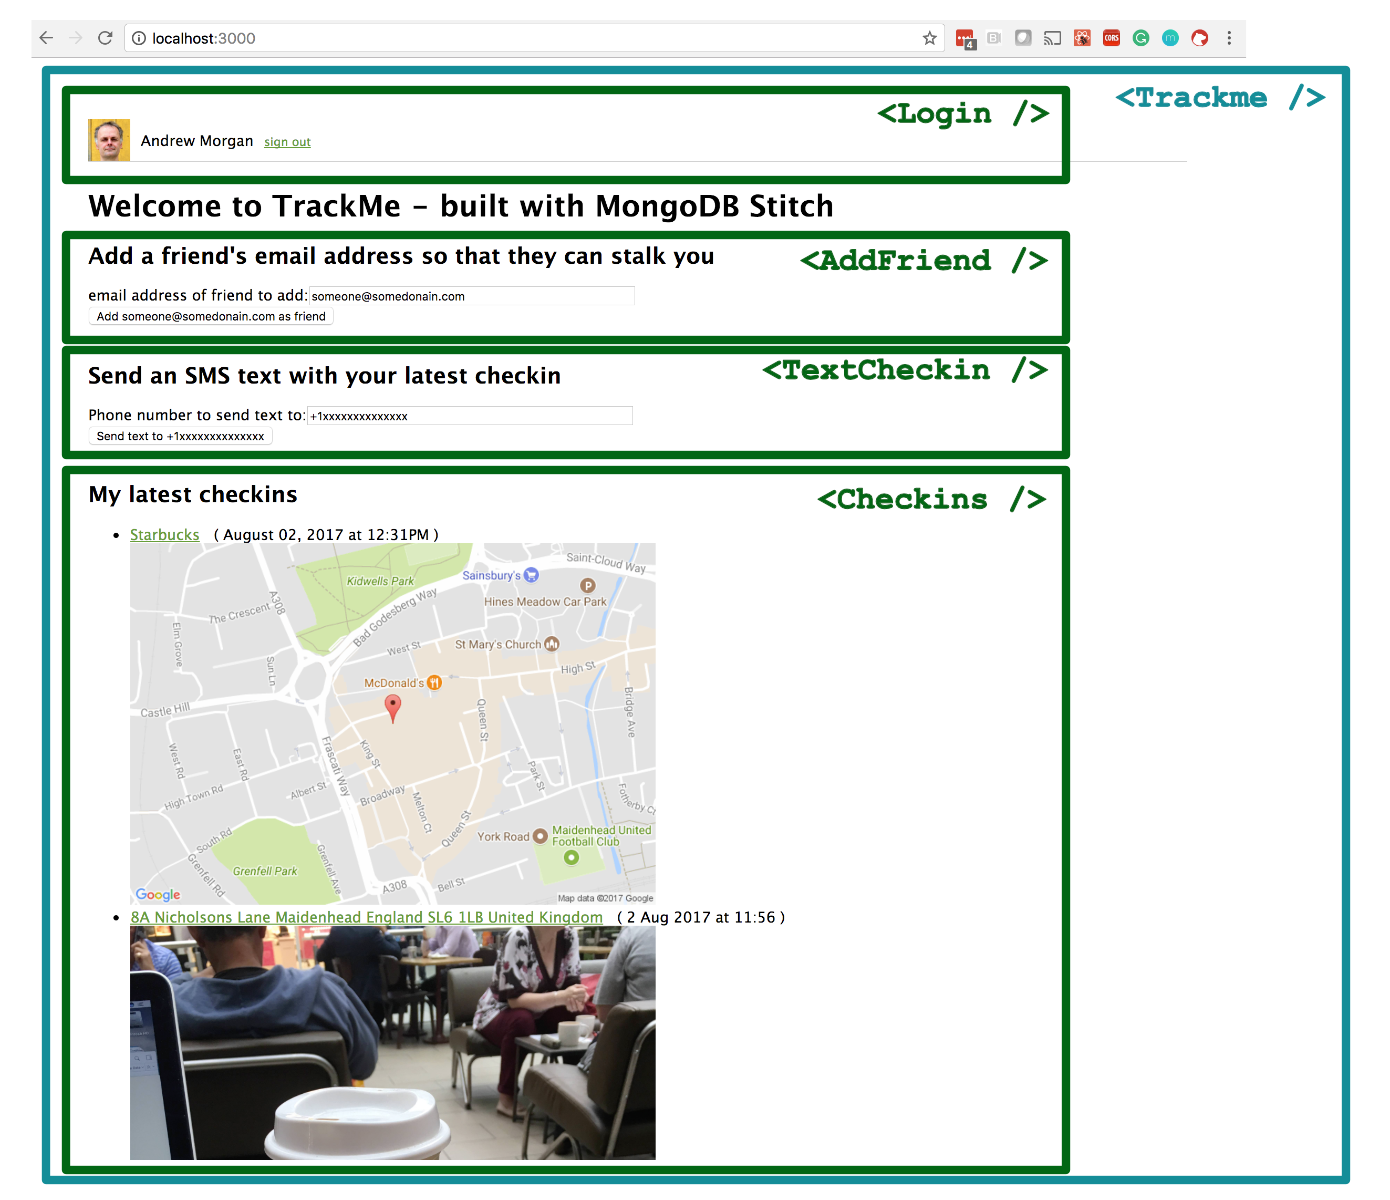
React components making up the TrackMe web app
Any Stitch JavaScript application must start by importing the Stitch SKD StitchClient. The code then uses StitchClient to connect to MongoDB Stitch in the Trackme component’s constructor function within App.js. After instantiating stitchClient, it’s used to connect to the trackme database, followed by the checkins, and user collections:
import { StitchClient } from 'mongodb-stitch';
import config from './config';
...
class Trackme extends React.Component {
  constructor(props) {
    super(props);
        ...
    this.appId = config.appId;
        ...
    let options = {};

    this.stitchClient = new StitchClient(this.appId, options);

    this.db = this.stitchClient.service("mongodb",
        "mongodb-atlas").db("trackme");

    this.checkins = this.db.collection("checkins");
    this.users = this.db.collection("users");
    }
...
}
stitchClient is passed down to src/login.component.js, where a single line of code (this.props.stitchClient.authWithOAuth("facebook")) can be used to authenticate using Facebook:
<div
  onClick={() =>
    this.props.stitchClient.authWithOAuth("facebook")}
  className="signin-button">
  <div className="facebook-signin-logo" />
  <span className="signin-button-text">
    Sign in with Facebook
  </span>
</div>
The same component can use Google to authenticate in the same way:
<div
  onClick={() =>
    this.props.stitchClient.authWithOAuth("google")}
  className="signin-button"
>
  ...
  <span className="signin-button-text">
    Sign in with Google
  </span>
</div>
Whichever authentication method was used, common code displays the user’s name and avatar (in src/login.component.js):
this.props.stitchClient.userProfile()
.then(
  userData => {
    ...
    this.setState({userData: userData.data});
    ...
  },
  error => {
    // User hasn't authenticated yet
  })
...
{this.state.userData &&
    this.state.userData.picture
  ? <img src={this.state.userData.picture}
    className="profile-pic" alt="mug shot"/>
  : null}
<span className="login-text">
  <span className="username">
    {this.state.userData && this.state.userData.name
      ? this.state.userData.name
      : "?"}
  </span>
</span>
Common code can logout the user (in src/login.component.js):
this.props.stitchClient.logout()
Once logged in, the application frontend can start making use of the services that we’ve configured for this app through the Stitch UI. In this case, we directly insert or update the user’s details in the trackme.users collection (in src/login.component.js):
this.props.userCollection.updateOne(
  {},  /* We don't need to identify the
        user in the query as the
        pipeline's filter will handle
        that.*/
  {
    $set: {
      owner_id:
      this.props.stitchClient.authedId(),
      userData: userData.data
    }
  },
  {upsert: true})
.then(
  result=>{},
  error=>{console.log("Error: " + error)}
  );
While that code is using the Stitch SDK/API, it is invoking the MongoDB Atlas service in a traditional manner by performing an updateOne operation but the Stitch filters and rules we’ve configured for the users collection will still be enforced.
In this React application frontend, I have intentionally used a variety of different ways to interact with Stitch – you will later see how to call a named pipeline and how to construct and execute a new pipeline on the fly.
When adding a new friend, two of the named pipelines we created through the Stitch UI (alreadyAFriend & addFriend) are executed to add a new email address to the list if and only if it isn’t already there (src/addfriend.component.js):
import { builtins } from 'mongodb-stitch';
...
this.props.stitchClient
  .executePipeline([
    builtins.namedPipeline('alreadyAFriend',
      {friendsEmail: email})])
  .then(
    response => {
      if (response.result[0]) {
        this.setState({error: email +
          " has already been included as a friend."});
      } else
      {
        this.props.stitchClient
          .executePipeline([
            builtins.namedPipeline(
              'addFriend', {friendsEmail: email})])
          .then(
            response => {
              if (response.result[0]) {
                this.setState({success:
                  email + " added as a friend; they can now see your checkins."});
              } else {
                this.setState({
                  error: "Failed to add " + email + " as a friend"});
              }
            },
            error => {
              this.setState({error: "Error: " + error});
              console.log({error: "Error: "+ error});
            }
          )
      }
    },
    error => {
      this.setState({error: "Error: " + error});
      console.log({error: "Error: " + error});
    }
  )
...
src/text.checkin.component.js finds the latest checkin (for this user), and then creates and executes a new service pipeline on the fly – sending the venue name to the requested phone number via Twilio:
this.props.checkins.find({},
  {sort: {_id: -1}, limit: 1})
.then (
  response => {
    venue = response[0].venueName;
    this.props.stitchClient.userProfile()
    .then (
      response => {
        name = response.data.name;
      })
    .then (
      response => {

        this.props.stitchClient
          .executePipeline([
            {
              service: "myTwilio",
              action: "send",
              args: {
                to: this.state.textNumber,
                from: "%%values.twilioNumber",
                body: name + " last cheked into " + venue
              }
            }
          ])
          .then(
            response => {
              this.setState({success: "Text has been sent to " +
                this.state.textNumber});
            },
            error => {
              this.setState({error: "Failed to send text: " + error});
              console.log({error: "Failed to send text: " + error});
          })
    })
  },
    error => {
    this.setState({error: "Failed to read the latest checkin: " + error});
    }
  )
Note that the pipeline refers to %%values.twilioNumber – this is why that value couldn’t be tagged as Private within the Stitch UI.
This is the result:

Text message from Twilio – via MongoDB Stitch
The checkins for the user and their friends are displayed in the Checkins component in src/checkins.component.js. The following code invokes the recentCheckins named pipeline (including the number parameter to request the 10 most recent checkins):
this.props.stitchClient.executePipeline([
    builtins.namedPipeline('recentCheckins', {number: 10})])
  .then(
    checkinData => {
      this.setState({checkins: checkinData.result[0].map((checkin, index) =>
        <li key={index}>
          <a href={checkin.url} target="_Blank">{checkin.venueName}</a>
          ( {checkin.date} )
           <br/>
           <img src={checkin.locationImg} className="mapImg"
            alt={"map of " + checkin.venueName}/>
        </li>
      )})
    },
    error => {
      console.log("Failed to fetch checkin data: " + error)
  })
A similar code block executes the friendsCheckin named pipeline and then loops over each of the friends, displaying the latest checkins for each one:
this.props.stitchClient
  .executePipeline([
    builtins.namedPipeline('friendsCheckins', {number: 10})])
  .then(
    friendData => {
      this.setState({friendsCheckins:
        friendData.result[0].map((friend, friendIndex) =>
          <li key={friendIndex}>
            <strong>{friend._id}</strong>
            <ul>
              {friend.checkins.map((checkin) =>
                <li>
                  <a href={checkin.url} target="_Blank"> {checkin.venueName}</a>
                     ( {checkin.date} ) <br/>
                    <img src={checkin.locationImg} className="mapImg"
                      alt={"map of " + checkin.venueName}/>
                </li>
              )}
            </ul>
          </li>
        )
      })
    },
    error => {
      console.log("Failed to fetch friends' data: " + error)
  })
Continue accessing your data from existing applications (Amazon Alexa skill)
Not every MongoDB Stitch use-case involves building a greenfield app on top of a brand new data set. It’s common that you already have a critical application, storing data in MongoDB, and you want to safely allow new apps or features to use some of that same data.
The good news is that your existing application can continue without any changes, and Stitch can be added to control access from any new applications. To illustrate this, you can reuse the Mongo Alexa Skill created in my earlier post. The JavaScript code needs a sight adjustment (due to a change I made to the schema) – use alexa/index.js.
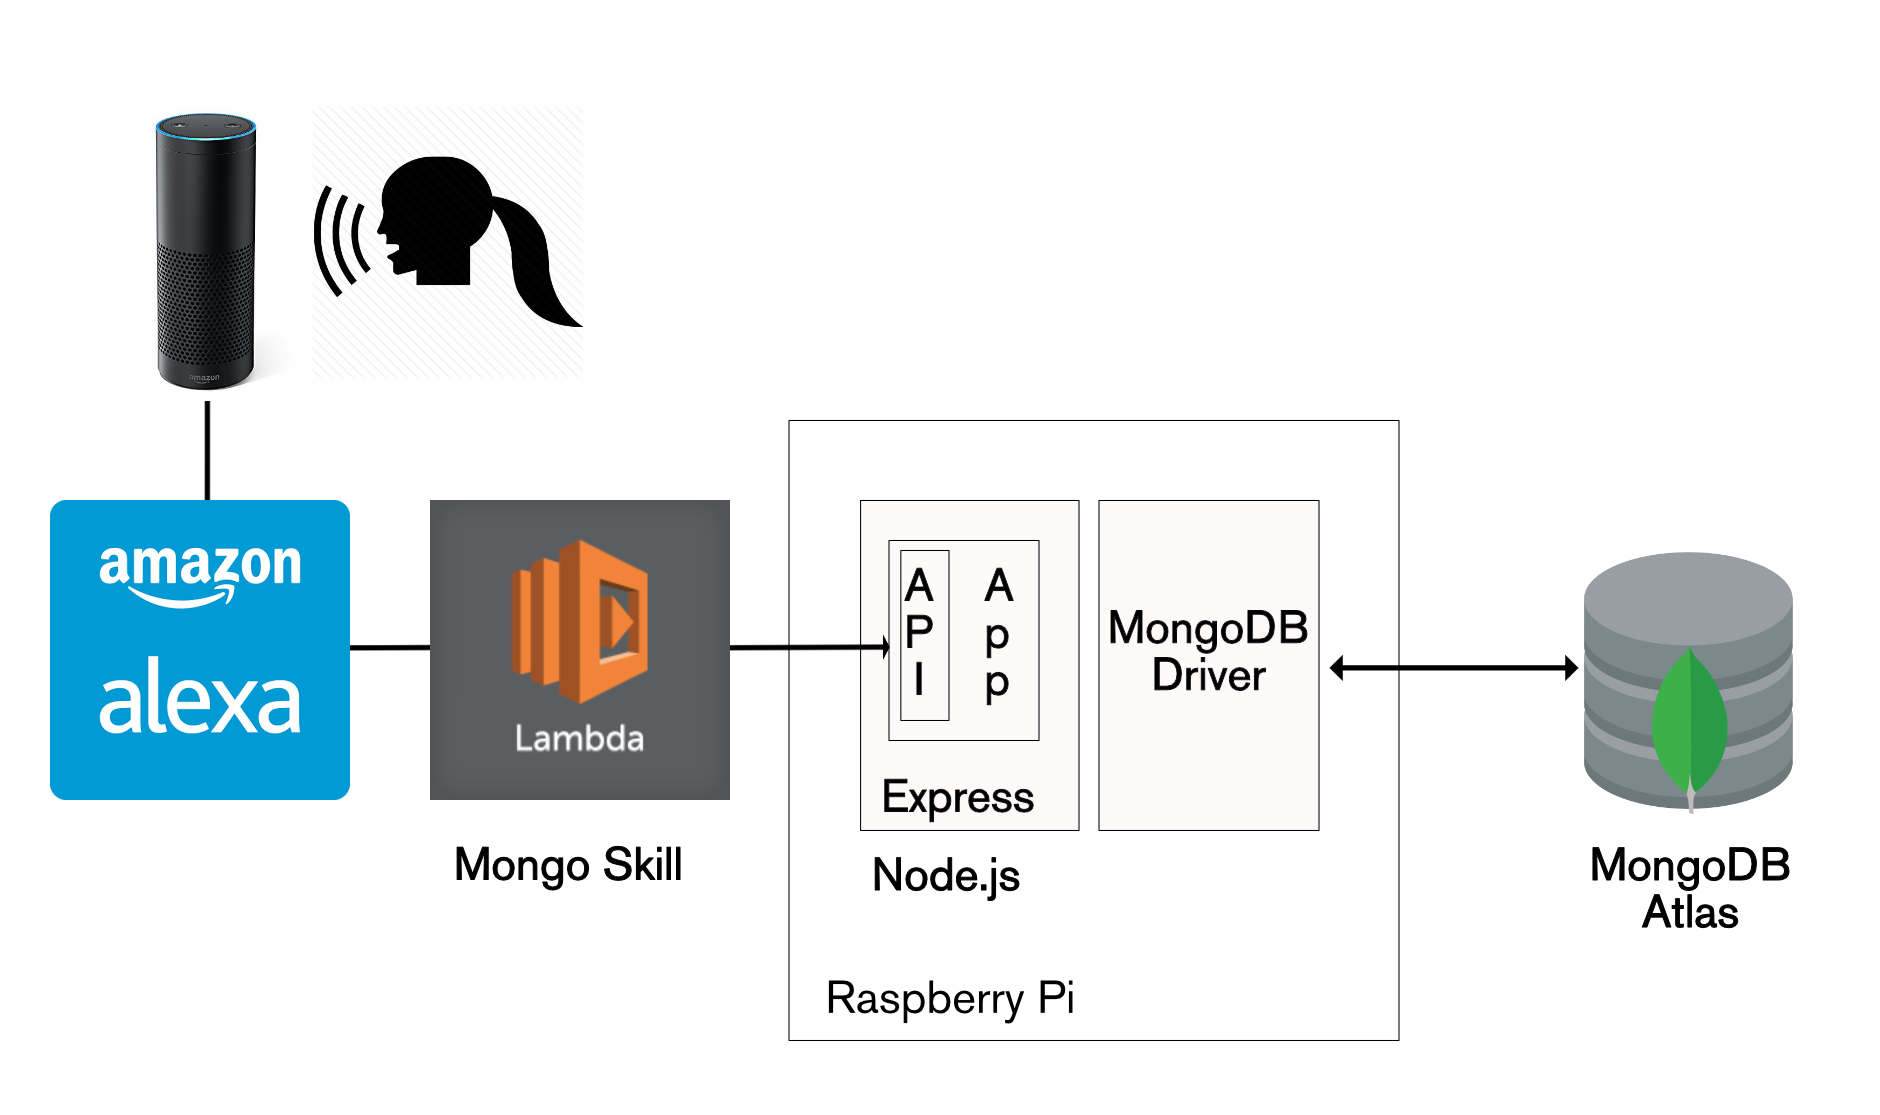
Architecture for Amazon Alexa reading data from MongoDB Atlas
The Alexa skill uses the Express/Node.js REST API implemented in The Modern Application Stack – Part 3: Building a REST API Using Express.js.
Conclusion
MongoDB Stitch lets you focus on building applications rather than on managing data manipulation code, service integration, or backend infrastructure. Whether you’re just starting up and want a fully managed backend as a service, or you’re part of an enterprise and want to expose existing MongoDB data to new applications, Stitch lets you focus on building the app users want, not on writing boilerplate backend logic.
In this post, you’ve learned how to:
- Create a new MongoDB Stitch app that lets you access data stored in MongoDB Atlas
- Integrate with authentication providers such as Google and Facebook
- Configure data access controls – ensuring that application end-users can access just the information they’re entitled to
- Enable access to the Slack, and Twilio services
- Define constants/values that you can use securely within your application backend, without exposing them to your frontend code, or the outside world
- Implement named pipelines to access MongoDB and your other services
- Implement WebHooks that allow external services to trigger events in your application
- Invoke your new WebHooks from other applications
- Implement your application frontend in React/JavaScript
- Authenticate users using Google and Facebook
- Use the MongoDB Query Language to “directly” access your data through Stitch
- Execute names pipelines
- Create and run new pipelines on the fly
- Continue to access the same MongoDB data from existing apps, using the MongoDB drivers
When revisiting the original blog series, it’s interesting to assess what work could you could save:
- Part 1: Introducing The MEAN Stack and the young MERN upstart
- This is an introductory chapter, much of it is still relevant when using Stitch.
- Part 2: Using MongoDB With Node.js
- The work in this chapter isn’t needed as Stitch works with MongoDB Atlas directly, removing the need to use the MongoDB Driver for Node.JS.
- Part 3: Building a REST API with Express.js
- This chapter isn’t needed as Stitch provides the SDK/REST API to access your MongoDB data (and other services).
- Part 4: Building a Client UI Using Angular 2 (formerly AngularJS) & TypeScript
- Much of this chapter is still relevant if you’re looking to build your application frontend using Angular2, but the work to implement the data service isn’t needed when working with MongoDB Stitch.
- Part 5: Using ReactJS, ES6 & JSX to Build a UI (the rise of MERN)
- Much of this chapter is still relevant if you’re looking to code your application frontend using React, but the work to implement the data service isn’t needed when working with MongoDB Stitch.
- Part 6: Browsers Aren’t the Only UI – Mobile Apps, Amazon Alexa, Cloud Services
- Covers much of the same ground as this post. Some of the examples can be simplified when using MongoDB Stitch, and the extending of the REST API to add new features isn’t necessary when using Stitch.
The following table summarizes the steps required to build an application without without the help of Stitch:
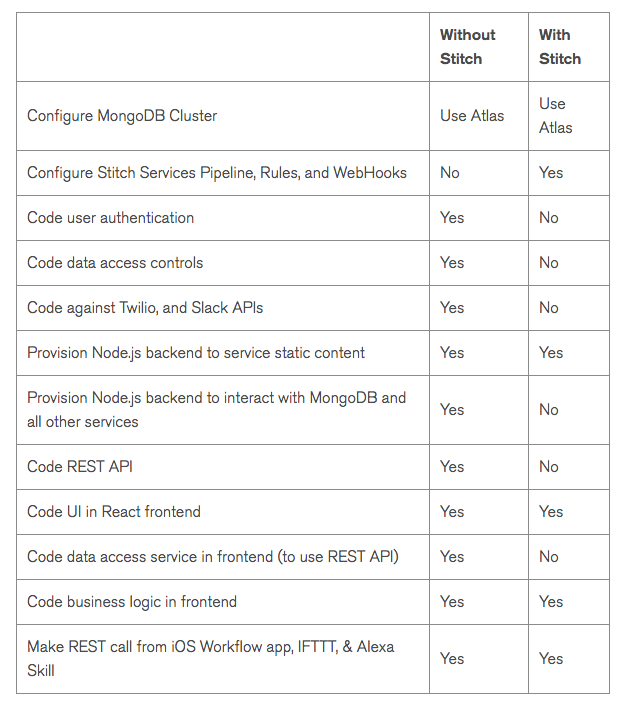
Development steps skipped when using MongoDB Stitch
Both MongoDB Atlas and MongoDB Stitch.