Oracle have just made availble the new MySQL Cluster 7.4.1 Development Milestone Release – it can be downloaded from the development release tab here. Note that this is not a GA release and so we wouldn’t recommend using it in production.
There are three main focus areas for this DMR and the purpose of this post is to briefly introduce them:
- Active-Active (Multi-Master) Replication
- Performance
- Operational improvements (speeding up of restarts; enhanced memory reporting)
Active-Active (Multi-Master) Replication
MySQL Cluster allows bi-directional replication between two (or more) clusters. Replication within each cluster is synchronous but between clusters it is asynchronous which means the following scenario is possible:
Conflict with asynchronous replication
| Site A |
Replication |
Site B |
| x == 10 |
|
x == 10 |
| x = 11 |
|
x = 20 |
|
— x=11 –> |
x == 11 |
| x==20 |
<– x=20 — |
|
In this example a value (column for a row in a table) is set to 11 on site A and the change is queued for replication to site B. In the mean time, an application sets the value to 20 on site B and that change is queued for replication to site A. Once both sites have received and applied the replicated change from the other cluster site A contains the value 20 while site B contains 11 – in other words the databases are now inconsistent.
How MySQL Cluster implements eventual consistency
There are two phases to establishing consistency between both clusters after an inconsistency has been introduced:
- Detect that a conflict has happened
- Resolve the inconsistency
The following animation illustrates how MySQL Cluster 7.2 detects that an inconsistency has been introduced by the asynchronous, active-active replication:

Detecting conflicts
While we typically consider the 2 clusters in an active-active replication configuration to be peers, in this case we designate one to be the primary and the other the secondary. Reads and writes can still be sent to either cluster but it is the responsibility of the primary to identify that a conflict has arisen and then remove the inconsistency.
A logical clock is used to identify (in relative terms) when a change is made on the primary – for those who know something of the MySQL Cluster internals, we use the index of the Global Checkpoint that the update is contained in. For all tables that have this feature turned on, an extra, hidden column is automatically added on the primary – this represents the value of the logical clock when the change was made.
Once the change has been applied on the primary, there is a “window of conflict” for the effected row(s) during which if a different change is made to the same row(s) on the secondary then there will be an inconsistency. Once the slave on the secondary has applied the change from the primary, it will send a replication event back to the slave on the primary, containing the primary’s clock value associated with the changes that have just been applied on the secondary. (Remember that the clock is actually the Global Checkpoint Index and so this feature is sometimes referred to as Reflected GCI). Once the slave on the primary has received this event, it knows that all changes tagged with a clock value no later than the reflected GCI are now safe – the window of conflict has closed.
If an application modifies this same row on the secondary before the replication event from the primary was applied then it will send an associated replication event to the slave on the primary before it reflects the new GCI. The slave on the primary will process this replication event and compare the clock value recorded with the effected rows with the latest reflected GCI; as the clock value for the conflicting row is higher the primary recognises that a conflict has occured and will launch the algorithm to resolve the inconsistency.

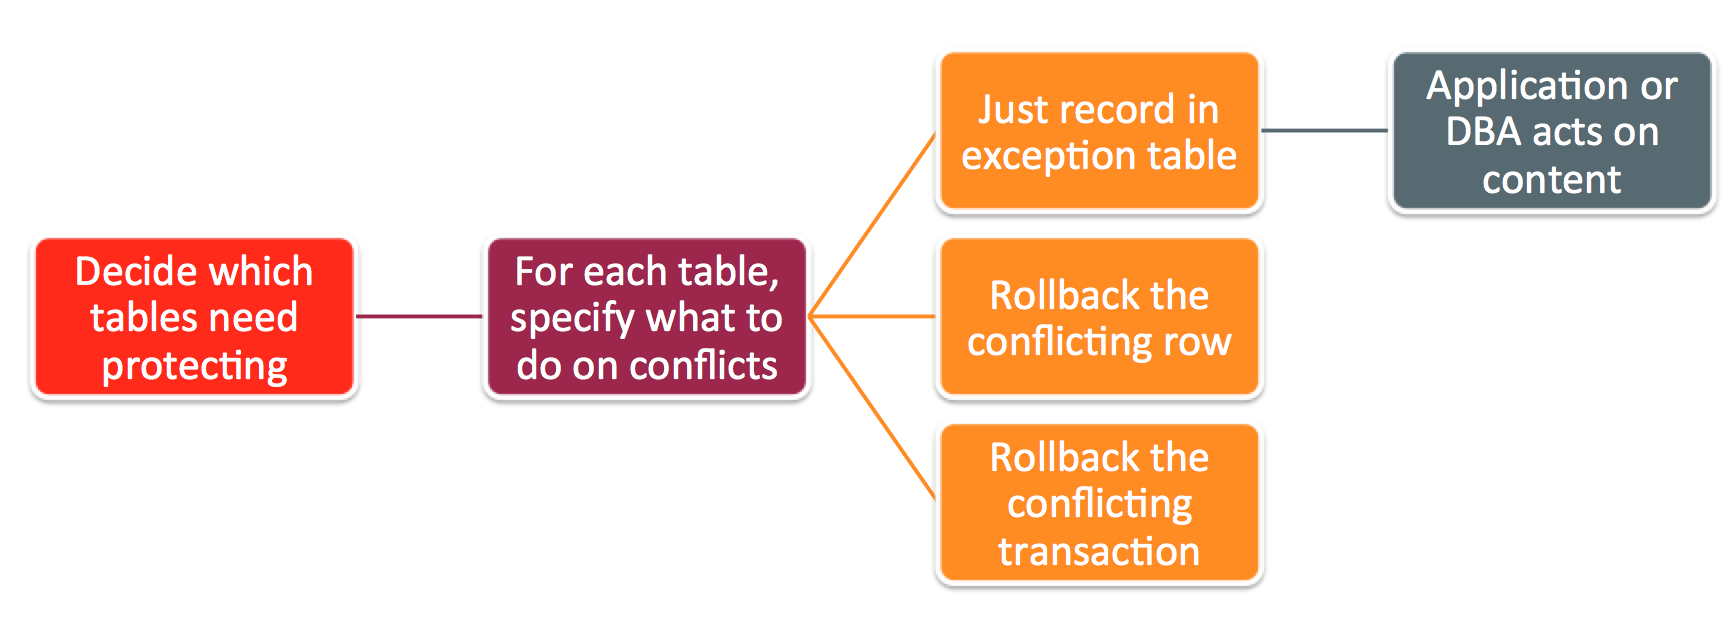
After a conflict has been detected, you have the option of having the database simply report the conflict to the application or have it roll back just the conflicting row or the entire transaction and all subsequent transactions that were dependent on it.
So – what’s new in 7.4.1?
- Detects conflicts between inserts and updates
- Option to roll back entire transaction (and dependent transactions) rather than just the conflicting row
- All conflicts are handled before switching primary – avoiding potential race conditions
As mentioned at the start of this post, this is pre-GA and there are some extra enhancements we plan on including in the final version:
- Handle deletes which conflict with other operations
- Roll back transactions that have read a row that had been rolled back due to a conflict
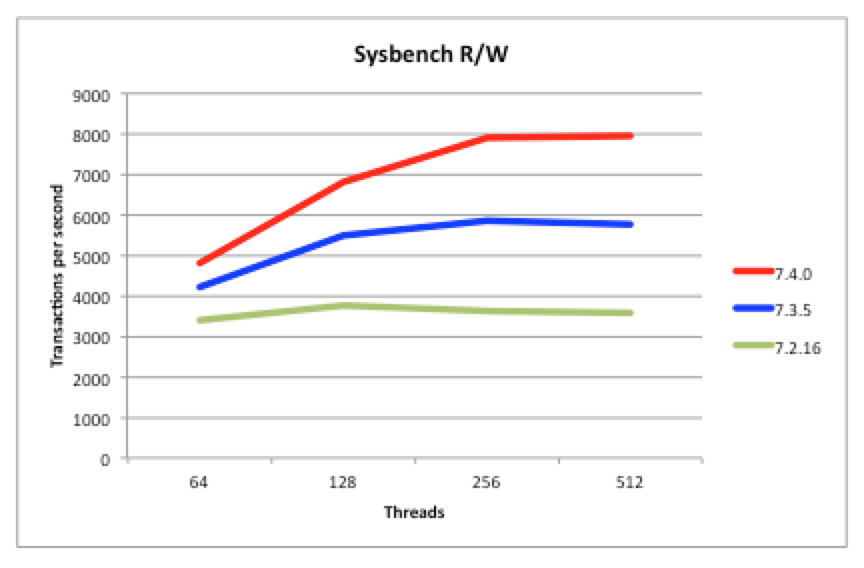
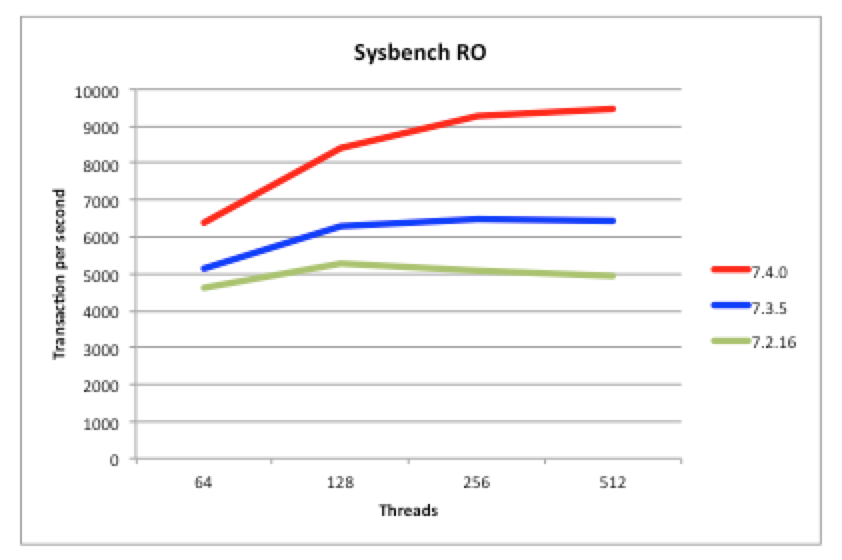
Performance
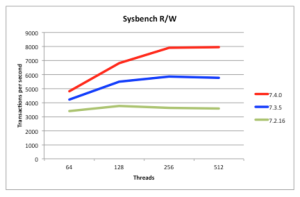
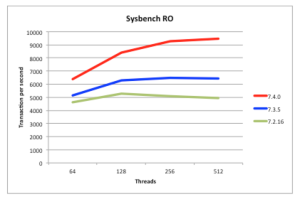
Being a scaled-out, in-memory, real-time database, MySQL Cluster performance has always been great but we continue to work on making it faster each release. In particular, we want to keep pace with the trend of having more and more cores rather than faster ones. 7.4 continues along the path of better exploiting multiple cores – as can be seen from these benchmark results.
Just make sure that you’re using the multi-threaded data node (ndbmtd rather than ndbd) and have configured how many threads it should use.
Faster Restarts
You can restart MySQL Cluster processes (nodes) without losing database service (for example if adding extra memory to a server) and so on the face of it, the speed of the restarts isn’t that important. Having said that, while the node is restarting you’ve lost some of your high-availability which for super-critical applications can make you nervous. Additionally, faster restarts mean that you can complete maintenance activities faster – for example, a software upgrade requires a rolling restart of all of the nodes – if you have 48 data nodes then you want each of the data nodes to restart as quickly as possible.
MySQL 7.4.1 includes a number of optimisations to the restart code and so if you’re already using MySQL Cluster, it might be interesting to see how much faster it gets for your application. We also have some extra optimisations in the works that you can expect to see in later 7.4 versions.
Extra Memory Reporting
MySQL Cluster presents a lot of monitoring information through the ndbinfo database and in 7.4 we’ve added some extra information on how memory is used for individual tables.
For example; to see how much memory is being used by each data node for a particular table…
mysql> CREATE DATABASE clusterdb;USE clusterdb;
mysql> CREATE TABLE simples (id INT NOT NULL AUTO_INCREMENT PRIMARY KEY) ENGINE=NDB;
mysql> SELECT node_id AS node, fragment_num AS frag, \
        fixed_elem_alloc_bytes alloc_bytes, \
        fixed_elem_free_bytes AS free_bytes, \
        fixed_elem_free_rows AS spare_rows \
        FROM ndbinfo.memory_per_fragment \
        WHERE fq_name LIKE '%simples%';
+------+------+-------------+------------+------------+
| node | frag | alloc_bytes | free_bytes | spare_rows |
+------+------+-------------+------------+------------+
|    1 |    0 |      131072 |       5504 |        172 |
|    1 |    2 |      131072 |       1280 |         40 |
|    2 |    0 |      131072 |       5504 |        172 |
|    2 |    2 |      131072 |       1280 |         40 |
|    3 |    1 |      131072 |       3104 |         97 |
|    3 |    3 |      131072 |       4256 |        133 |
|    4 |    1 |      131072 |       3104 |         97 |
|    4 |    3 |      131072 |       4256 |        133 |
+------+------+-------------+------------+------------+
When you delete rows from a MySQL Cluster table, the memory is not actually freed up and so if you check the existing memoryusage table you won’t see a change. This memory will be reused when you add new rows to that same table. In MySQL Cluster 7.4, it’s possible to see how much memory is in that state for a table…
mysql> SELECT node_id AS node, fragment_num AS frag, \
        fixed_elem_alloc_bytes alloc_bytes, \
        fixed_elem_free_bytes AS free_bytes, \
        fixed_elem_free_rows AS spare_rows \
        FROM ndbinfo.memory_per_fragment \
        WHERE fq_name LIKE '%simples%';
+------+------+-------------+------------+------------+
| node | frag | alloc_bytes | free_bytes | spare_rows |
+------+------+-------------+------------+------------+
|    1 |    0 |      131072 |       5504 |        172 |
|    1 |    2 |      131072 |       1280 |         40 |
|    2 |    0 |      131072 |       5504 |        172 |
|    2 |    2 |      131072 |       1280 |         40 |
|    3 |    1 |      131072 |       3104 |         97 |
|    3 |    3 |      131072 |       4256 |        133 |
|    4 |    1 |      131072 |       3104 |         97 |
|    4 |    3 |      131072 |       4256 |        133 |
+------+------+-------------+------------+------------+
mysql> DELETE FROM clusterdb.simples LIMIT 1;
mysql> SELECT node_id AS node, fragment_num AS frag, \
        fixed_elem_alloc_bytes alloc_bytes, \
        fixed_elem_free_bytes AS free_bytes, \
        fixed_elem_free_rows AS spare_rows \
        FROM ndbinfo.memory_per_fragment \
        WHERE fq_name LIKE '%simples%';
+------+------+-------------+------------+------------+
| node | frag | alloc_bytes | free_bytes | spare_rows |
+------+------+-------------+------------+------------+
|    1 |    0 |      131072 |       5504 |        172 |
|    1 |    2 |      131072 |       1312 |         41 |
|    2 |    0 |      131072 |       5504 |        172 |
|    2 |    2 |      131072 |       1312 |         41 |
|    3 |    1 |      131072 |       3104 |         97 |
|    3 |    3 |      131072 |       4288 |        134 |
|    4 |    1 |      131072 |       3104 |         97 |
|    4 |    3 |      131072 |       4288 |        134 |
+------+------+-------------+------------+------------+
As a final example, we can check whether a table is being evenly sharded accross the data nodes (in this case a realy bad sharding key was chosen)…
mysql> CREATE TABLE simples (id INT NOT NULL AUTO_INCREMENT, \
        species VARCHAR(20) DEFAULT "Human",
        PRIMARY KEY(id, species)) engine=ndb PARTITION BY KEY(species);

// Add some data

mysql> SELECT node_id AS node, fragment_num AS frag, \
        fixed_elem_alloc_bytes alloc_bytes, \
        fixed_elem_free_bytes AS free_bytes, \
        fixed_elem_free_rows AS spare_rows \
        FROM ndbinfo.memory_per_fragment \
        WHERE fq_name LIKE '%simples%';
+------+------+-------------+------------+------------+
| node | frag | alloc_bytes | free_bytes | spare_rows |
+------+------+-------------+------------+------------+
|    1 |    0 |           0 |          0 |          0 |
|    1 |    2 |      196608 |      11732 |        419 |
|    2 |    0 |           0 |          0 |          0 |
|    2 |    2 |      196608 |      11732 |        419 |
|    3 |    1 |           0 |          0 |          0 |
|    3 |    3 |           0 |          0 |          0 |
|    4 |    1 |           0 |          0 |          0 |
|    4 |    3 |           0 |          0 |          0 |
+------+------+-------------+------------+------------+
If you get chance to try out this new release then please let us know how you get on – either through a comment on this blog, a MySQL bug report or a post to the MySQL Cluster Forum.
 I recently hosted a webinar introducing MySQL Cluster and then looking into what’s new in the latest version (MySQL Cluster 7.4) in some more detail. The replay of the MySQL Cluster 7.4 webinar is now available here. Alternatively if just want to skim through the charts then scroll down.